




How to Convert RAW to NTFS Without Losing Data in Windows
To convert RAW to NTFS without losing data, protect your files before changing the drive. This guide explains how to recover them, check the results, and choose a Windows formatting method that fits your situation.

By Ivy Updated on September 17, 2026


Windows asks you to format a drive, but it contains files you still need. Disk Management shows RAW where NTFS used to appear. Before accepting that format prompt, cancel it.
The practical method to convert RAW to NTFS without losing data is to recover files to another drive, check them, and then format partition as NTFS. AOMEI FastRecovery can help scan for recoverable files before formatting. Or, if you have a complete backup, use that instead.
Recovery isn't guaranteed. So before you format, make sure you've already saved the files you need. Don't just assume it's safe because the scan finished.
Check the RAW Drive and Choose Your Next Step
RAW means Windows cannot recognize a usable file system on the drive. It can result from damaged file system information, an unsupported format, or a drive that has never been formatted. It does not automatically mean the files are gone.
Open Disk Management by right-clicking Start. Check the affected volume’s capacity, drive letter, and status without changing anything.
| 🧩 Your situation | 👉 Next step | 🔑 Key requirement |
|---|---|---|
| Files are inaccessible and still needed | Recover files first | Save them to another physical drive |
| Files are protected; the RAW volume is listed | Use Disk Management | Format only the intended volume |
| Files are protected; the drive appears in This PC | Use File Explorer | Confirm its letter and capacity |
| Files are protected; you prefer commands | Use DiskPart | Distinguish volume formatting from whole-disk cleaning |
If the drive clicks, repeatedly disconnects, or is not detected, stop repeated scans and consider professional recovery. Formatting cannot fix physical damage.
If the partition is missing and its space appears as Unallocated, follow guidance for recovering lost partition on external hard drive before replacing it.
Recover Files Before Changing the RAW Drive
👍 Best for: Retrieving inaccessible files from a detected drive before formatting; recovery depends on the remaining data and device condition.
AOMEI FastRecovery is easy-to-use Windows data recovery software that can retrieve files from inaccessible RAW drives, HDDs/SSDs, external hard drive, USB disk, and more, regardless of the scenario.
 AOMEI FastRecovery
Easy-to-Use RAW Drive Recovery Software

- 🎯Scenario‑Driven: Start with Deleted Files Recovery or the Recycle Bin for fast results, or others for complex scenario.
- 🔎 Dual Scan Mode: Quick Scan for fast results; Deep Scan for a deeper search - each fits a different scenario.
- 📚 1000+ data types: Recover deleted files, from documents to images, videos, audios, archive files, and more.
- 📂 Flexible Browsing: Navigate results by file type or folder path - clean, intuitive, and beginner‑friendly.
- 🚀 Pinpoint What You Need: Search, sort, and filter to quickly find files - with thumbnail previews so you know exactly what you're recovering.
- 💰 Free Tier: Recover data up to 500MB for free. Need more? Upgrade for unlimited recovery.
 100% Secure
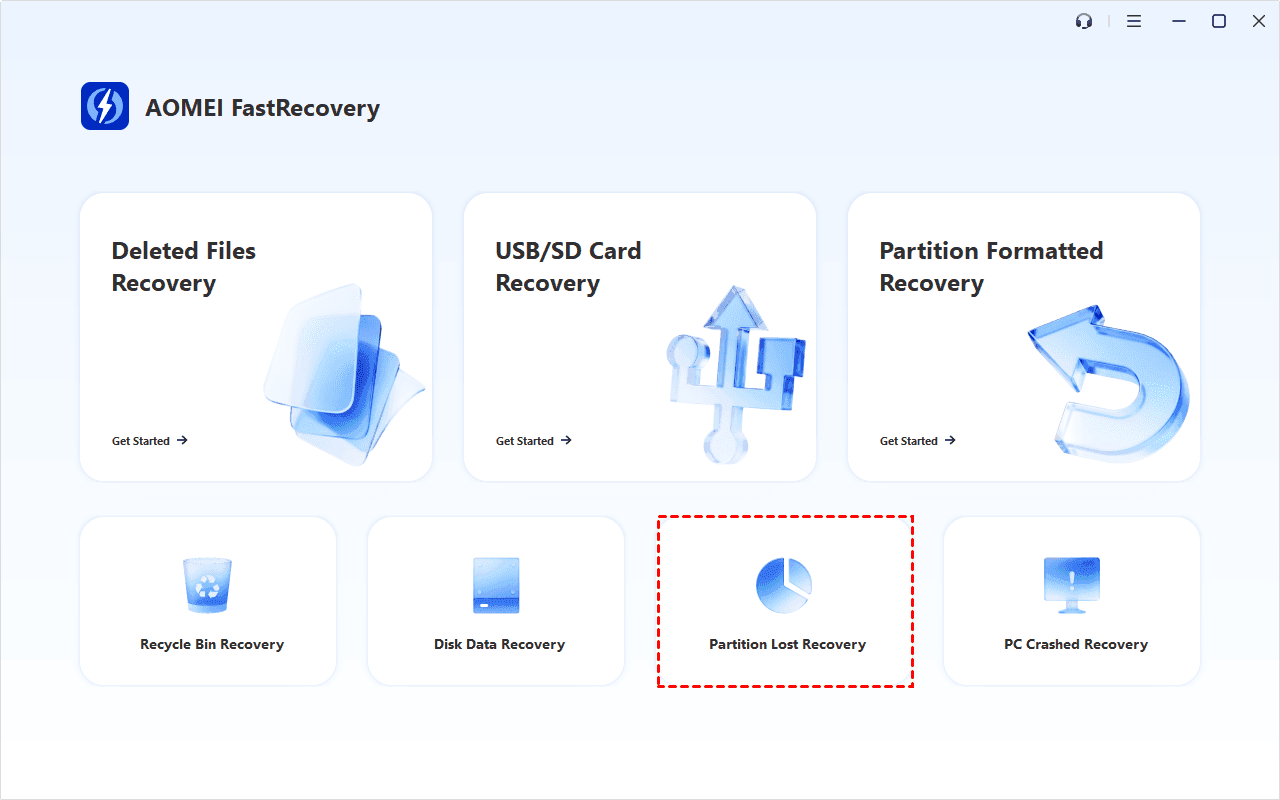
Step 1. Prepare a separatedrive with enough free space to save the recovered data. Download and install AOMEI FastRecovery on a different, healthy drive, not the RAW drive. Then, click Partition Lost Recovery to get started. If you format it, click Partition Formatted Recovery instead.
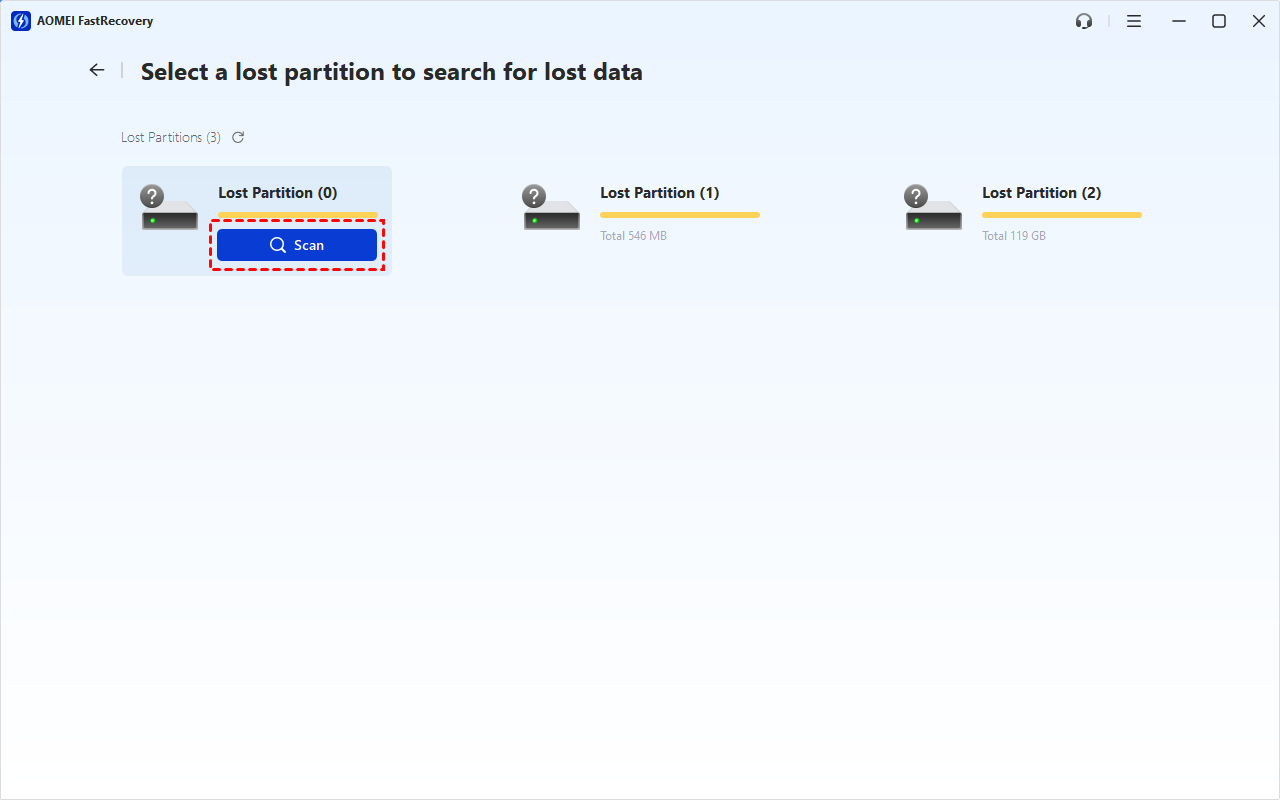
Step 2. Locate the affected drive by capacity and drive letter if available, then click Scan. This scenario will start Deep Scan to search more thoroughly.
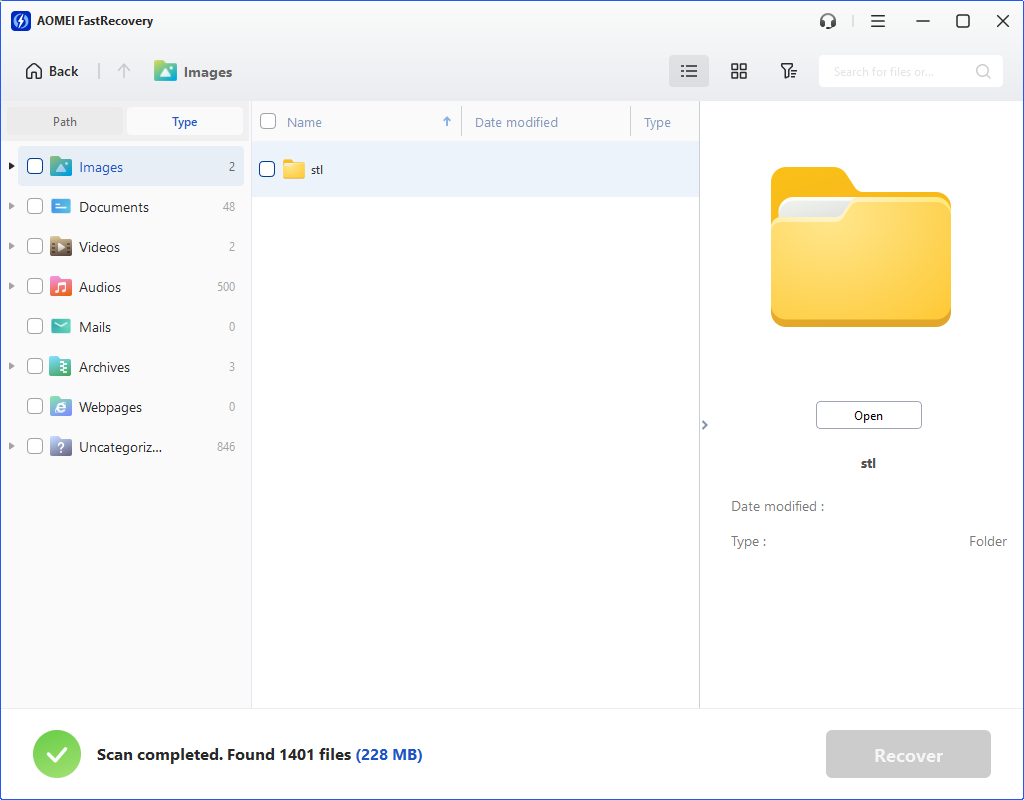
Step 3. Browse results by Type or Path. Search for a filename or extension, filter by file type and size, or sort to narrow results.
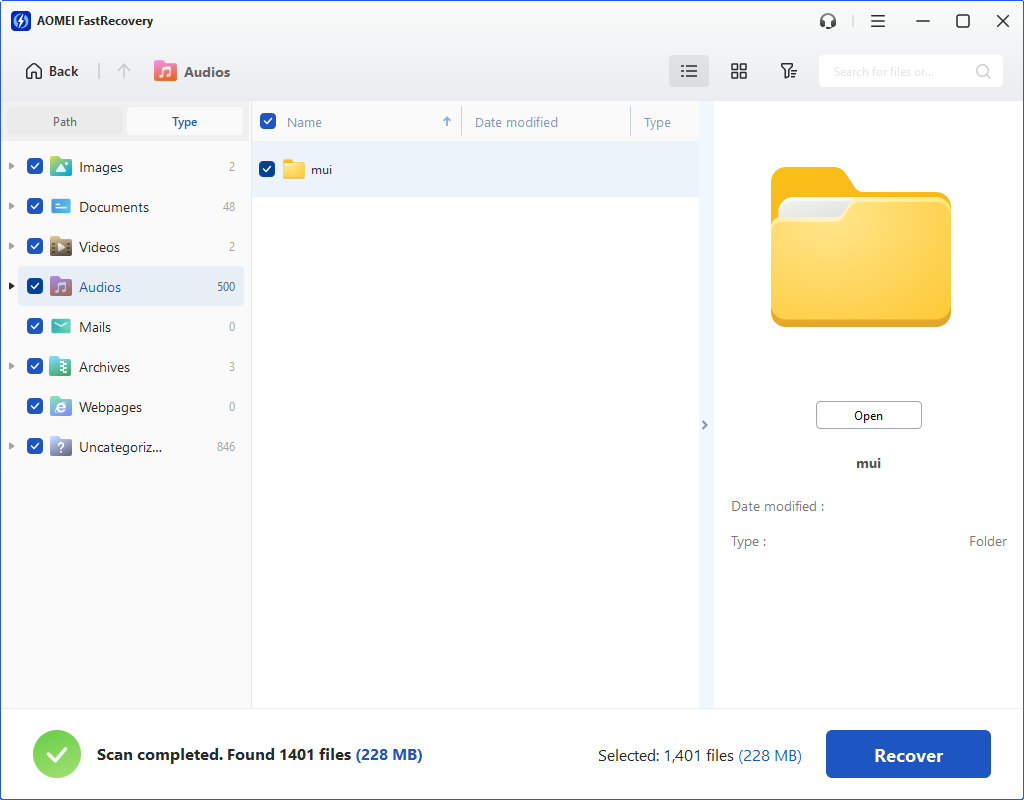
Step 4. Select the required files, click Recover.
Step 5. Browse and select a new drive to save the recovered data, not the RAW drive. Otherwise, your data may be overwritten.
- The free edition recovers up to 500 MB. Recovery beyond that requires an upgrade.
- These steps also apply to recover files from RAW external hard drive, recover deleted JPEG, recover data from SSD, etc.
📌 Before proceeding:
- Open important recovered documents, photos, and videos.
- Check that essential folders and recent files are present.
- Keep the recovered copy separate from the drive you will format.
Missing or damaged important files? Pause here - formatting won't help you recover them.
How to Format RAW Drive as NTFS
Once your important files are protected, choose one method below. You do not need to perform all three to convert RAW to NTFS without losing data.
Method 1: Use Disk Management
👍 Best for: Formatting an existing RAW volume while checking its position among other partitions.
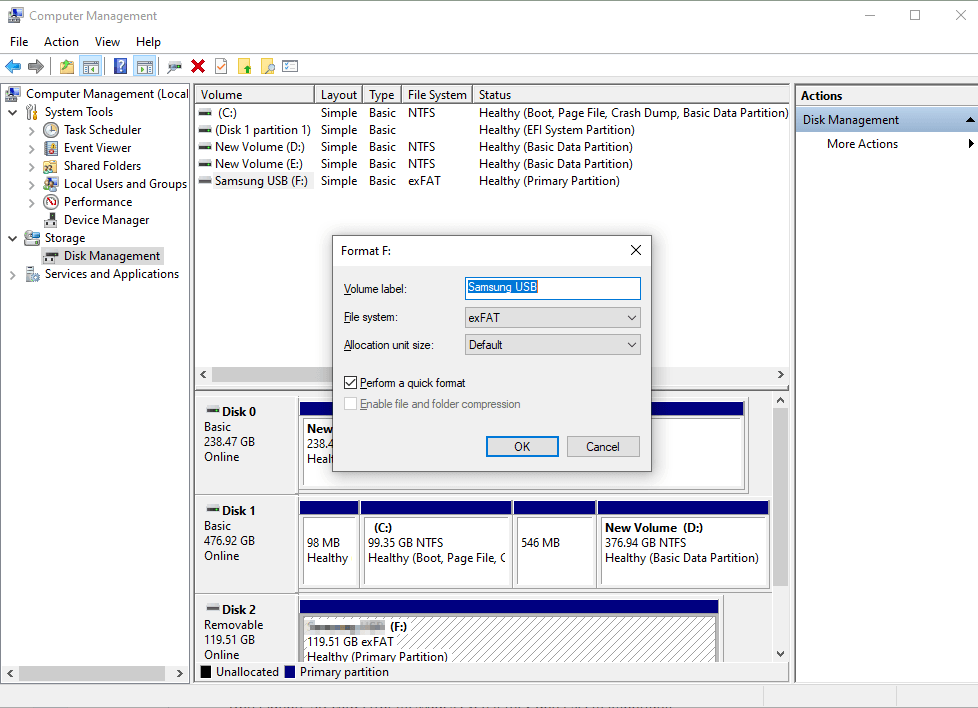
Disk Management gives you a useful overview of all connected disks. Compare the volume's capacity and drive letter before selecting it. As long as you pick the correct target, formatting one volume won't affect the others.
Step 1. Right-click the Start meni and open Disk Management. Locate the RAW volume and confirm its capacity and disk number.
Step 2. Right-click the RAW volume and select Format.
Step 3. Choose NTFS file system and enter a volume label, if needed. Select Perform a quick format only if the drive is known to be healthy. Click OK to proceed.
Method 2: Use File Explorer
Best for: A drive that still appears in This PC and offers a working Format option.
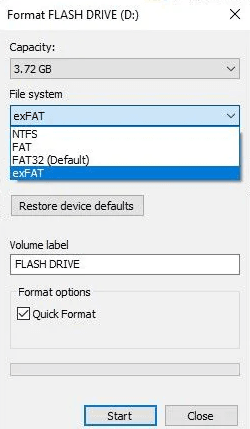
If the drive has a drive letter, File Explorer is the faster method - same NTFS format, simpler window. If the drive is missing or formatting fails, check Disk Management instead of retrying.
Step 1. Press Win + E to open File Explorer, scroll down to find This PC, and identify the RAW drive there.
Step 2. Right-click it and select Format.
Step 3. Choose NTFS as file system and click Start to convert RAW to NTFS.
Method 3: Use DiskPart
👍Best for: Users comfortable identifying disks and volumes in a command line tool; an incorrect selection can affect another drive.
DiskPart can format an existing volume or rebuild a disk's entire partition layout - two operations with different scopes. Start with volume formatting when the target volume still exists, and save clean for a deliberate whole-disk rebuild.
Step 1. Type cmd in the seach box and select Run as administrator.
Step 2. In the Command Prompt window, enter:
- diskpart
- list volume
- select volume N
- detail volume
Replace N with the target volume number. These commands verify the drive letter and size, so you don't format the wrong drive.
After confirming, enter:
- format fs=ntfs quick
- exit
Stop if formatting succeeds. There is no need to clean the disk.
📌 Optional whole-disk rebuild:
Only use this branch if you're wiping an entire separate data disk and you've already saved every file you need from it.
✅ First identify it:
- diskpart
- list disk
- select disk N
- detail disk
Replace N with the disk number. Check the model, capacity, and listed volumes.
👉 Only after verifying the target, run these commands individually:
- clean
- convert gpt
- create partition primary
- format fs=ntfs quick
- assign
- exit
This creates one GPT data partition for a modern Windows PC. Stop at any error rather than continuing blindly.
Check the Drive Before Copying Files Back
Confirm that the volume displays NTFS and opens normally. Copy a few nonessential files onto it and open them again. This checks basic access, not the drive’s long-term health.
If access remains stable, copy your recovered files back while retaining the separate copy. Repeated RAW status, I/O errors, or disconnections require further diagnosis; do not trust that drive with your only copy.
FAQs
Can I convert RAW to NTFS without formatting?
Some file-system problems can be repaired without formatting, but there is no universal repair for every RAW volume. Recovering files first and then formatting remains a practical route when preserving the original partition is unnecessary.
Why does convert X: /fs:ntfs not work?
That command converts FAT/FAT32 volumes to NTFS. It does not repair an unreadable RAW file system.
Should I run CHKDSK first?
Do not make CHKDSK the default first step when important files are unprotected. It may report that it is unavailable for RAW drives, and repair parameters modify file-system information. Microsoft describes CHKDSK as a checking and repair tool, not a guaranteed RAW converter.
What if I already formatted the drive?
Stop writing to it. Recovery may still be possible, depending on formatting, overwriting, and SSD TRIM. Review the options for recovering files after formatting hard drive before doing anything else.
Conclusion
To convert RAW to NTFS without losing data, begin with the files: recover or restore them, verify the saved copies, and then choose a formatting method. Disk Management suits most users; File Explorer offers a shorter route, while DiskPart provides command-line control. Keep a separate backup after the drive becomes usable again.

 as a preferred
source on Google
as a preferred
source on Google