
Quick Fixes: Windows Cannot Be Installed to This Disk
Stuck with the "Windows cannot be installed to this disk" error? Don't worry. Discover three proven fixes to resolve the issue and learn an alternate approach to successfully install Windows on your new drive.
By Lily Updated on December 23, 2025
Why Windows Cannot Be Installed to This Disk?
The error “Windows cannot be installed to this disk” appears during Windows setup when the installer detects a conflict between your system configuration and the target drive. Below are two common situations:
1️⃣ Windows cannot be installed on this disk MBR

2️⃣ Windows cannot be installed on this disk GPT
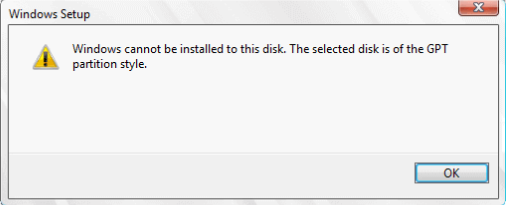
If you see these error messages, it can be caused by:
📍 The Target Disk Is Not Properly Initialized or Partitioned
📍 Disk Partition Style Mismatch (GPT vs. MBR)
📍 Incorrect BIOS/UEFI Boot Mode
If upgrading to a new SSD or HDD, you can clone your existing Windows with reliable disk clone software instead of reinstallation.
How to Fix Windows 11/10 Cannot Be Installed to This Disk
If you encounter Windows 11/10 cannot be installed to this disk, don’t worry. Here are three effective solutions for your reference.
Fix 1: Delete Partitions on Target Disk
If you see the error “Windows cannot be installed to this disk”, existing or incompatible partitions on the target drive may be preventing Windows Setup from creating the required system partitions. Follow the steps below to delete partitions on the target disk:
⚠️ Warning: This process will erase all data on the selected disk. Back up important files before proceeding.
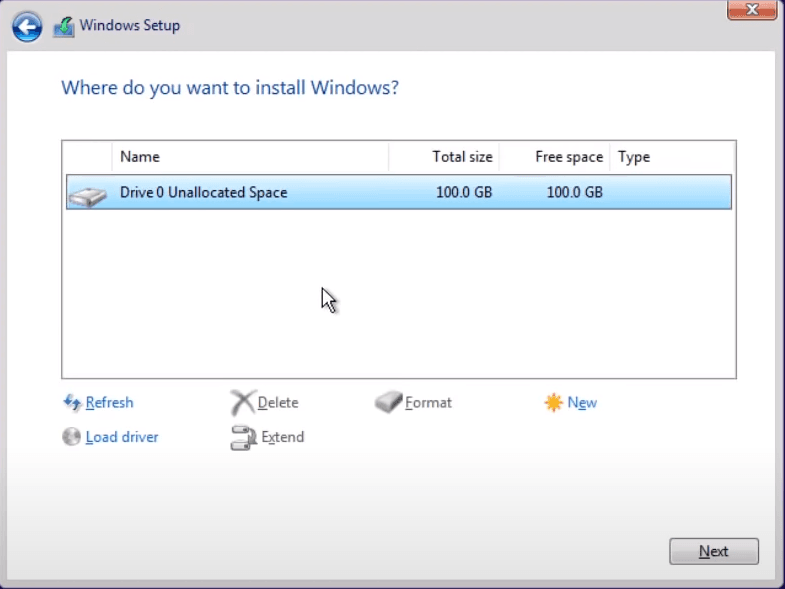
1. Boot your PC from the Windows installation media. Proceed until you reach the Where do you want to install Windows? screen.
2. Select the target disk partition. Click Delete, then confirm the action.
3. Repeat the process until the disk shows as Unallocated Space.
4. Select the unallocated space and click Next to let Windows create the required partitions automatically.
Fix 2: Convert Disk Between GPT and MBR
Another common reason for the “Windows cannot be installed to this disk” error is a mismatch between the disk’s partition style and the system’s boot mode. Learn how to convert the disk between GPT and MBR below:
⚠️ Warning: Converting the disk with DiskPart will erase all data on the disk. Back up important files before continuing.
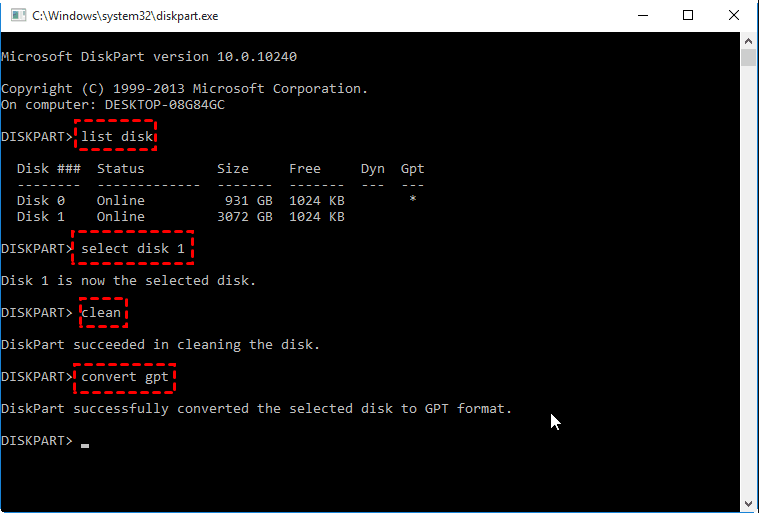
1. On the Where do you want to install Windows? screen, press Shift + F10 to open Command Prompt.
2. Type the following commands one by one and press Enter after each:
- diskpart
- list disk
- select disk X (replace X with the target disk number)
- clean
- convert gpt (or convert mbr, depending on your needs)
- exit
3. Close Command Prompt and click Refresh.
4. Select the unallocated space and click Next to install Windows.
Fix 3: Change BIOS/UEFI Settings
If the disk itself is correctly formatted but you still encounter the Windows installation error, the problem may lie in your BIOS/UEFI firmware settings. Here’s how to fix it:
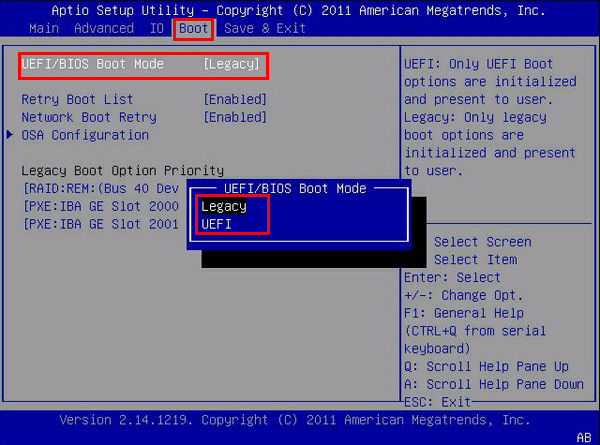
1. Restart your computer. Press the BIOS/UEFI key (commonly Del, F2, F10, F12, or Esc) repeatedly during startup to enter the firmware setup menu.
2. Set the correct boot mode. For GPT disks, choose UEFI. For MBR disks, choose Legacy.
3. (Optional) In some cases, Secure Boot can interfere with disk detection. You may disable Secure Boot temporarily.
4. Save and exit BIOS/UEFI. Boot again from the Windows installation media and retry installing Windows.
💡 Note: You can re-enable Secure Boot after Windows is successfully installed.
Bonus: How to Clone Windows 11/10 to a New Drive
If you’re facing the “Windows cannot be installed to this disk” error while upgrading to a new SSD or HDD, reinstalling Windows isn’t your only option. A safer and faster alternative is to clone your existing Windows 11/10 system directly to the new drive, avoiding installation errors altogether.
AOMEI Cloner is a professional yet user-friendly Windows cloning tool designed for system migration.

- It offers System Clone to migrate only Windows and boot-related partitions and Disk Clone for full disk duplication.
- It runs Intelligent Clone by default to copy only used sectors (works with smaller SSDs).
- It uses 4K alignment to improve SSD performance and longevity.
- It supports various disk types. You can use it to clone NVMe, SATA, M.2, and external SSDs/HDDs from all major brands.
Download AOMEI Cloner now and follow the instructions below to clone Windows to a new drive:
Step 1. Connect the new SSD or HDD to your computer. If it is not empty, backup important data in advance.
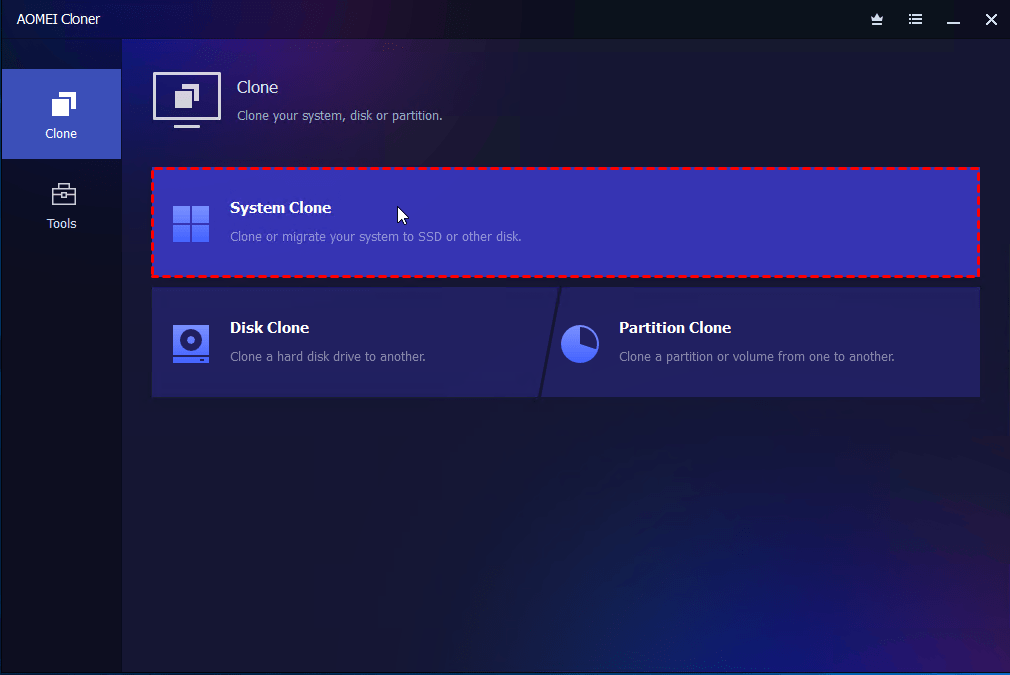
Step 2. Install and launch AOMEI Cloner. Then select Clone > System Clone.
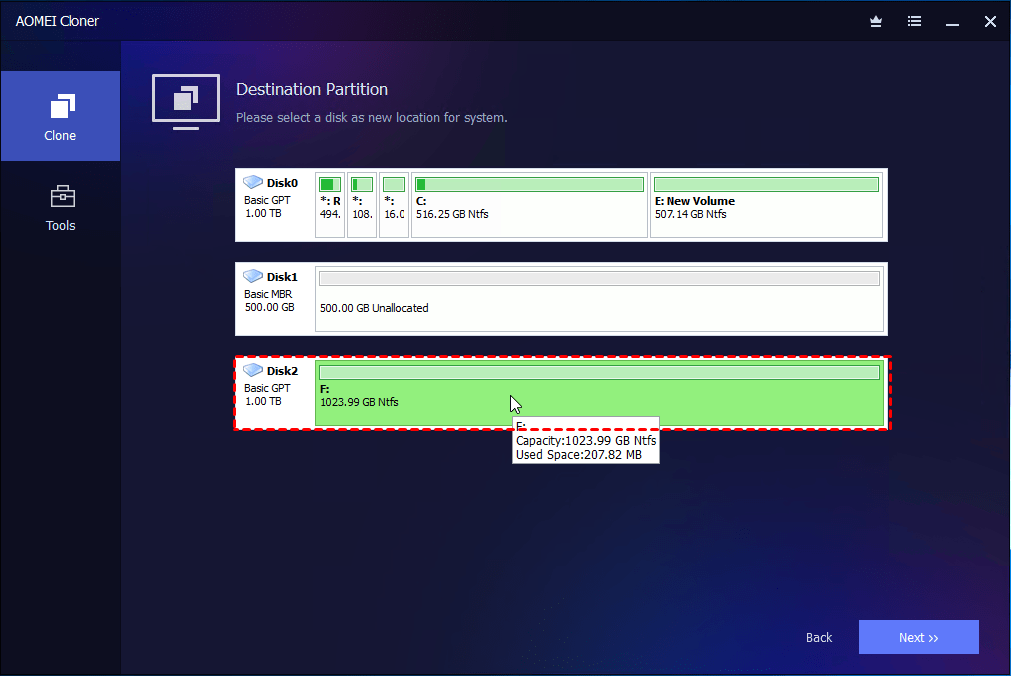
Step 3. Choose the destination disk for the cloned system and click Next.
Step 4. Enable SSD Alignment if cloning to an SSD. Confirm the operation and click Start Clone.

Step 5. Once the cloning process finishes, shut down your PC and replace the old drive with the newly cloned drive. Your system will boot directly into Windows.
Summary
The “Windows cannot be installed to this disk” error usually occurs due to disk partition mismatches, incorrect BIOS/UEFI settings, or incompatible disk configurations. You can try the solutions offered in this article to fix the error.
For users upgrading to a new drive or repeatedly encountering setup failures, cloning Windows 11/10 to a new disk with AOMEI Cloner offers a reliable alternative to reinstallation. It enables you to clone USB drives, HDDs, and SSDs, etc. Why not give it a shot?
