How to Use Ddrescue on Windows: Complete Guide
Ddrescue is a powerful recovery tool for disk drives, DVDs, CDs, etc., with the ability to copy data from one location to another. But how to use ddrescue on Windows? Keep reading to get a full guide.
By Jonna Updated on May 9, 2025
Can You Run Ddrescue on Windows?
Ddrescue is a powerful, command-line data recovery tool developed by GNU. Its primary function is to rescue data from failing, damaged, or partially unreadable storage devices such as hard drives, SSDs, USB flash drives, and CDs/DVDs. Unlike traditional copy utilities that stop at the first error, ddrescue intelligently skips over bad sectors and continues copying the rest of the readable data. It then returns to retry the bad areas multiple times to maximize recovery success.
As is known by most people, although it is a Linux native tool, you can also run Ddrescue on Windows 10, 11, and 8.1, using additional layers like Cygwin. In this guide, we’ll show you exactly how to use it, step by step, while also exploring a user-friendly alternative for data migration from one drive to another.
Best Ddrescue Alternative for simple and secure data copying from one drive to another
Part 1. How to Use Ddrescue on Windows
For how to use ddrescue on Windows 10/11, follow these steps:
Step 1. Install a Linux-like Environment
Set up Cygwin or WSL on your Windows system to provide a Unix-like environment necessary for running ddrescue.
Step 2. Download Ddrescue
Obtain the ddrescue source code from the GNU ddrescue official page and compile it within your Linux-like environment.
Step 3. Connect the Drives
Attach both the source (failing) drive and the destination drive to your Windows system. Ensure they are recognized by the system.
Step 4. Identify Drive Paths
Use commands like lsblk or fdisk -l within your Linux-like environment to identify the correct paths for the source and destination drives (e.g., /dev/sda, /dev/sdb).
Step 5. Run ddrescue
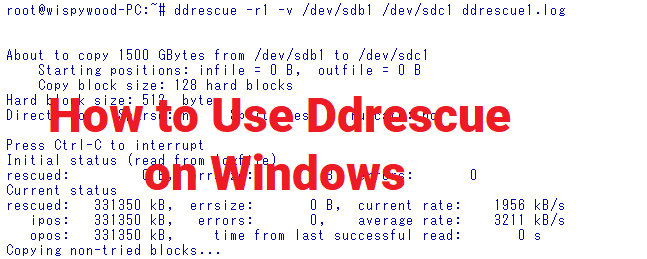
Execute the ddrescue command with appropriate parameters. A basic command structure is:
- ddrescue [options] infile outfile [mapfile]
The "infile” and "outfile" can be files, devices, or partitions. The "mapfile" is a regular file and must be placed in an existing directory, and ddrescue will create one if there is no mapfile. For example, to image from disk to image file, the ddrescue command would be like:
- root# ddrescue -f -n /dev/[baddrive] /root/[imagefilename].img /root/recovery.log
Ddrescue command explanation:
-f Forces ddrescue to proceed even if the target file or drive already exists (this is necessary when writing directly to a disk). Be aware- existing data will be overwritten.
-n This is the shorthand for no-scrape. It skips the scraping phase, meaning ddrescue won’t spend extra time trying to recover data from severely corrupted parts of the file.
/dev/[baddrive] Specifies the source device containing the failing or damaged data. Replace this with the identifier of the problematic drive.
/dev/[gooddrive] Indicates where the recovered data should go. Substitute this with the path to your intended destination.
/root/recovery.log Defines the path and name of the log file used to track recovery progress.
Part 2. How to Use DDRescue-GUI on Windows
For users who prefer a graphical interface, DDRescue-GUI, which is a graphical user interface for the command-line ddrescue data recovery tool, offers a more user-friendly approach to using ddrescue on Windows 10/11. Here is how to use it:
Step 1. Download and install the DDRescue-GUI on your Windows computer, and run it following the on-screen instructions.
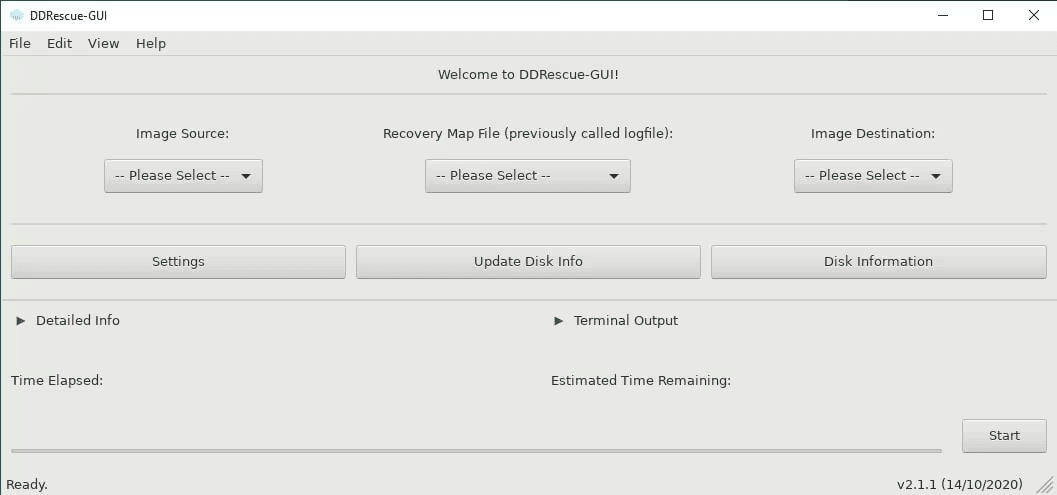
Step 2. On the main screen of the DDRescue-GUI, there are 3 options you must configure:
- Image Source - The corrupted drive from which you want to recover files.
- Image Destination - Where you want to save the recovered data. It can be another hard drive or an image file. But ensure there is enough space for storing recovered data.
- Detailed Info - It provides detailed information about the recovery process and allows you to create a map file to continue if the recovery is interrupted. It is advised to save this map file to a separate drive for security.
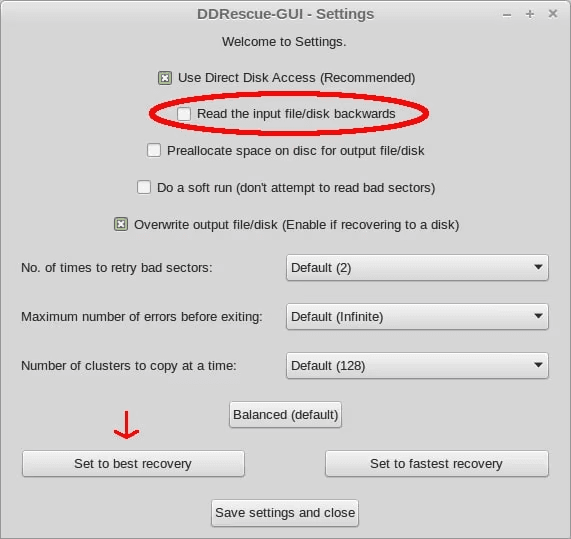
Step 3. Then, go on to set up ddrescue settings by clicking on the Settings button.
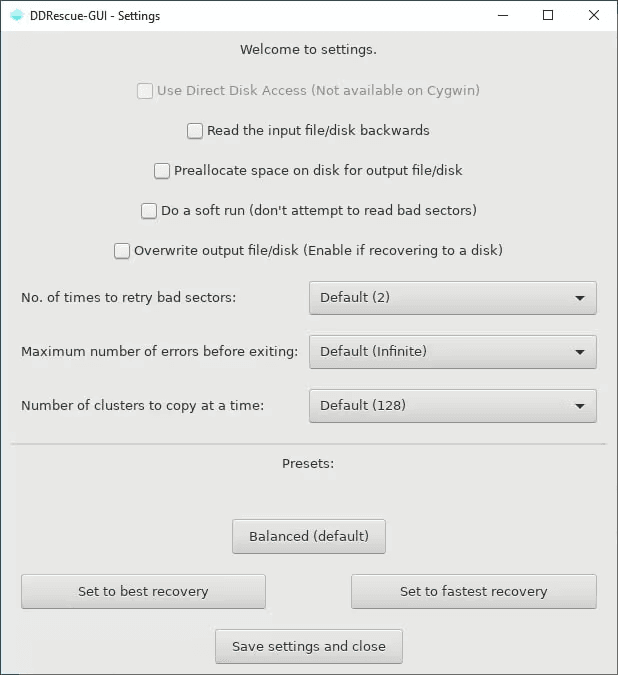
Step 4. You'll find three Presets at the bottom of the window designed to help you get started with this tool.
- Go with Fastest if you're confident that most of your disk is readable.
- If you’re unsure, the Balanced preset is a safe middle ground.
- For disks you know are badly damaged, choose Best for the most thorough recovery.
Then, click on Save settings and close.
Step 5. Now, click on Start to begin your disk data recovery.
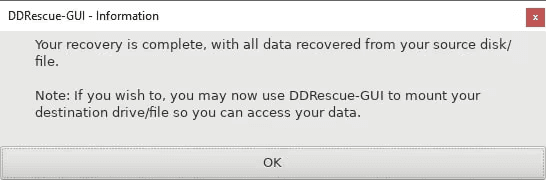
Step 6. When the data recovery process is finished successfully, you will get a message prompt like this:
Step 7. If it is aborted, you'll probably see something like this:
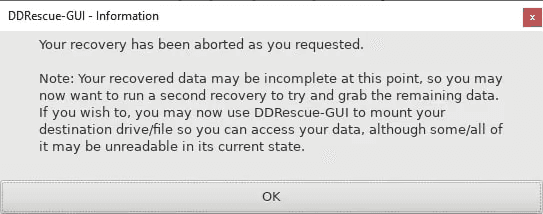
Step 8. In such a case, if you created a mapped file during the initial recovery, you can still recover more data. To recover, restart the recovery process with the same settings. However, for best results, read the input file backwards and select the "Best Recovery" preset.
Best Disk Cloning Alternative to Ddrescue on Windows
Another solution for copying data from one drive to another is to rely on professional disk cloning software like AOMEI Cloner.
Coming with a user-friendly interface, this tool allows you to clone hard drive with bad sectors, as it allows you to run an intelligent clone for skipping bad sectors and only copying the used space. It is widely supported on Windows 11/10/8/7/XP/Vista and all Windows Server systems, and makes it simple to clone hard drive to SSD, clone SSD to SSD, and so on.
Follow the tutorial below on how to transfer data from one drive to another using the ddrescue Windows alternative AOMEI Cloner:
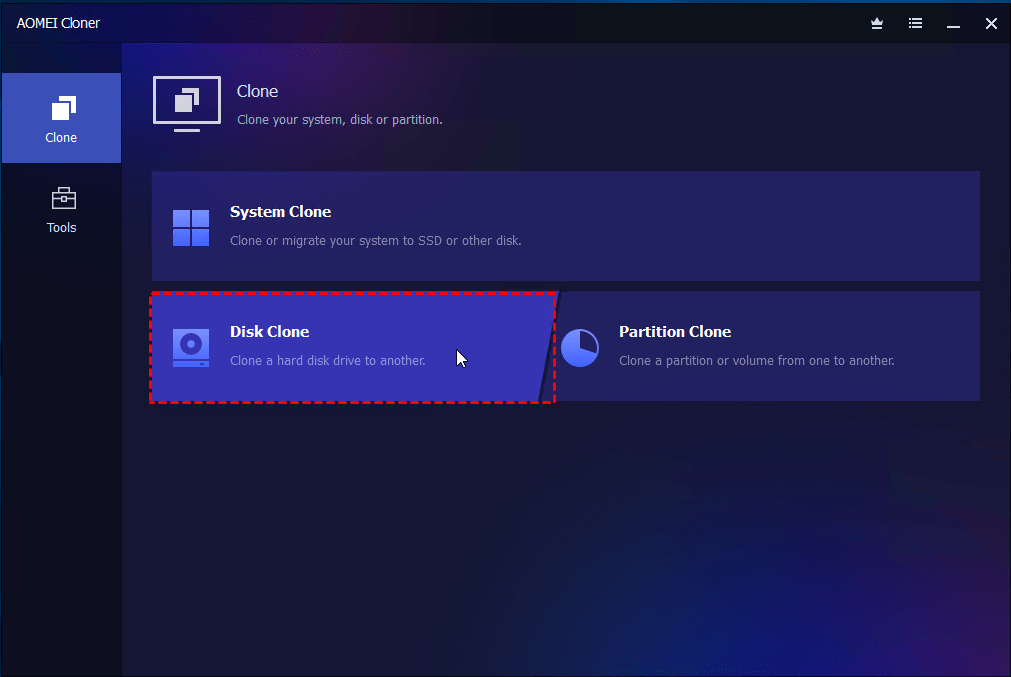
Step 1. Download and run AOMEI Cloner, and head toward Clone > Disk Clone.
- Note: You can also use the System Clone option to migrate only OS or Partition Clone to copy a specific partition to a new drive.
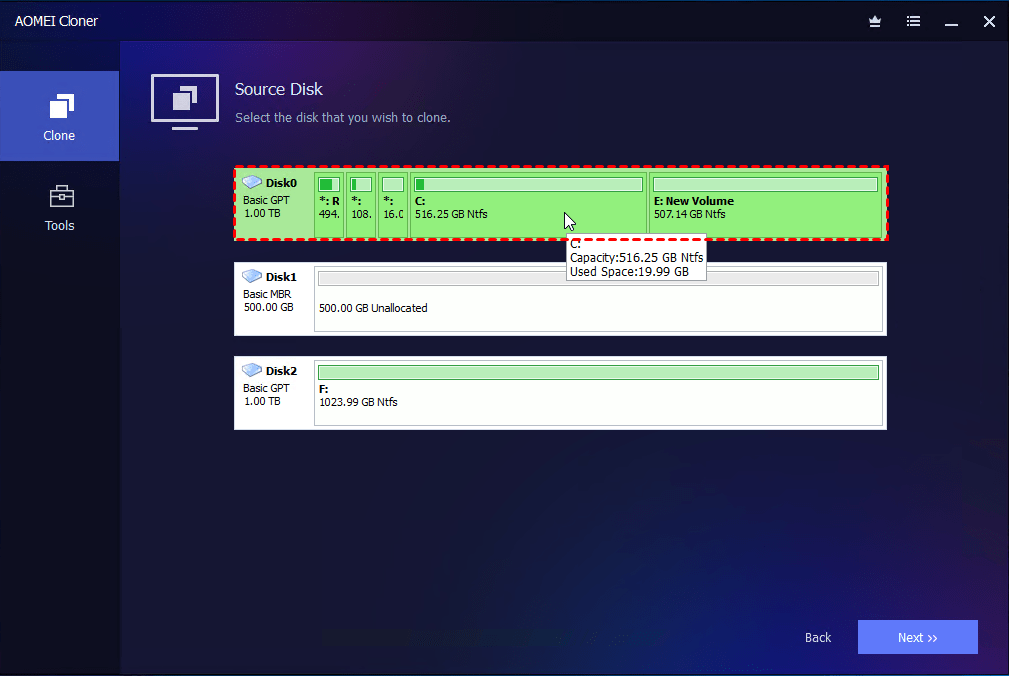
Step 2. Pick your source disk and destination drive separately.
Step 3. Click on Start Clone to begin the data transfer.
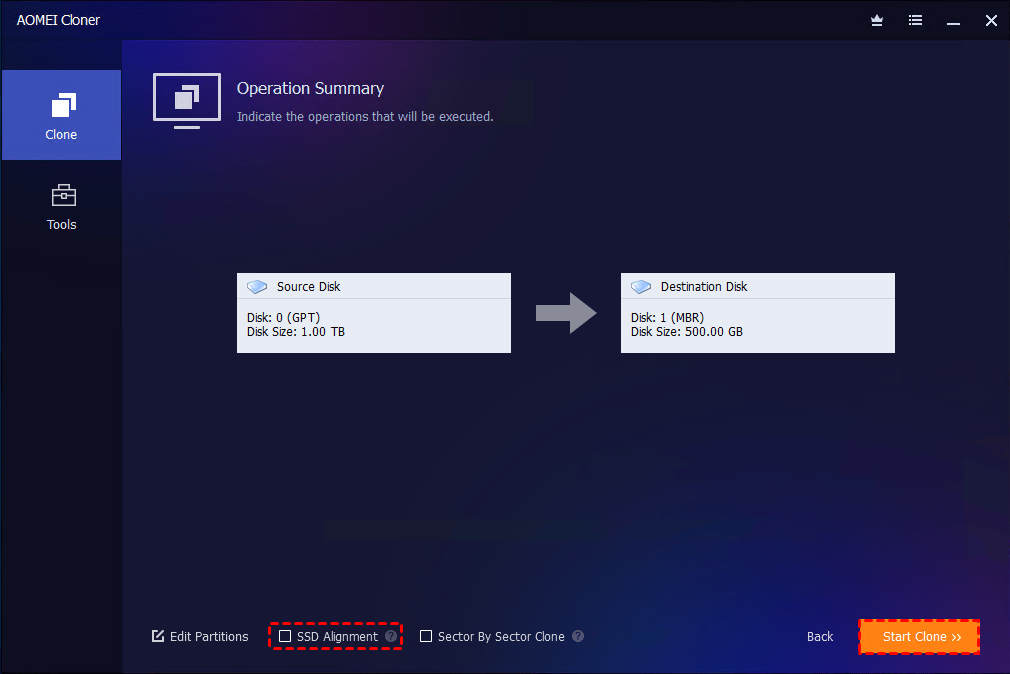
- Other useful options:✎...
- Edit Partitions: Resize partitions on the destination disk to utilize full capacity.
- SSD Alignment: Improve reading and writing speed if you clone to an SSD.
- Sector By Sector Clone: Do NOT check this feature if you are copying data from a hard drive with bad sectors, as it will copy every bit of the source drive.
FAQs about Ddrescue on Windows
#1. What is Ddrescue used for?
Ddrescue is a data recovery tool used to copy data from one drive to another, especially when the source is failing or has bad sectors.
#2. Where can I download ddrescue?
You can download ddrescue from the GNU ddrescue official page. For a graphical interface, you could use Cygwin.
#3. Is ddrescue GUI free?
Yes, DDRescue-GUI is a free software with a user interface for GNU ddrescue, which allows for easy and robust data recovery on Windows, macOS, and Linux.
Conclusion
This is all about how to run ddrescue on Windows. If you need a simpler method of transferring data between disks, you could also try AOMEI Cloner. With this utility, you can not only copy data from hard drive with bad sectors to another drive, but also migrate only the Windows OS without reinstallation. Also, you could use it to clone hard drive to larger SSD/HDD and smaller SSD/HDD flexibly.