
How to Clone 2.5 SSD to M2 NVMe SSD (Max 3 Steps)
This guide will show you how to successfully clone 2.5 SSD to M.2 SSD with the best SSD cloning software - AOMEI Cloner, covering the entire process, from preparations to post-cloning operations.
By Ivy Updated on April 14, 2026
Upgrading from 2.5" SATA SSD to M.2 NVMe SSD dramatically improves overall system performance, offering faster read/write speeds, shorter boot times, and quicker application launches.
And cloning lets you transfer everything, such as Windows, apps, settings, and files, to a new drive, saving hours of reinstalling and setup work. It’s the easiest method to replace your old drive while keeping your system exactly the way it is. Let’s dive in!
🌟 To check more M.2 SSD cloning scenarios, please refer to this complete guide: Clone M.2 SSD.
Before You Start -Important Preparations
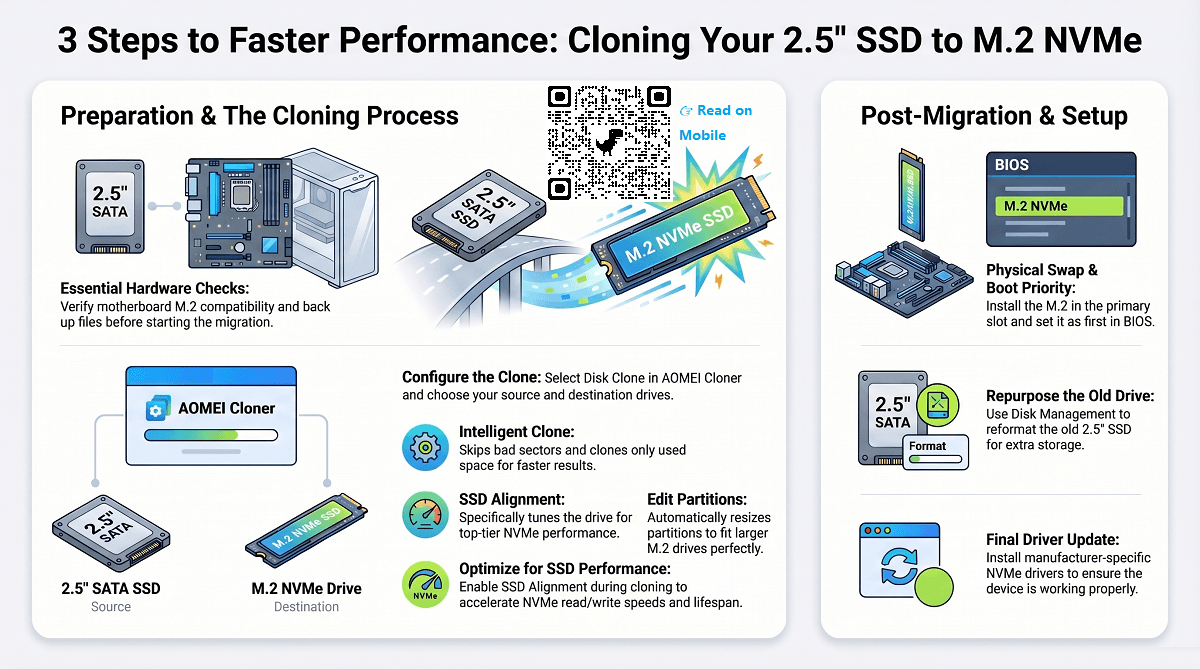
Before cloning your 2.5 inch SSD to an M.2 drive, it’s important to verify compatibility, prepare your hardware, and safeguard your data. These quick checks ensure a smooth and error-free migration process.
◾ Check M.2 Compatibility: Not all PCs support every type of M.2 SSD, so confirm whether your motherboard accepts NVMe, SATA, or both.
◾ Ensure the M.2 SSD Is Properly Connected: Make sure the M.2 SSD is mounted correctly on your motherboard. If you are using laptops with only one slot, connect it using a compatible M.2 adapter.
◾ Add a Thermal Pad or Heatsink(if possible). Proper cooling is necessary for M.2 NVMe drives as they generate more heat than SATA SSDs.
◾ Backup Important Files Before Cloning: Cloning is generally safe, but it's best practice to backup files to external hard drive, USB drive, network drive, etc., in case of unexpected shutdowns or hardware issues.
Best Tool to Clone 2.5 SSD to M.2 NVMe
AOMEI Cloner is one of the best SSD cloning software that can clone 2.5 SSD to M.2 SSD, clone PCIe SSD, clone SATA to M.2 SSD, clone M.2 SATA to M.2 NVMe, etc., in Windows 11, 10, 8/8.1, and 7, just a few steps.
It offers 3 cloning solutions alongside a comprehensive suite of features, making the process faster andless error-prone.

- 3 Cloning Solutions: System Clone, Disk Clone, Partition Clone. Select as needed.
- Bootable Clone: Include all data, OS and boot-related partitions, making cloned drive bootable.
- Intelligent Clone: Clone only the used sectors, skipping bad sectors for faster, smoother cloning.
- SSD Alignment: Optimize SSD to achieve top-tier performance and extend lifespan.
- Edit Partitions: Clone and resize partitions of a new, larger SSD and convert MBR to GPT (with different partition style).
- SSD Compatibility: Support all branded PCIe SSDs, including Intenso, Samsung, WD, SanDisk, Crucial, etc.
How to Clone 2.5 SSD to M.2 SSD on Windows 10/11
Now, it’s time to clone 2.5 SSD to M.2 SSD on Windows 10 or 11.
Step 1. Connect the M.2 SSD to your motherboard or using M.2 adapter. Then, open AOMEI Cloner after installing, click Clone > Disk Clone.

Step 2. Select the current 2.5 SSD and M.2 SSD, respectively. Click Next after each selection.
Step 3. Set up the following 3 options to avoid potential cloning issues. click Start Clone to clone 2.5 SSD to M.2 SSD.
- Edit Partitions: The Add unused space to all partitions is automatically checked to auto-resize the larger NVMe drive, preventing cloned hard drive show wrong size. Optionally, convert MBR to GPT to boot a UEFI system.
- SSD Alignment: Be sure to enable this feature to accelerate the reading and writing speed of NVMe SSD.
- Sector by Sector Clone: It clones all sectors of a drive, including empty and bad sectors, thus taking longer. Just uncheck it to keep using Intelligent Clone mode - copy only the used sectors, especially useful for cloning to smaller SSD.
After Cloning -What to Do Next
After cloning is complete, there are a few more things to take care of to ensure you can boot up and use your computer normally.
#1: Verify the Cloned SSD Is Bootable
Make sure the cloned M.2 SSD works properly is essential to be sure you can boot from it when needed. Just physical swap the two SSDs and let Windows boot from M.2. If it fails, try to change boot order first. The overall steps:
Step 1. Shutdown your computer and disconnect the power cable. If you are using laptop, remove battery as well. For laptop with only one slot, take M.2 SSD out of the adapter first.
Step 2. Remove the screws securing the case and open the side panel (or back cover).
Step 3. Locate 2.5 SSD. Disconnect the SATA and power cable, unscrew the bracket and take it out carefully.

Step 4. Then, put M.2 SSD in the primary slot and secure it tightly. Reassemble your PC and boot from M.2 SSD.
Step 5(Optional). Press the BIOS key, usually F2, F10, ESC, Del, etc., to access the BIOS/UEFI settings window. Switch to the Boot tab and move the M.2 SSD as the first boot option. Press F10 to save change and reboot.
#2: Reformat Old SSD for Extra Storage
If your old SSD is healthy, you can consider deleting all partitions on it and using it to store data or as a backup drive.
Step 1. Right-click the Start menu and select Disk Management.
Step 2. Locate the old SSD, right-click it, and select Delete Volume.
Step 3. Click Yes to continue the removal. Repeat the steps if there are two or more partitions.
Step 4. Right-click M.2 SSD showing Unallocated and select New Simple Volume.
Step 5. You’ll then be asked to specify the volume size, drive letter, file system, perform a quick format, etc. Just select the desired option and click Finish.
#3: Update NVMe Drivers
You need to install proper drivers to ensure your new SD performs at its best.
Step 1. Open Device Manager. Scroll down and expand Storage controllers, looking for entries:
- NVMe Controller
- Standard NVM Express Controller
- Manufacturer-specific names like Samsung NVMe Controller or Intel Rapid Storage Controller
Step 2. Right-click the controller entry and select Properties.
Step 3. Under the General tab, look at Device status: This device is working properly. If there is a yellow triangle or error code, the driver is missing or incompatible.
Step 4. Under the Driver tab, check the driver provider (e.g., Microsoft, Intel, Samsung), version, and date to confirm it is recent.
Step 5. Expand Disk Drives and locate your NVMe SSD, right-click it, and select Properties. Go to Details and select Hardware lads to confirm it matches the installed driver.
Step 6. Download and install the latest NVMe driver from your SSD manufacturer’s website. Restart the PC and check that the driver is active.
FAQs about Cloning 2.5 SSD to M.2
1. Can I clone laptop 2.5 SSD onto M.2 drive?
Yes, you can clone laptop 2.5 SSD onto M.2 drive as long as your laptop supports the M.2 interface (SATA or NVMe). You’ll need to connect the M.2 drive via an internal slot or an external adapter/enclosure, then use reliable disk cloning software to transfer all data.
2. How to avoid data loss cloning SSD to M.2?
To avoid data loss when cloning SSD to M.2, follow these tips:
- Back up important files before starting.
- Check disk health to ensure the source SSD has no errors.
- Use trusted cloning software that supports sector-by-sector or intelligent cloning.
- Avoid interruptions (like power loss) during cloning.
- Verify the cloned drive after completion to ensure all data is intact and bootable.
3. Which external enclosure for cloning 2.5 SSD to M.2?
You may choose external enclosure for cloning 2.5 SSD to M.2 depending on your setup:
- USB to SATA adapter/enclosure for the 2.5-inch SSD
- USB to M.2 enclosure (supports either SATA or NVMe, depending on your target drive)
Make sure the enclosure matches your M.2 type (SATA vs. NVMe) and supports USB 3.0 or higher for faster transfer speeds. Tool-free enclosures are also convenient for quick setup.
4. Does cloning 2.5 SSD to M.2 keep Windows activation?
Yes, cloning 2.5 SSD to M.2 keeps Windows activation in most cases. Windows activation is tied to your motherboard, not the storage drive. Therefore, cloning from a 2.5" SSD to an M.2 drive on the same computer should keep Windows activated.
If you move the cloned drive to a different computer, reactivation may be required—depending on your license type (e.g., OEM vs. Retail).
Final Thoughts
Cloning 2.5 SSD to M.2 SSD is a convenient method to upgrade your system without losing Windows, applications, or personal data. It is the best option if you want a seamless transition and prefer not to reinstall everything, saving time and effort.
Using reliable cloning software - AOMEI Cloner makes the process faster, safer, and more efficient by reducing cloning errors(e.g., cloned SSD won’t boot), optimizing SSD alignment, cloning only used sectors of a drive, etc.
