
Windows 10 File Sharing Not Working? Try 8 Solutions Here!
Experiencing issues with Windows 10 file sharing not working? This guide walks you through simple and advanced solutions to fix network issues. Scroll down to learn more.
By Lily Updated on October 29, 2025
Possible Causes of Network Sharing Issues in Windows 10
When you encounter file sharing not working in Windows 10, the root cause is usually tied to misconfigured settings, disabled network services, or security software interference. Here are some common causes:
- Network Discovery Is Turned Off
- File and Printer Sharing Is Disabled
- Disabled Essential Services
- Incorrect Sharing Permissions
- Windows Firewall or Antivirus Blocking Connections
- Network Profile Is Set to Public
- Outdated Network Drivers or Windows Updates
How to Fix Windows 10 File Sharing Not Working Step by Step
When Windows 10 network sharing not working, don’t panic—follow the steps below in order. After each fix, try accessing the shared folder again to see if the issue is resolved.
Solution 1: Enable Network Discovery and File Sharing
Network discovery and file sharing are core features that allow your Windows 10 PC to locate other devices and share files across the network. Follow the steps below to enable these features:
1. Open the Control Panel and click on Network and Sharing Center.
2. From the left panel, select Change advanced sharing settings.
3. Under the Private (current profile) section:
- Select Turn on network discovery.
- Check the box for Turn on automatic setup of network-connected devices.
- Select Turn on file and printer sharing.
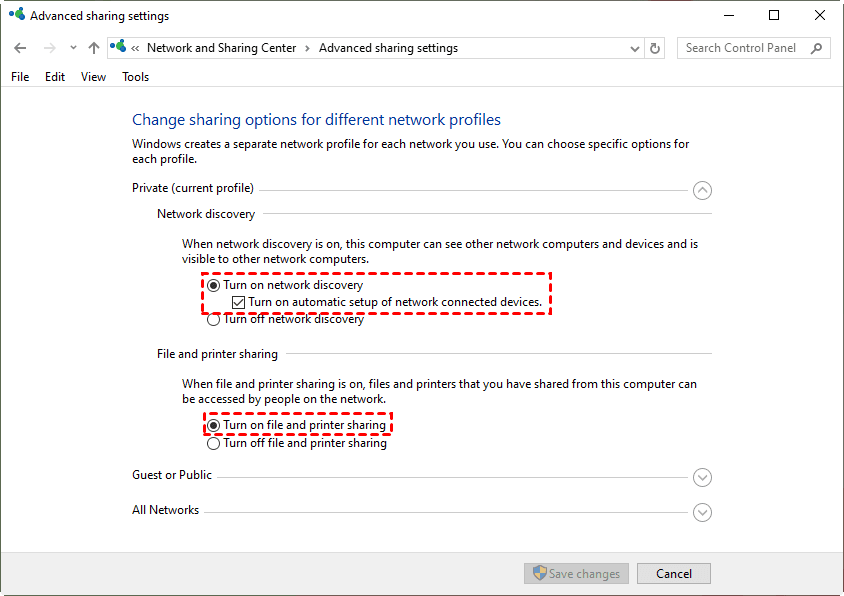
4. Scroll down to the All Networks section.
- Ensure Public folder sharing is enabled if you want to share files in the Public folder.
5. Click Save changes to apply the settings.
Solution 2: Enable Required Windows Services
File sharing in Windows 10 relies on several background services. If any of these services are disabled or not running properly, you may encounter network issues. Follow these steps to enable them:
1. Press Windows + R, type services.msc, and press Enter to open the Services window.
2. Locate the following services one by one:
- Function Discovery Provider Host
- Function Discovery Resource Publication
- SSDP Discovery
- UPnP Device Host
3. For each service:
- Right-click it and select Properties.
- Set Startup type to Automatic.
- If the service is not running, click Start.
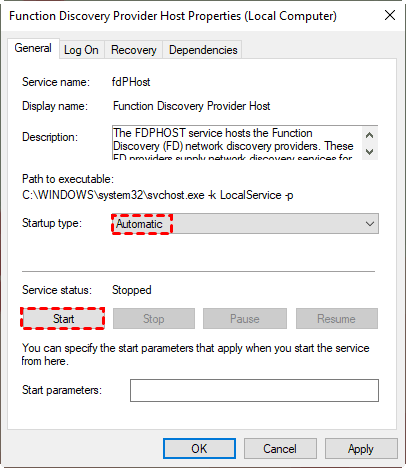
4. Click Apply and then OK to save the changes.
Solution 3: Turn Off Password Protected Sharing
Turning off password protected sharing can resolve the Windows 10 file sharing not working issue, especially in home or small office networks. Here’s how to do it:
1. Go to Advanced sharing settings as mentioned in Solution 1.
2. Scroll down to the All Networks section.
3. Under Password protected sharing, select Turn off password protected sharing.
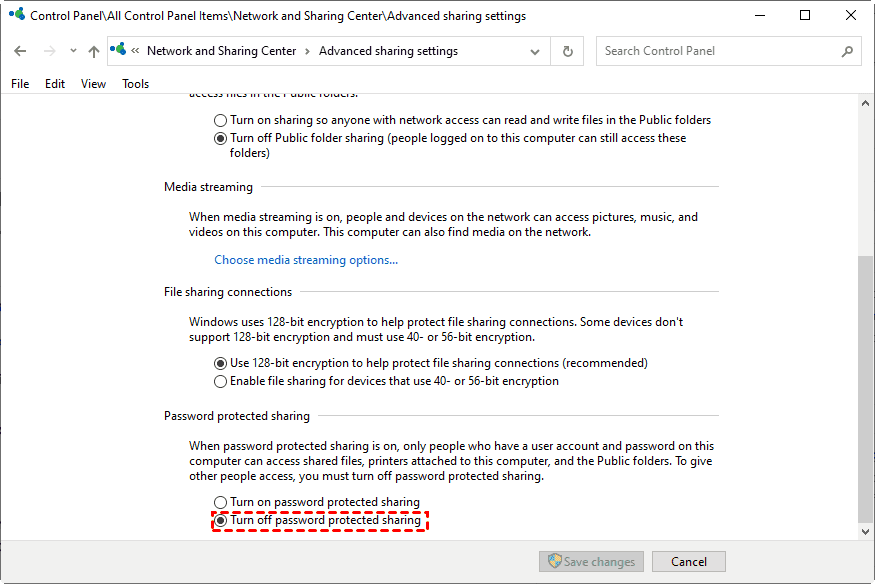
4. Click Save changes at the bottom.
Solution 4: Check Folder Sharing Permissions
Incorrect permissions are one of the most common causes of shared folder access failure. You can fix it as follows:
1. Right-click the folder you want to share > Properties.
2. Go to the Sharing tab and click Advanced Sharing.
3. Check Share this folder. Then click Permissions and ensure Everyone has access (Read or Full Control depending on your needs).
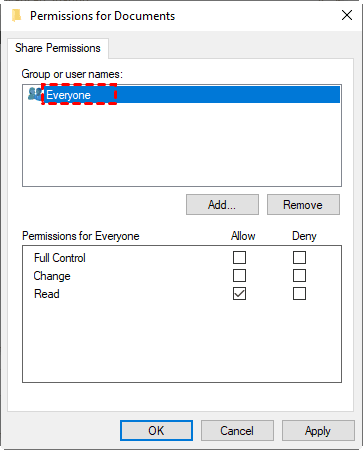
4. Click Apply and OK.
Solution 5: Allow File Sharing Through Windows Firewall
Firewalls can block incoming file sharing requests unless explicitly allowed. Follow the steps below to fix it:
1. Open Control Panel > Windows Defender Firewall.
2. In the left panel, click Allow an app or feature through Windows Defender Firewall.
3. Make sure File and Printer Sharing is checked for both Private and Public networks. If not, click Change settings to check them.
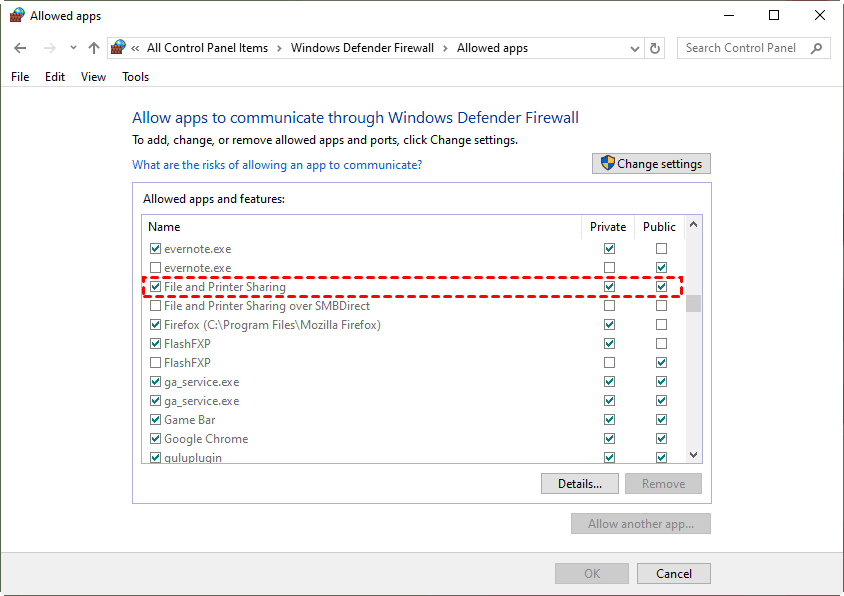
4. Click OK.
Solution 6: Use IP Address Instead of Computer Name
Sometimes DNS or network name resolution fails, but direct IP access works. Here’s how to do it:
1. Press Win + R, type cmd, and press Enter.
2. Type ipconfig and press Enter.
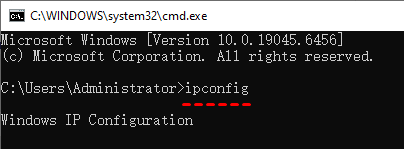
3. Note the IPv4 Address (e.g., 192.168.1.5).
4. On another PC, open File Explorer and type: \\192.168.1.5. This bypasses name resolution errors and connects directly.
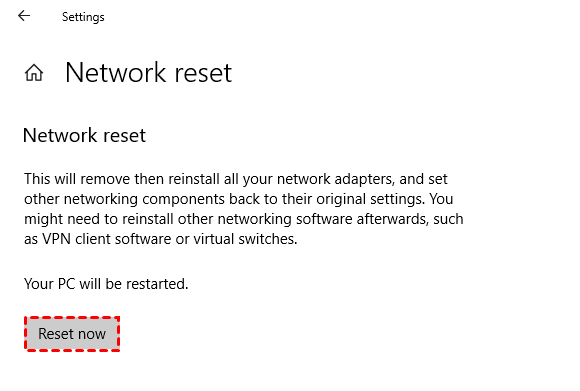
Solution 7: Reset Network Settings
Follow the steps below to reset all network components to default to fix misconfigurations:
1. Go to Settings > Network & Internet > Status.
2. Scroll down and click Network reset.
3. Click Reset now, then restart your PC.
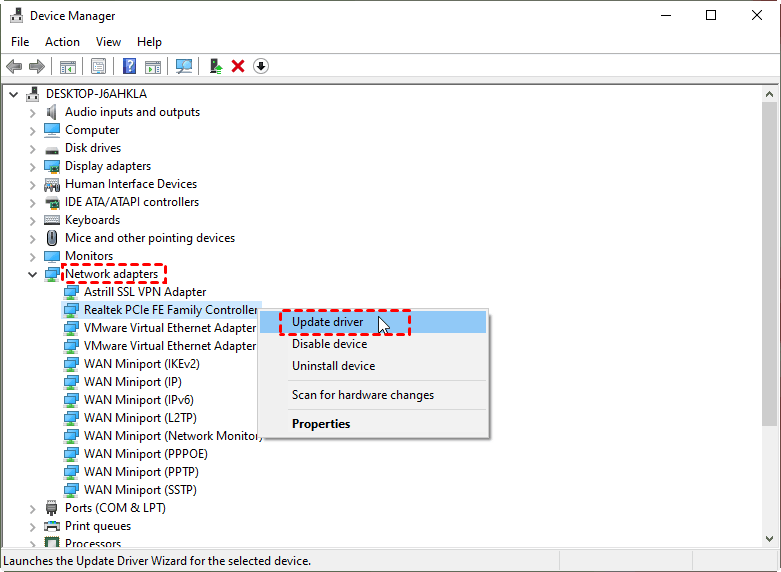
Solution 8: Update Windows and Network Drivers
Outdated drivers or system bugs can directly cause file sharing issues. Use these steps to update Windows and drivers:
👉 To update Windows:
Open Settings > Update & Security > Windows Update and install available updates.
👉 To update drivers:
- Press Win + X > Device Manager.
- Expand Network adapters.
- Right-click your adapter and select Update driver.
Best Way to Share Files over Network in Windows
After fixing network issues, you may be looking for a guaranteed, hassle-free way to share files between PCs. AOMEI Backupper Standard is the best solution.
🎯 Batch Sync: Sync multiple folders at once to streamline your workflow and boost productivity.
🎯 Auto Sync: Schedule your file sync to run automatically on a daily, weekly, monthly, or event-based basis.
🎯 Sync Changed Data: After the initial full sync, any time you run the job again (manually or on a schedule), it will copy new and modified files from the source to the destination.
🎯 Supported Devices: Sync files across a wide range of devices, including local and external drives, network locations, and cloud storage.
Download AOMEI Backupper and follow the steps below to sync files from one PC to another:
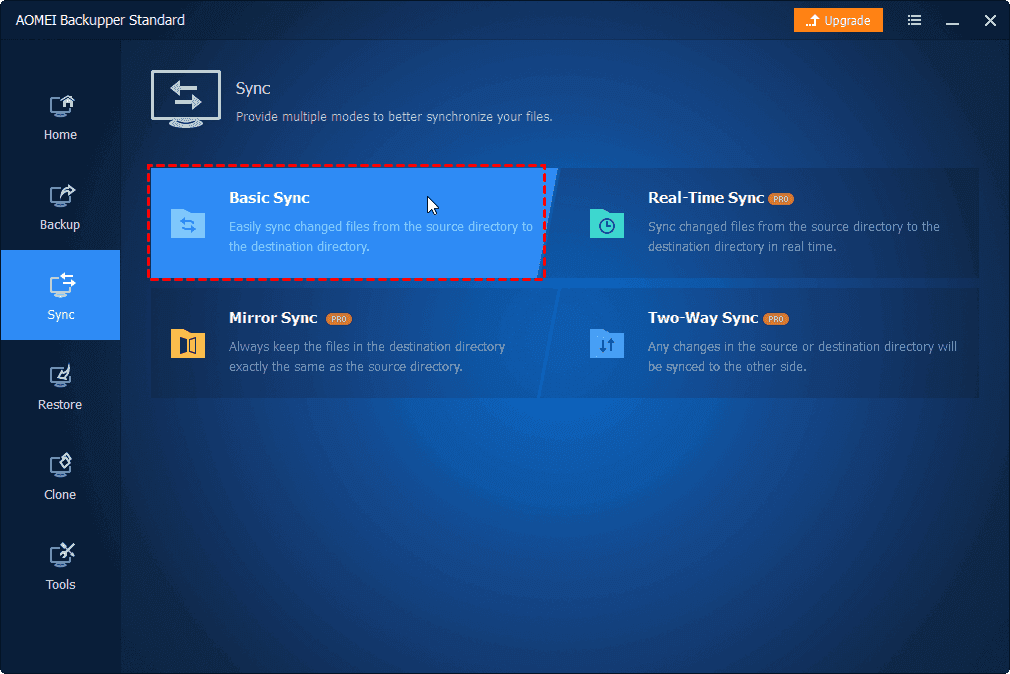
Step 1. Launch AOMEI Backupper and go to Sync > Basic Sync.
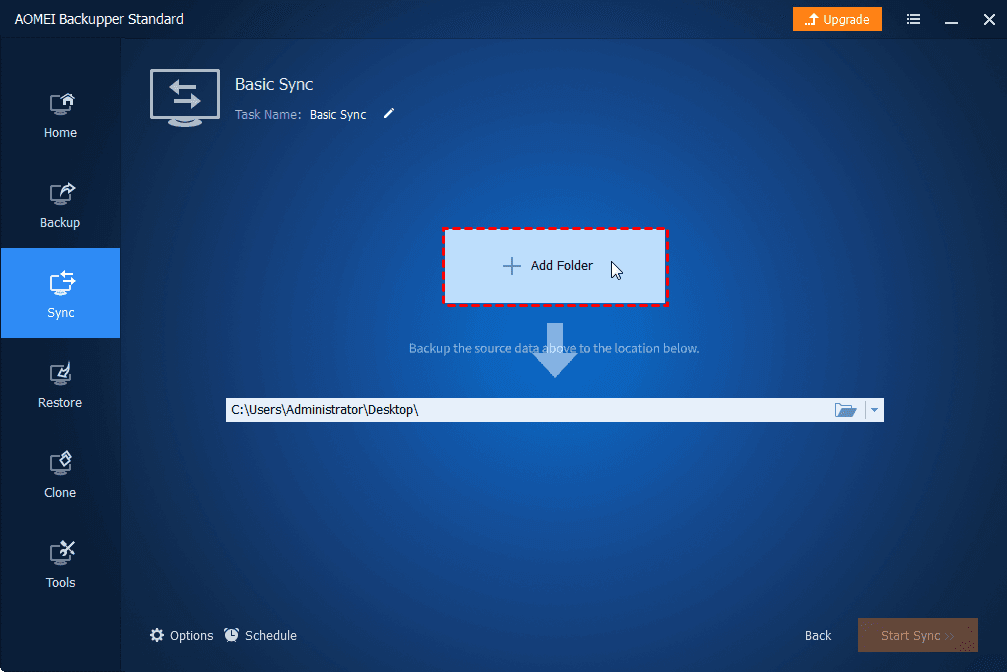
Step 2. Click Select Source to choose the files or folders you want to share.
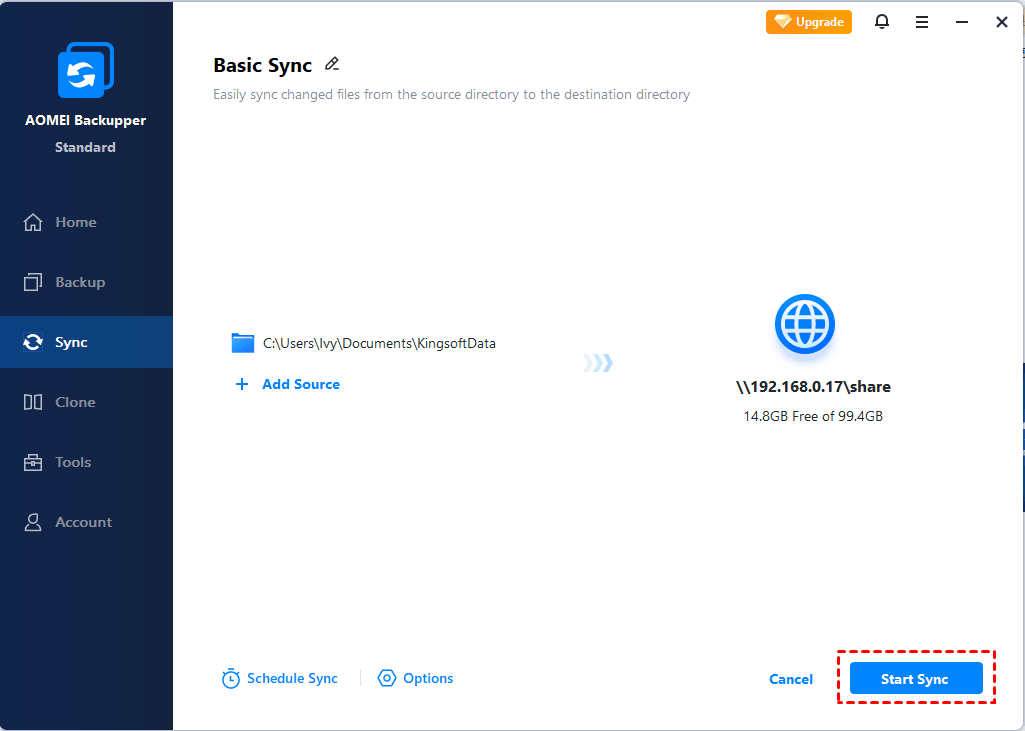
Step 3. Click the destination box and select Add Network Share in the next window.
Step 4. In the pop-up window, type \\[your source computer IP address] and click the right arrow. Then select one shared folder as the destination path and click OK.

Step 5. Click Start Sync to begin sharing files across the network.
🔔 Notes:
● You can also enable Schedule Sync to keep files continuously updated across all devices—without any manual effort.
● After the sync process is finished, access the shared folder(s) on the destination computer by clicking This PC > Network or typing \\[your source computer IP address] in File Explorer.
Verdict
When Windows 10 file sharing is not working, it can interrupt productivity and cause serious inconvenience—especially when you rely on shared files for work, backup, or collaboration. Luckily, you can fix the issue with the 8 solutions offered in this article.
For users who want a fast, reliable, and error-free way to share files across devices, AOMEI Backupper is an ideal choice. It supports all devices detected by Windows. You can use it to sync files to external hard drive, NAS, or network share, etc. Why not try it out by yourself?
✍You May Also Like
