
How to Create a Robocopy Scheduled Task Automatically
In this task, you’ll learn how to create a Robocopy scheduled task automatically using Task Scheduler or the best alternative - AOMEI Backupper Standard. Scroll down to learn more!
By Ivy Updated on December 8, 2025
Robocopy is Windows’ advanced copy tool that handles big jobs better than normal Copy/Paste. It can copy multiple files at once (multithreading), automatically retry when files fail to copy, and perform basic integrity checks, so your backup is accurate.
This makes it much faster and more reliable for large or repeated backups, especially when creating a Robocopy scheduled task.
What Is a Robocopy Scheduled Task?
Scheduling Robocopy turns it into an automatic backup task. Instead of remembering to run a backup, Windows does it for you, such as daily, weekly, monthly, etc., even during off-hours. This means your files stay protected with zero effort and without interrupting your work.
Robocopy is great for copying files to another drive, NAS, or server, especially when speed and reliability matter. But it’s not perfect. It requires using command lines and doesn’t keep multiple versions of files, which deters some users.

If you need a fast, free, built-in option, Robocopy works extremely well. For advanced features like versioning or cloud backups, or just don’t like the command line, you’ll need other tools.
Preparations Before Creating a Robocopy Scheduled Task
1️⃣ Make sure you know exactly the source and destination folders, such as another internal drive, USB drive, network drive, etc.
2️⃣ Network destinations require a full UNC path.
3️⃣ Choose the right mode before using Robocopy:
- /MIR for exact mirror, including deletion
- /E copyall subfolders, including empty ones
- /MT:n – Enables multithreaded copying (e.g., /MT:16or /MT:32), speeding up large backups.
4️⃣ Learn all necessary Robocopy parameters:
- /R:3: Retries failed copies up to 3 times
- /W:5: Waits 5 seconds between retries
- Add /TEE to show the Robocopy output live while also writing it to a file.
- Consider /XO, /XN, or /XC filters to skip certain overwrites.
- Using /LOG+: appends entries instead of overwriting the file.
5️⃣ Use wired Ethernet when possible to avoid slow Wi-Fi transfers.
6️⃣ Always test your Robocopy command before scheduling it. This confirms the folders are correct and the command runs without errors, preventing unexpected deletion or overwriting.
The Critical Robocopy Scheduled Task Examples
Here are 5 common Task Scheduler Robocopy examples, provided for reference.
Daily Incremental Backup Script
A simple incremental backup copies all new and updated files but never deletes anything at the destination. This is the safest and most common Robocopy command for everyday use. Example:
robocopy "C:\Source" "D:\Backup" /E /R:3 /W:5
Mirror Backup Script (Exact Replication)
A mirror backup keeps the destination folder identical to the source, including deletions. This is ideal for work folders that must stay perfectly synchronized, but it must be used carefully because deleted source files will also be removed from the backup. Example:
robocopy "C:\Source" "D:\Backup" /MIR /R:2 /W:2
Fast Multi-Threaded Backup Script
Robocopy can dramatically increase speed by copying multiple files simultaneously. The /MT:n option uses n threads (32–128 are common for SSDs and fast networks). Higher thread counts may cause minor performance dips during active use. Example:
robocopy "C:\Source" "D:\Backup" /E /MT:32
Robocopy with Logging for Long-Term Auditing
For auditing, monitoring, or troubleshooting backup history, Robocopy can write all details to a log file. Using /LOG+: appends entries instead of overwriting the file. Example:
robocopy "C:\Source" "D:\Backup" /E /LOG+:C:\Logs\backup.log
Robocopy Backup to Network Drive or NAS
This is one of the most common cases, yet many users report that Robocopy does not run in the task scheduler - completed too quickly, no files copied, and no backup log generated. In this case, you must always use UNC paths, such as \\NAS\Share. Example:
robocopy "C:\Source" "\\NAS-Server\Backups\User1" /E /R:3 /W:5 /MT:16 /LOG+:C:\Logs\nas-backup.log
How to Create a Robocopy Scheduled Task Step by Step
Creating an automated Robocopy backup is a two-part process: first, you build a Robocopy backup script, then you use Task Scheduler to run it automatically. Below is the complete, detailed walkthrough.
Step 1: Create a Robocopy Script File (.cmd or .bat)
First, create a simple script containing the Robocopy backup command. This will make the scheduled task more concise and clear.
1. Write a Robocopy script:
Example:
@echo off
robocopy "C:\Users\YourName\Documents" "\\NAS-Server\Backups\Documents" /E /R:3 /W:5 /MT:16 /FFT /TEE /LOG+:C:\Logs\robocopy-backup.log
exit /b
⚠️Note:
◾ /E — Copy all subfolders, including empty ones
◾ /R:3 — Retry failed copies 3 times (prevents endless hang-ups)
◾ /W:5 — Wait 5 seconds between retry attempts
◾ /MT:16 — Use 16 threads for faster copying
◾ /FFT — Allows FAT/NTFS timestamp tolerance (important for NASes)
◾ /TEE — Shows output on-screen and writes to log
◾ /LOG+: — Appends logs instead of overwriting
◾ exit /b — Ensures Task Scheduler receives a clean exit code
2. Type Notepad in the Start menu and select it.
3. Copy and paste your Robocopy command. Then, save it as: C:\Scripts\robocopy-backup.cmd. Note: You can choose any folder, but avoid Desktop or Downloads.
4. Test the script manually. Right-click the script and select Run as administrator. Watch for errors and confirm files actually copy to the destination.
Step 2: Use Robocopy in Task Scheduler
With your script ready, you can automate Robocopy using Task Scheduler.
1. Press Win + R, type taskschd.msc and press Enter. In the Task Scheduler, click Action and Create Task (NOT “Create Basic Task”- you need advanced options).
2. Under the General tab, specify a name (e.g., Robocopy Backup Task), when to run (e.g., user logon or not, with highest privileges), and the running user account.
3. Under the Triggers tab, click New and select your schedule. Nighttime is recommended for large jobs.
- Daily/weekly/monthly
- At logon
- Onidle
- ...
4. Under the Actions tab, click New and set up the following:
- Action: Start a program
- Program/script: C:\Scripts\robocopy-backup.cmd
- Start in (optional): C:\Scripts\
(THIS IS IMPORTANT -fixes many “task ran but did nothing” issues.)
5. Under the Conditions tab, uncheck Start the task only if the computer is idle. For laptops, leave AC/battery settings as needed.
6. Under the Settings tab, check the following options and click OK. When prompted, enter your password to store credentials for the task.
- Allow task to be run on demand
- Run task as soon as possible after a scheduled start is missed
- Stop the task if it runs longer than 2 hours (optional)
- If task fails, restart every 5 minutes (up to 3 times)
Step 3: Test the Scheduled Task to Ensure Reliability
A scheduled task that “should” work is not enough, you must verify it. In Task Scheduler, right-click the Robocopy task and select Run. Then, wait 10–20 seconds and check your backup folder for new files
If nothing copied, verify folder permissions, UNC paths, “Start in” field, or user account. For unexpected deletions, try /E instead of /MIR.
In addition, open your Robocopy Log (i.e., C:\Logs\robocopy-backup.log) and look for:
- Errors
- Skipped files
- Access denied messages
- Network timeout warnings
This is your best troubleshooting tool. You can also check the log file update to make sure it runs at the scheduled time. Be sure to enable all task history.
Best Alternative to Robocopy Task Scheduler [Simple & Fast]
If you are not an advanced user, using Robocopy Task Scheduler might be challenging, and opting for the best alternative may be more appropriate. AOMEI BackupperStandard is an all-in-one free backup and sync tool to automatically copy data from one hard drive to another drive, external drives, USB drives, NAS, etc., without Task Scheduler.
- With a simple and intuitive interface, all users can use it easily and quickly.
- Fast Sync: Copy only changed files each time to maximize transfer speed.
- Batch Sync: Select multiple folders to sync at once.
- Automatic Sync: Set up a scheduled task based on frequency or event triggers.
- Sync Deletions: Optionally sync the deletions from source directory to destination.
- Email Notification: Set it up before syncing to get timely alerts.
Step 1. Download and install AOMEI Backupper Standard on your computer. Open it and click Sync >Basic Sync.
Step 2. Click Select Source to access and add files on the source drive. Then, click the PC icon > This PC/NAS/Network Share to select a destination.
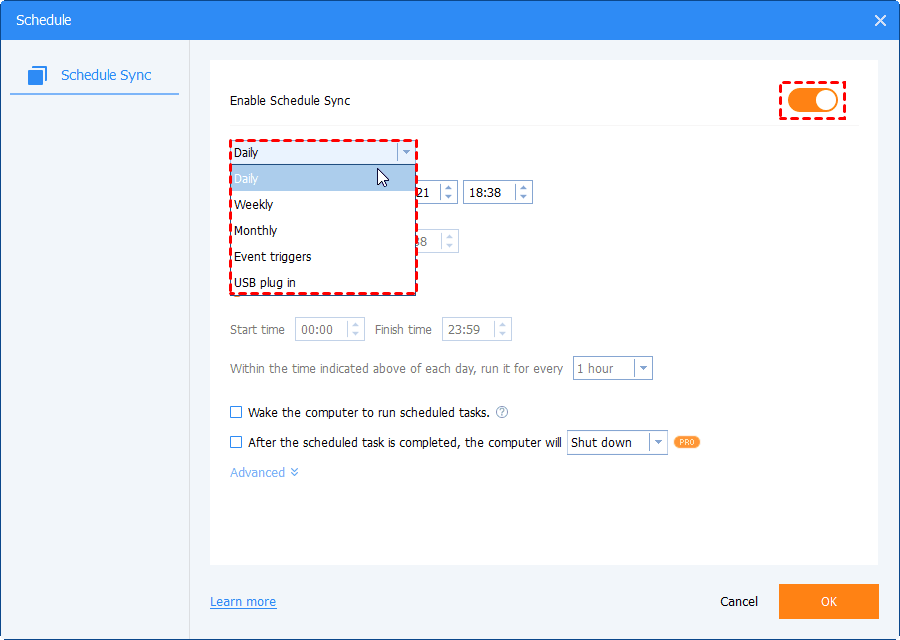
Step 3. Click Schedule Sync to set a frequency - based on daily, weekly, monthly, or event triggers. You can also enable Email notifications for sync status. At last, click Start Sync to copy files automatically.
⚠️Note:
◾ For a 1:1 copy, check the option to sync deletions from source directory to destination.
◾ To ensure safety, it’s suggested to verify the integrity of files in Options.
After the first sync, it will only sync modified or new files -saving both time and disk space. If you choose to sync all files simultaneously, you can speed up the sync process.
Final Thoughts
Robocopyscheduled task makes the sync task automatic, featuring multithreaded performance, retry logic, and seamless handling of large files, etc., it is fast, resilient, and extremely flexible.
In addition, if you want an easier way, try a free backup and sync tool - AOMEI Backupper Standard. It supports multiple schedule backups, from daily to event triggers, syncs multiple files at once, and offers optional features like sync deletion, etc. What’s more, it has a simple and intuitive interface, making the entire process easier.
