
Enable or Disable Microsoft Defender Real Time Protection
You can easily enable or disable Microsoft Defender Real Time Protection through Windows Security, Registry, Group Policy, and PowerShell. To enhance data security, try ransomware protection software - AOMEI Backupper.
By Ivy Updated on April 30, 2026
What Is Microsoft Defender Real-Time Protection?
Microsoft Defender Real-Time Protection is an always-on, quiet built-in security feature in Windows 10 or 11. Instead of waiting for scheduled scans, it continuously scans files, apps, and downloads as you open or run them, checking for suspicious behavior.
If it detects malware, ransomware, or other threats, it can block or quarantine them immediately - often before you even notice anything is wrong. It significantly reduces the risk of infections and keeps your system more secure during everyday use. Only disable Real-Time Protection in the following scenarios:
- Install trusted apps mistakenly flagged by Microsoft Defender
- Troubleshoot software conflicts or system performance issues
- Run specific tools or scripts requiring temporary suspension of real-time scanning
How to Enable or Disable Microsoft Defender Real-Time Protection
Enabling real-time protection ensures that Microsoft Defender continuously monitors your system for malware, ransomware, and other threats. It’s the easiest method to keep your Windows PC secure without needing additional software.
Method 1: Windows Security Settings
This is the most user-friendly method to turn on or off real-time protection. Windows Security provides a straightforward interface, making it easy for anyone to operate in just a few clicks.
📌 Enable Real-Time Protection:
Step 1. Open Windows Security from the Start menu. Then, click Virus & Threat Protection.

Step 2. Under the Virus & Threat Protection settings section, click Manage settings.
Step 3. Toggle Real-Time Protection to ON. Once enabled, Microsoft Defender will actively scan files, apps, and downloads in real time, helping prevent threats before they can affect your system.
- The Real-Time Protection feature will be grayed out if you are using third-party antivirus software. This is primarily to prevent software conflicts and optimize system performance.
- To prevent false positives, you can add trusted applications or folders as exclusions in Windows Security.
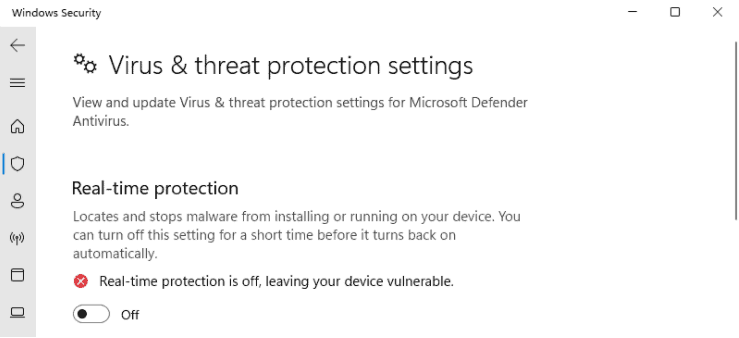
📌 Disable Real-Time Protection:
Accordingly, switch Real-Time Protection to Off. It will temporarily disable Real-Time Protection and reset once you restart the system.
Method 2: Group Policy (for Windows Pro/Enterprise)
For advanced users or IT administrators, Group Policy provides more control over Microsoft Defender settings, preventing accidental or unauthorized disabling of Windows Defender. This method is ideal for users who are using Windows Pro or Enterprise editions and want a reliable, always-on defense.
📌 Enable Real-Time Protection:
Step 1. Press Win + R to open the Run window, type gpedit.msc, and press Enter to access the Local Group Policy Editor.
Step 2. Navigate to: Computer Configuration > Administrative Templates >Windows Components > Microsoft Defender Antivirus.
Step 3. On the right pane, double-click Allow antimalware service to start up with normal priority, and set it to Enabled.
Step 4. Click Real-time Protection in the left pane. Then, double-click Turn off real-time protection and set it to Disabled or Not Configured.
Step 5. Click Scan in the left pane. Double-click Turn on heuristics, and set it to Enabled.
📌Disable Real-Time Protection:
Correspondingly, to disable Microsoft Defender Real-Time Protection, set Allow antimalware service to start up with normal priority and Turn on heuristics to Disabled or NOT configured. Meanwhile, set the Turn off real-time protection to Enabled.
Method 3: Registry Editor
For users who are comfortable with advanced system settings, the Registry Editor provides a way to enable or disable Microsoft Defender at a deeper system level, particularly useful when other methods are restricted. Care should be taken, as incorrect changes to the registry can affect system stability.
📌 Enable Real-Time Protection:
Step 1. Press Win + R to open the Run window, type regedit, and press Enterto access the Registry Editor.
Step 2. Navigate to: HKEY_LOCAL_MACHINE > SOFTWARE > Policies > Microsoft > Windows Defender.
Step 3. Locate the DisableAntiSpyware key and set its value to 0. Then, restart your system to apply the changes.
📌Disable Real-Time Protection:
Accordingly, to turn off Real-Time Protection, set the value of DisableAntiSpyware to 1 and restart your system.
Method 4: PowerShell (for Advanced Users)
PowerShell provides a fast and precise way to enable or disable Microsoft Defender Real-Time Protection, especially useful when managing multiple systems or when GUI access is limited.
📌 Enable Real-Time Protection:
Step 1. Search for PowerShell in the Start menu, right-click it, and select Run as administrator.
Step 2. Enter the following command and press Enter.
Set-MpPreference -DisableRealtimeMonitoring $false
Once executed, Microsoft Defender will resume actively scanning your system for malware, ransomware, and other threats, providing continuous protection without needing to restart your computer.
📌Disable Real-Time Protection:
To disable Real-Time Protection, type Set-MpPreference -DisableRealtimeMonitoring $true in the PowerShell window.
Add an Extra Layer of Security with AOMEI Ransomware Protection
For stronger protection, combine Microsoft Defender with dedicated ransomware protection software, like AOMEI Backupper Professional. It integrates complete backup solutions and features a Ransomware Protection tool that continuously monitors disk I/O activities, thereby protecting backups and critical data from deletion, encryption, or tampering.
- You need to create at least one backup task before enabling Ransomware Protection. AOMEI Backupper allows you to backup system, disk, OS, files, etc.
- For long-term data protection, it’s suggested to enable schedule backup, incremental backup, backup scheme, etc., greatly saving backup time and space while keeping multiple backup versions.
- For safety, it’s best to save backup image to multiple storage, such as external drive, NAS or network share, etc.
Step 1. Open AOMEI Backupper Professional after installing. Under the Tools tab, click Ransomware Protection.
Step 2. Toggle the Enable Ransomware Protection tab. The option to protect backup image created by AOMEI Backupper is automatically checked. To enhance data security, specify file type, files, or folders
- Protect Specific File Types: Enter the extensions you frequently use to protect them.
- Protect Specific Files and Folders: Enter specific folder paths, such as C:\Program Files (x86), C:\ProgramData, etc.
Once enabled, you’ll be asked to add apps to trust or block list. Check the specific app, and click Add to Trust List or Add to Block List. Or click Ignore.
Step 3. Switch to the Trust List, Block List, Block History, and manually configure them. In the Block History window, you can choose to clear block history, add to trust list, or add to block list.
Conclusion
Microsoft Defender Real-Time Protection is a powerful built-in tool that continuously monitors your system for malware, ransomware, and other threats, significantly reducing the risk of infections and data loss. You can enable or disable it through Windows Security, Registry, Group Policy, and PowerShell.
While it provides solid baseline protection, combining Defender with proactive ransomware protection software - AOMEI Backupper ensures a more resilient, ransomware-ready system. It primarily focuses on protecting backup images and individual files or folders.
