
Install Windows 11 without Microsoft Account [4 Methods]
With 4 effective methods, you can install Windows 11 without Microsoft account successfully, along with step by step instructions. Always backup C drive beforehand just in case.
By Ivy Updated on March 25, 2026
Why Install Windows 11 without Microsoft Account?
When setting up Windows 11, Microsoft strongly encourages users to sign in with a Microsoft account. While this method offers cloud syncing and service integration, many users prefer a local account for greater control, cleaner, faster experience, without sacrificing performance, updates, or security. With a local account:
- Your login credentials stay on your device instead of being stored online.
- Activity data, device usage, and settings are not automatically synced to Microsoft servers.
- You avoid automatic linking between your operating system and online identity.
In contrast, using a Microsoft account involves a much larger undertaking, requiring an internet connection, entering your account credentials, completing multi-factor authentication, syncing your settings, files, and preferences from Microsoft account (along with extra time to download necessary apps and configure settings), etc. As such, the entire process is quite time-consuming.

|
Local Account vs Microsoft Account - Key Differences |
||
|
Feature |
Local Account |
Microsoft Account |
|
Internet required for setup |
❌ No |
✅ Yes |
|
Data stored online |
❌ No |
✅ Yes |
|
Device independence |
✅ Full control |
❌ Linked to online identity |
|
OneDrive & Store auto-integration |
❌ Optional |
✅ Enabled by default |
|
Privacy exposure |
Low |
Higher |
What You Need Before Installing Windows 11
Before attempting to install Windows 11 without a Microsoft account, it’s important to prepare your system properly, ensuring a smooth, error-free installation process.
1️⃣ Be sure your PC meets Windows 11minimum system requirements.
Before proceeding, confirm the following:
- Processor: 1 GHz or faster with 2+ cores on a compatible 64-bit CPU
- RAM: 4 GB minimum (8 GB recommended)
- Storage: 64 GB or more available space
- Firmware: UEFI with Secure Boot support
- TPM: Trusted Platform Module (TPM) version 2.0
- Graphics: DirectX 12 compatible GPU with WDDM 2.0 driver
- Display: 9” or larger, 720p resolution minimum
2️⃣ Create a Windows 11 installation USB.
What you needto create abootable USB drive with Windows 11 installer:
- A USB flash drive (8 GB or larger)
- A working PC
- Windows 11 ISO file(Download from Microsoft).
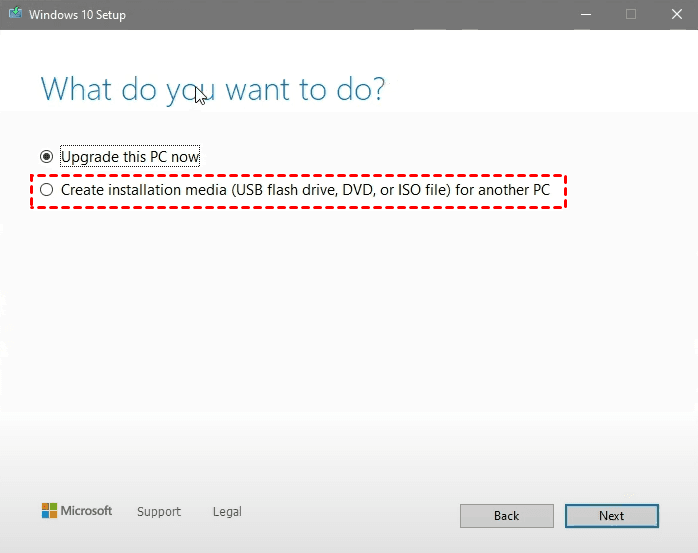
Double-click the MediaCreationTool to open the Windows 11 setup screen. Select Create installation media (USB flash drive, DVD, or ISO) for another PC to get started. Be sure to select USB drive as the bootable media for convenience.
3️⃣ Internet Connection: Use It or Not
Whether or not your PC is connected to the internet plays a critical role in bypassing the Microsoft account requirement. It’s often best to disconnect from the internet to prevent Windows 11 from forcing online sign-in during setup. You can then use alocal account to install Windows 11 while still enjoying full Windows functionality afterward.
How to Install Windows 11 without Microsoft Account Step by Step
Microsoft increasingly enforces Microsoft account sign-in during Windows 11 setup, but the following proven methods still allow you to complete installation using a local account.
Method 1: Bypass Microsoft Account Windows 11 Sign in using OOBE\BYPASSNRO
OOBE\BYPASSNRO is a built-in Windows setup command that tells Windows 11 to skip the Network Requirement during OOBE (Out-Of-Box Experience) and offers options like “I don’t have internet”, “Continue with limited setup”, etc., to allow you create a local account instead of linked to an online Microsoft account. This method works on Windows 11 24H2.
Step 1. Start the Windows 11 installation normally. Continue until you reach the Choose a country or region screen.
Step 2. Press Shift + F10 to open Command Prompt. Then, type OOBE\BYPASSNRO and press Enter. It will automatically reboot and restarts setup.
Step 3. Press Shift + F10 again. Press ipconfig /release and press Enter to disable the internet.
Step 4. Close the Command Prompt window. Continue with the installation until the network screen appears. Click I don’t have internet.
Step 5. Select Continue with limited setup if prompted. The OOBE may skip this screen and ask you to enter a local username and password. Complete the remaining installation.
Method 2: Install Windows 11 No Microsoft Account using ms-cxh:localonly
In Windows 11 build 26120 and later, Microsoft has removed the OOBE/BYPASSNRO command, which is now obsolete. A new command, start ms-chx:localonly, has been introduced to provide users with this feature.
Step 1. Start the Windows 11 installation normally. At the Microsoft sign-in screen, press Shift + F10.
Step 2. In the Command Prompt window, enter start ms-cxh:localonly and press Enter.
Step 3. In the "Create a user for this PC" window, enter a local username and password. Click Next to continue and complete Windows 11 setup.
Method 3: Disconnect the Internet Manually During Installation
This method prevents Windows from contacting Microsoft’s authentication servers, forcing the installer to allow offline setup.
Step 1. Start Windows 11 installationas normal. When prompted for network connection:
- unplug Ethernet cable, or
- disable Wi-Fi, usually at the bottom-right corner.
Step 2. Windows will detect no internet connection. Select I don’t have internet >Continue with limited setup.
Step 3. Create your local account and complete the installation.
Method 4: Install Windows 11 without MS Account using Rufus
This is the cleanest long-term solution because the Microsoft account requirement is removed before installation even begins. Rufus allows you to customize the Windows 11 installer and remove the requirement for an online Microsoft account.
Step 1. Download the Windows 11 ISO file and Rufus. Insert your USB drive (16GB or larger) as well.
Step 2. Open Rufus. Select your USB drive under Device.
Step 3. Under the Boot selection section, select Disk or ISO image. Click SELECT to browse and select the Windows 11 ISO file.
Step 4. Click Start > OK.
Step 5. In the Windows User Experience customization window, check Remove requirement for an online Microsoft account and click OK to create a Windows 11 bootable USB. You can also uncheck Secure Boot, TPM, etc., for a secure installation.
Step 6. Restart your computer and boot from this USB drive. It will load the Windows Setup screen and allow you to install Windows 11 in “true” offline mode - with no Microsoft account or internet connection requirement.
Backup C drive to External Hard Drive to Protect OS & Data Safely
Installing Windows 11 with no Microsoft account is a major change for your computer. For security purposes, it is suggested to backup C drive to external hard drive, or at least the important files. AOMEI Backupper Standard, as a free backup software, offers complete backup solutions and a full suite of features, making this process simple and efficient.
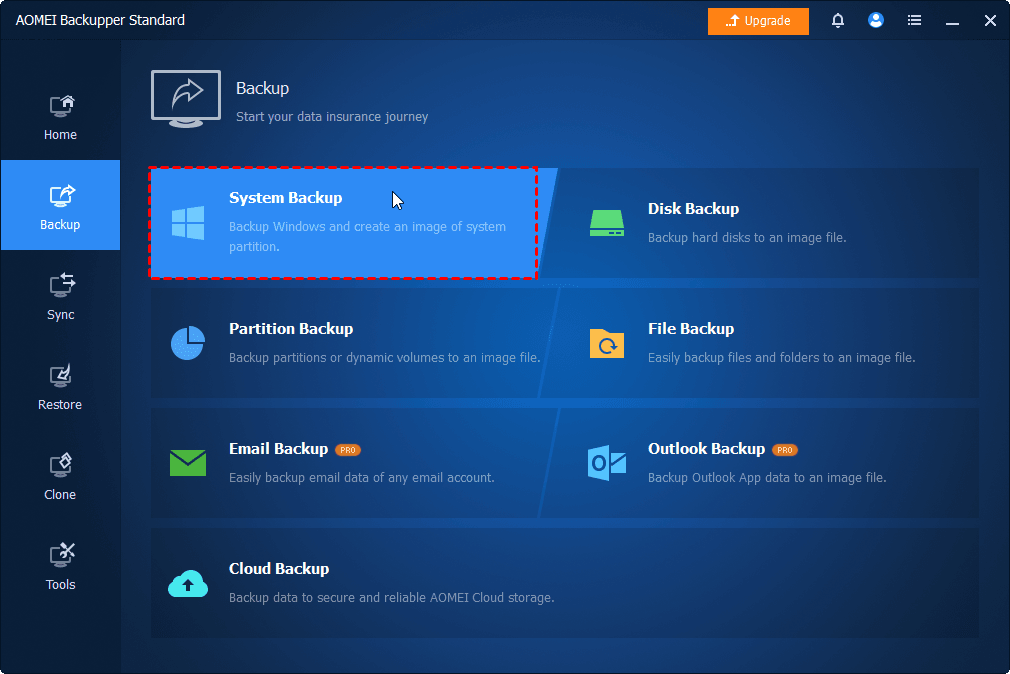
Step 1. Open AOMEI Backupper Standard. Click Backup on the left panel, then choose System Backup.
Step 2. The software automatically select system partition to start a Windows. Click the PC icon and Local Drive to add your external hard drive as a destination.
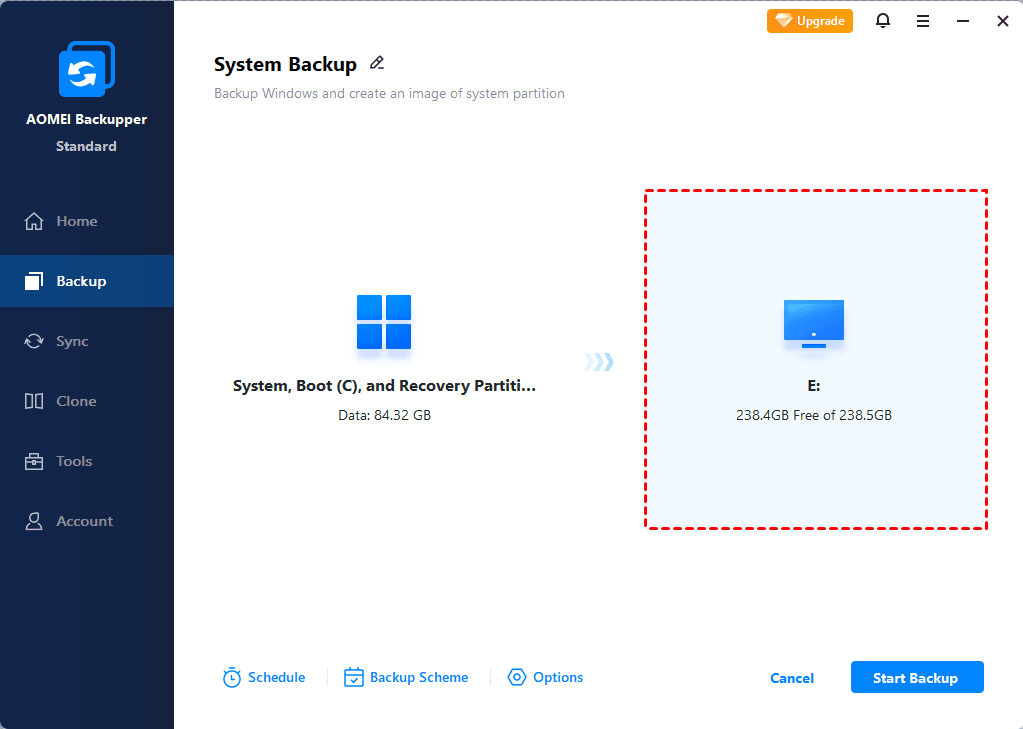
Step 3. Confirm you select the right drive and click Start Backup to backup C drive to external hard drive.
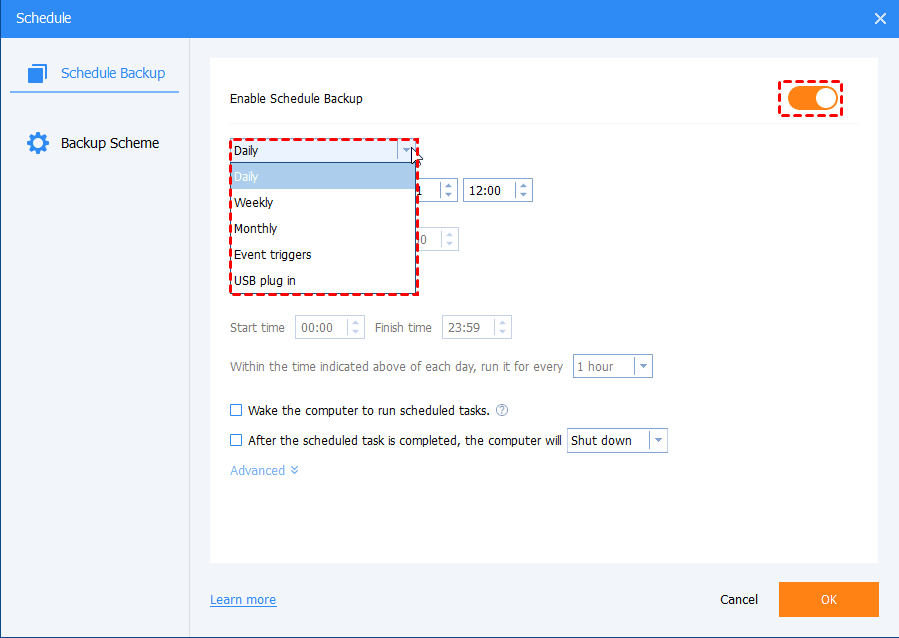
For continuous data protection, you can enable schedule backup and combine them with multiple fast, space-saving features
- Schedule: Include Daily, Weekly, Monthly (By date), Event triggers, etc., up to 7 options available.
- Incremental backup or differential backup: Backup only changed files, saving significant space and time, especially over the long term.
- Compression: Use Normal compression by default. Alternatively, switch to High compression to reduce image file size.
- Automatic cleanup: Delete old backups automatically to free up space.
Final Thoughts
Installing Windows 11 without Microsoft account offers usersmore privacy, control, and long-term system stability without sacrificing performance or features. You still can add a Microsoft account later if you want.
Don’t forget to backup C drive or at least important files to external hard drive or other storage devices for disaster recovery. With it, you can restore Windows image to new hard drive or SSD and replace the old drive without downtime.
