
How to Do Dell Latitude 5400 Hard Drive Replacement: 2 Cases
Upgrading or replacing the hard drive in your Dell Latitude 5400 can breathe new life into your laptop. Whether you're swapping out a failing HDD or upgrading to a faster SSD, you can find everything you want to know from this guide.
By Lily Updated on May 26, 2025
Prepare for Latitude 5400 hard drive replacement
Before you start replacing the hard drive in your Dell Latitude 5400, it’s essential to prepare properly. This ensures a smooth installation process and minimizes the risk of data loss or hardware damage. Here’s what you need to do:
1. Check Compatibility and Choose a New Drive
The Latitude 5400 supports 2.5-inch SATA hard drives and M.2 NVMe SSDs. Check your user manual to find out what type of disk your laptop is using. Buy a new drive of the same type (2.5-inch or M.2).
2. Back Up Your Data
Before making any hardware changes, always back up your data to prevent loss. You can make a backup on an external drive or cloud drive for better protection.
3. Gather the Necessary Tools
To open your Dell Latitude 5400 and replace the drive, you’ll need:
- Phillips #0 screwdriver – to remove the screws from the laptop’s bottom cover.
- Plastic spudger or pry tool – to safely detach the back panel without damaging it.
- USB-to-SATA adapter or M.2 NVMe enclosure – to connect the new drive for disk cloning.
Now you are ready for Dell Latitude 5400 hard drive replacement. In the sections below, I’ll show you detailed steps in different cases:
👉Case 1: Dell Latitude 5400 replace hard drive with SSD
👉Case 2: Dell Latitude 5400 SSD upgrade
Case 1: Dell Latitude 5400 replace hard drive with SSD
Upgrading your Dell Latitude 5400 from a traditional HDD to an SSD is one of the best ways to enhance your laptop’s speed, boot times, and overall performance.
To avoid reinstalling your OS and applications after hard drive replacement, you can clone your existing drive to the new SSD using AOMEI Cloner. This tool provides reliable disk cloning with advanced features, ensuring a seamless migration.

- Disk Clone: Duplicates an entire HDD or SSD, including the OS, applications, and files, onto a new drive.
- System Clone: Transfers C drive to new SSD for a seamless OS migration.
- Intelligent Clone: Copies only occupied sectors, skipping empty space for a faster and more efficient cloning process.
- SSD Alignment: Enhances 4K sector alignment to improve SSD performance and longevity.
- Partition Resizing: Automatically adjusts partition sizes during cloning, ensuring optimal disk space utilization.
Download AOMEI Cloner now and then follow the instructions below to replace HDD with SSD on Dell Latitude 5400.
Step 1. Transfer data from HDD to SSD
1. Connect the new SSD to your laptop via the USB-to-SATA adapter you prepared.
2. Install and run AOMEI Cloner. Then click Clone > Disk Clone.

3. Select your HDD as the source disk and choose your new SSD as the destination disk.
4. On the Operation Summary page, check the information of the source and destination disks.
- If the two disks are of a different partition style (one MBR one GPT), click Edit Partitions > Convert the destination disk from MBR (GPT) to GPT (MBR) to make the two disks coincide. This can avoid boot failure caused by BIOS/UEFI mismatch.
- If the SSD has a larger capacity than HDD, click Edit Partitions > Add unused space to all partitions or Manually adjust partition size to make full use of SSD capacity.
5. Enable SSD Alignment to optimize the target SSD performance and click Start Clone.
Step 2. Swap HDD for SSD and boot
1. Shut down your Latitude 5400 and unplug the power adapter. Remove any connected peripherals (mouse, USB drive, microSD card, etc.).
2. Remove the base cover.
- Flip the laptop over and use a Phillips screwdriver to remove the screws securing the back cover.
- Gently pry open the back panel using a plastic spudger or pry tool.
3. Remove the battery.
4. Remove the hard drive.
- Find the 2.5-inch HDD bay inside the laptop. Disconnect the SATA cable from the system board.
- Remove the four M2x2.7 screws securing the hard drive assembly in place.
- Remove the hard drive assembly from the computer.
- Disconnect and remove the SATA cable from the hard drive.
- Remove the four M3x3 screws securing the hard drive bracket in place.
- Remove the hard drive bracket and the HDD.

5. Install the new SSD.
- Place the hard drive bracket. Tighten the four M3x3 screws to attach the metal bracket to the SSD.
- Connect the SATA cable to the SSD and insert the SSD into the slot on the computer.
- Tighten the four M2x2.7 screws to secure the SSD to the computer.
- Connect the SATA cable to the system board.
6. Replace the battery and base cover.
7. Reconnect any external devices you need and the power adapter. Turn on the laptop.
8. Press F2 during boot to enter BIOS. Ensure the SSD is set as the primary boot drive.
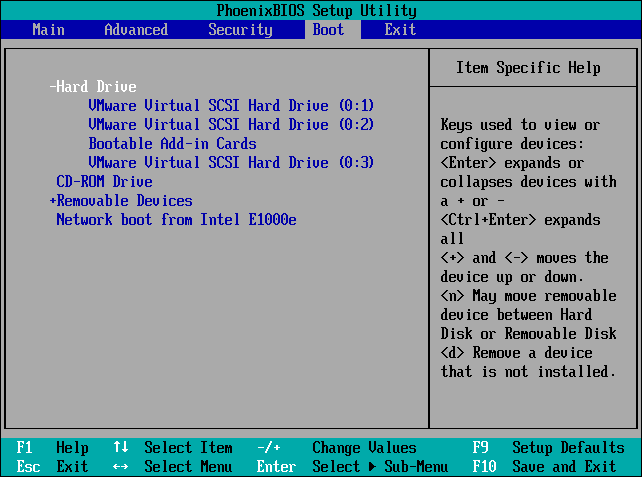
9. If any changes are made, press F10 to save changes and exit. Your Latitude 5400 should now boot from the new SSD.
Note: If your laptop doesn’t boot as expected, please refer to this article: cloned SSD won't boot.
Case 2: Dell Latitude 5400 SSD upgrade
If your Latitude 5400 is equipped with an M.2 SSD and you want to upgrade it to a larger one, here’s how to do it:
Step 1. Transfer data from old SSD to new SSD
First, connect the new M.2 SSD to your laptop via the M.2 NVMe enclosure you prepared. Then, clone M.2 SSD to larger M.2 SSD via AOMEI Cloner. The steps are basically the same as in Case 1, and you just need to choose the corresponding source and target disks.
Step 2. Swap two SSDs and boot
1. Shut down your Latitude 5400 and unplug the power adapter.
2. Remove connected peripherals, base cover and battery as mentioned in Case 1.
3. Remove the old M.2 SSD.
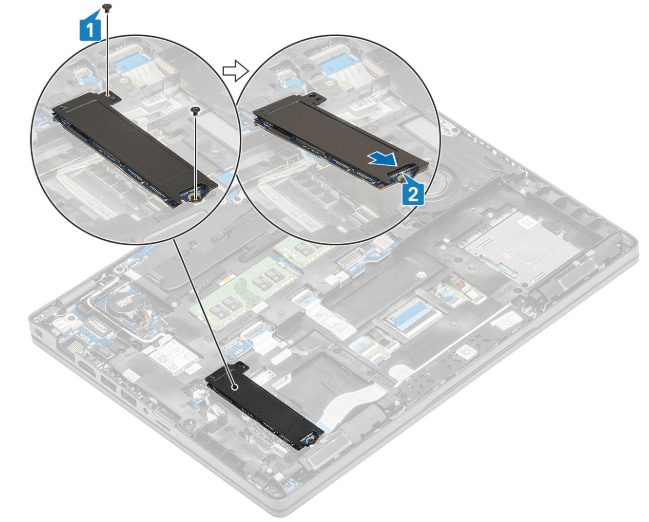
- Find the M.2 SSD slot on the motherboard. Remove the two (M2x3) screws that secure the M.2 SSD support bracket to the palmrest.
- Slightly turn and remove the SSD support bracket from the M.2 slot.
- Remove the M.2 SSD off the solid-state drive thermal plate.
4. Install the new M.2 SSD.
- Place the new M.2 SSD into the slot on the palmrest.
- Align and place the SSD support bracket above the M.2 SSD.
- Replace the two (M2x3) screws to secure the SSD support bracket to the palmrest.
5. Replace the battery, base cover and external devices. Turn on your laptop to boot from the new M.2 SSD.
Wrapping things up
By following this guide, you can ensure a smooth Dell Latitude 5400 hard drive replacement, boosting your laptop’s speed, efficiency, and storage capacity. The best part is that you can transfer everything from your old HDD/SSD to a new SSD using AOMEI Cloner, eliminating the need to reinstall Windows and all your applications. Just give it a try!
