
How to Create a Recovery Partition in Windows 11 (2 Ways)
Don't wait for a crash! Build a safety net for your Windows 11 PC with a recovery partition. Scroll down to get 2 effective ways to create a recovery partition in Windows 11.
By Lily Updated on December 8, 2025
Why create Windows 11 recovery partition?
A dedicated recovery partition is one of the most reliable ways to protect your Windows 11 system from unexpected failures. Instead of relying on external media or cloud-based tools, a recovery partition keeps essential repair files directly on your PC—always available when you need them. Here are the main reasons to create one:
- Instant Recovery Tools: Access Startup Repair, System Restore, and other system recovery tools directly from your hard drive.
- No External Media Needed: Restore Windows without a USB drive.
- Faster Troubleshooting: Resolve boot issues and corrupted files locally.

Check if there is already a recovery partition
Before creating a new recovery partition in Windows 11, you should verify whether your system already has one. Here’s how to check:
1. Right-click Start and select Disk Management.
2. Look for a small partition labeled Recovery, typically 500MB–1GB in size.
- If you see a “Recovery Partition” or “Healthy (Recovery Partition),” then WinRE is likely present.
- If Disk Management shows no recovery partition, then follow the guidance below to create one.
✍ Tip: Some OEM computers may label it differently, such as OEM Reserved or Recovery.
How to create a recovery partition in Windows 11
Now let’s see how to create a Windows 11 recovery partition step by step. Pick one way that best fits your needs.
Method 1: Windows 11 create recovery partition with third-party tool
If you want a beginner-friendly way to create a recovery partition in Windows 11, try AOMEI OneKey Recovery. It automates the whole process with just a few clicks.
✅ Creates its own recovery partition automatically
✅ One-click system backup and one-click restore
✅ Adds a startup option like OEM-style recovery (F11/A key)
✅ Works on all editions of Windows 11/10/8/7 and Windows Server 2025/2022/2019, etc.
Download AOMEI OneKey Recovery and follow the steps below to create a recovery partition in Windows 11:
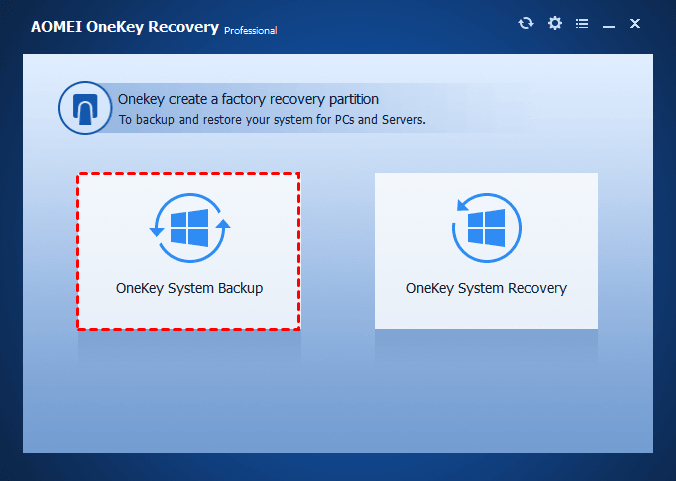
Step 1. Install and open AOMEI OneKey Recovery. Then choose OneKey System Backup.
Step 2. Choose Backup system to AOMEI OneKey Recovery Partition (Recommended) and click Next.
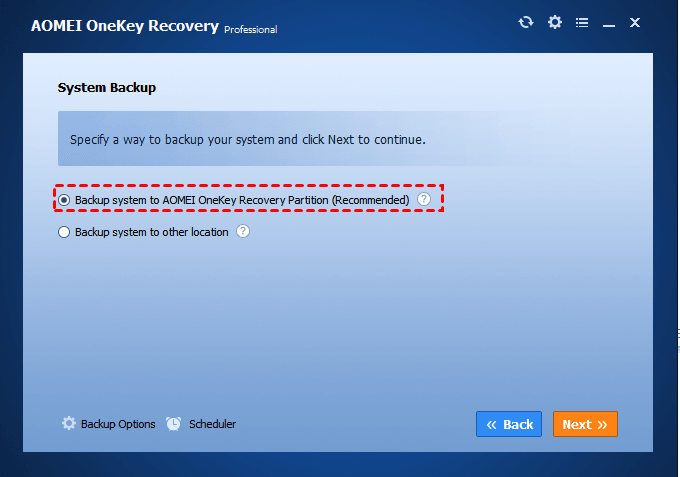
💡 Notes:
◆ If your system drive is low on space, you can choose Backup system to other location to avoid storage issues.
◆ Backup Options: You can choose to compress or encrypt the system backup image.
◆ Scheduler: You can set the backup task to run daily/weekly/monthly.
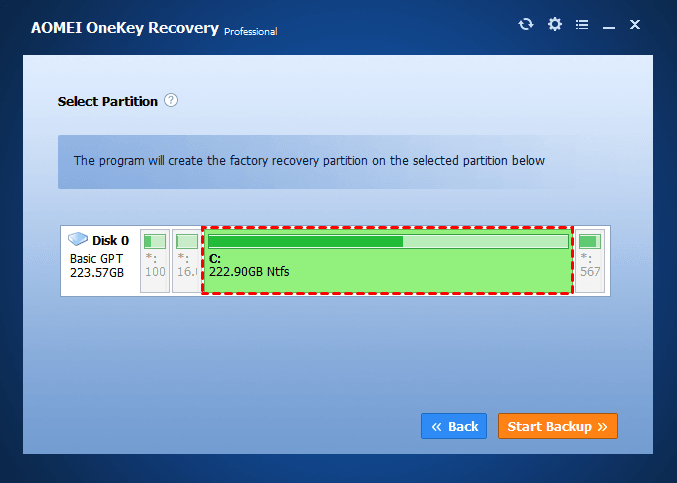
Step 3. Select a partition on your system drive to divide some space (the size depends on how big your system partition is) for creating a factory recovery partition. Then click Start Backup to continue.
Step 4. The program will enter Restart Mode to finish the backup process. After the process is finished, you will be prompted that the boot menu has been added to your system. Click OK > Finish.
Step 5. Boot your computer normally and check if there is a partition labelled “AOMEI Recovery Partition” in Disk Management.
💡 Note: To disable or adjust your system’s boot menu, you can click the gear icon in the upper-right corner and configure it as per your need.

Method 2: Create a Windows 11 recovery drive instead
If you don’t want to create a dedicated recovery partition on your internal disk, the easiest alternative is to create a Windows 11 recovery drive using a USB flash drive. Follow the instructions below:
Step 1. Insert a USB drive (minimum 16 GB, 32 GB recommended) into your computer. If the drive is not empty, backup files on it before you move on.
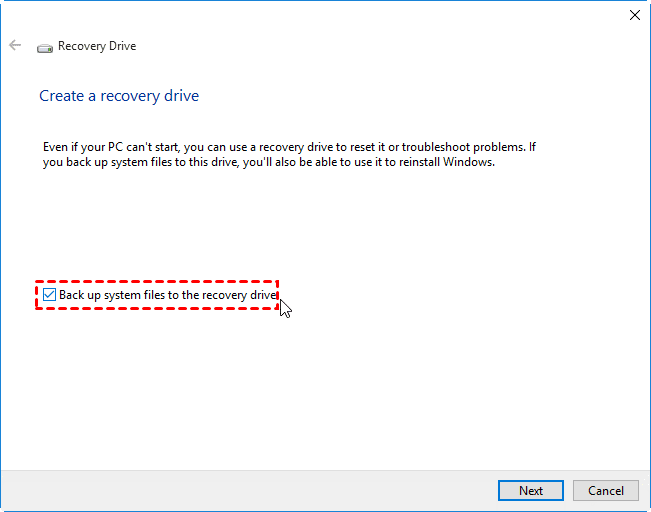
Step 2. In the search box, search for Create a recovery drive and then select it.
Step 3. When the tool opens, make sure Back up system files to the recovery drive is selected and then select Next.
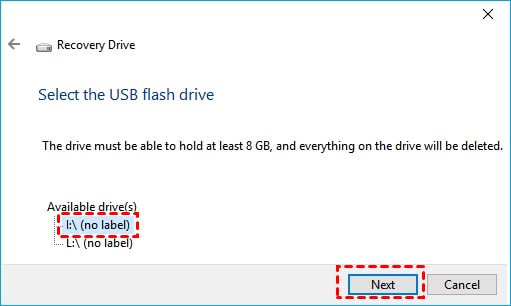
Step 4. The tool will automatically search for connected USB flash drives. When your drive is shown on the screen, select it, and click Next.
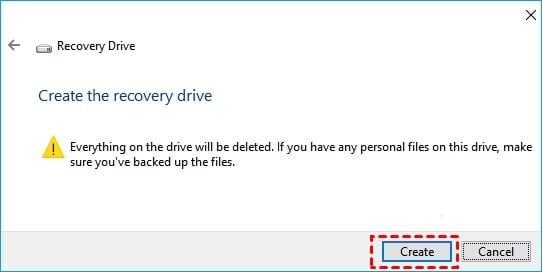
Step 5. Read the warning message and click Create to begin creating a Windows 11 recovery USB.
💡 Note: Microsoft releases periodic Windows updates for security and performance. To keep your recovery drive current, we recommend recreating it annually.
FAQs about Windows 11 recovery partition
1. Can I delete the recovery partition?
Yes, but it’s not recommended. Deleting it will prevent Windows from accessing WinRE. If deleted accidentally, you must recreate it manually or with third-party tools.
2. Is a recovery partition the same as a recovery drive?
No. A recovery partition is on your internal disk, while a recovery drive (USB) is external and can restore Windows even if your internal drive fails.
3. Do OEM recovery partitions work the same as Windows RE?
Not exactly. OEM partitions (Dell/HP/Lenovo) often include custom factory images and branded tools. The Windows 11 recovery partition only includes WinRE and basic system repair options.
Conclusion
To protect your system from crashes, failed updates, or boot issues, you can create a recovery partition in Windows 11 with the methods mentioned above. For beginners, AOMEI OneKey Recovery offers the easiest way to create a dedicated recovery partition with a one-click restore option. Alternatively, you can create a Windows 11 USB recovery drive for portable repair tools.
What's more, the recovery partition created by AOMEI OneKey Recovery is universal and you can use it on all brands of computers and all systems, which is very convenient. Download this software now to explore more useful features.
