
How to Copy Data from One Hard Drive to Another (Fast & Safe)
With 3 effective methods, you’ll learn how to copy data from one hard drive to another quickly, not limited to personal data. Scroll down to learn more!
By Ivy Updated on November 14, 2025
Why Copy Data From One Hard Drive to Another?
There are many practical reasons to transfer data from one hard drive to another whether you’re upgrading, backing up, or just managing storage more efficiently.
- Upgrade to a larger or faster drive for high performance, especially when your current drive runs out of space or starts slowing down.
- Backup data to a second drive as offline backups, preventing hardware failure or system issues.
- Move data from an old PC or external drive when you’re setting up a new computer or retiring an old one.
- Free up space to keep the primary drive lightweight and responsive, thereby improving overall performance and startup times.
What to Prepare Before Transferring Data
Before starting, it’s important to make sure both drives are properly connected, accessible, and ready for the data transfer process. Here are a few quick checks:
- Check drive type and connection: External drives are USB-connected drives, just connect them to a USB port of your computer. For internal drives, connect them through a USB enclosure or adapter, or directly connect to motherboards (with extra slots).

- Confirm free space on the target drive: Check the free space of the target drive in File Explorer to be sure sufficient capacity to copy files. If you’re moving large folders like photos, videos, or backups, leave a bit of extra space to prevent errors during copying.
Method 1: Copy Personal Data Manually (for Smaller Data)
Manual copying is simple and ideal for everyday users who just need to move personal data like photos, videos, music, and working documents rather than system or app data.
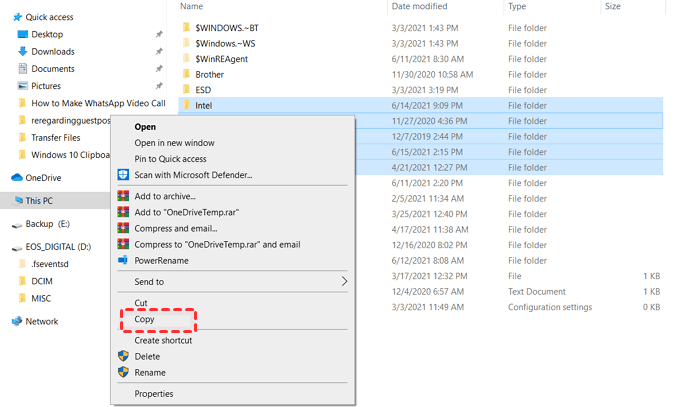
Step 1. Press Win + E to open File Explorer. Under This PC, find your source drive and click to open it.
Step 2. Browse through Documents, Pictures, Videos, Music, etc., and select files or folders to transfer. Hold Ctrl to select multiple items or Shift to select a range.
Step 3. Right-click on the selection and choose Copy. Then go to the second drive, right-click the blank space, and select Paste.
💡Tips:
❌Avoid moving system or program files manually, as this may cause system errors or corrupt programs.
✅ Always verify files on the target drive before deleting originals.
✅ For faster transfer speeds, use USB 3.0 or higher if you are copying one external hard drive to another.
Method 2: Sync Files From One Hard Drive to Another (for Large Files)
📖 Syncing copies only new or modified files to another drive to make them identical automatically - perfect for users who frequently update files or need continuous backup without manual copying. It’s a smarter and faster way to keep your data consistent across multiple drives.
AOMEI Backupper Standard is the best sync tool to copy data from one hard drive to another and works with all drive types, including HDDs/SSDs, external drives, USB drives, and even NAS devices.

- Free & Fast Sync: Synconly changed files each time to maximize transfer speed.
- Flexible Sync: Select multiple folders to sync at once, or batch-sync them.
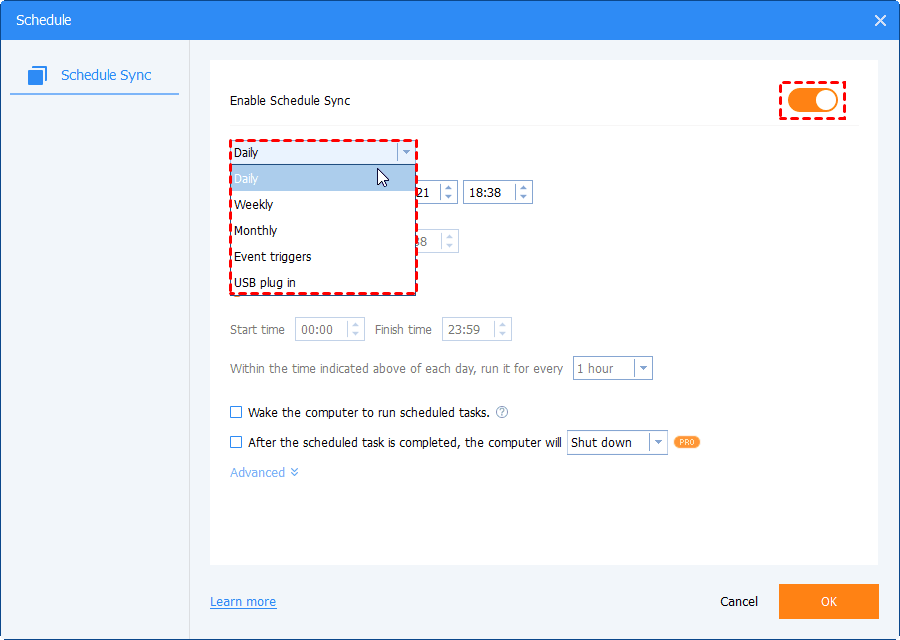
- Automatic Sync: Set up schedule sync based on daily, weekly, monthly, or event triggers, without intervention.
- Sync Deletions: Optionally sync the deletions from source directory to destination.
- Email Notification: Set it up before syncing to get timely alerts.
Step 1. Download and install AOMEI Backupper Standard on your computer. Open it and click Sync >Basic Sync.
Step 2. Click Select Source > This PC to access and select files on the source drive. Then, click the PC icon to select the target drive. Both local drives and external drives will appear under This PC.
Step 3. Click Schedule Sync to set a frequency - based on daily, weekly, monthly, or event triggers. You can also enable Email notifications for sync status. At last, click Start Sync to copy all selected files.
💡Tips:
✅ To enhance efficiency, please check the option to sync deletions from source directory to destination.
✅ To be safety, it’s suggested to verify the integrity of files in Options.
After the first sync, it will only sync modified or new files -saving both time and disk space. You can enjoy advanced features like Mirror Sync in the advanced edition.
Method 3: Backup or restore Your Files (for System Files and Apps)
Backup and Restore (Windows 7) integrates the feature to backup user data, or even enter system, including OS, system files, apps, etc., on one hard drive and restore to another drive.
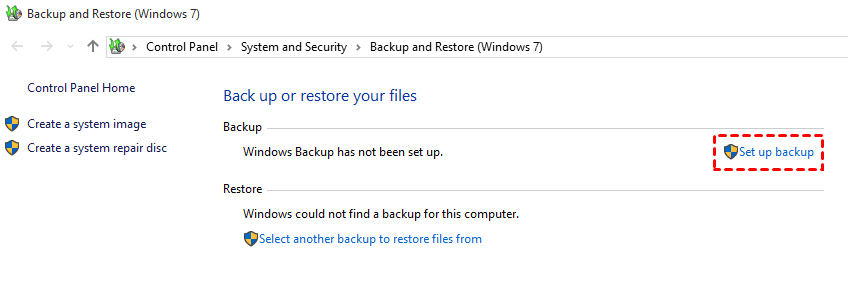
Step 1. Press Win + S and type control panel, then select Backup and Restore (Windows 7) from the search results.
Step 2. Under the Backup section, click Set up backup.
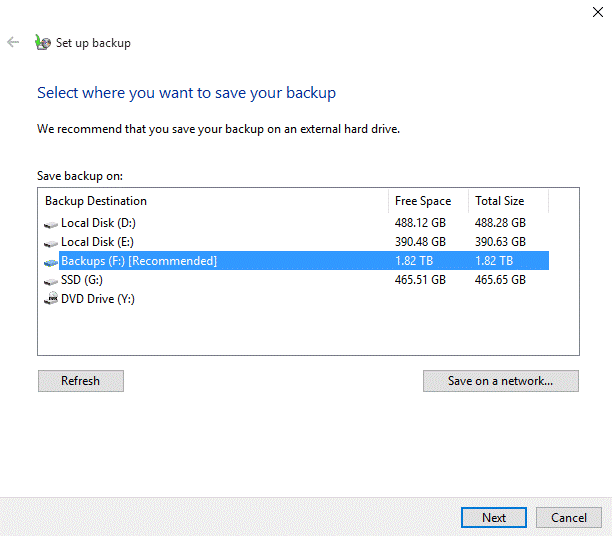
Step 3. It will automatically detect all available drives. Select a drive with enough space and click Next.
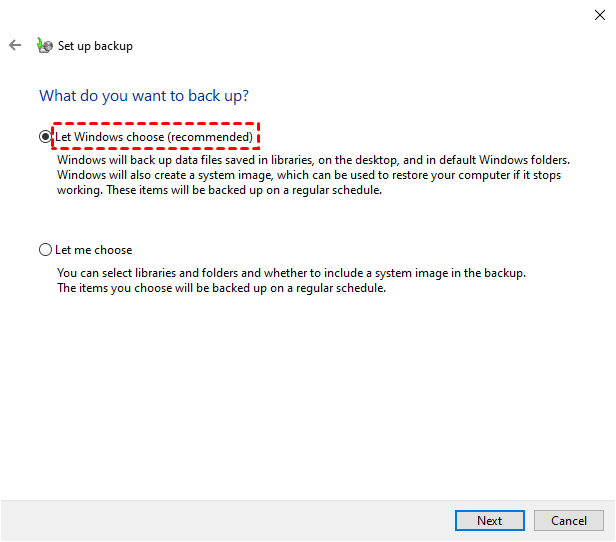
Step 4. Select Let Windows choose (Recommended). It will include both user data and system image.
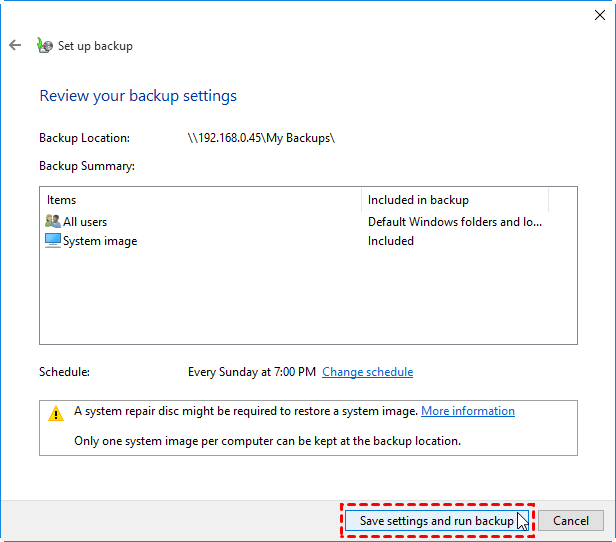
Step 5. Click Save settings and run backup to copy everything from one hard drive to another. You can then restore files or OS as needed.
⚠️Notes:
✅ Backup and Restore (Windows 7) allows you to restore files to new hard drive under the Restore section.
✅ You can only restore system image to new hard drivein the Windows recovery environment. It requires a system repair disc or recovery drive to access.
Final Thoughts
How to copy data from one hard drive to another? Here are 3 effective methods: Manual copying is perfect for one-time transfers -simple, quick, and requires no setup. File syncing, on the other hand, is ideal for automatic and continuous backups, ensuring both drives stay identical without manual effort.
For the best protection, combine file sync with full-image backups so you’re covered against hardware failure, deletion, or ransomware. AOMEI Backupper, which supports both options, is an excellent choice. You can also make use of built-in tools - Backup and Restore (Windows 7)
FAQs
1. What’s the difference between copying and syncing?
Copying is a one-time action -you manually copy contents of one hard drive to another. Syncing, on the other hand, keeps both drives identical automatically. When files change on the source drive, they’re updated (or deleted) on the destination drive, depending on the sync rules you set.
2. Can I use file sync as a long-term backup solution?
Not entirely. File sync is great for keeping two drives identical, but it doesn’t protect you from accidental deletions or ransomware because those changes also get synced. For true long-term protection, pair syncing with scheduled backups.
3. How often should I sync my drives?
That depends on how frequently your data changes. For active work files, set up real-time or daily syncs. For personal or archived data, a weekly or monthly schedule is usually enough.
4. Will syncing delete files from my backup drive?
It usually depends on the sync methods and whether to enable the option to sync deletions from source directory to destination. To prevent data loss, choose to backup files and keep multiple versions.
5. Can I sync between external USB drives or a NAS?
Absolutely. Tools like AOMEI Backupper support syncing between internal drives, external USB drives, SSDs, and NAS devices, making it easy to maintain up-to-date copies across different devices.
