
How to Backup Mail in Office 365 – Best 3 Ways
Safeguard your business from data loss. Learn how to backup Office 365 mail using proven methods and clear, step-by-step instructions.
By Lily Updated on November 28, 2025
Backing up your Microsoft 365 email isn’t just a good practice—it’s a necessity for long-term data protection. While Office 365 offers powerful cloud-based email services, it doesn’t fully shield your account from accidental deletion, cyberattacks, sync errors, or retention policy gaps.
That’s why many businesses and individual users turn to dedicated solutions to backup mail in Office 365. In this guide, you’ll learn the best methods to export or automate Office 365 mail backups.
👉 Method 1: Backup Mail in Office 365 Using Outlook Desktop App
👉 Method 2: Run O365 Email Backup with Microsoft 365 Backup
👉 Method 3: Backup Outlook 365 Emails via Powerful Third-Party Tool🔥
Method 1: Backup Mail in Office 365 Using Outlook Desktop App
If you want a simple and direct way to backup mail in Office 365, exporting your mailbox through the Outlook desktop app is one of the easiest options. This method saves your Office 365 emails, contacts, calendar items, and more into a local PST file, which you can store on your PC, external drive, or NAS for long-term protection.
Step 1. Launch Outlook (classic) on your PC. Make sure you are signed in using your Office 365 account.
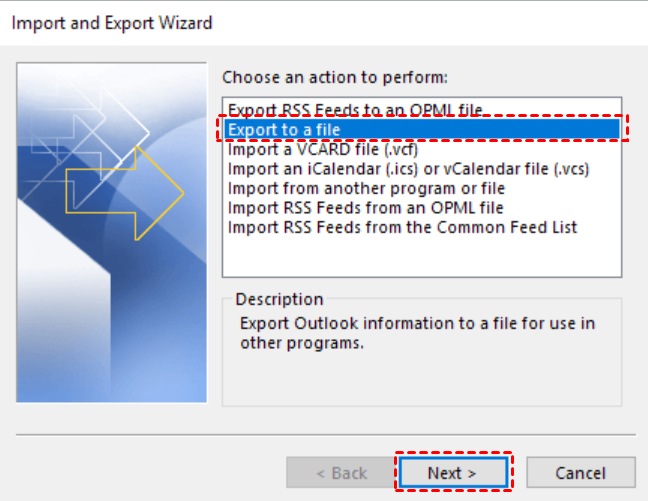
Step 2. Click File in the top-left corner. Select Open & Export > Import/Export to open the export wizard.
Step 3. In the wizard, choose Export to a file. Click Next.
Step 4. Select Outlook Data File (.pst), then hit Next.
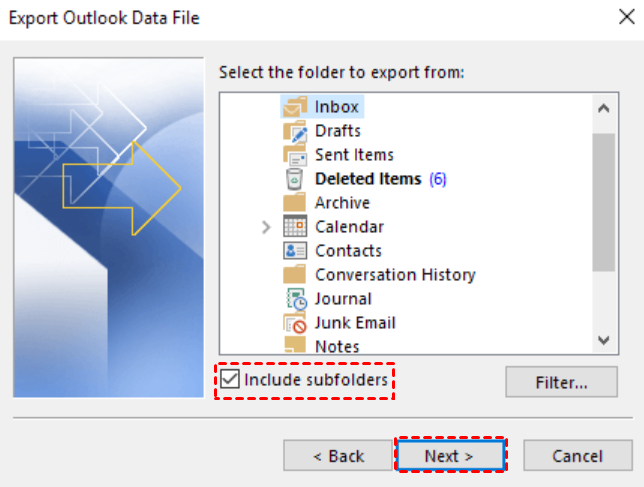
Step 5. Choose your Office 365 mailbox or a specific folder such as Inbox, Sent Items, or any custom folders. Check Include subfolders to ensure a complete backup and click Next.
Step 6. Click Browse and select a storage path (e.g., a local disk, external USB drive, or Synology or QNAP NAS folder). Name the file and click Finish.
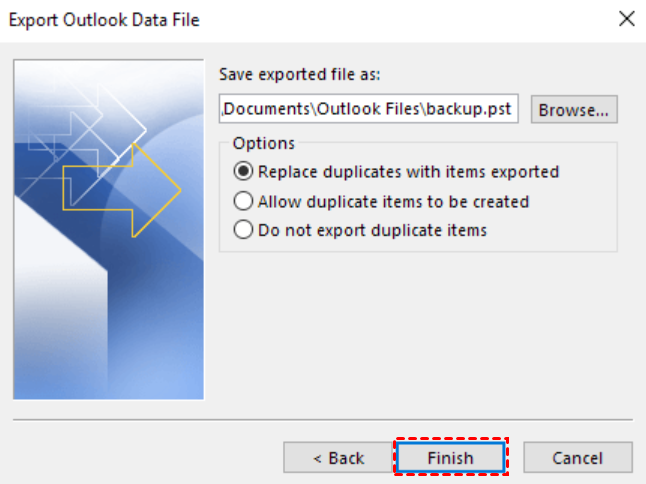
Step 7. You can set a password for your PST to prevent unauthorized access. If you don’t want one, simply leave the password field blank and continue.
Method 2: Run O365 Email Backup with Microsoft 365 Backup
Microsoft introduced Microsoft 365 Backup as part of its modern data protection suite, giving organizations a native way to protect Exchange Online, SharePoint, and OneDrive data. This cloud-to-cloud service allows you to backup mail in Office 365 automatically without relying on manual exports or local PST files.
Step 1. Set up billing and turn on Microsoft 365 Backup
To set up pay-as-you-go billing, you need to have this information:
- Valid Azure subscription. An Azure subscription provides a logical container for your resources. Each Azure resource is associated with only one subscription.
- Resource group. A resource group provides a logical grouping of resources within an Azure subscription.
- Region. The region in which you want to register the service.
- Owner or contributor. Name of an owner or contributor role on the Azure subscription.
Once you have the information on this list, you can start to set up pay-as-you-go billing and enable Microsoft 365 Backup.
1. In the Microsoft 365 admin center, select Setup, and then view the Billing and licenses section.
2. In the Billing and licenses section, select Activate pay-as-you-go services. Then select Get started.
3. On the Pay-as-you-go services page, on the Billing tab, select Syntex services.
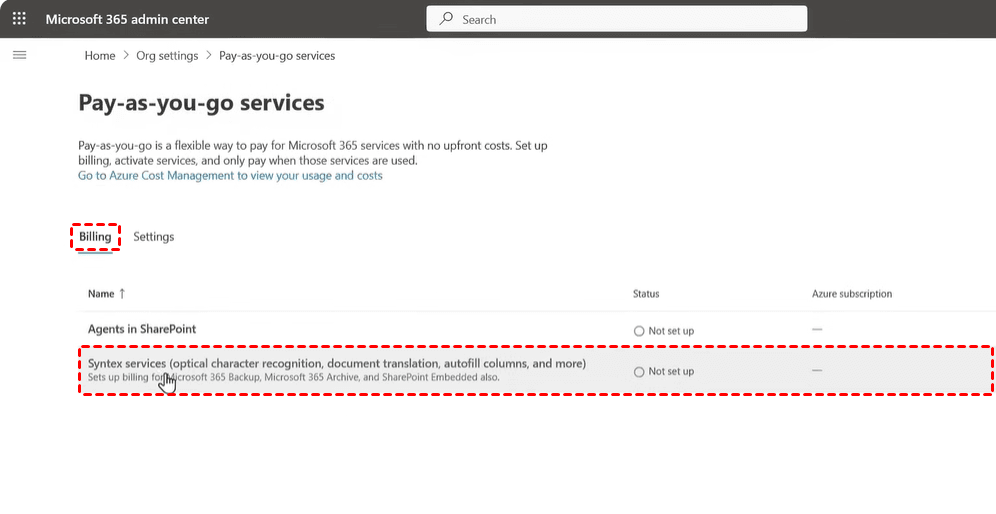
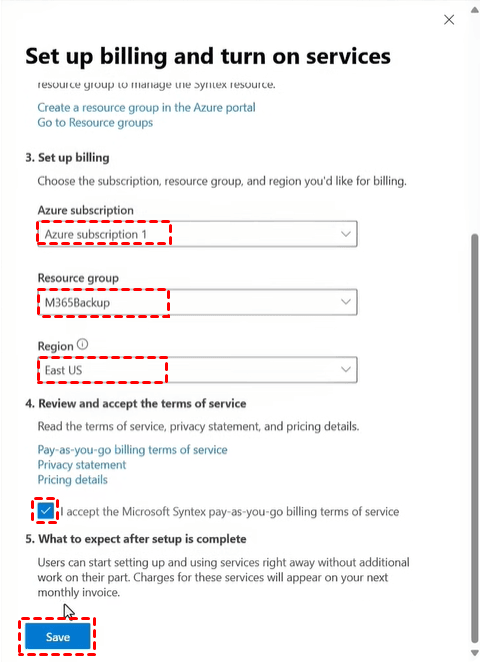
4. On the Set up billing and turn on services panel, select your Azure subscription, resource group, and region. Review and accept the terms of service, and then select Save.
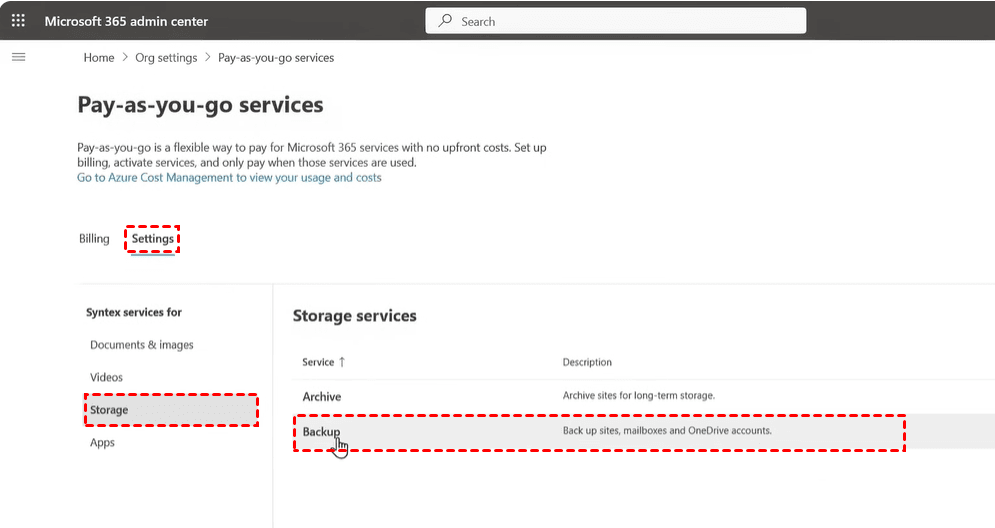
5. On the Pay-as-you-go services page, on the Settings tab, select Storage > Backup.
6. On the Backup panel, select Turn on.
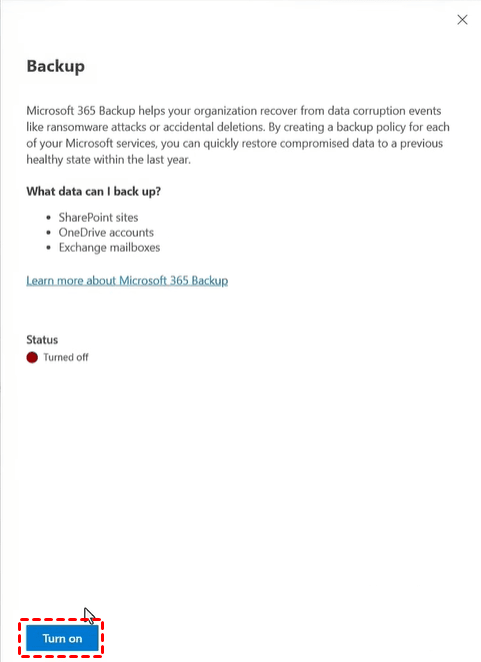
7. Review the applicable terms of service for Microsoft 365, and then select Save.
Step 2. Create an Exchange backup policy
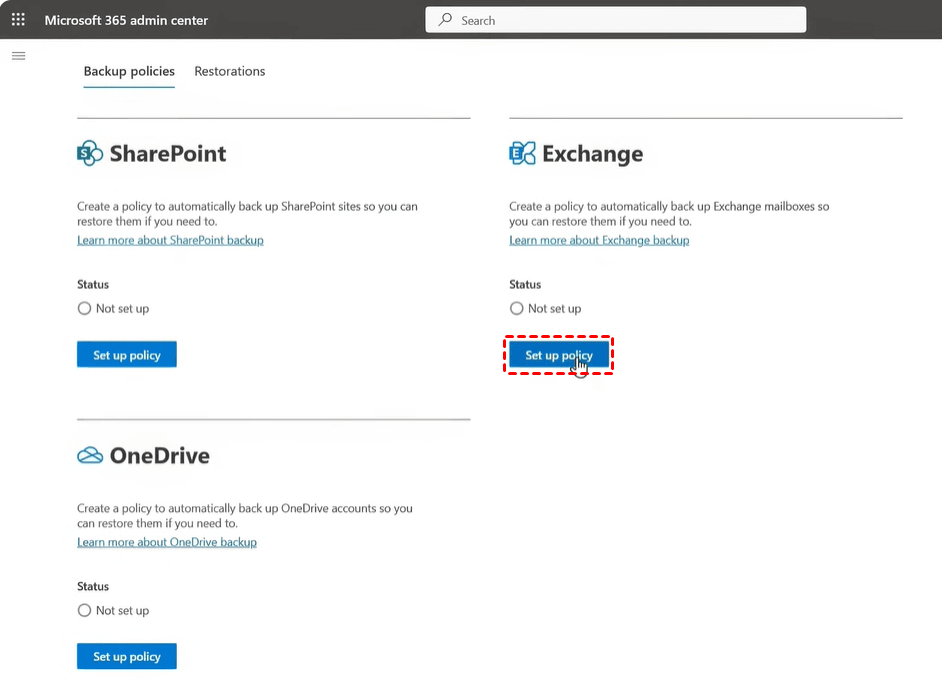
1. In the Microsoft 365 admin center, select Settings > Microsoft 365 Backup from the list of products.
2. On the Microsoft 365 Backup page, in the Exchange section, select Set up policy.
3. On the Overview page, review the backup policy attributes for Exchange, and then select Next.
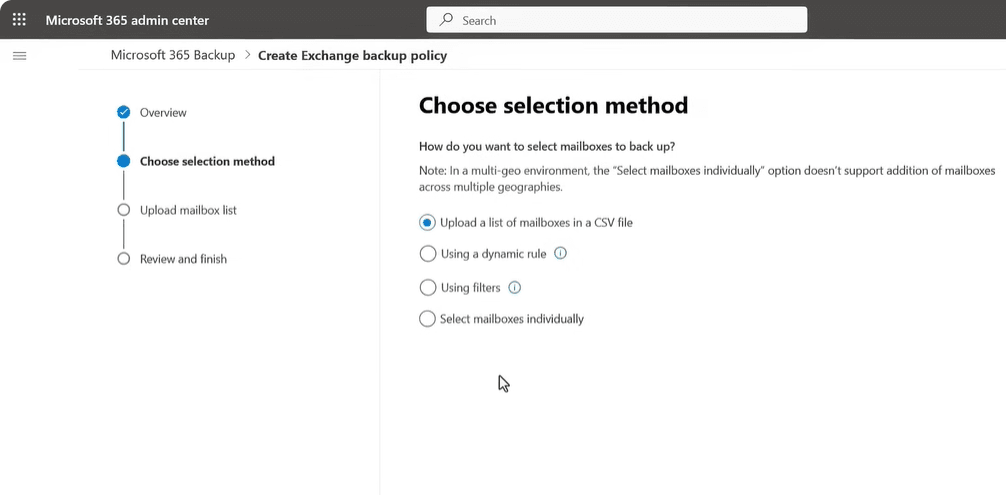
4. On the Choose selection method page, you can select shared or user mailboxes using any of the four available methods.
- Upload a list of mailboxes in a CSV file: Upload a list of accounts to back up via a CSV file.
- Using a dynamic rule: With dynamic rules, any changes to membership in the selected distribution lists and security groups are automatically reevaluated daily, ensuring the backup policy reflects those membership changes regularly.
- Using filters: The distribution list and security group are flattened when added, meaning the policy doesn't update dynamically if the groups or distribution list are updated later.
- Select mailboxes individually: Search and select mailboxes you want to add to a backup policy.
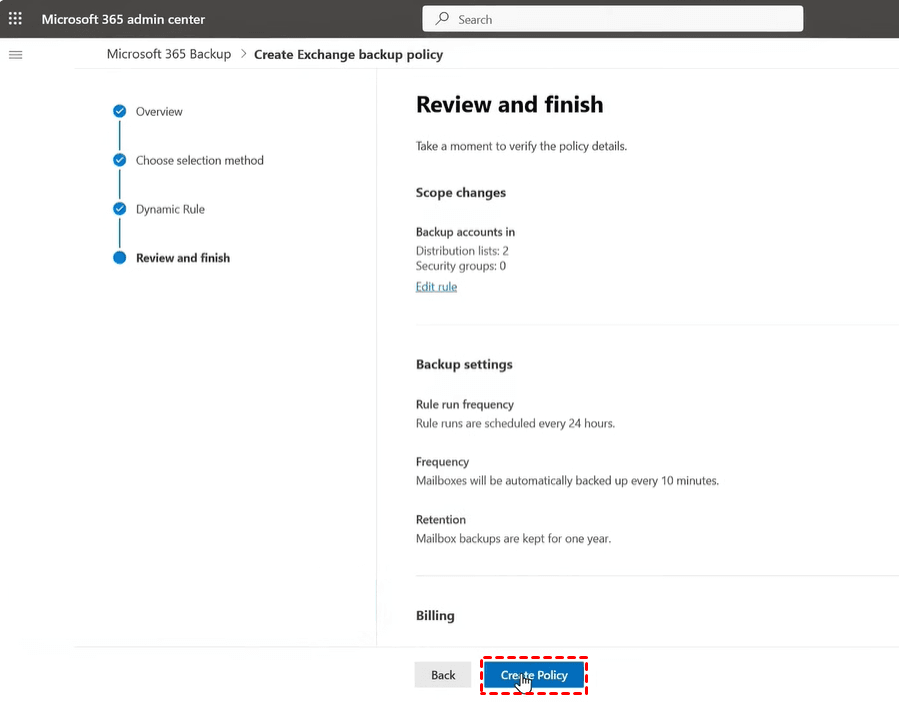
5. On the Review and finish page, review the information to make sure it's how you want it, and then select Create policy. The backup policy for Exchange is created.
Method 3: Backup Outlook 365 Emails via Powerful Third-Party Tool
If you want a flexible, automated, and long-term way to back up Outlook 365 data, AOMEI Backupper Professional is a solid choice.

- Flexible Backup Destinations: Store backups locally, on network drives (NAS), or seamlessly to cloud services like Google Drive, OneDrive, and Dropbox.
- Automated Scheduling: Set it and forget it. Configure automatic backups on a daily, weekly, or monthly schedule to ensure continuous data protection.
- Efficient Backup Methods: Save time and storage space with Incremental and Differential backups, which only capture changes made since the last backup.
- Precision Restoration: Preview emails directly within the restore window to ensure you recover exactly what you need, quickly and accurately.
Download AOMEI Backupper and follow the steps below to backup Outlook 365 emails:
Step 1. Add your Microsoft 365 email account in Outlook desktop app.
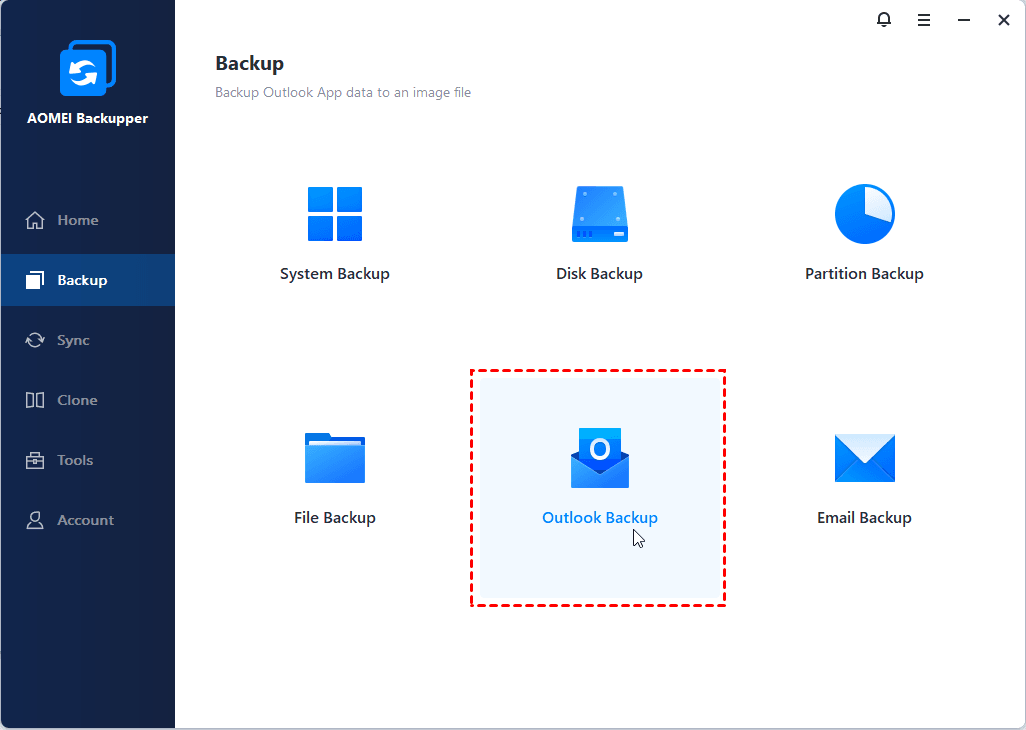
Step 2. Install and open AOMEI Backupper. Then, click Backup and select Outlook Backup.
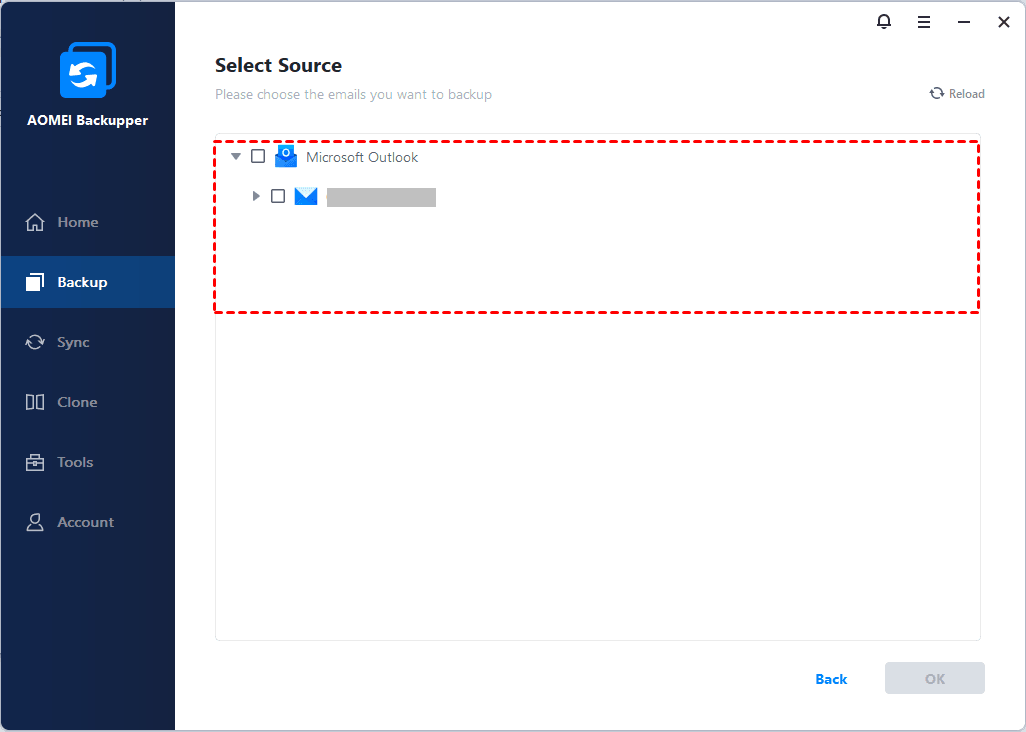
Step 3. You can give this backup task any name you like. Click Select Source to select the email folder(s) under the target email account as the backup source.
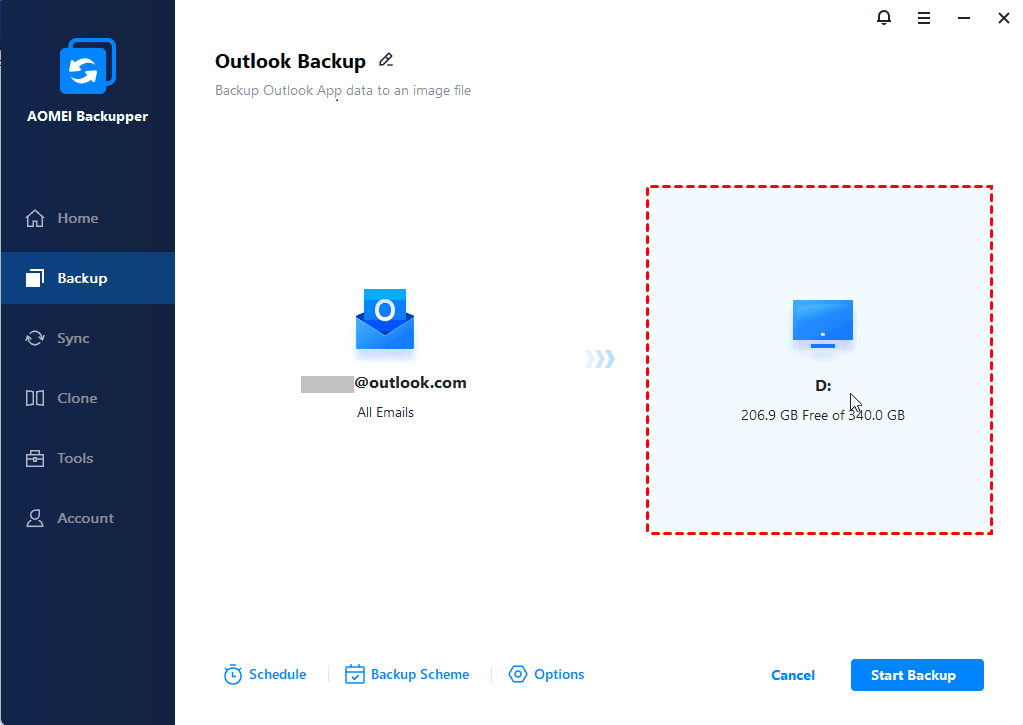
Step 4. Choose a destination path to save the backup image. It can be a local drive, external hard drive, NAS, etc.
Step 5. Configure your backup task as necessary.
- Schedule: Set frequency (One Time/Daily/Weekly/Monthly/Event Triggers).
- Backup Scheme: Choose Incremental Backup (default) or Differential Backup to save space and time. You can also Enable Automatic Backup Cleanup.
- Options: Enable compression, email notification, or password protection.

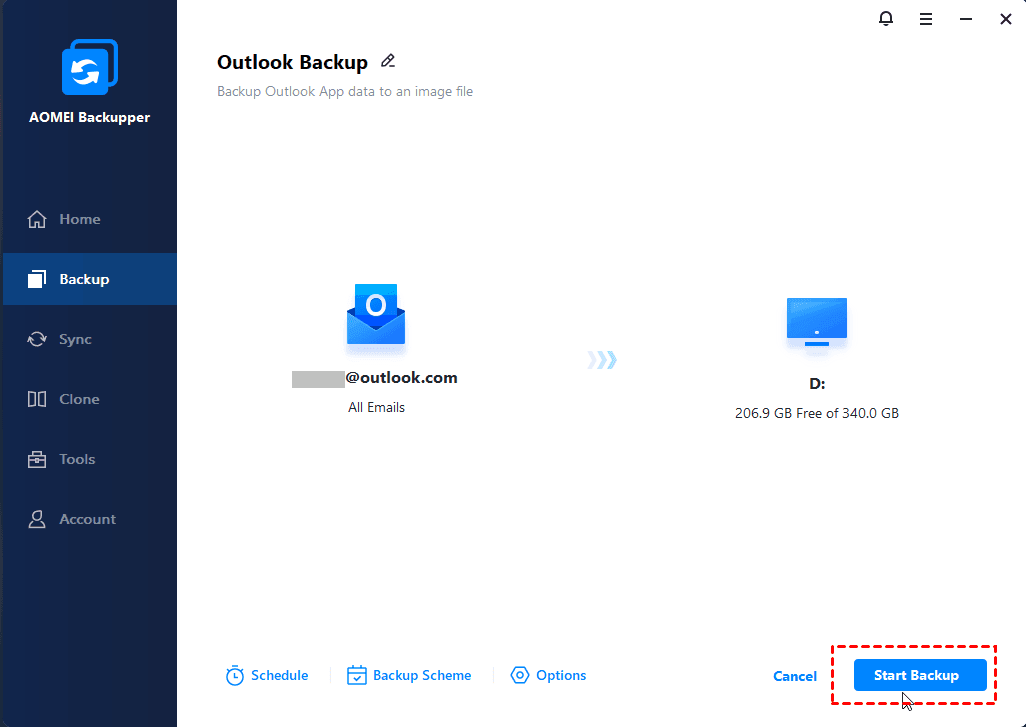
Step 6. Confirm your operation and click Start Backup.
FAQs about Microsoft 365 Email Backup
1. Why do I need to back up Office 365 emails if they’re already in the cloud?
Office 365 data is still vulnerable to:
- Accidental or malicious deletion
- Ransomware or malware
- Sync errors and mailbox corruption
- Limited retention policies
A separate backup ensures your emails remain recoverable for years—not just weeks or months.
2. Does Microsoft 365 Backup cost extra?
Availability depends on your Microsoft 365 plan. Some tenants may require additional licensing or enrollment in Microsoft’s advanced data protection services.
3. Can I back up multiple Office 365 accounts at once?
Yes. Microsoft 365 Backup and many third-party tools support multi-user backups. Manual Outlook PST exports, however, must be done per mailbox.
Summary
This page offers you 3 effective methods to backup mail in Office 365. You can choose manual exports through Outlook, automated cloud-to-cloud protection with Microsoft 365 Backup, or powerful Outlook backup software AOMEI Backupper as per your need.
Actually, AOMEI Backupper is not limited to email backup. You can also use it to create bare metal recovery backup, disk backup, and file backup, etc. Try it now to discover more!
