
Acronis Clone Failed in Windows 10/11? Try Quick Fixes Here!
Running into the Acronis clone failed error can be frustrating. In this guide, we break down the most common reasons why cloning with Acronis True Image fails and offers step-by-step fixes.
By Lily Updated on May 23, 2025
Common Scenarios Where Acronis Clone Disk Failed
When the Acronis clone disk failed error pops up, it usually doesn’t come out of nowhere. In most cases, the issue is tied to a handful of common scenarios that trip up the cloning process. Let’s break them down:
- Cloning to a Smaller Target Drive: If the target drive is smaller than the source, Acronis may fail unless partitions are resized manually during the cloning process.
- Bad Sectors or Corrupted Data: A damaged source disk with bad sectors or corrupted files can interrupt the cloning operation entirely.
- Partition Style Mismatch (MBR vs GPT): Cloning between drives with different partition styles can cause boot issues or failure unless properly configured.
- Cloning a Live System (Hot Clone): Cloning while Windows is running may lead to file conflicts or an incomplete clone due to active system files.
- Issues with USB Adapters or Enclosures: External drives connected via USB may not be recognized properly or may experience unstable transfer speeds.
- Software Conflicts and Background Tasks: Antivirus tools, disk utilities, or active background apps can block Acronis from accessing the disk fully.
Quickly fix Acronis clone failed with the best alternative cloning tool.
How to Fix Acronis Clone Disk Operation Failed
No matter what scenario you encounter, you can find a way to fix Acronis True Image failed to clone below:
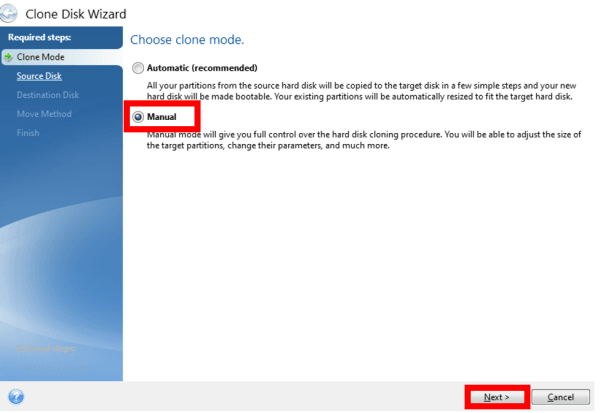
Fix 1: Switch to Manual Cloning Mode
Automatic mode can lead to partition size issues, especially when cloning to a smaller or differently sized drive. Here’s how to switch to manual cloning mode:
1. Open Acronis True Image and select Tools > Clone Disk.
2. Choose Manual instead of Automatic when prompted.
3. Select your source disk (the one you want to clone) and destination disk (where the clone will go).
4. Select a disk usage type according to your situation. Here I choose To replace a disk on this machine.
5. Select the Proportional move method. It will change the size of the original partitions to fit the new hard drive.
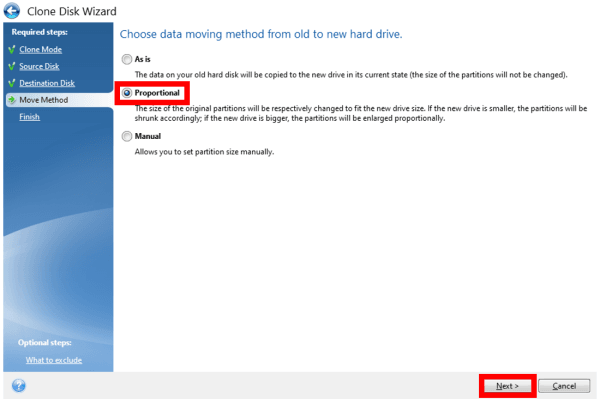
6. (Optional) On the Summary page, click What to exclude on the bottom left corner to exclude certain files and folders from being cloned.
7. Review the summary for accuracy. Then click Proceed.
Fix 2: Run CHKDSK and Check Disk Health
Corrupted data or bad sectors on the source drive are one of the most common causes of cloning failures. Follow these steps to fix it:
1. Open Command Prompt as Administrator.
2. Type chkdsk C: /f /r /x (replace C: with your source drive letter) and press Enter.
3. Type Y when prompted and press Enter.
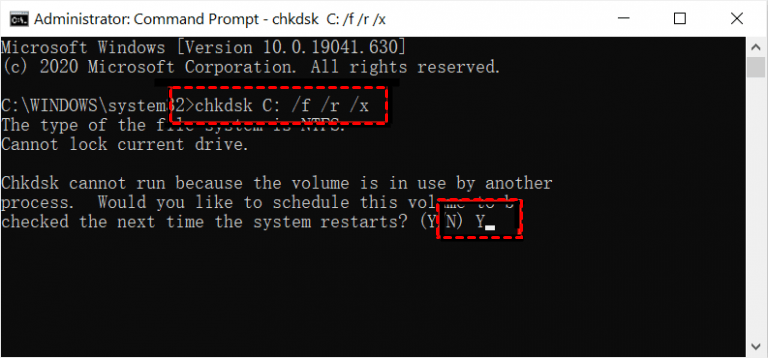
4. Restart your computer and let the system scan and fix any errors before trying the clone again.
Fix 3: Match the Partition Styles
A mismatch between MBR and GPT formats can cause cloned drives to not boot or clone at all. Follow these steps to match the partition styles:
1. Press Windows + X and select Disk Management.
2. Right-click the source and destination drives > Properties > Volumes tab to see the partition style. It will show MBR or GPT.
3. Reformat the destination disk if it has a different partition style than the source disk.
3.1. Open Command Prompt as Administrator.
3.2. Type the following commands and press Enter after each line:
- diskpart
- list disk
- select disk X (replace X with your target disk number)
- clean (this will erase the disk, so backup your data first)
- convert mbr (to convert to MBR) or convert gpt (to convert to GPT)
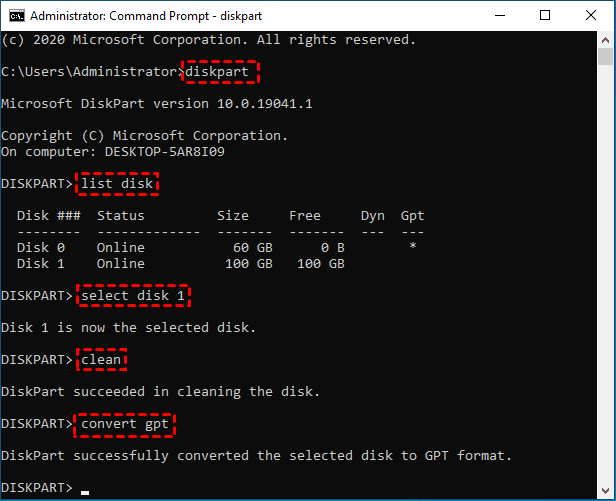
4. Exit Command Prompt and restart the Acronis cloning process.
Fix 4: Use the Acronis Bootable Rescue Media
Cloning from within Windows (hot cloning) may trigger failures due to locked files or services running in the background. Follow the instructions below to fix it:
1. Open Acronis True Image and select Tools > Rescue Media Builder.
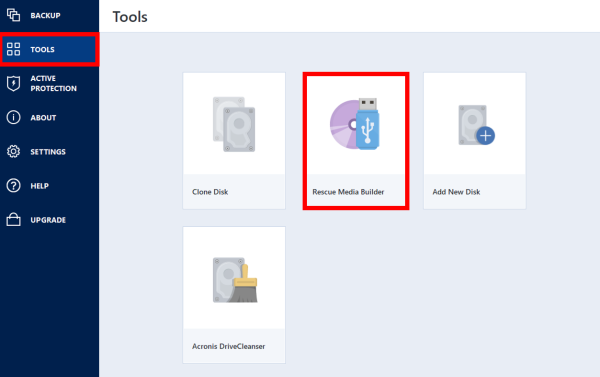
2. Choose Simple mode and select your USB flash drive. Let Acronis create the bootable USB.
3. Restart and enter the BIOS/UEFI. Set the USB drive as the primary boot device.
4. Your PC will boot into Acronis Rescue Media. Once Acronis loads, choose Clone Disk. Follow the wizard to clone your disk again.
Fix 5: Use a Direct SATA Connection
If your Acronis clone failed while using a USB-to-SATA adapter or external enclosure, try to use a direct SATA connection:
1. Turn off your computer and unplug it from power.
2. Open the case and locate an available SATA data port on the motherboard and a SATA power connector from the power supply.
3. Plug the destination drive into both the data and power ports.
4. Boot your PC and launch Acronis to begin the clone.
Note: On laptops, this may not be possible—consider using a SATA dock if needed.
Fix 6: Disable Background Programs and Antivirus
When a clone fails unexpectedly, background apps and antivirus software are often the silent culprits. Before you run the Acronis clone operation, please temporarily disable:
- Real-time antivirus protection (e.g., Windows Defender, Norton, McAfee).
- Firewall software if it includes file system or disk monitoring.
- Cloud sync apps like OneDrive, Dropbox, or Google Drive.
- System optimization tools (like CCleaner or IObit).
- Automatic updates or disk scan schedulers.
Bonus: Clone Disk with Best Acronis True Image Alternative
If you’ve tried everything and the Acronis clone failed message keeps showing up, it might be time to look beyond Acronis altogether. A solid alternative? AOMEI Cloner. It’s one of the most reliable, user-friendly, and success-proof cloning tools available—perfect for both beginners and power users.

- It supports MBR & GPT cloning without converting the partition style first.
- It runs intelligent clone by default, so you can successfully clone hard disk with bad sectors.
- It allows hot clone. There’s no need to reboot or exit Windows to perform disk clone.
- It offers SSD alignment optimization to ensure better performance and lifespan.
Download AOMEI Cloner now to try it out!
To clone your hard drive with AOMEI Cloner, click Clone > Disk Clone and follow the wizard to complete the task. If you want to migrate only the OS, choose System Clone instead.

To Sum Up
Cloning your hard drive should be simple—but if you’re facing the Acronis clone failed error, you’re not alone. This guide walked you through the most common scenarios and practical fixes like switching to manual mode, using Acronis bootable media, and connecting drives via SATA.
If all else fails, you may use AOMEI Cloner as a reliable alternative. It simplifies the cloning process and offers more advanced cloning features. What’s more, you can use AOMEI Cloner to create bootable USB drive for unbootable cloning. Just give it a shot!
