




How to View Photos in iTunes Backup without Restoring iPhone
Can't view photos in iTunes backup directly? Here are 3 practical approaches: check backup existence, restore to iPhone, or extract with a viewer, so you can choose what fits your situation.

By Ivy Updated on August 6, 2026


"I got a new iPhone and need to get the photos from the iTunes backup, but I couldn't find the button to view or restore photos. It just keeps saying iTunes would erase this iPhone. I don't want that. Anyone could tell me how to find or view photos in iTunes backup?"
- Question from an iPhone user
Sound familiar? You're not alone. This is one of the most common frustrations iPhone users face with iTunes backups.
iTunes doesn't let you view photos inside a backup as if it were a normal folder. Apple intentionally stores backup files in an encrypted, unreadable format to protect your data. You can't just open the backup folder and browse photos like you would in File Explorer.
If you try the "restore" route just to check what's inside? iTunes will wipe your iPhone first, then replace everything with the backup data. That's a scary prospect if all you want is to find one photo.
What "view" actually means in this context:
-
Basic check: confirming a backup exists, its date, and size (Apple tools can do this)
-
Photo preview: seeing thumbnails or actual photos inside the backup
-
Photo extraction: saving specific photos from the backup to your computer
Choose the Right Way to Access Your Backup Photos
Before diving into specific methods, here's a quick decision guide:
| 👇 What you want to do | 🎯Best method | 💡 Why |
|---|---|---|
| Check if a backup exists and when it was made | Method 1: Check for existing iTunes backup | Apple tools show backup date, size, and device name |
| See actual photos inside the backup | Method 3: Try iTunes backup viewer | Only a backup viewer can decrypt and show the content |
| Extract specific photos without touching your iPhone | Method 3: Try iTunes backup viewer | Extractors let you preview and select individual files |
| Restore everything to a new iPhone | Method 2: Restore backup from Apple devices | Official restore is the most reliable way to transfer a full device state |
Where Is iTunes Backup Stored on Your Windows PC?
Before you can view or manage your backups, you need to know where they're stored. The location depends on which Apple app you're using.
👉 For Apple Devices (recommended) or iTunes (from Microsoft Store):
%USERPROFILE%\Apple\MobileSync\Backup\
👉 If you're using the traditional iTunes version downloaded from Apple Support:
%AppData%\Apple Computer\MobileSync\Backup\
To quickly access these folders, press Win + R to open the Run dialog, paste the appropriate path, and press Enter. Once you locate the Backup folder, you'll see folders with long, random alphanumeric names. Each one represents a backup of a specific device.
However, even when you find these folders, you can't view the photos directly, the files are encrypted and stored in an unreadable format. You'll need one of the methods below to actually see what's inside.
Method 1. Check Whether the iTunes Backup Exists
If you just need to confirm that a backup exists and you don't need to see the actual photos yet, this method is the safest starting point.
-
Shows you backup date, size, and device name
-
Lets you archive, delete, or locate backups
-
Does NOT let you preview or extract individual photos
How to check your iTunes backups using Apple Devices:
Step 1. Connect the iPhone to your Windows PC and open the Apple Devices App (for Windows 10 or 11).
Step 2. Click your device icon in the sidebar. Under the Backups section, click Manage Backups. You'll see a list of all backups stored on your computer, along with dates and sizes.
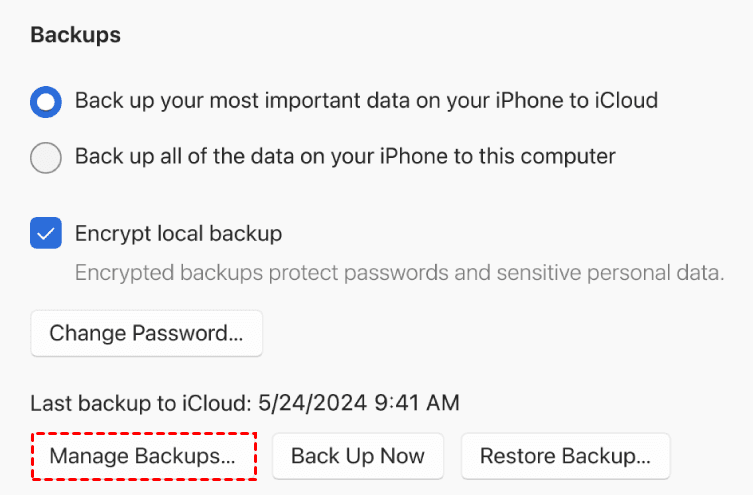
Step 3. Right-click a backup to Archive, Delete, or Show in Explorer to locate the actual backup folder on your computer.
Method 2. Restore iTunes Backup to an iPhone
If you've confirmed that a backup exists and you're ready to restore everything, for example, when setting up a new iPhone, using Apple Devices or iTunes to restore backup is the official Apple method.
How to restore everything from iTunes backup:
Step 1. Open the Apple Devices App or iTunes. Connect your iPhone to your PC with a USB cable and click Trust when prompted..
Step 2. Click your device icon. Then, go to General (Apple Devices) or Summary (iTunes), click Restore Backup.

Step 3. Select the backup you want and click Restore. If the backup is encrypted, enter the password.
Wait for the process to complete. Do not disconnect your iPhone during the restore.
You're restoring everything or nothing. You can't select just photos. If you only need a few pictures, try Method 3 instead.
Method 3. Preview and Extract Photos with an iTunes Backup Viewer
If you want to see what's actually inside an iTunes backup and extract specific photos without wiping your iPhone, you'll need a dedicated backup viewer.
Here's how to do it using iMyFone iTransor Lite as an example :
Step 1. Download and install iMyFone iTransor Lite on your PC. Connect your iPhone via USB if required.
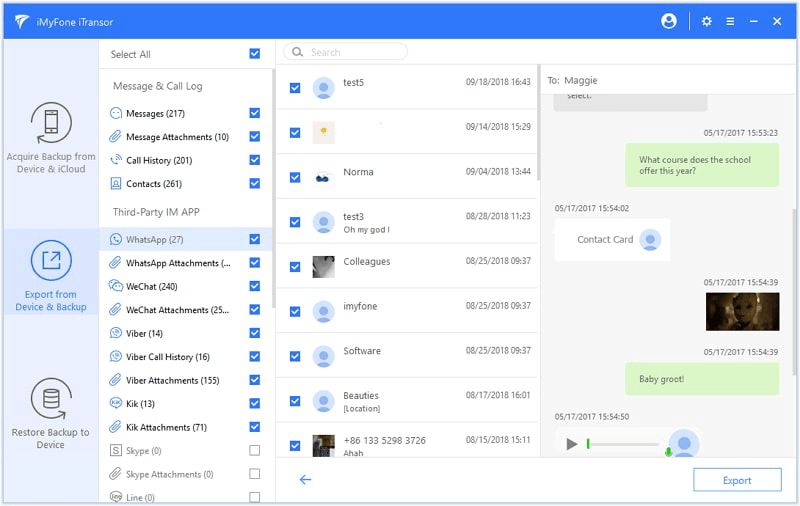
Step 2. Launch the software, click Extract Data from Backup. The tool will automatically scan your computer and display all iTunes backups it finds.
Step 3. Select the backup you want to view and specify the Photos data type for previewing. You can choose to export photos to your computer.
How the Methods Compare
| Method 1: Check for iTunes Backup | Method 2: Restore everything to iPhone | Method 3: Backup Viewer | |
|---|---|---|---|
| Can you preview photos? | No | No (until after restore) | Yes |
| Will it erase your iPhone? | No | Yes | No |
| Can you extract only photos? | No | No | Yes |
| 🔥 Best for... | Confirming a backup exists | Full device migration | Finding and extracting specific photos |
| Cost | Free (Apple built-in) | Free (Apple built-in) | Varies |
Beyond iTunes: Backup, Preview, and Choose What to Save
The 3 methods above all assume you're working with an existing iTunes backup. But what if you could avoid these workarounds altogether?
AOMEI FoneBackup takes a different approach: you can preview photos before backing up, choose specific files to save, and view your backup contents anytime without needing a separate viewer tool.
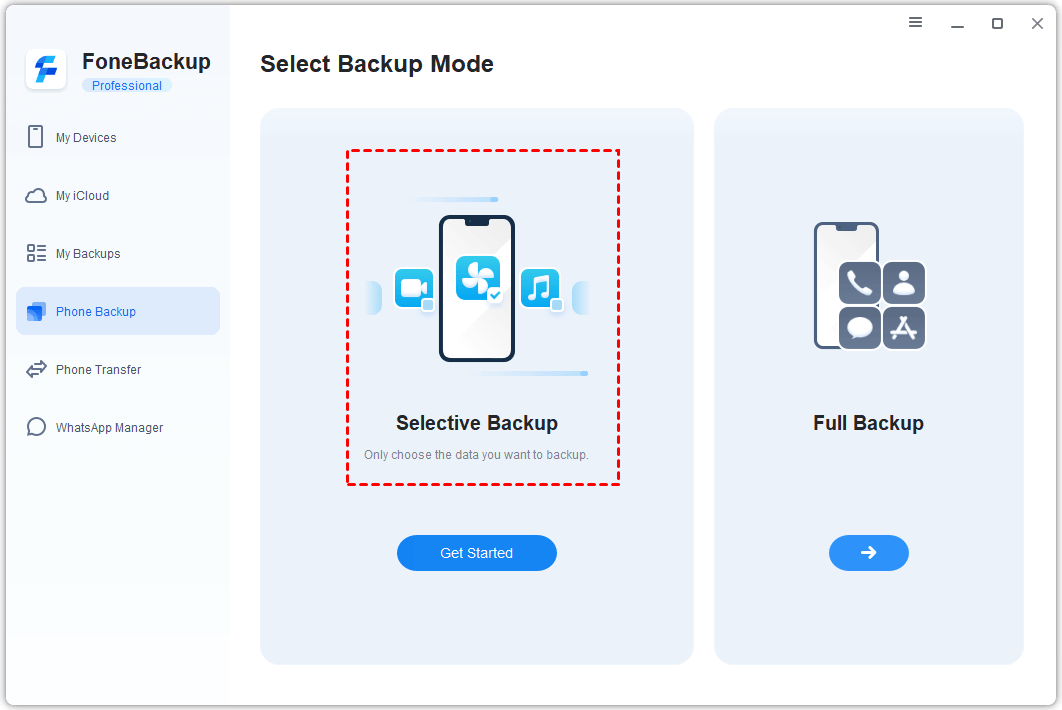
Here's how it compares to iTunes:
| AOMEI FoneBackup | iTunes | |
|---|---|---|
| Preview before backup | Yes | No |
| Select specific files to back up | Yes | No |
| View backup contents anytime | Yes | No |
| Restore without wiping iPhone | Yes (Selective backup) | No |
| Choose storage location | Any folder on PC or external drive | System drive only |
| Platform | Windows only | Primarily for Windows |
When to consider AOMEI FoneBackup:
-
You want to preview photos before backing them up
-
You prefer to select specific files rather than backing up everything
-
You want to store backups on an external drive or NAS
-
You want to restore specific items without wiping iPhone first
When to stick with iTunes:
-
You're comfortable with iTunes' all-or-nothing backup approach
-
You only need to back up occasionally and don't mind the limitations
Need detailed steps? Visit our complete guide on how to backup iPhone to external hard drive, including AOMEI FoneBackup, iTunes, and archive methods.
FAQs
Q: Can I open an iTunes backup like a normal folder?
No. iTunes backup files are stored in an encrypted, proprietary format that's not human-readable. This is intentional—Apple designed it this way to protect your data.
Q: Does an iTunes backup include all my iPhone photos?
Not always. iTunes backs up photos from your Camera Roll, but does not back up photos that were synced to iCloud Photos. If you have iCloud Photos enabled, your photos are stored in iCloud, not in the local iTunes backup.
Q: Can I view an encrypted backup without the password?
No. Most backup viewers require the password to decrypt the content. Without it, the backup cannot be accessed.
Q: Can I extract only photos without restoring the entire backup?
Yes! That's exactly what backup viewers are designed for. They let you preview and select specific photos to export without touching your iPhone's current data.
Q: How do Mac users manage or view iPhone backups?
Mac users can manage iPhone backups through Finder (macOS Catalina and later).
- Connect your iPhone with a USB cable. Then, open Finder, select your device from the sidebar.
- Click the General tab, then Manage Backups to see all backups stored on your Mac.
For viewing actual photos inside a backup, Mac users can use third-party backup viewers.
Final Thoughts
iTunes doesn't let you view backup photos directly. For most Windows users who simply want to check or extract specific photos, a reliable backup viewer is the most practical solution.
That said, there are two exceptions:
-
To confirm that a backup exists, use Method 1. It's quick, free, and built into Apple Devices or iTunes, but it won't show you actual photos.
-
Setting up a new iPhone and want to transfer everything, use Method 2. Note it will erase your destination device first.
And if you're tired of dealing with iTunes backup limitations altogether, consider a backup tool that lets you preview and select files before backing them up, so you never have to guess what's inside again. Try AOMEI FoneBackup now!

 as a preferred
source on Google
as a preferred
source on Google