



How to Transfer Photos from iPhone to Computer Easily
Compare 4 practical ways to transfer photos from iPhone to computer. Choose between selective transfer, built-in USB import, manual DCIM copying, and wireless iCloud access.

By Ivy Updated on August 7, 2026


Your iPhone is running low on storage, but thousands of photos and videos are still on the device. You want to move them to your Windows computer without missing files or dealing with repeated import failures.
Several practical methods are available. Use AOMEI FoneBackup if you want to preview and select photos before transferring them. Windows Photos offers a built-in importer, while File Explorer lets you copy DCIM files manually. For a wireless option, you can access the library through iCloud Photos.
Which Way Should You Use to Transfer Photos from iPhone to Computer?
Choose a method based on the number of photos, your preferred connection, and how much control you need.
| 💭 Your situation | 🎯 Use this method | 💡 Why it fits | ⚠️ Keep in mind |
|---|---|---|---|
| Select specific photos and choose a PC folder | AOMEI FoneBackup | Provides a guided selection and transfer workflow | Designed for Windows-based transfers |
| Import photos with a Windows tool | Windows Photos | Offers a familiar built-in import experience | The iPhone must be detected through USB |
| Copy camera files manually | File Explorer | Gives you direct access to DCIM folders | iPhone album organization is not preserved |
| Access photos without a USB cable | iCloud Photos | Makes the synced library available online | Requires iCloud storage and an internet connection |
Method 1. Transfer Photos from iPhone to PC with AOMEI FoneBackup
👍 Best for: Selecting individual photos or videos and controlling where they are stored on a Windows PC.
If you need more control than a standard Windows import provides, AOMEI FoneBackup offers a guided iPhone-to-PC transfer workflow.
 AOMEI FoneBackup
- 3 transfer modes: iPhone to PC, PC to iPhone, iPhone to iPhone. No iCloud or Apple ID needed.
- Selective Transfer: Preview the available photos and choose specific items you want to transfer - No WiFi, Apple ID required.
- Fast and Lossless: Transfer 1,000+ photos in about 10 minutes. No compression, no resolution loss.
- Wide image format support: Work with JPG, HEIC, PNG, RAW, and more.
- Flexible destination: Directly transfer photos to a PC folder or drive, external drive, USB stick, NAS, etc.
- Free boundary: Transfer up to 30 files per day at no cost.
- Wide compatibility: Support all iOS versions and iPhone models, including iPhone 17/16/15, iPad, and iPod.
 100% Secure
Step 1. Open AOMEI FoneBackup after installing. Connect the iPhone to your computer with a USB cable and tap Trust when prompted.
Step 2. Select Phone Transfer in the left panel. Choose iPhone to PC, then click Get Started.
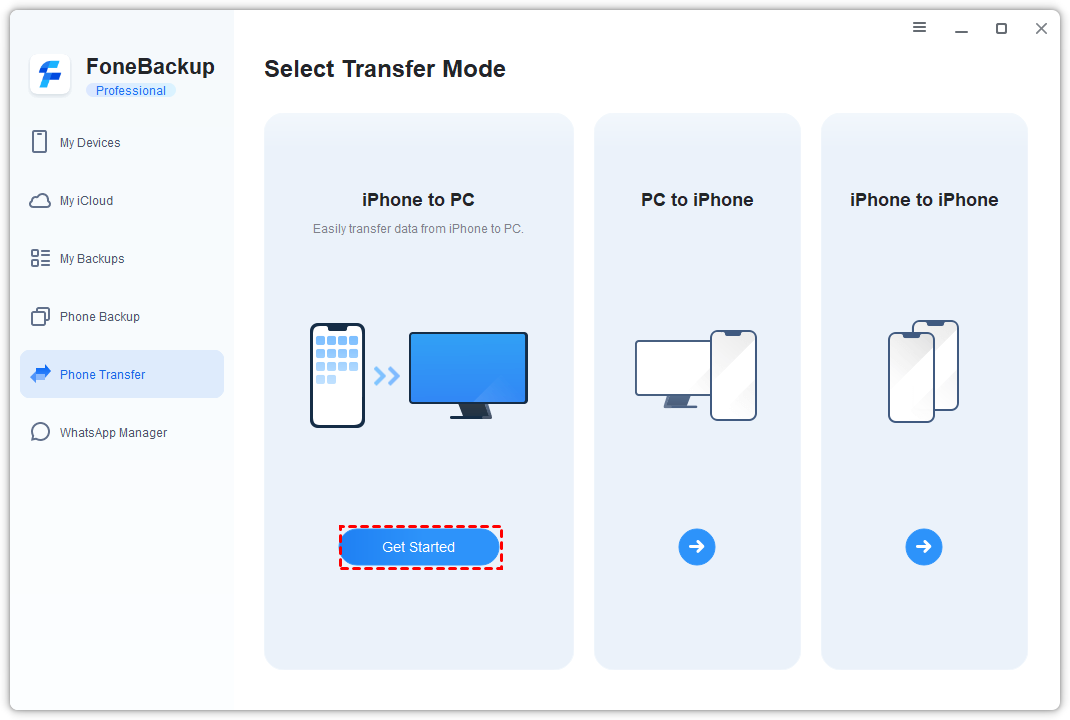
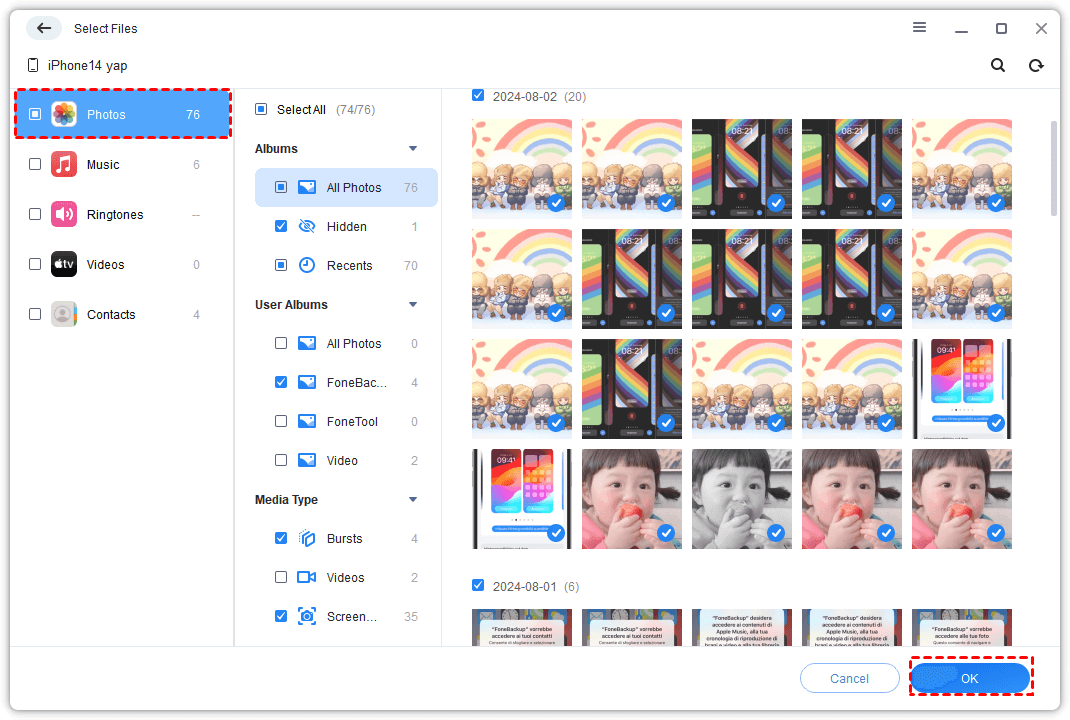
Step 3. Click the Photos icon to preview and select the photos you want to export, then click OK.
Step 4. Open Transfer Settings and choose the folder or connected drive where you want to save your photos.
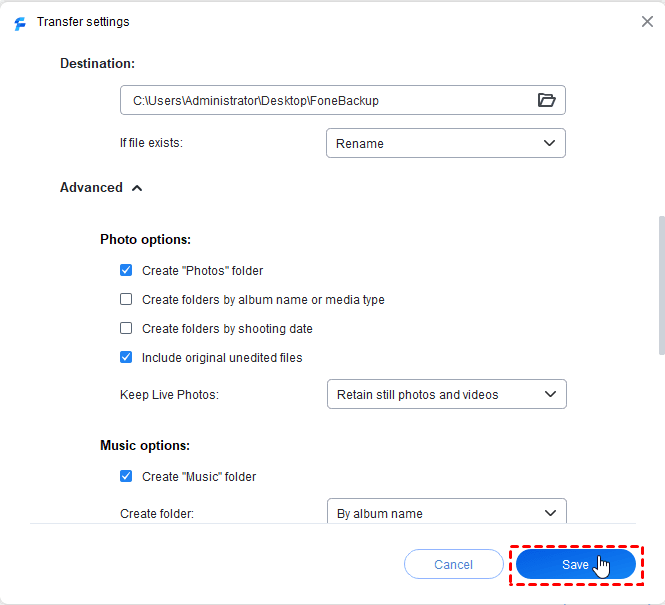
Step 5. Click Start Transfer and wait for the process to finish before disconnecting the iPhone.
After the transfer, open the destination folder and check several photos. If an item is missing, keep the original on the iPhone and transfer it again.
Method 2. Import Photos from iPhone to PC with Windows Photos
👍 Best for: Importing a group of photos to Windows 10 or Windows 11 with a built-in Windows app.
Microsoft Photos can detect an unlocked iPhone through a USB connection and import selected pictures. Apple’s current Windows instructions also require the Apple Devices app.
Step 1. Install Apple Devices from the Microsoft Store if it is not already available on the PC. Connect the iPhone using a USB cable that supports data transfer. Unlock it and tap Trust to authorize.
Step 2. Open the Start menu, search for Photos, and tap it to launch the Microsoft Photos app.
Step 3. Click Import, then browse your iPhone and select the photos you want. Follow the on-screen instructions to complete the transfer.
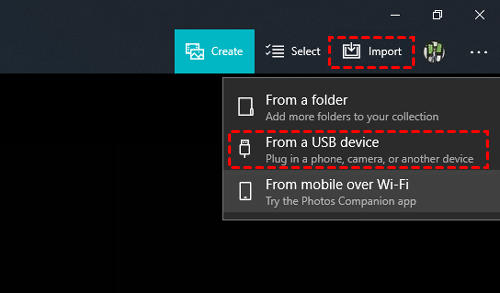
Keep the iPhone unlocked while Windows detects and imports the library. If the device does not appear, reconnect it and try another data-capable cable or USB port.
If iCloud Photos and Optimize iPhone Storage are enabled, some original files may not be stored on the iPhone. Download the originals first or use iCloud for Windows.
Method 3. Copy iPhone Photos to Computer with File Explorer
👍 Best for: Copying camera photos and videos manually without using an import application.
File Explorer lets you open the iPhone’s DCIM folders and copy files directly. However, the folders do not reproduce the albums you created in the iPhone Photos app.
Step 1. Connect your iPhone to your PC, unlock it, and tap Trust when prompted.
Step 2. In File Explorer, go to This PC, find and open Apple iPhone.
Step 3. Go to Internal Storage > DCIM, then open the folder containing the photos you need. Copy and paste them to your PC.
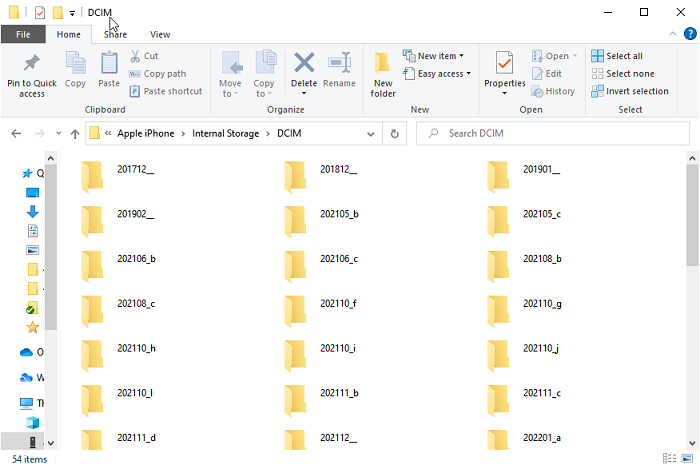
If the iPhone appears but the DCIM folder is empty, unlock the phone again and reconnect the cable. Photos stored only in iCloud may also be unavailable through DCIM. Download the originals to the iPhone or use iCloud Photos instead.
If the files still do not appear, check out our guide on how to fix iPhone files not showing up on a PC.
Do not remove the original photos from the iPhone until the copied files open correctly.
Method 4. Transfer iPhone Photos to PC Wirelessly with iCloud
👍 Best for: Accessing iPhone photos on a Windows computer without connecting the phone by USB.
iCloud Photos uploads the iPhone library and keeps it available on connected devices. The method requires an internet connection and enough iCloud storage for the photo library.
Step 1. On your iPhone, go to Settings > [your name] > iCloud > Photos and turn on Sync this iPhone. Make sure your iPhone is connected to a stable Wi-Fi or cellular network.
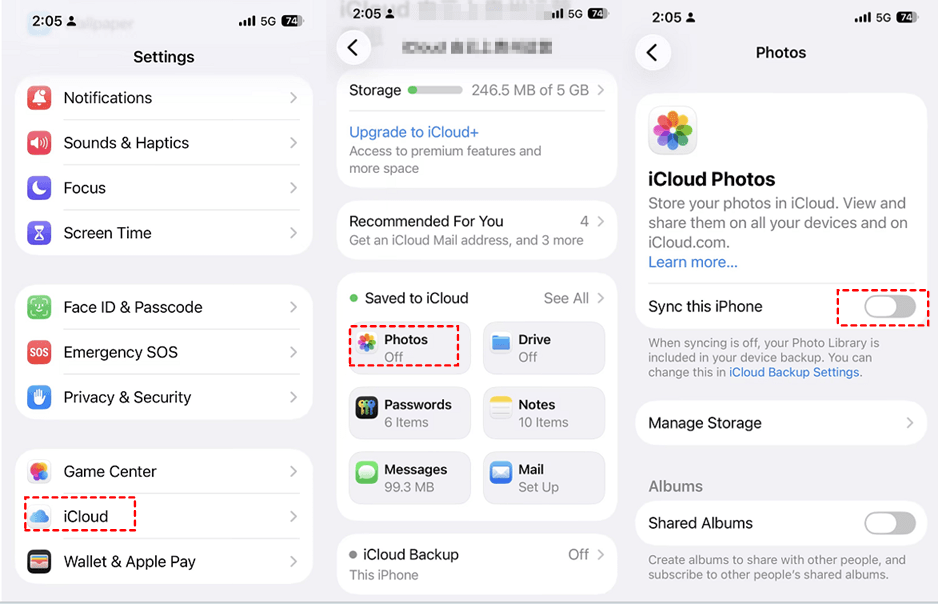
Step 2. On the Windows PC, install iCloud for Windows from the Microsoft Store and open it. Be sure you sign in with the same Apple Account used on the iPhone.
Step 3. Click Options... next to Photos and turn on iCloud Photos. Then, select Done > Apply.
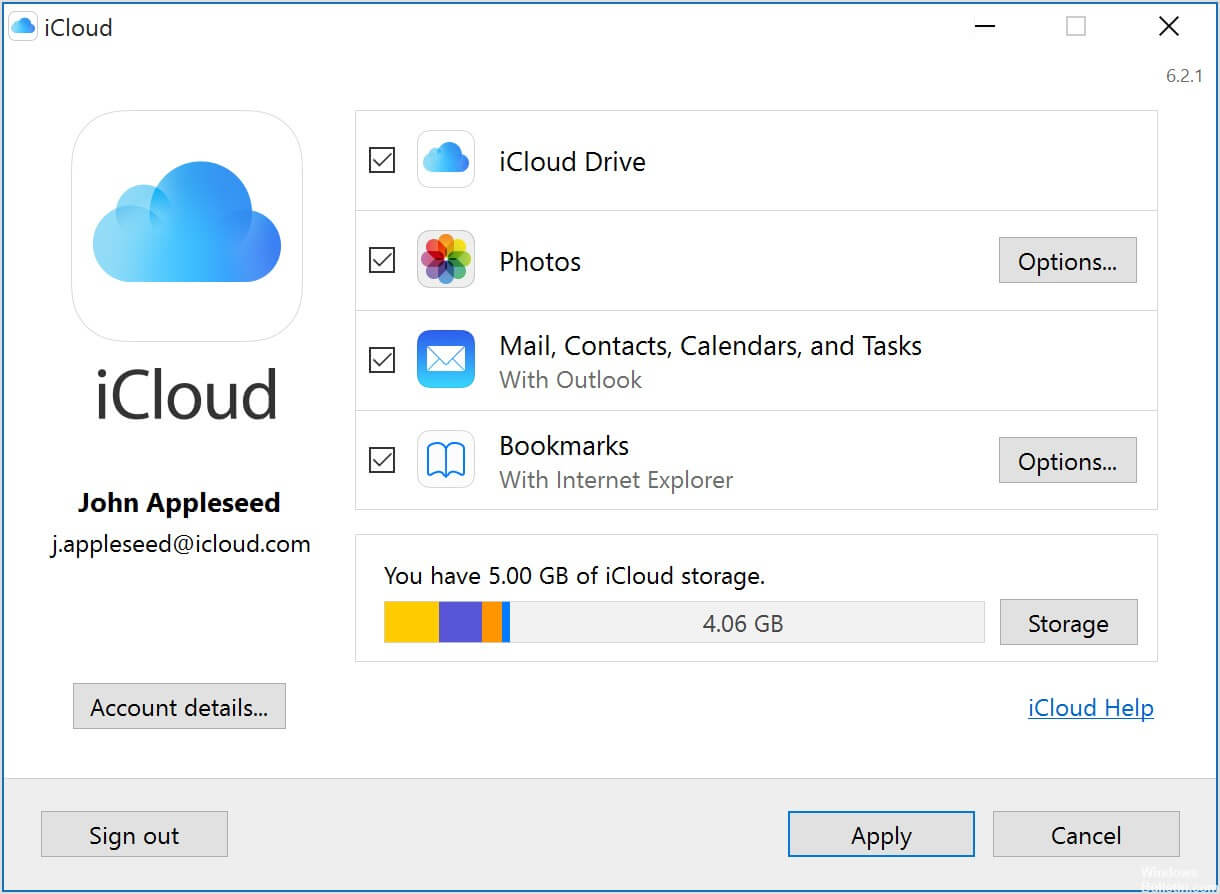
Step 4. Open File Explorer, you'll see iCloud Photos. Double-click a photo to download and view it.
You can also open iCloud.com in a browser. Sign in, select the photos you need, and use the Download button.
If recent photos are missing, check the sync status in the iPhone Photos app. Make sure the phone has an internet connection and that your iCloud storage is not full.
Comparison: 4 Ways to Transfer Photos from iPhone to PC
| Method | Connection | Selective | 🎯 Choose it when |
|---|---|---|---|
| AOMEI FoneBackup | USB | Select individual items | You want to choose photos and their PC destination |
| Windows Photos | USB | Select detected items | You want a standard import experience |
| File Explorer | USB | Select files and folders | You prefer manual copy and paste |
| iCloud Photos | Internet | Access the synced library | You want wireless access photos on the PC |
Common Transfer Issues and How to Fix Them
Issue 1: HEIC photos won't open on Windows
iPhones capture photos in HEIC format by default. Windows doesn't natively support HEIC without additional codecs.
How to fix it:
Option 1 (recommended): Change your iPhone settings before transferring. Go to Settings > Photos > Transfer to Mac or PC > Automatic. This converts HEIC to JPG during USB transfers.
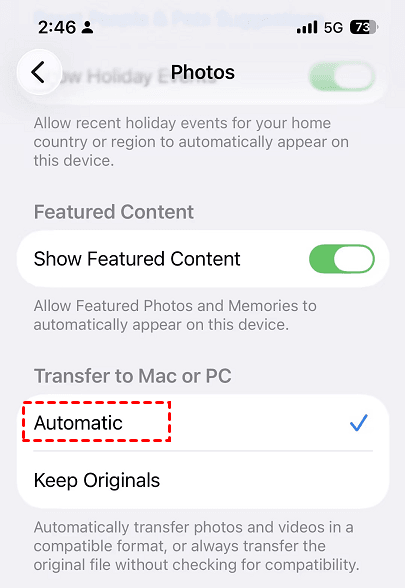
Option 2: On your PC, install the HEIF Image Extensions from the Microsoft Store.

Issue 2: USB connection shows "This folder is empty" or only a few photos
If iCloud Photos is enabled with "Optimize Storage," photos are stored in the cloud, not locally on the device. USB connection can only access what's physically stored on your iPhone.
How to fix it:
On your iPhone, go to Settings > [your name] > iCloud > Photos. Tap Download and Keep Originals instead of Optimize Storage.
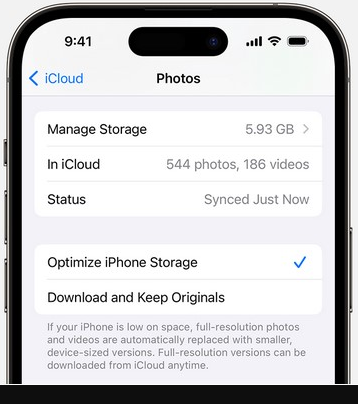
Alternatively, use iCloud for Windows to access all your photos directly from the cloud.
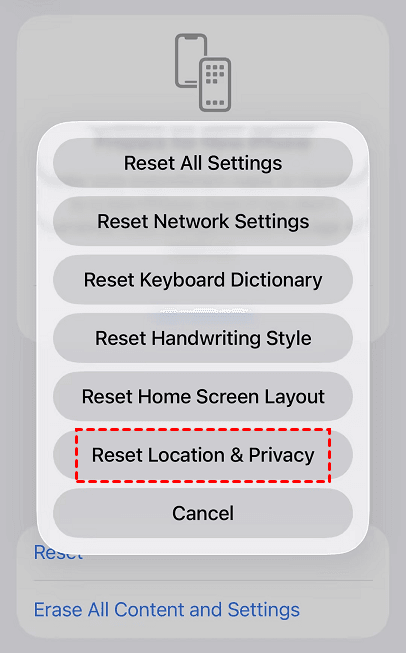
Issue 3: You accidentally tapped "Don't Trust" and the prompt won't reappear
Once you tap "Don't Trust", iOS blocks that specific computer from accessing your iPhone.
How to fix it:
On your iPhone, go to Settings > General > Transfer or Reset iPhone > Reset > Reset Location & Privacy. Then, reconnect your iPhone to your PC and the Trust prompt will appear. Tap Trust and enter your passcode.
Issue 4: USB connection keeps disconnecting during transfer
Common causes include a faulty cable, USB port issues, or the device going to sleep during the transfer.
How to fix it:
-
Try a different USB cable, preferably an Apple-certified one.
-
Try a different USB port, directly on the PC, not through a hub.
-
Keep your iPhone unlocked and the screen active during the transfer.
FAQs
1. Why are some iPhone photos missing from the DCIM folder?
Some pictures may exist in iCloud while the phone keeps only smaller optimized versions. Open Settings > [your name] > iCloud > Photos, then select Download and Keep Originals. Wait for the downloads to finish before reconnecting the iPhone.
If the entire DCIM folder is empty, unlock the phone, approve the trust request, and reconnect it with a data-capable cable. Try AOMEI FoneBackup or iCloud Photos if File Explorer still cannot access the content.
2. Can you transfer photos from iPhone to PC without iTunes?
Yes. You can use AOMEI FoneBackup, Microsoft Photos, File Explorer, or iCloud for Windows. Current Windows workflows use Apple Devices instead of relying on iTunes for iPhone photo importing.
3. Can you transfer iPhone photos without losing quality?
Copying or downloading an original photo does not normally reduce its resolution. However, the available version may depend on your iCloud optimization and download settings.
If you need the originals stored on the phone, open Settings > [your name] > iCloud > Photos and select Download and Keep Originals before starting a USB import.
4. Why are transferred iPhone photos saved as HEIC files?
An iPhone can capture pictures in the High Efficiency format, which commonly produces HEIC files. Some Windows applications may need additional format support to open them.
To make future photos more compatible, open Settings > Camera > Formats and select Most Compatible. This setting applies to new photos and does not convert existing files.
5. How do you transfer photos from an iPhone to a Mac?
Connect the iPhone to the Mac, open Photos, select the device in the sidebar, and import the pictures you need. For a small selection, you can use AirDrop instead.
If iCloud Photos is enabled with the same Apple Account on both devices, the library can also appear automatically in Photos on the Mac. A separate Mac-focused guide is more suitable for detailed Mac instructions.
6. Is it safe to delete iPhone photos after transferring them?
Verify the computer copy first:
- Open photos from several dates.
- Play important transferred videos.
- Confirm that the destination contains the expected files.
- Keep a second copy of important pictures.
If any check fails, do not delete the originals. Repeat the transfer or use another method. When using iCloud Photos, remember that deleting an item can also remove it from other devices connected to the synced library.
Summary
If you regularly transfer photos from iPhoneto a computerfolder or connecteddevice, AOMEI FoneBackup provides a direct workflow with destination control. Keep the iPhone originals until you have checked the computer copy.
In addition, you can also try the following options:
- Choose Windows Photos for a built-in import experience.
- Choose File Explorer to copy DCIM files manually.
- Choose iCloud Photos for wireless access to a synced library.

 as a preferred
source on Google
as a preferred
source on Google