




How to Transfer Music from CD to iPhone on PC or Mac
This guide explains how to transfer music from CD to iPhone using Windows, Mac, Apple Devices, Finder, or a selective transfer tool, with practical fixes for common syncing problems.

By Ivy Updated on August 25, 2026


You have found an old CD with songs that are missing from streaming services, and now you want to play them on your iPhone. Connecting a CD drive directly to the phone will not normally import those songs into the Music app.
To transfer music from CD to iPhone, you first need to rip the CD to a Windows PC or Mac. You can then sync the files with Apple Devices or Finder, or transfer selected songs with AOMEI FoneBackup on Windows.
What You Need Before Transferring a CD to iPhone
A physical audio CD must be converted into regular audio files before the iPhone can use its music. This process is called ripping a CD.
📖 Prepare the following items:
- The original audio CD
- A Windows PC or Mac
- A built-in or external CD/DVD drive
- A USB or USB-C data cable
- Enough free space on the computer and iPhone
You also need to choose an audio format. MP3 offers wide compatibility and moderate file sizes. AAC is another practical choice for Apple devices. Apple Lossless preserves more audio detail but uses considerably more storage.
For a straightforward transfer, MP3 is usually the easiest option.
Which CD to iPhone Transfer Method Should You Use?
| 🧩 Your situation | 🎯 Recommended method | ⛔ Key limitation |
|---|---|---|
| You use a current Windows PC | Windows Media Player, Apple Music, and Apple Devices | Manual syncing requires Sync Library to be off |
| You want to transfer selected songs without Apple’s music sync | Windows Media Player, and AOMEI FoneBackup | Windows only; the CD must be ripped first |
| You use a Mac | Mac Music and Finder | Finder music syncing may be unavailable while Sync Library is on |
If your Windows computer still uses an older iTunes-only setup, iTunes can import an audio CD and sync music. However, the current Windows setup separates music management into Apple Music and device syncing into Apple Devices.
Method 1. Transfer Music from CD to iPhone with Apple Music & Devices (for Windows)
👍 Best for: Current Windows 10 or Windows 11 computers using Apple’s apps - requires a CD drive and manual library syncing.
This method has 3 stages. First, rip the CD with Windows Media Player. Next, import the files into Apple Music. Finally, use Apple Devices to sync them to the iPhone.
Stage 1. Rip the CD to MP3 on Windows
Step 1. Insert the audio CD into the computer’s CD/DVD drive. If the computer has no disc drive, connect an external USB CD/DVD drive first.
Step 2. Open Windows Media Player Legacy, insert the audio CD, and select the CD in the Player Library. Maximize the window if the ripping controls are not visible.
Step 3. Select Rip settings > Format > MP3. To change the destination folder, select Rip settings > More options > Rip Music.
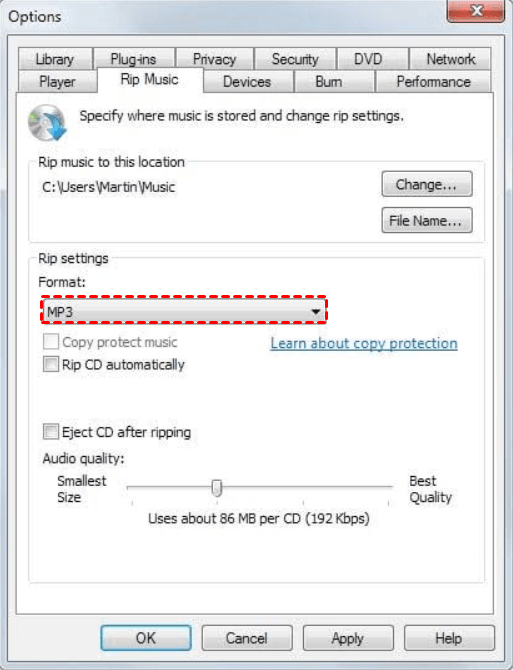
Step 4. Clear the checkbox beside any track you do not want, then select Apply > OK.
Keep the resulting files in their saved folder. Moving or deleting them after adding them to Apple Music may prevent the app from finding them later.
Stage 2. Add the ripped songs to Apple Music
Step 1. Open the Apple Music app on the Windows PC.
Step 2. Select the Sidebar Actions button at the top of the sidebar, then choose Library > Add Files to Library or Add Folder to Library.
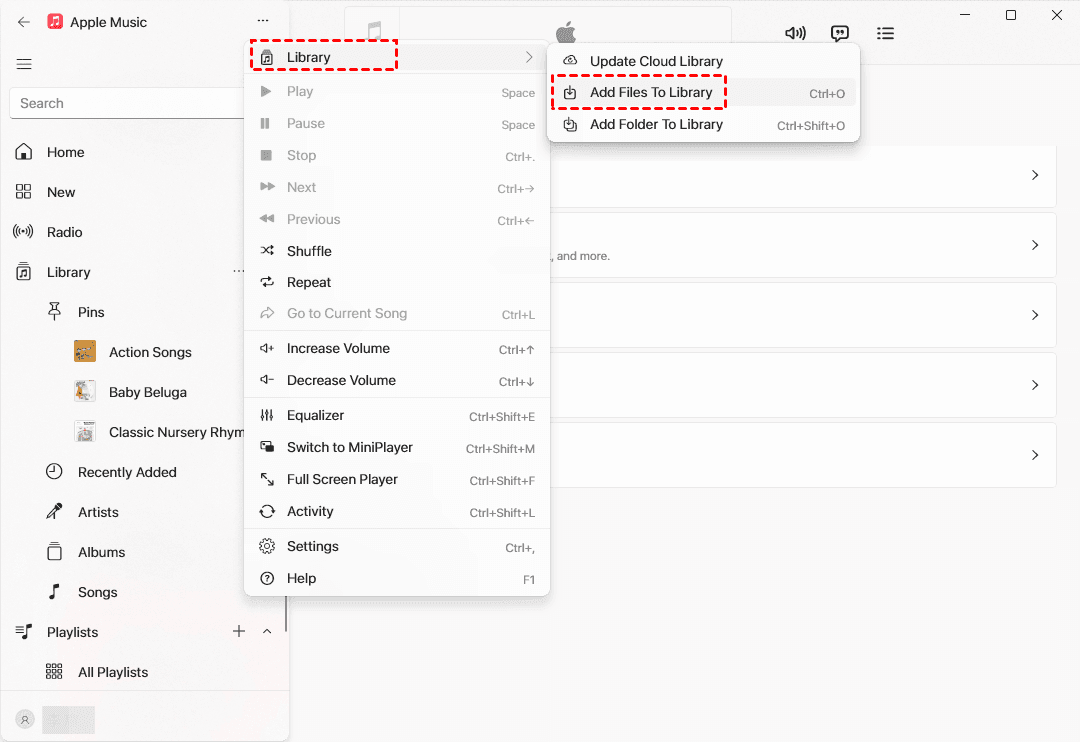
Step 3. Open the folder containing the ripped MP3 files. Select the files or the entire folder, then click Open.
The songs should now appear in your Apple Music library. You do not need an Apple Music subscription merely to import and play local music files on the computer.
Stage 3. Sync the CD music to iPhone
Step 1. Connect the iPhone to the PC with a USB data cable. Unlock the iPhone and tap Trust if the permission message appears.
Step 2. Open Apple Devices, then select the iPhone in the sidebar.
Step 3. Select Music and enable Sync music onto [device name]. Meanwhile, choose Selected artists, albums, genres, and playlists
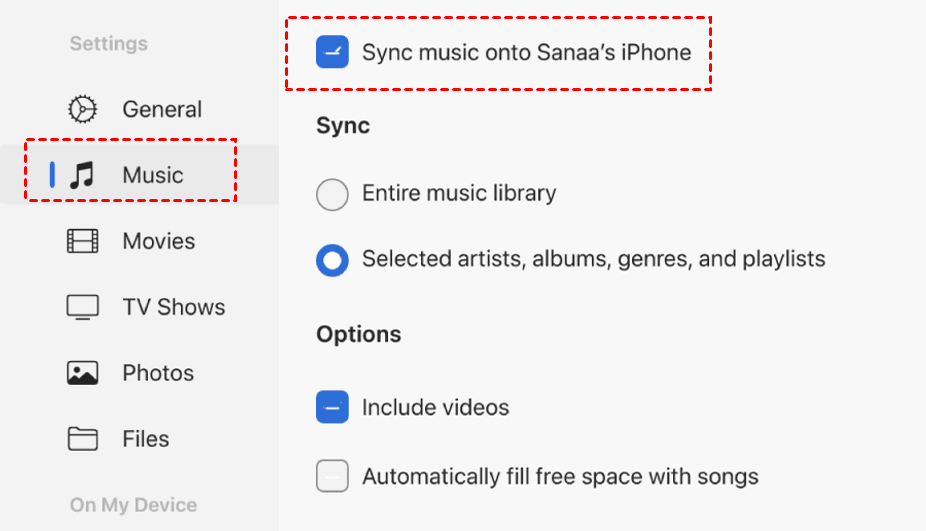
Step 4. Choose the imported CD music and click Apply. Wait for syncing to finish, then use the Eject button before disconnecting the iPhone.
If no music-syncing options appear, Sync Library may be enabled in Apple Music. Apple does not allow this manual syncing method while Sync Library is managing the music. Review what is already stored through Apple Music before turning that option off.
Also pause if Apple Devices displays an Erase and Sync warning. An iPhone can be manually synced with only 1 music library at a time. Continuing may replace music previously synced from a different computer or library.
Method 2. Selectively Transfer Music from CD to iPhone with AOMEI FoneBackup
👍 Best for: Windows users who want to add selected CD songs without managing a complete Apple music-library sync - the CD must already be ripped to the PC.
AOMEI FoneBackup is an iPhone backup and transfer tool for Windows PCs that can transfer local music from PC to iPhone easily and quickly.
 AOMEI FoneBackup
- Direct transfer: Transfer music from PC to iPhone without iCloud or Apple ID required.
- Selective transfer: Transfer local files you choose instead of syncing an entire Apple Music library.
- Added, not replace: The transferred songs are added to the connected iPhone.
- Free boundary: The free Transfer feature is limited to 30 files per day. Its backup feature are free.
 100% Secure
Step 1. Connect the iPhone to the Windows PC. Unlock it and tap Trust if asked.
Step 2. Open AOMEI FoneBackup. Select Phone Transfer, choose PC to iPhone, and click Get Started.
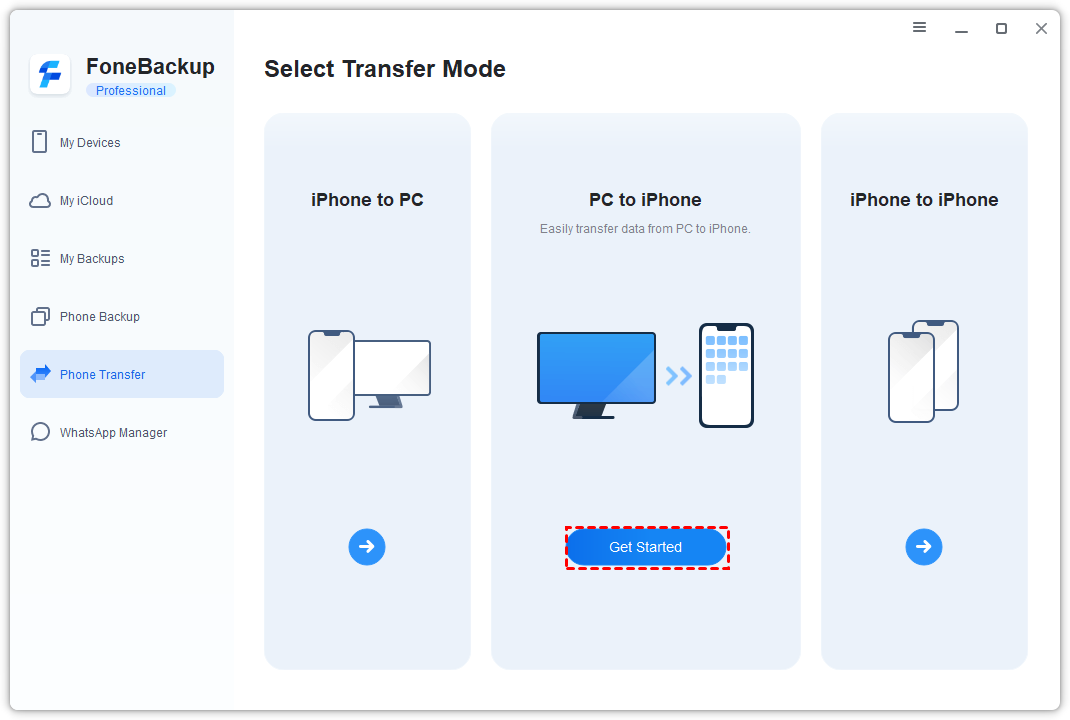
Step 3. Select Music. Drag the ripped CD songs into the window, or use the folder button to add them. At last, click Start Transfer.
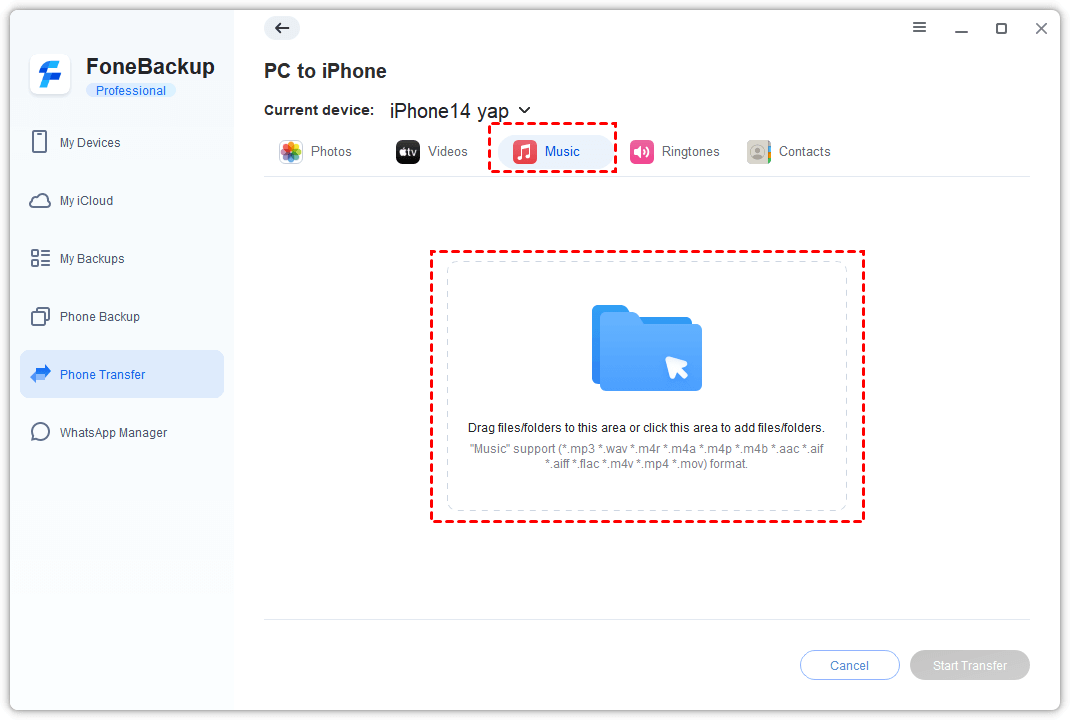
Keep the iPhone connected until the process finishes. You can then open the Music app on the iPhone and check the transferred tracks.
If AOMEI FoneBackup does not detect the device, unlock the iPhone, reconnect it directly to another USB port, and respond to the Trust prompt. For further connection checks, see this guide: iPhone files not showing up on a PC.
Method 3. Import Music from CD to iPhone with Mac Music and Finder
👍 Best for: Mac users who want to use Apple’s built-in apps - requires a built-in or external CD/DVD drive.
On current macOS versions, the Music app imports the CD, while Finder manages the iPhone connection and music syncing.
Stage 1. Import the CD into Music
Step 1. Open Music on your Mac system. Choose Music > Settings > Files, then select Import Settings.
Step 2. Choose an encoder such as AAC Encoder, MP3 Encoder, or Apple Lossless Encoder, then confirm the setting.
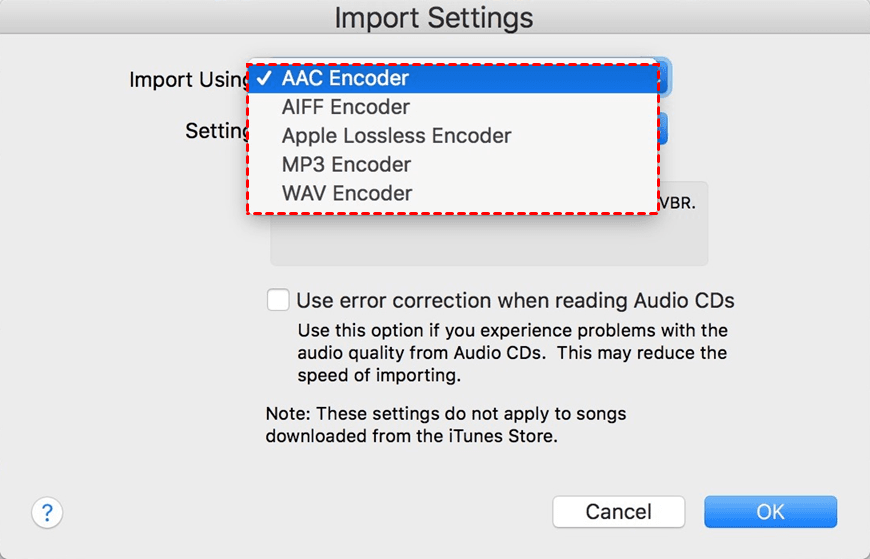
Step 3. Insert the audio CD. Click Yes to import every track. To choose individual tracks, click No, clear the unwanted songs, and select Import CD.
If it does not appear automatically, select the CD under Devices in the Music sidebar.
Wait until the import is complete, then eject the CD. If Music displays generic names such as “Track 01,” make sure the Mac is online so it can retrieve available album and track information. You can also edit the song information manually.
Stage 2. Sync the imported music through Finder
Step 1. Connect the iPhone to the Mac with a USB cable. Open Finder and select the iPhone in the sidebar.
Step 2. Select Music, then enable Sync music onto [device name].
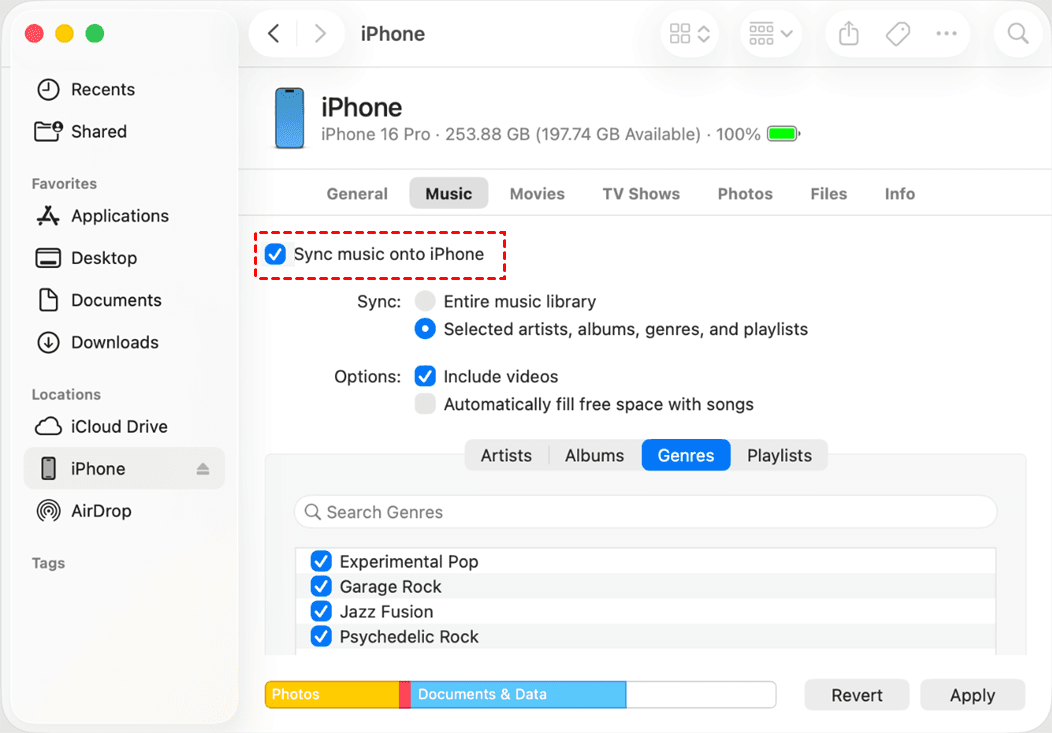
Step 3. Choose the entire music library or select specific artists, albums, genres, and playlists, then click Apply. If syncing does not begin automatically, click Sync.
Finder syncing for music may be unavailable when Cloud Music Library or Sync Library is active. As with Windows, check which music is already cloud-managed before changing that setting.
Check the result before you finish:
- Open the Music app on the iPhone.
- Confirm that the album and selected songs appear.
- Play at least 1 track after disconnecting the computer.
- Check that the artist, album, and track names are correct.
- If a song is greyed out, verify that the original file still exists on the computer and review the Sync Library setting.
If the files are missing, reconnect the iPhone and repeat the sync or transfer. Do not delete the ripped files from the computer until you have confirmed that the music works on the phone.
Compare the Ways to Put CD Music on iPhone
| Method | 👍 Best for | Selection control | Key limitation |
|---|---|---|---|
| Apple apps on Windows | Current Windows setup | Albums, artists, genres, or playlists | Conflicts with Sync Library |
| AOMEI FoneBackup | Directly selecting local songs | Individual files | Windows only; 30 free transfers per day |
| Music and Finder | Mac users | Albums, artists, genres, or playlists | Conflicts with cloud-managed music |
Use Apple Devices or Finder when you already manage a local Apple music library. Choose AOMEI FoneBackup when the CD has been ripped on Windows and you only want to transfer selected local songs without syncing the full library.
Common CD Music Transfer Problems
The computer does not recognize the CD: The disc may be dirty, scratched, or unreadable by the drive. Clean it with a soft, lint-free cloth and try another drive if available.
The imported songs contain clicks or skips: The drive may not have read the disc correctly. Enable the available CD error-correction option and import the affected tracks again.
The iPhone does not appear on the computer: The phone may be locked, the computer may not be trusted, or the cable may only support charging. Unlock the iPhone, use a data cable, and reconnect it directly to the computer.
The music-syncing option is missing: Sync Library is probably managing the music. Manual music syncing in Apple Devices or Finder requires this cloud option to be off.
Songs appear greyed out on the iPhone: The original file may have been moved, the cloud library may not have completed syncing, or the phone may be tied to another manually synced library. Check the file location and current sync settings before importing the same album again.
FAQs
1. Can I connect a USB CD drive directly to an iPhone?
Connecting the drive does not normally let the iPhone Music app rip and import an audio CD. Use a Windows PC or Mac to convert the tracks into music files first.
2. Do I need an Apple Music subscription to import a CD?
No. You can import personal music files into the Music app and manually sync them without subscribing. An Apple Music subscription is relevant if you want to use Sync Library to make your library available through the cloud.
3. Will syncing CD music erase the songs already on my iPhone?
It depends on how the existing music was added. Manually syncing with a different computer or music library can trigger an Erase and Sync warning and replace previously synced music. Do not continue until you understand which library currently manages the phone.
4. Should I rip a CD as MP3, AAC, or Apple Lossless?
Choose MP3 for broad compatibility and reasonable file sizes. AAC is also suitable for Apple devices. Choose Apple Lossless when preserving CD quality matters more than saving storage space.
5. Can I transfer CD music to an iPhone without iTunes?
Yes. On a current Windows PC, you can rip the CD with Windows Media Player and transfer the resulting files using Apple Music with Apple Devices or AOMEI FoneBackup. On a Mac, use Music and Finder.
Summary
You cannot normally copy songs straight from a physical CD to an iPhone. First, use a computer and CD drive to convert the tracks into audio files.
- On Windows, use Windows Media Player to rip the CD, then choose Apple Music with Apple Devices for library syncing or AOMEI FoneBackup for selected local songs.
- On Mac, import the CD with Music and sync it through Finder.
Before changing Sync Library or accepting Erase and Sync, check how the music already on your iPhone is managed.

 as a preferred
source on Google
as a preferred
source on Google