



How to Transfer Data from iPhone to Computer (5 Easy Ways)
Need to get iPhone data to your computer? Discover 5 easy methods to transfer photos, videos, music, contacts, and more – with or without a USB cable.

By Lily Updated on August 14, 2026


When you need to edit photos on a larger screen, back up music, move videos, or free up storage on your iPhone, transferring your files to a computer is often the easiest solution. However, moving data from an iPhone to a Windows PC can sometimes be less straightforward than transferring files between Apple devices.
Fortunately, there are several ways to transfer data from iPhone to computer. Some methods work with a USB cable for faster transfers, while others let you send files wirelessly. You can also use these methods to transfer files from iPhone to laptop.
|
Transfer Tool |
Main Function |
Connection |
|
AOMEI FoneBackup |
Selectively transfer iPhone data to a PC |
USB |
|
iTunes |
Transfer files shared by supported apps |
USB |
|
Snapdrop |
Transfer files through a web browser |
Wireless |
|
iCloud Drive |
Upload and download iPhone files through the cloud |
Wireless |
|
Nearby Sharing |
Transfer files between nearby devices |
Wireless |
Way 1. Transfer Data from iPhone to PC with AOMEI FoneBackup
If you need to move a large number of files quickly, AOMEI FoneBackup is a convenient option. It allows you to select the data you want to transfer instead of copying everything from your iPhone.
 AOMEI FoneBackup
- Transfer all data or selected files from iPhone to PC.
- Preview any file instantly before you transfer—no more guessing.
- Supports transferring photos, videos, music, and more.
- Browse and manage your iPhone's content right from your PC.
- Works with every iPhone model and the newest iOS.
 100% Secure
Download AOMEI FoneBackup and learn how to transfer iPhone data to PC using it below. This method is especially useful when you need to transfer large videos or many files from iPhone to PC without manually copying each item.
Step 1. Install and launch AOMEI FoneBackup, then connect your iPhone to the computer with a USB cable. Unlock your iPhone and tap Trust if prompted.
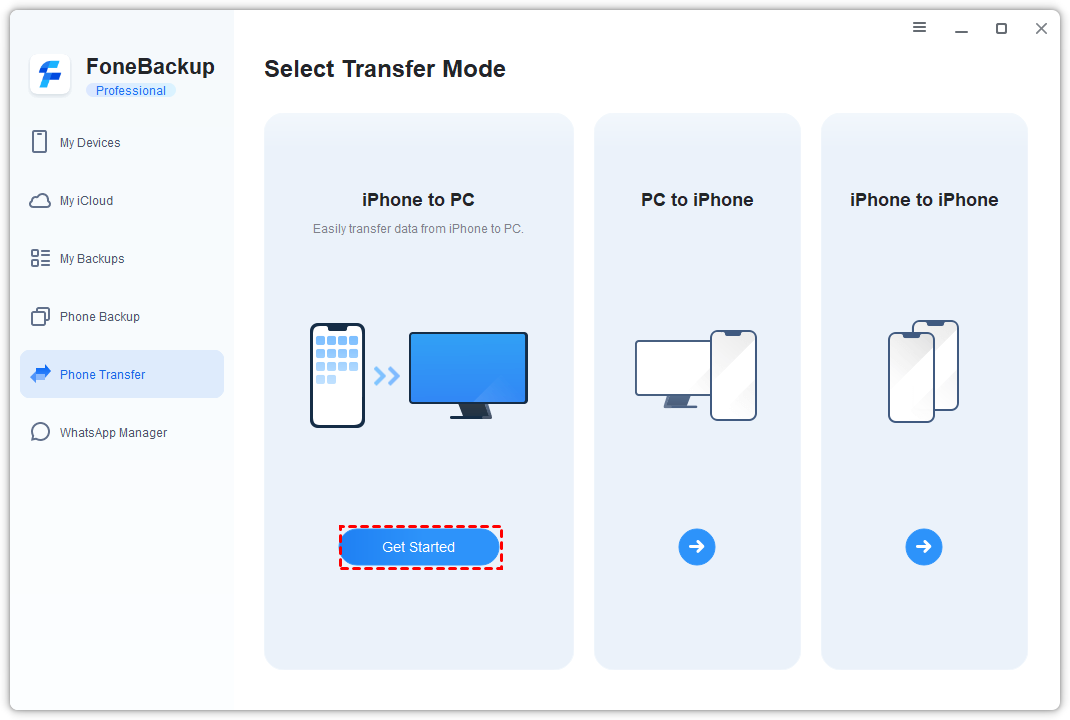
Step 2. Select Phone Transfer from the main interface. Move the cursor to iPhone to PC and click Get Started.
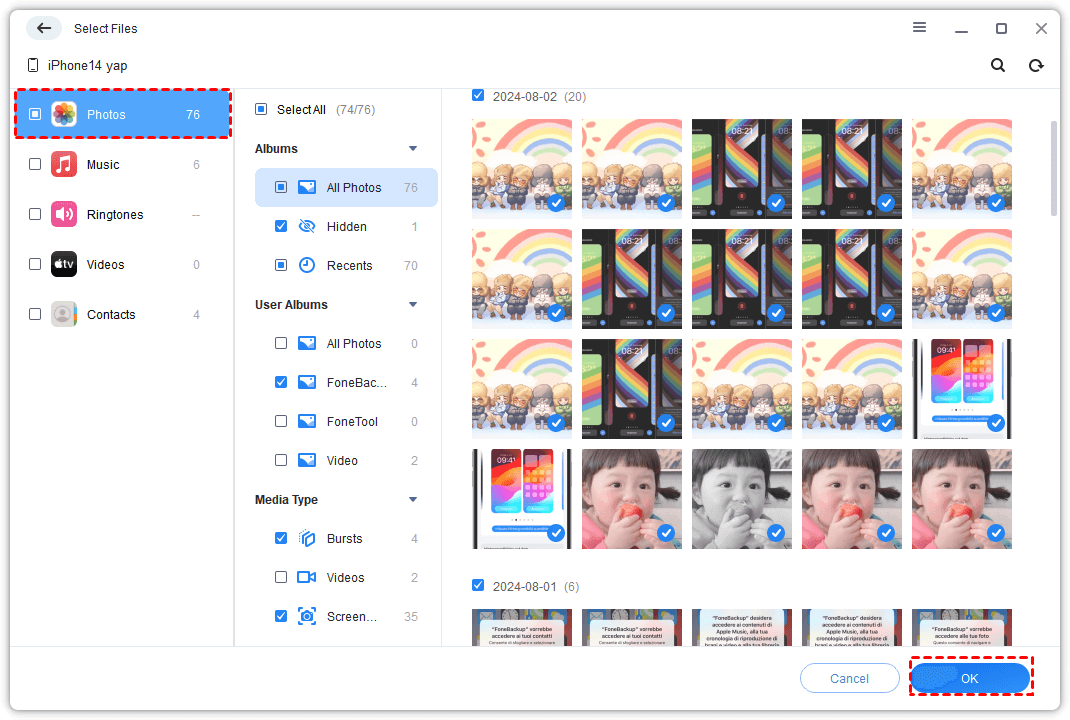
Step 3. Select the types of data you want to move. To transfer photos from iPhone to computer, click the Photos icon and select the desired photos in the Select Files window.
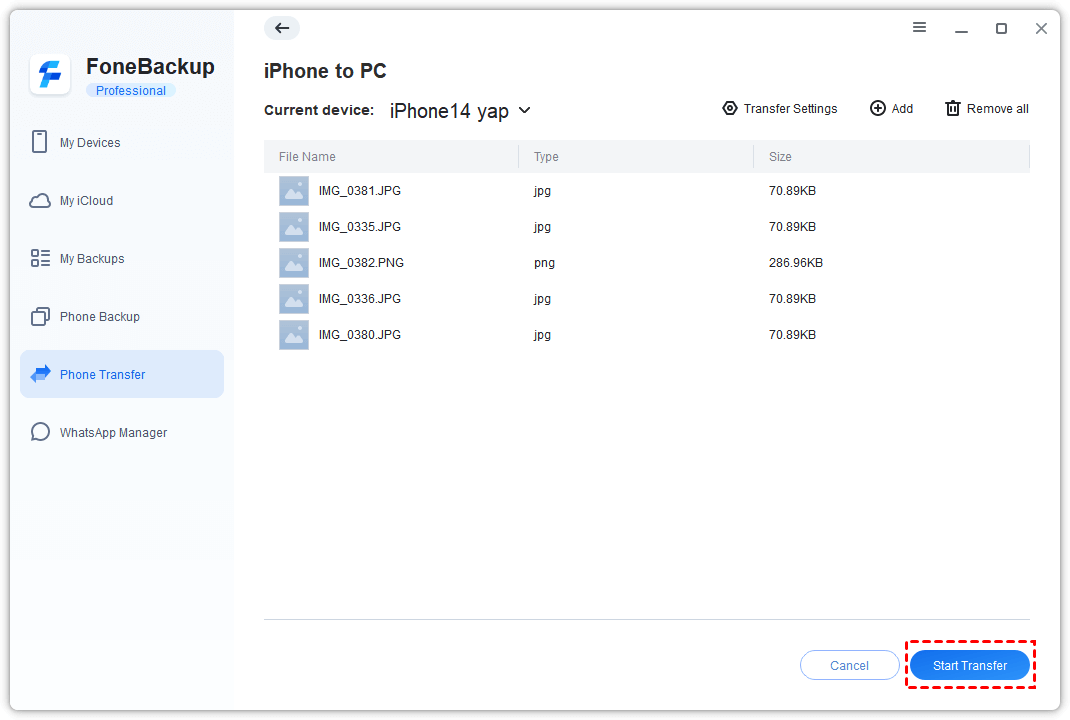
Step 4. Under Transfer Settings, select a destination folder on your computer. Then click Start Transfer to begin moving the selected data.
💡 Note: If your goal is to back up everything rather than selectively transfer files, you can also use the Full Backup feature in AOMEI FoneBackup to create a complete iPhone backup on your computer.
Way 2. Transfer Data from iPhone to Computer with iTunes
iTunes is Apple's traditional desktop solution for managing iPhone content on Windows. However, its file-transfer capabilities are limited. With File Sharing, you can move files associated with certain supported apps, such as Pages, Numbers, Keynote, and Kindle.
Therefore, iTunes is better suited to app-specific files than general-purpose iPhone-to-PC transfers. Learn how to transfer files from iPhone to PC with iTunes below:
Step 1. Download and install iTunes on your computer, then connect your iPhone using a USB cable.
Step 2. Open iTunes, click the Device icon, and select File Sharing under Settings.
Step 3. Select an app from the list and choose the files you want to transfer to your computer.
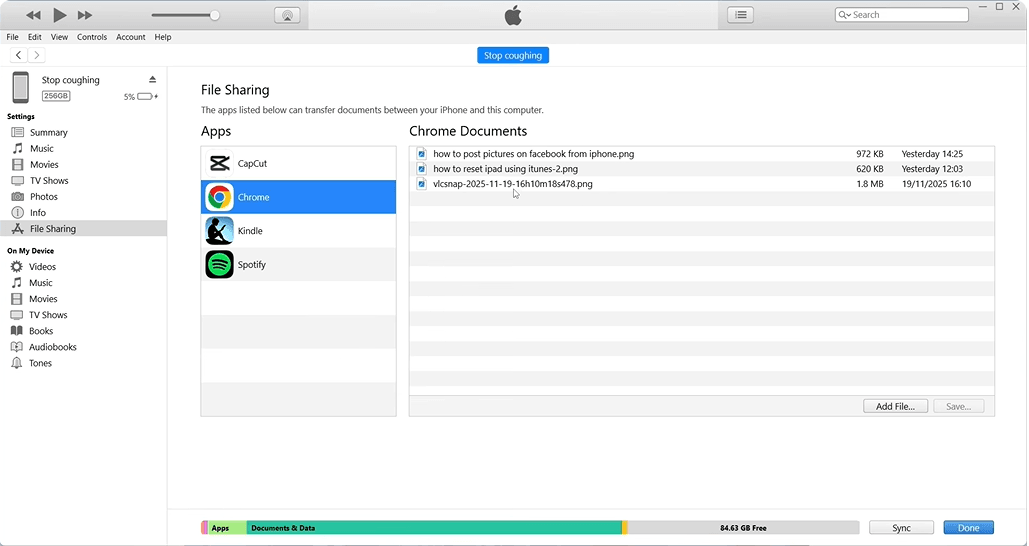
Step 4. Click Save, choose a destination folder on your PC, and click Save again to complete the transfer.
💡 Note: iTunes does not provide unrestricted access to all iPhone files. If the files you want aren't associated with a supported app, consider using AOMEI FoneBackup or one of the wireless options below.
Way 3. Transfer Data from iPhone to Computer via Snapdrop
If you don't want to install desktop software, Snapdrop provides a simple way to transfer files wirelessly. It works through a web browser, so you can use it on both your iPhone and Windows PC without installing a dedicated transfer application.
This can be convenient when you only need to send a few photos, videos, or documents. Follow the instructions below:
Step 1. Connect both your iPhone and computer to the same Wi-Fi network.
Step 2. Open a browser on both devices and visit Snapdrop.net.
Step 3. Wait for both devices to appear. On your iPhone, tap the name or icon representing your computer.
Step 4. Select Photo Library, Take Photo or Video, or Browse to locate the files you want to send.
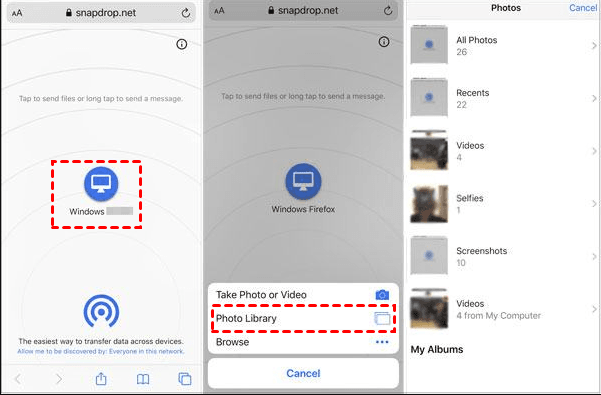
Step 5. On your computer, click Save when the transfer request appears.
💡 Note: Snapdrop is useful for quick wireless transfers, but connection quality and transfer speed depend on your network. For a large collection of photos or videos, a USB-based solution may be more reliable.
Way 4. Transfer Data from iPhone to Computer via iCloud Drive
iCloud Drive provides another wireless way to transfer files from iPhone to PC. You can upload files from your iPhone and then access them through a web browser on your computer.
It can be useful for transferring photos, videos, documents, notes, and files stored in the Files app. However, your available iCloud storage may limit how much data you can move at once. Take transferring photos as an example. Please follow these steps:
Step 1. Open the Photos app on your iPhone and select the photos you want to transfer.
Step 2. Tap the Share button, choose Save to Files, and select iCloud Drive as the destination. Tap Save.
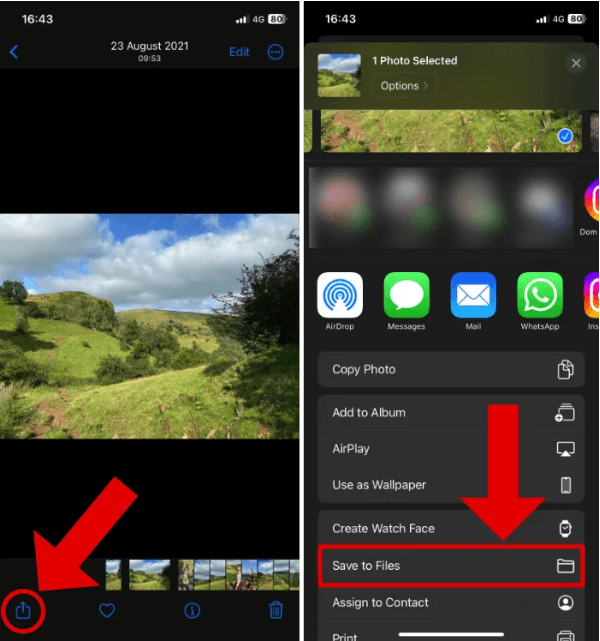
✍ Tip: For files already stored in the Files app, select the items you need, tap Move, and choose iCloud Drive. You can also copy the files to iCloud Drive.
Step 3. On your computer, open a browser and visit iCloud.com. Sign in with your Apple Account.
Step 4. Select iCloud Drive, find the files you uploaded, and download them to your PC.
💡 Note: This method works well when you don't have a USB cable available and only need to transfer a manageable amount of data.
Way 5. Transfer Data from iPhone to PC via Nearby Sharing
Nearby Sharing can be used for sharing files between compatible Windows devices. However, the original method described as using Nearby Sharing directly from an iPhone over Bluetooth is not a typical supported iPhone-to-Windows transfer workflow.
For files on an iPhone, you can instead use the Files app to connect to a Windows shared folder over the local network. This allows you to move files between the iPhone and PC without a USB cable.
👉 Set Up a Shared Folder on Your Windows PC
Step 1. On your Windows computer, create a folder where you want to receive the iPhone files.
Step 2. Right-click the folder, select Properties, open the Sharing tab, and click Advanced Sharing.
Step 3. In the Advanced Sharing window, enable Share this folder, and configure the sharing permissions as needed.
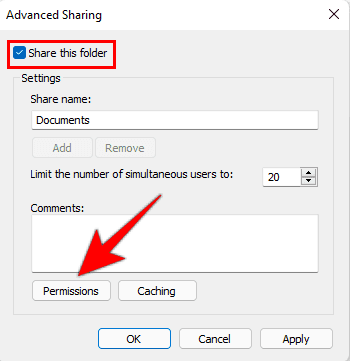
Step 4. Find your PC's local IPv4 address by opening Settings > Network & Internet > Properties and locating IPv4 address.
👉 Transfer Files from Your iPhone to the Shared Folder
Step 1. Open the Files app on your iPhone, tap the three-dot icon, and select Connect to Server.
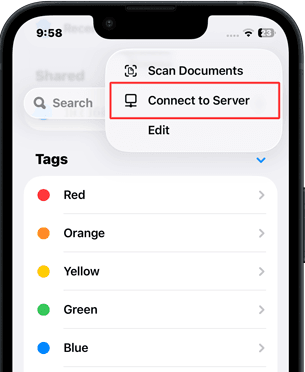
Step 2. Enter your Windows PC's local IP address and tap Connect.
Step 3. Select Registered User, then enter your Windows account username and password.
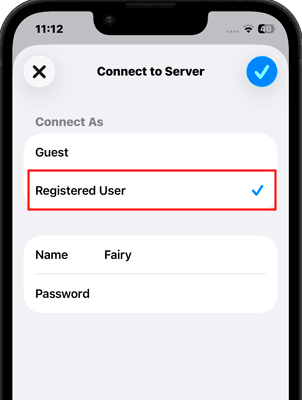
Step 4. Once connected, open the shared folder and move or copy supported files from your iPhone to the folder.
Step 5. Open the shared folder on your computer to access files transferred from iPhone.
💡 Note: This approach is useful when both devices are connected to the same local network and you want to transfer files without relying on cloud storage.
iPhone Data Transfer Not Working? Try These Fixes
Sometimes an iPhone-to-PC transfer may fail, stop midway, or fail to recognize the device. Common causes include an unreliable USB connection, outdated software, insufficient storage, network problems, or permission issues.
Try the following troubleshooting steps:
- Reconnect the USB cable and try another USB port.
- Make sure the iPhone is unlocked when connecting it to the PC.
- Tap Trust on the iPhone if the trust prompt appears.
- Update Windows, iOS, iTunes, or your transfer software.
- Check that your computer has enough free storage.
- Restart both the iPhone and computer.
- If using a wireless method, make sure both devices are connected to the same Wi-Fi network.
- If one transfer method fails, try another method, especially when transferring a large number of files.
Final Words
Now you know several ways to transfer data from iPhone to computer. AOMEI FoneBackup is a good choice when you need fast, selective transfers over USB, while iTunes works for files supported by its File Sharing feature. For wireless transfers, Snapdrop, iCloud Drive, and Nearby Sharing are convenient alternatives.
Choose the method based on the amount and type of data you need to transfer. For large collections of photos, videos, music, or other files, a USB-based transfer is generally the more practical choice.
Besides iPhone data transfer, AOMEI FoneBackup offers many other practical features. For example, you can use it to transfer iCloud data to a new iCloud account. Don't hesitate to try it out!

 as a preferred
source on Google
as a preferred
source on Google