




How to Fix Second SSD Not Showing up Windows 11
It’s a good way to get an SSD or HDD for extra storage. However, what if your second SSD not showing up Windows 11? Don’t worry, follow this article to learn seven effective and reliable solutions.

By Hedy Updated on June 4, 2026


A second SSD not showing up in Windows 11 can interrupt work and reduce storage access. Fortunately, several proven methods can solve this issue fast. Whether you installed a SATA SSD or NVMe drive, the following fixes can help Windows 11 detect your second SSD correctly.
|
🔧 Check the connection line |
Inspect SSD cables, power connections, and SATA ports carefully. Reconnect loose cables or try another motherboard SATA port to ensure proper hardware detection. |
|
🔧 Initialize and partition the drive |
Initialize the new SSD in Disk Management, create a new partition, assign a drive letter, and format the drive for Windows recognition. |
|
🔧 Assign a drive letter |
Use Disk Management to assign or change the SSD’s drive letter, allowing Windows Explorer to recognize and display the storage device properly. |
|
🔧 Update device driver |
Update SSD drivers through Device Manager to fix outdated or corrupted drivers that may block Windows from detecting the SSD correctly. |
|
🔧 Update SSD firmware |
Install the manufacturer’s management tool, such as Samsung Magician, to update SSD firmware and resolve compatibility, stability, or performance-related detection issues. |
|
🔧Scan for SSD errors |
Use a disk management utility like AOMEI Partition Software to scan and repair hidden SSD errors that may prevent proper detection. |
|
🔧 Configure BIOS settings |
Enter BIOS, locate storage settings, and ensure SATA Mode is set to AHCI instead of IDE or RAID for proper SSD recognition. |
How to fix second SSD not showing up Windows 11
If your second SSD is not appearing in Windows 11, the problem could be related to hardware connections, partition issues, outdated drivers, BIOS settings, or SSD errors. Below are several effective methods to troubleshoot and fix the issue.
Method 1. Check the connection line
Start by inspecting the SSD connection carefully. Ensure the drive is securely attached to the computer and that all cables are firmly connected. Next, verify the connection between the motherboard and the power supply to rule out any loose or faulty links. If the SSD uses a SATA cable, switch to another SATA port on the motherboard, as a damaged or unresponsive port may prevent the drive from being detected.
Method 2. Initialize and partition the drive
If the SSD is brand new and has not been initialized yet, Windows may fail to recognize it. Fortunately, the fix is straightforward. You simply need to initialize the drive and create a partition so the system can use the storage space properly.
Step 1. Right-click the Start button and select Disk Management from the menu.
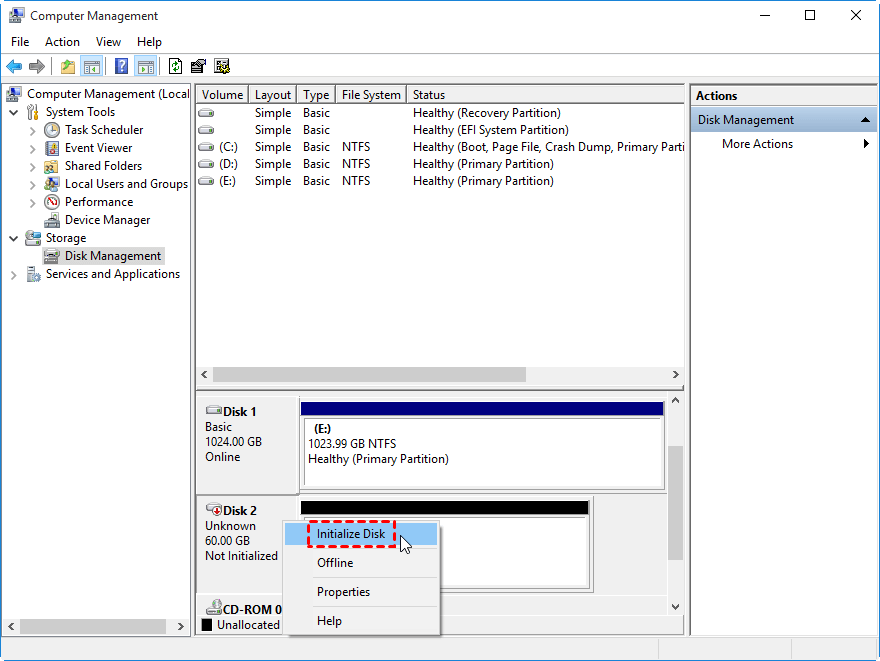
Step 2. Locate the newly installed SSD in the Disk Management window. Right-click the drive and choose Initialize Disk to make it detectable by Windows.
Step 3. After initialization, right-click the unallocated space on the SSD and select New Simple Volume.
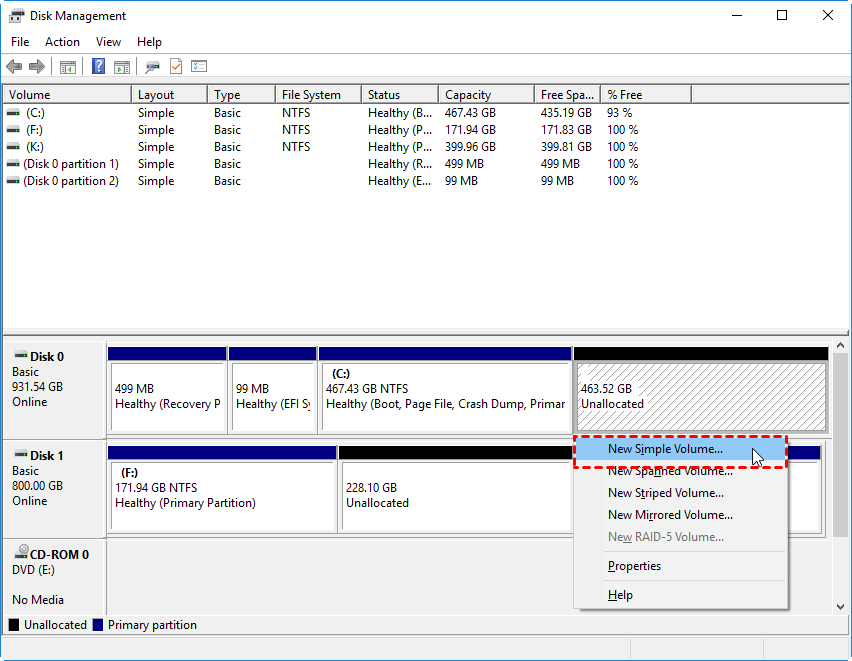
Step 4. Complete the setup by following the on-screen instructions. During the process, assign a drive letter and format the SSD to prepare it for use.
Method 3. Assign a drive letter
If the SSD has already been initialized and partitioned but still does not appear in File Explorer, the issue may be caused by a missing or conflicting drive letter. Without a drive letter, Windows cannot properly identify or display the drive.
Step 1. Press Win + X and select Disk Management from the menu.
Step 2. In the Disk Management window, locate the SSD partition, right-click it, and choose Change Drive Letter and Paths.
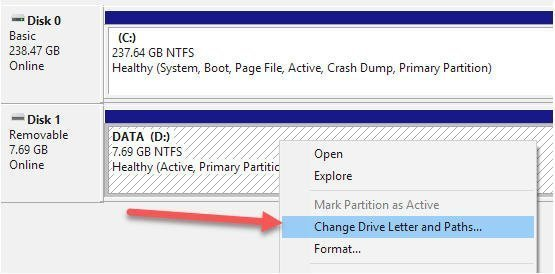
Step 3. Click Add or Change, then assign an available drive letter to the SSD partition.
Once the new drive letter is applied, the SSD should become visible and accessible in Windows Explorer.
Method 4. Update device driver
If the SSD still does not appear on your computer, outdated or corrupted drivers could be preventing Windows from detecting the device correctly. Since drivers allow the operating system to communicate with hardware components, updating them may quickly resolve the issue.
Step 1. Press Win + X and choose Device Manager from the menu.
Step 2. Expand the Disk drives category to view all connected storage devices.
Step 3. Locate your SSD, right-click it, and select Update driver.
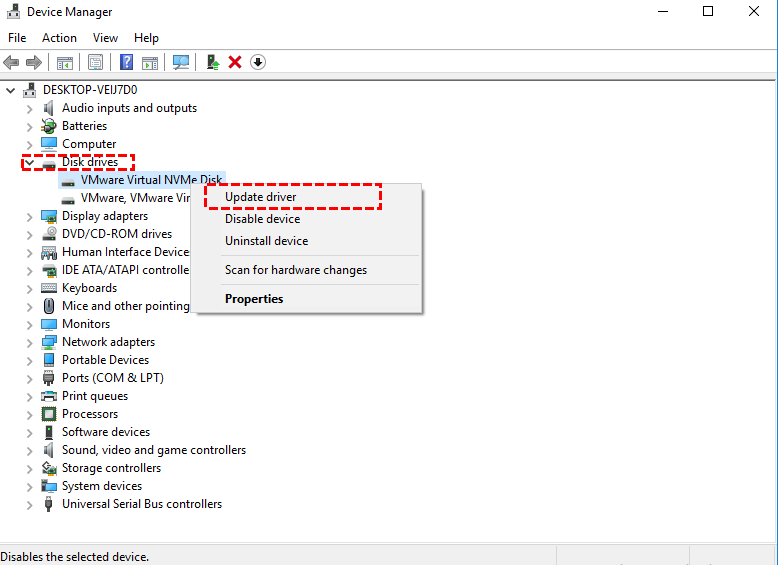
After the update process is complete, restart your computer and check whether the SSD is now visible in Windows Explorer.
Method 5. Update SSD firmware
If the SSD remains undetected, its firmware may be outdated. Firmware acts as the internal operating system of the SSD, and updating it can fix compatibility problems, improve stability, and even enhance performance. For Samsung SSD users, keeping the firmware up to date is especially important.
Step 1. Download Samsung Magician from the official Samsung website. This utility is designed to monitor, manage, and optimize Samsung SSDs.
Step 2. Install and open the software after the download is complete. The program will automatically detect compatible Samsung SSDs connected to your computer.
Step 3. In the main interface, locate the Firmware Update section. The software will scan for the latest firmware version available for your SSD model and provide an option to begin the update process.
Method 6. Scan for SSD errors
When an SSD becomes unresponsive, hidden system or disk errors are often the cause. A beginner-friendly tool like AOMEI Partition Software can help detect and repair these issues with ease. Its straightforward interface and practical features make troubleshooting storage problems much simpler, even for users with little technical experience.
 AOMEI Partition Software
A safe and reliable disk partition management tool that helps you migrate OS to SSD or HDD, reorganize disk space, and improve overall PC performance.
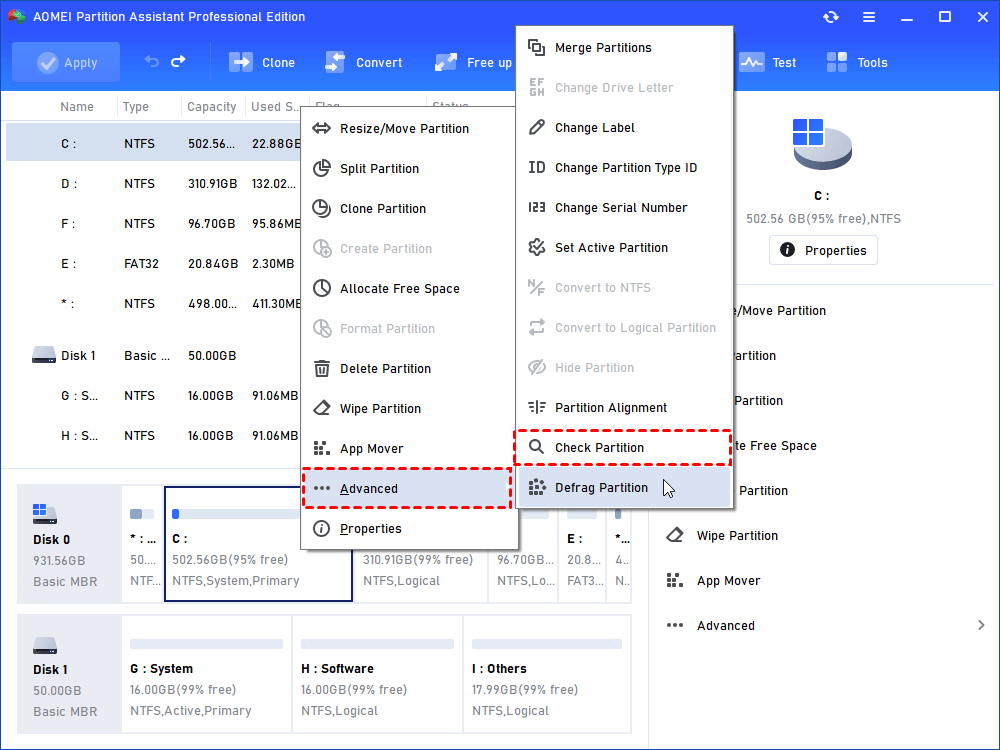
Step 1. In the main interface of AOMEI Partition Software, right-click the target drive and then click "Check Partition".
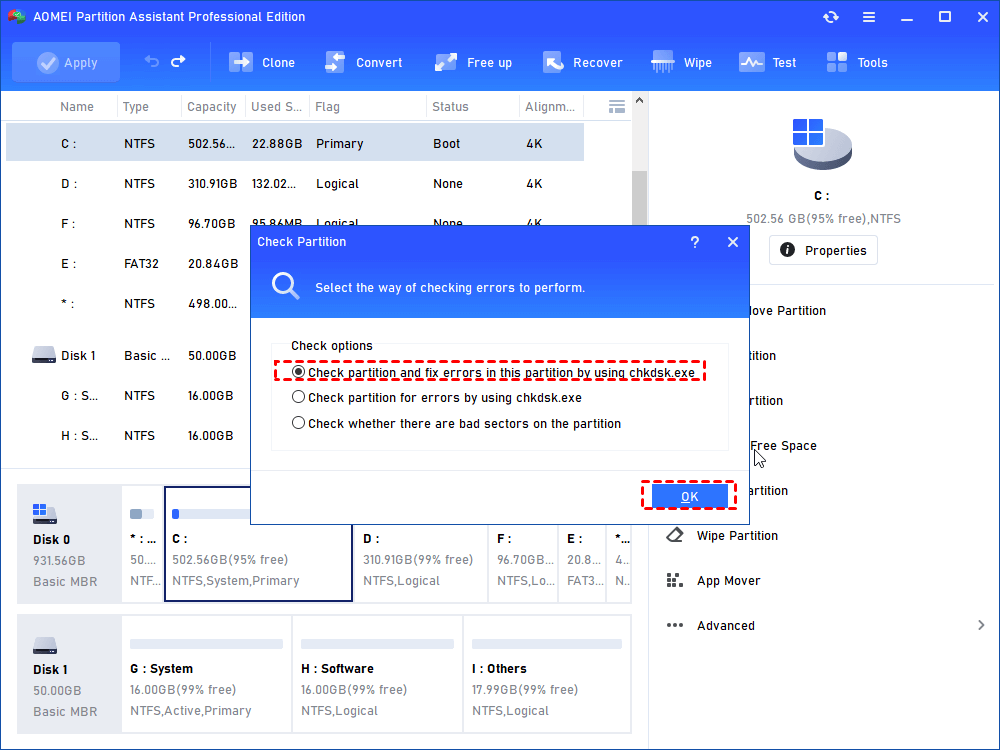
Step 2. Choose the "Check partition and fix errors in this partition by using chkdsk.exe" option, then click "OK".
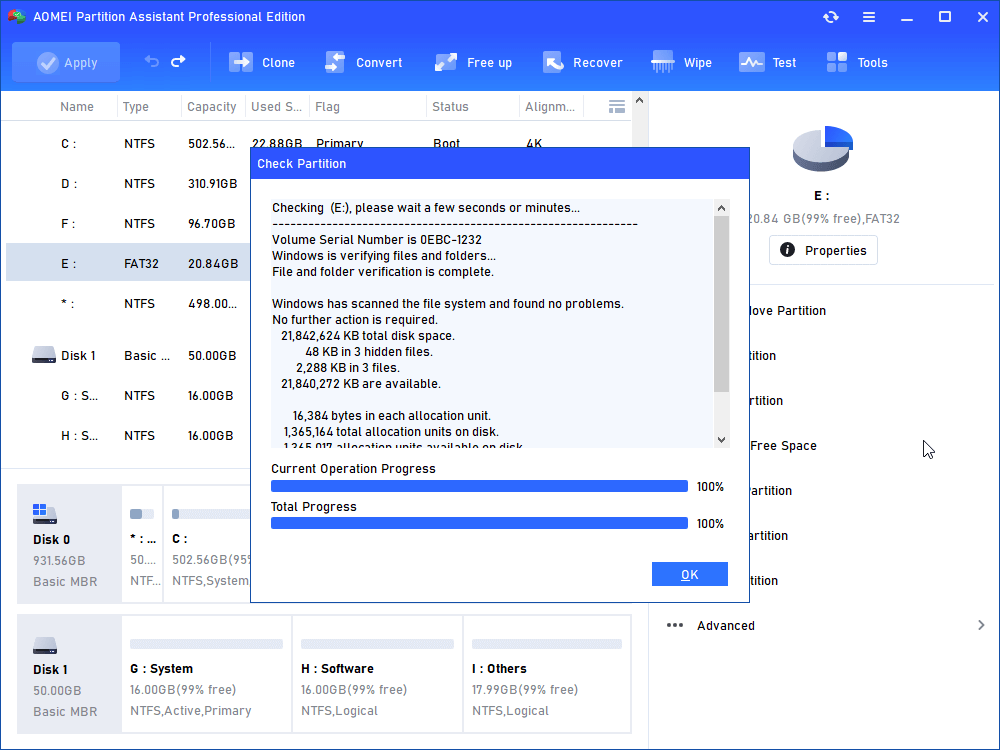
Step 3. Wait for a while and click "OK" when it's finished.
Method 7. Configure BIOS settings
If none of the previous methods work, it’s worth checking your computer’s BIOS settings. The BIOS (Basic Input/Output System) controls communication between the hardware and operating system. In some cases, incorrect storage settings can prevent an SSD from being detected properly. Follow these steps to adjust the configuration:
Step 1. Restart the computer and access the BIOS menu during startup. A message on the screen usually shows which key to press, such as Del, F2, or F10.
Step 2. Inside the BIOS interface, find the section related to SATA Configuration, Storage Options, or similar settings. The location may differ depending on the motherboard brand.
Step 3. Find the SATA Mode option and confirm it is set to AHCI (Advanced Host Controller Interface). AHCI is the preferred mode for most modern SSDs. If the setting is currently configured as IDE or RAID, switch it to AHCI.
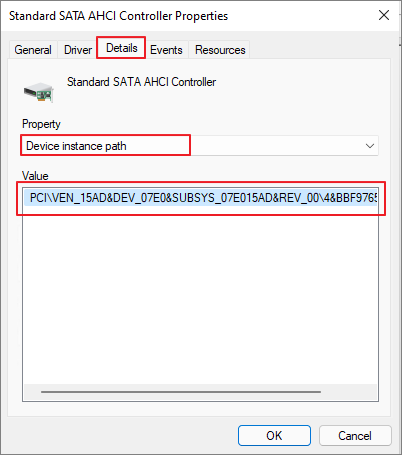
Step 4. Save the updated settings and exit the BIOS. The computer will reboot automatically, and the SSD should now be detected correctly.
Why second SSD not showing up Windows 11?
When a second SSD does not appear in Windows 11, most people immediately assume the hardware is defective. That assumption makes sense because storage drives are supposed to appear automatically once installed. Yet modern PCs are far more complicated than they used to be. Here are some main causes:
▶ The second SSD may not be properly connected to the motherboard or power supply, causing Windows 11 to fail to detect the drive.
▶ The SSD might not be initialized or partitioned, so it does not appear in File Explorer even though the hardware is installed.
▶ BIOS/UEFI settings may prevent the SSD from being recognized, especially if certain storage ports or modes are disabled.
▶ Some motherboards disable specific SATA ports when an M.2 SSD is installed, which can make the second SSD invisible.
▶ Outdated or corrupted storage drivers in Windows 11 can stop the system from detecting the SSD correctly.
▶ The SSD may have a damaged file system, hardware fault, or compatibility issue with the motherboard.
▶ A missing drive letter in Windows Disk Management can also cause the SSD not to appear in File Explorer.
FAQs
📌 How do I make Windows 11 recognize a new SSD?
To make Windows 11 recognize a new SSD, check BIOS detection, initialize the drive in Disk Management, assign a drive letter, and update storage controller drivers if necessary.
📌 Can a motherboard disable SATA ports when using M.2 SSDs?
Yes, some motherboards automatically disable specific SATA ports when an M.2 SSD is installed because certain SATA and M.2 slots share motherboard bandwidth or chipset lanes.
📌 Why does my NVMe SSD not appear in Disk Management?
An NVMe SSD may not appear in Disk Management due to outdated BIOS, missing NVMe drivers, improper installation, disabled PCIe settings, or because the SSD has not been initialized yet.
📌 Should I update BIOS if my SSD is not detected?
Yes, updating BIOS can help if an SSD is not detected, especially with newer NVMe drives, because BIOS updates often improve storage compatibility, stability, and hardware recognition.
Conclusion
When a second SSD is not showing up in Windows 11, the cause ranges from loose hardware connections and uninitialized disks to outdated drivers, conflicting BIOS settings, or missing drive letters. You can quickly resolve this issue by securing cables, using Disk Management to initialize the drive and assign a letter, updating your drivers or firmware, and ensuring your BIOS SATA mode is set to AHCI.

 as a preferred
source on Google
as a preferred
source on Google