
How to Partition Laptop Hard Drive in Windows 11/10
Wondering how to partition laptop hard drive in Windows 11 or 10? This guide covers two proven methods to help you organize your storage effectively and improve disk management with ease.
By Hedy Updated on June 4, 2026
Why partition a laptop hard drive?
Before learning how to partition laptop hard drive in Windows 11, it’s crucial to understand why partitioning matters. Partitioning divides a physical hard drive into independent sections, called partitions, and offers several advantages:
► Organize data efficiently: Separate partitions allow you to store the operating system, applications, and personal files independently. This structure makes managing files easier and more organized.
► Run multiple operating systems: If you plan to use Windows alongside Linux or another OS, each system requires its own partition for smooth performance.
► Reduce risk of data loss: Keeping your OS and personal data on different partitions ensures that if your system crashes, your files remain intact.
Understanding disk formats: MBR vs GPT
Sometimes, creating partitions in Windows can be confusing due to disk formats:
🚩 MBR (Master Boot Record): Supports drives up to 2TB and allows up to four primary partitions.
🚩 GPT (GUID Partition Table): Supports drives larger than 2TB and an unlimited number of partitions.
If your hard drive is MBR and larger than 2TB, you may find that creating new partitions from unallocated space is restricted. In such cases, converting the disk to GPT is recommended.
How to partition laptop hard drive in Windows 11
There are multiple methods to partition a laptop hard drive in Windows 11, including built-in tools and third-party software.
Way 1: Using Windows Disk Management
Windows includes a built-in Disk Management tool that allows you to shrink existing partitions, create new ones, and format them.
Step 1. Right-click This PC → select Manage → Storage → Disk Management.
Step 2. Right-click the partition you want to shrink and select Shrink Volume.
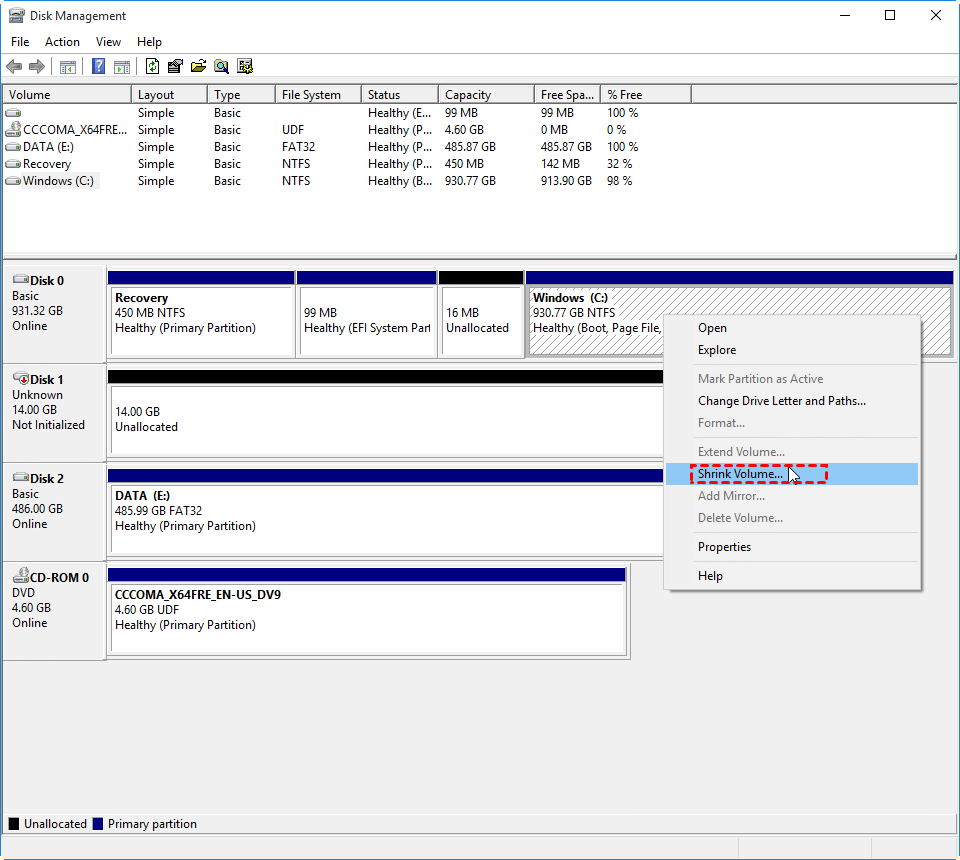
Step 3. Enter the desired size for the new partition in MB and click Shrink.
Step 4. Right-click the resulting Unallocated space and select New Simple Volume. Follow the wizard to set the drive letter, file system, and volume label.
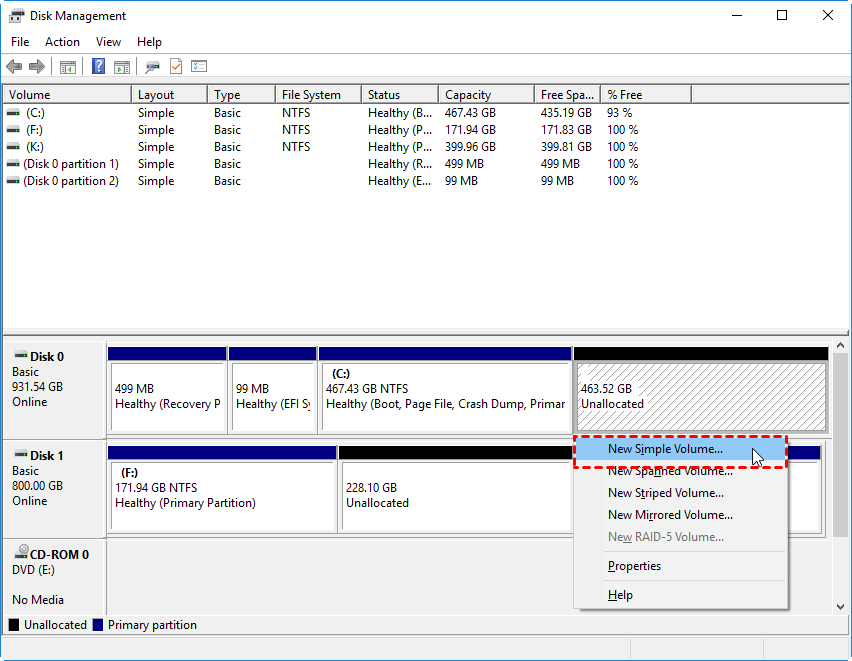
🔔 Tip: If the New Simple Volume option is greyed out, it may be due to MBR limitations or existing dynamic disk configurations.
Way 2: Using AOMEI Partition Software
AOMEI Partition Software is a professional and user-friendly disk management tool designed to help Windows users manage their hard drives efficiently. It offers a wide range of functions, including creating, resizing, merging, splitting, formatting, and deleting partitions without data loss. Unlike Windows’ built-in Disk Management tool, AOMEI provides more flexibility, advanced features, and a simpler interface, making it ideal for both beginners and experienced users.
For Windows 11, AOMEI Partition Software allows you to:
✅ Create new partitions to organize data and separate system files from personal files.
✅ Resize or extend partitions to optimize disk space usage.
✅ Merge partitions without losing data.
✅ Convert disk types between MBR and GPT or between NTFS and FAT32.
✅ Migrate OS to SSD/HDD, which is useful when upgrading your system drive.
With AOMEI Partition Software, you can partition your laptop or desktop hard drive safely and efficiently, even if your disk is nearly full or has existing data. Its step-by-step interface ensures that partitioning your Windows 11 drive is straightforward and secure.
A free and reliable disk partition software that helps you resize partitions, migrate OS, convert disks, and optimize PC efficiently.
1. Create a partition with unallocated space
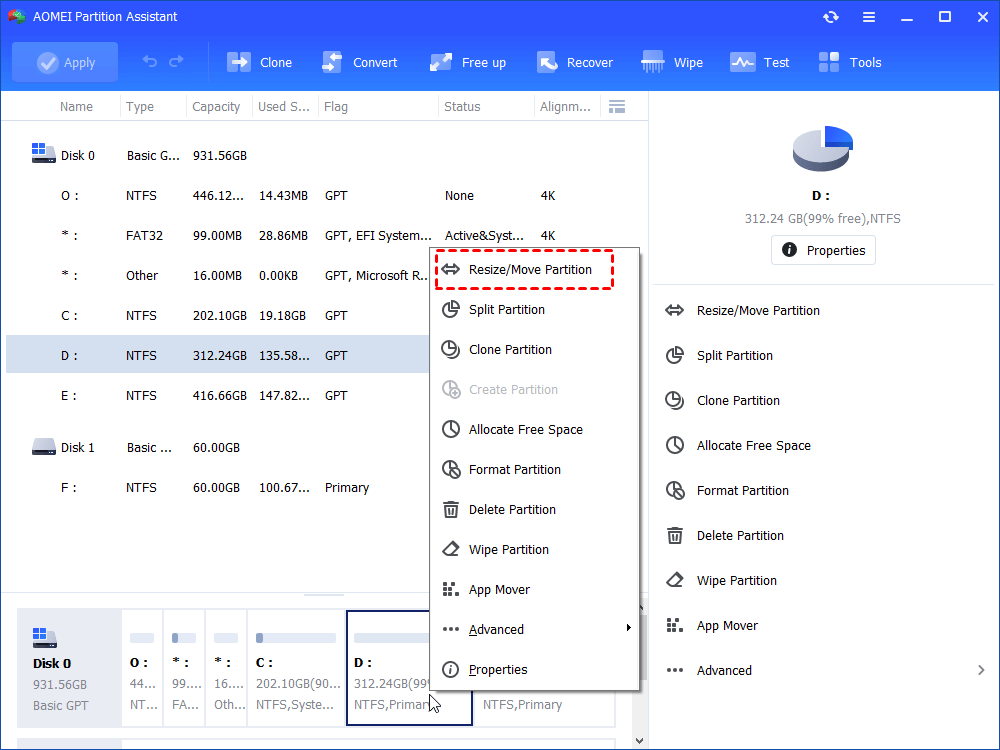
Step 1. Install and launch the software. Locate the NTFS disk you want to partition, then right-click the target partition (e.g., the F: drive) and select Resize/Move Partition.
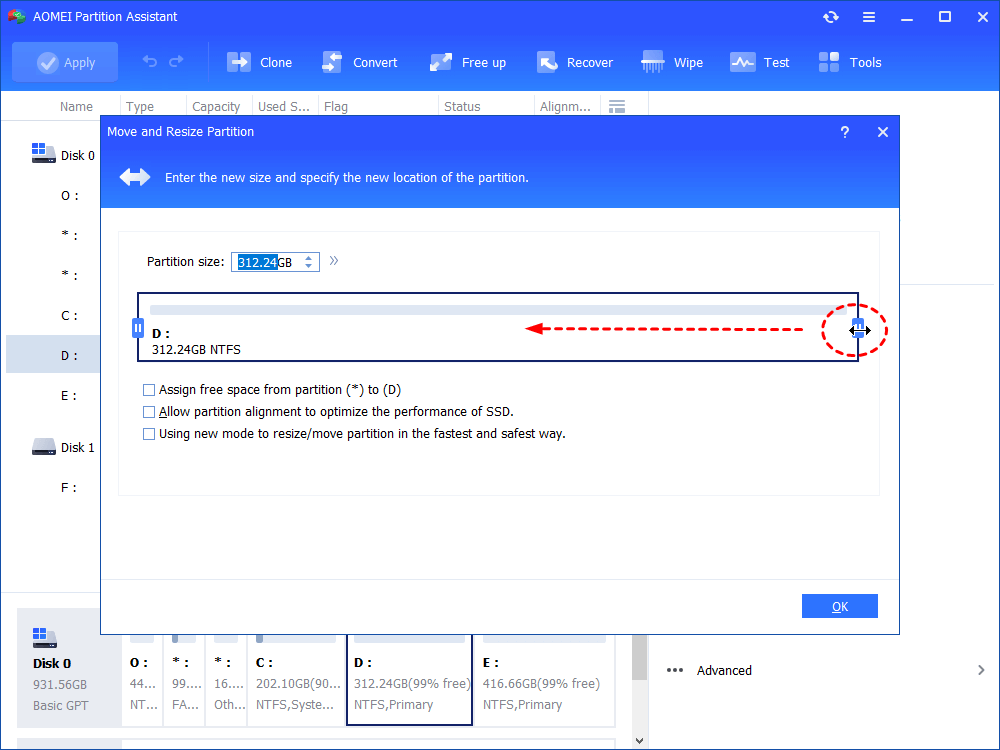
Step 2. Drag the slider bar to the left to shrink the partition and create unallocated space, then click OK.
Step 3. Once unallocated space appears next to the F: drive, right-click it and choose Create Partition.
Step 4. Adjust the size of the new partition by dragging the slider. Assign a drive letter and choose a file system, then click OK.
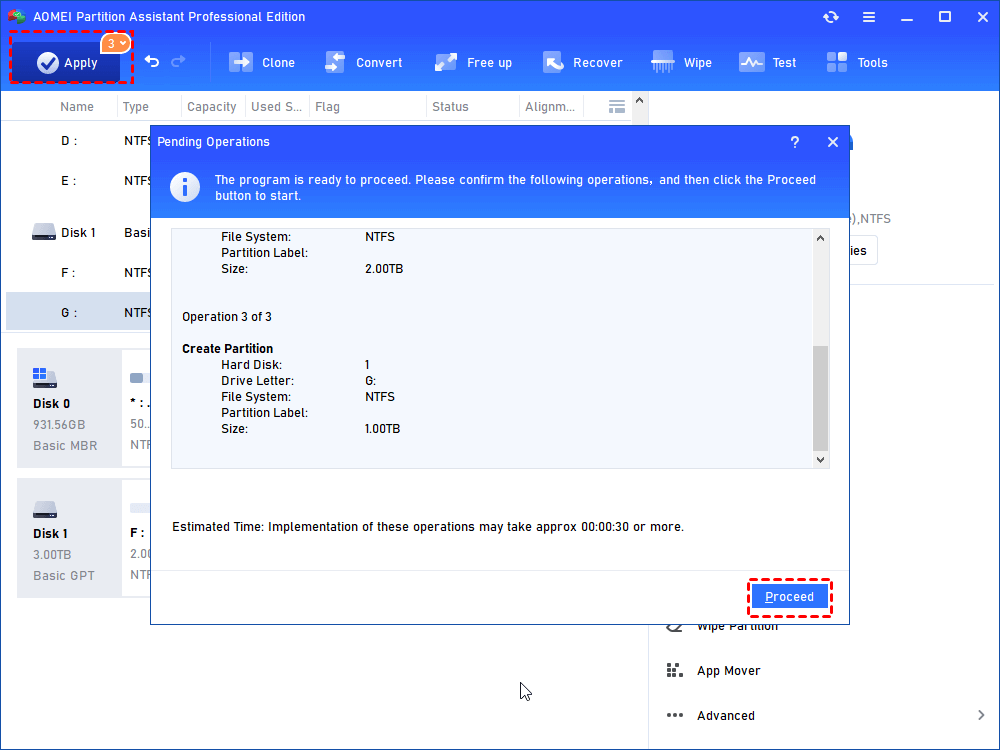
Step 5. Return to the main interface, review the pending changes, and click Apply > Proceed to execute the operation.
2. Create partition on the existing partition
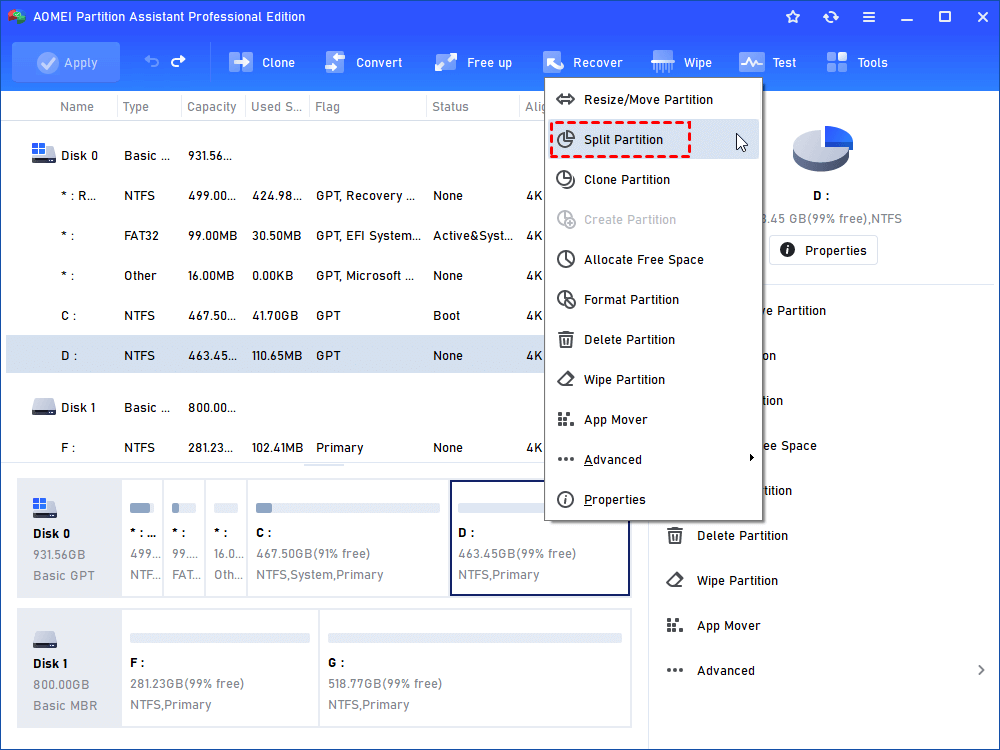
Step 1. Install and launch AOMEI Partition Software. Then, right-click on the D drive and select "Split Partition".
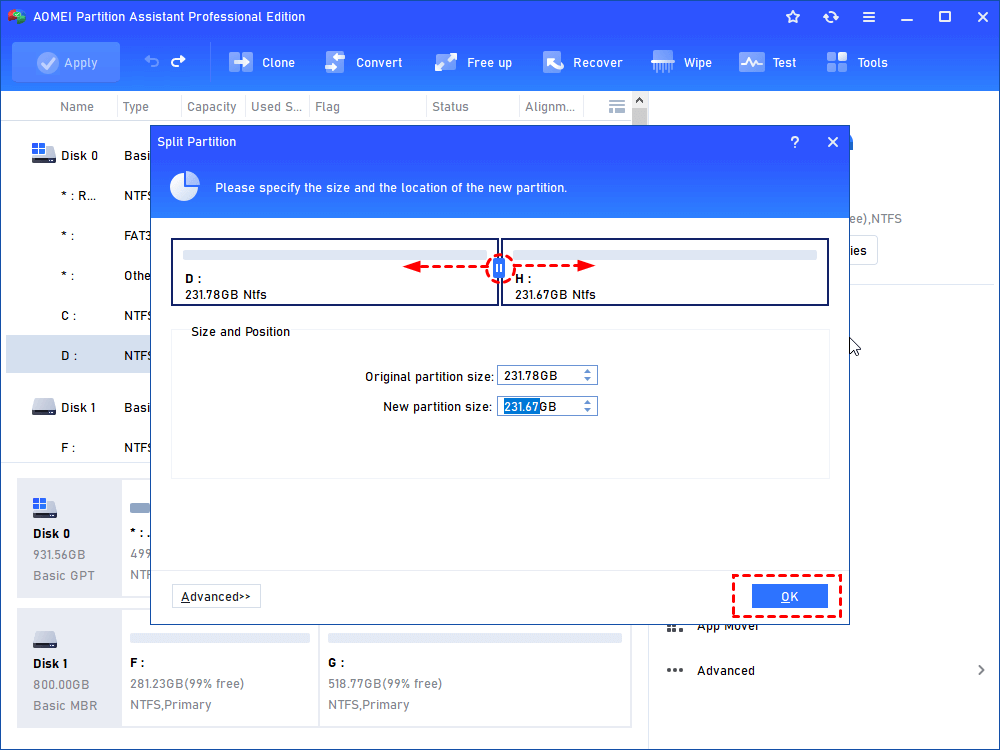
Step 2. In the following window, you can customize the size of the source partition and new partition by adjusting the length of the 2 green bars. After that, click on "OK".
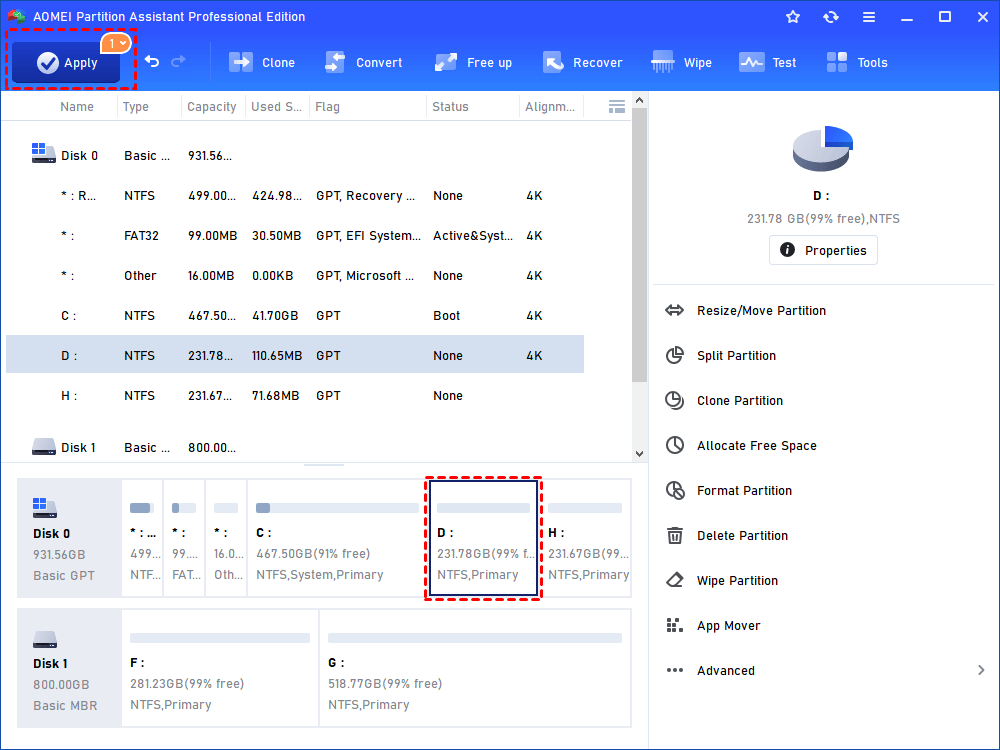
Step 3. Hit "Apply > Proceed" as the screenshot displays to commit the operation.
Conclusion
Partitioning a laptop hard drive in Windows 11 improves organization, enhances flexibility, and protects data by separating system files from personal content. Whether using built-in tools like Disk Management or advanced software such as AOMEI Partition Software, the process is straightforward and efficient. By understanding disk formats and choosing the right method, you can optimize storage, boost performance, and manage your data more securely and conveniently.