
Fixed: AOMEI Partition Assistant Error Code 2 - Failed to Assign Drive Letter
How to solve the Error Code 2: Failed to assign a drive letter in AOMEI Partition Assistant? In this guide, we'll show you detailed steps to fix the problem.
By Lucas Updated on January 7, 2026
Partitioning software is designed to handle complex disk operations automatically, but sometimes the Windows operating system refuses to cooperate. One of the most common issues users encounter when using AOMEI Partition Assistant is Error Code 2.
The error message typically reads:
"Failed to assign a drive letter for the volume, please manually add a drive letter for the volume by disk management."
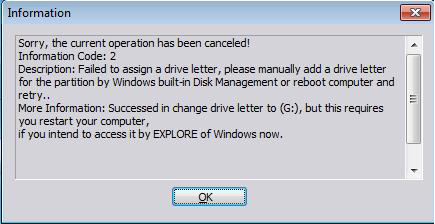
This error usually pops up at the very end of a partition operation—such as resizing, splitting, or creating a new partition. You might watch the progress bar reach 100%, only to be greeted by this warning. It can be confusing: Did the operation fail? Is my data lost?
The good news is that Error Code 2 is a minor error. It means the difficult part (partitioning the disk) was successful, but the final cosmetic step (giving the drive a name like "E:" or "F:") failed.
What is Error Code 2?
When you create or modify a partition, AOMEI Partition Assistant sends a request to Windows to assign a "mount point" or Drive Letter to that new space so it appears in File Explorer.
Error Code 2 indicates that Windows rejected or timed out on this request. This typically happens for one of three reasons:
-
System Lag: Windows is slow to update its internal partition table and didn't register the new volume in time to name it.
-
Drive Lock: Another program (like an antivirus or a file explorer window) was "holding" the drive, preventing the software from making changes to its identity.
-
Group Policy Restrictions: On some corporate or secured PCs, policies may prevent external software from assigning drive letters automatically.
Since the partition itself is usually created successfully despite this error, you simply need to finish the job manually.
Method 1: Reboot and Retry (The Simplest Fix)
In many cases, the error is caused by a temporary system glitch or a locked process. A simple reboot forces Windows to refresh its partition table and release any locked files.
Steps:
-
Close AOMEI Partition Assistant and any other open applications.
-
Restart your computer completely.
-
Once Windows boots back up, open File Explorer and check "This PC."
-
Scenario A: Windows automatically detected the new partition during boot and assigned it a letter. The problem is fixed.
-
Scenario B: The partition remains invisible. In this case, relaunch AOMEI Partition Assistant to see if the partition exists but lacks a letter (it will show as "*"). You can then try using the "Change Drive Letter" feature in the software again.
-
If the software still fails to assign it, proceed to Method 2.
Method 2: Manually Assign Drive Letter via Windows Disk Management
Since the error message explicitly suggests using Disk Management, this is the most reliable solution. It uses Windows' native tools to force the assignment.
Steps:
-
Press Windows Key + X on your keyboard and select Disk Management from the menu.
-
In the Disk Management window, locate the partition that is causing the issue. It will likely appear as a healthy partition but without a drive letter (e.g., it won't have "(E:)" next to its name).
-
Right-click on this partition and select "Change Drive Letter and Paths...".

-
Click the "Add" button.
-
Select "Assign the following drive letter" and choose a letter from the dropdown menu (e.g., F, G, H).
-
Click OK.
Windows should immediately mount the drive, and an AutoPlay window may pop up indicating the drive is now accessible.
Method 3: Use Command Line (Diskpart)
If Disk Management is greyed out or unresponsive, you can use the Command Prompt. This method is authoritative and often bypasses graphical interface bugs.
Steps:
-
Press Windows Key + R, type diskpart, and press Enter.
-
Type list volume and press Enter. Look for the volume that does not have a letter in the "Ltr" column.
-
Type select volume X (replace X with the number of your target volume).
-
Type assign letter=F (replace F with your desired letter).
-
Type exit to close the tool.
Tips:
Sometimes you can’t assign drive letter successfully whether you use Aomei Partition Assistant or Disk Management. Using AOMEI Partition Assistant, you may encounter information code 2 when trying to assign drive letter for a partition. Using Windows Disk Management, you may see error message below“Disk Management console view is not up-to-date......” when assigning drive letter for a partition:
To fix this issue:
1).Press Win +R and type “gpedit.msc” to open Group Policy
2).Locate to Local Computer Policy -> Computer Configuration -> Administrative Templates -> System -> Device Installation -> Device Installation Restrictions
3).Find “Prevent installation of devices not described by other policy settings” and set it as“Not configured”
P.S:It is not recommended to modify or delete the key directly from the registry, because this will leave some residual information in the registry, so it is recommended to use the Group Policy Editor to deal with it.
If problem persists, please feel free to contact our AOMEI Support Team.
Conclusion
Error Code 2 in AOMEI Partition Assistant is a "success with a warning." It means your partition was likely created or resized correctly, but the software simply couldn't name it. By using the native Windows Disk Management or a simple reboot, you can manually assign the drive letter and access your files immediately. This keeps your data safe while bypassing the limitation of the automatic process.