



How to Unformat a Hard Drive and Recover Your Files
Accidentally formatted the wrong drive? This unformat hard drive guide helps you choose between a recovery scan and an existing backup, understand recovery limits, and save retrieved files to a separate drive.

By Ivy Updated on September 11, 2026


You accidentally formatted your hard drive, and the photos, documents, and other files you need are no longer visible. Can you get them back?
Unformat hard drive may still be possible after a quick format, depending on whether the original data remains readable. Stop using the drive to avoid overwriting it. AOMEI FastRecovery can scan hard drive for recoverable files, while an existing backup or Windows File Recovery offers another recovery method.
This guide explains how to unformat hard drive in 3 useful methods. First, check which recovery option fits your situation.
Check Your Recovery Options Before Scanning
A quick format creates a new file system without deliberately overwriting every data sector. Some old file data may remain, though file names and folder information can be lost. A full format that zeroes the volume eliminates this recovery opportunity entirely.
| 🧩 Your situation | ✅ Suitable methods | ❌ Key limitation |
|---|---|---|
| Quick-formatted HDD or SSD | AOMEI FastRecovery | Results depend on what remains readable |
| Prefer a free command-line option | Windows File Recovery | Requires correct drive letters and commands |
| A separate backup contains the files | File History | Only previously backed-up files are available |
| Drive clicks or repeatedly disconnects | Professional recovery assessment | Continued scanning may worsen a failing drive |
-
Don’t format the drive again or create new partitions. If the files are irreplaceable, consider professional assessment before attempting recovery.
-
New files, Windows reinstallation, and SSD TRIM can further reduce recovery chances.
Method 1: Unformat Hard Drive with AOMEI FastRecovery
👍 Best for: Accidentally quick-formatted hard drives when you want a graphical recovery workflow.
AOMEI FastRecovery is easy-to-use hard drive recovery software that can retrieve deleted photos, documents, videos, and more after formatting.
 AOMEI FastRecovery
- 🧱 Partition Formatted Recovery: Specialized recovery for formatted hard drives, SSDs, external disks, USB drives, and more. Deep Scan runs by default.
- 📚 1000+ Data Types: recover deleted documents, photos, audios, videos, and more.
- 📂 Flexible Browsing: Navigate results by file type or folder path - clean, intuitive, and beginner‑friendly.
- 🚀 Pinpoint What You Need: Search, sort, and filter to quickly find files - with thumbnail previews so you know exactly what you're recovering.
- 💰 Free Tier: Recover data up to 500MB for free. Need more? Upgrade for unlimited recovery.
 100% Secure
-
Download and install AOMEI FastRecovery on a different, healthy drive, not the one you formatted.
-
Prepare anotherdrive with enough free space for recovered files.
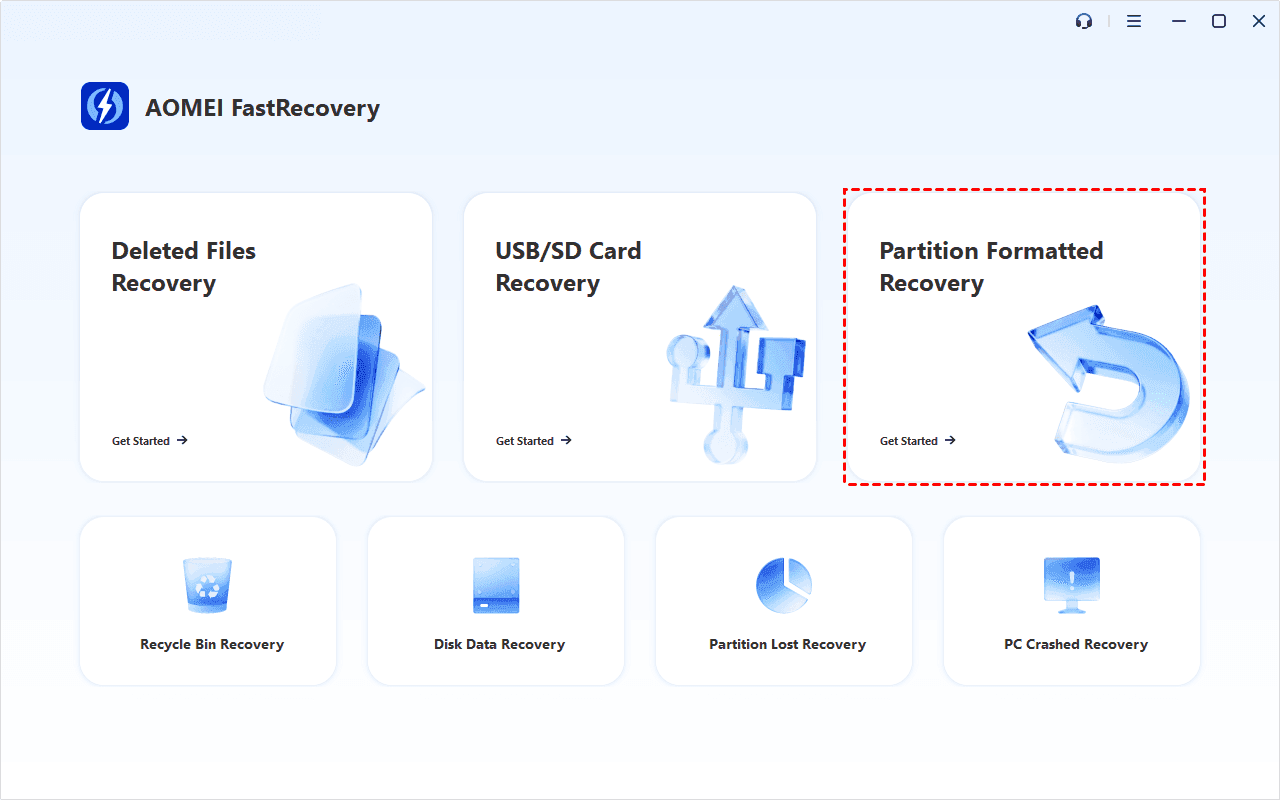
Step 1. Connect the formatted drive if it's external. Then, open this software, and select Partition Formatted Recovery.
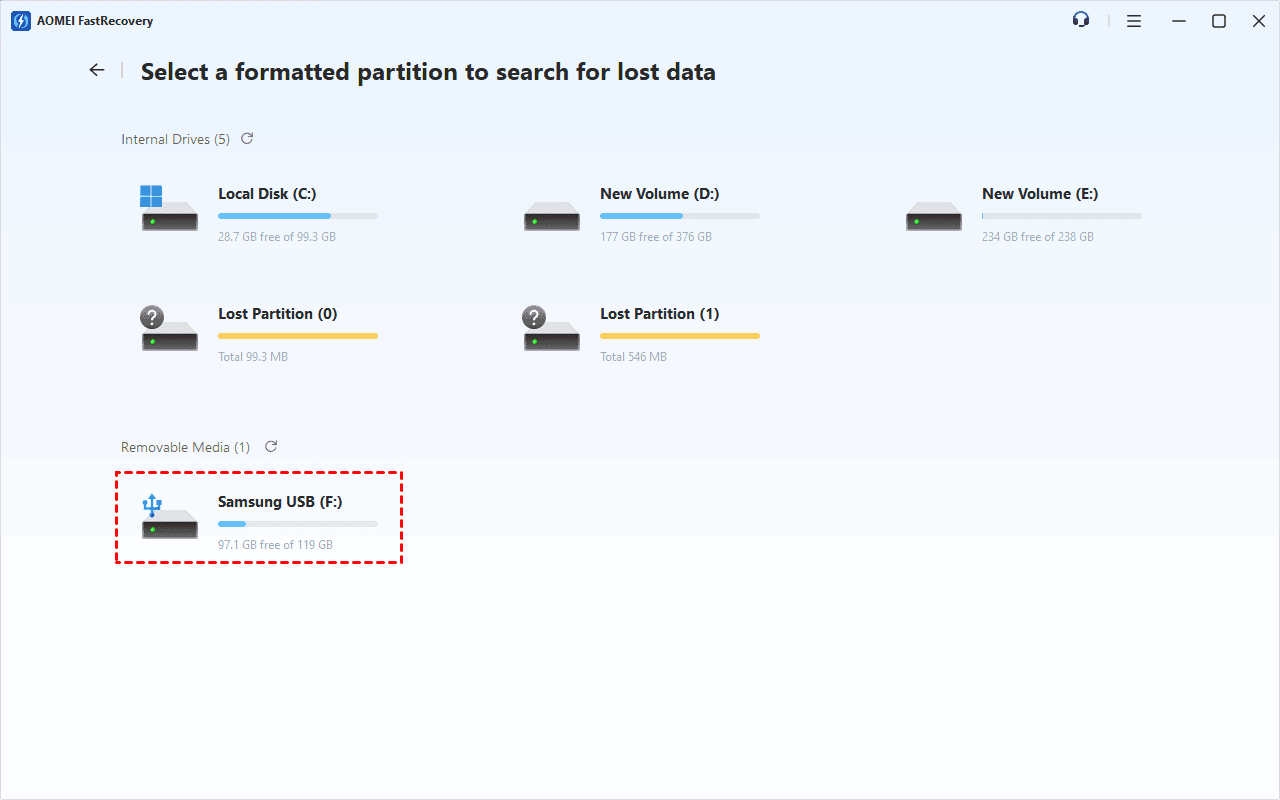
Step 2. Identify the formatted hard drive by its capacity and drive letter, then click Scan.
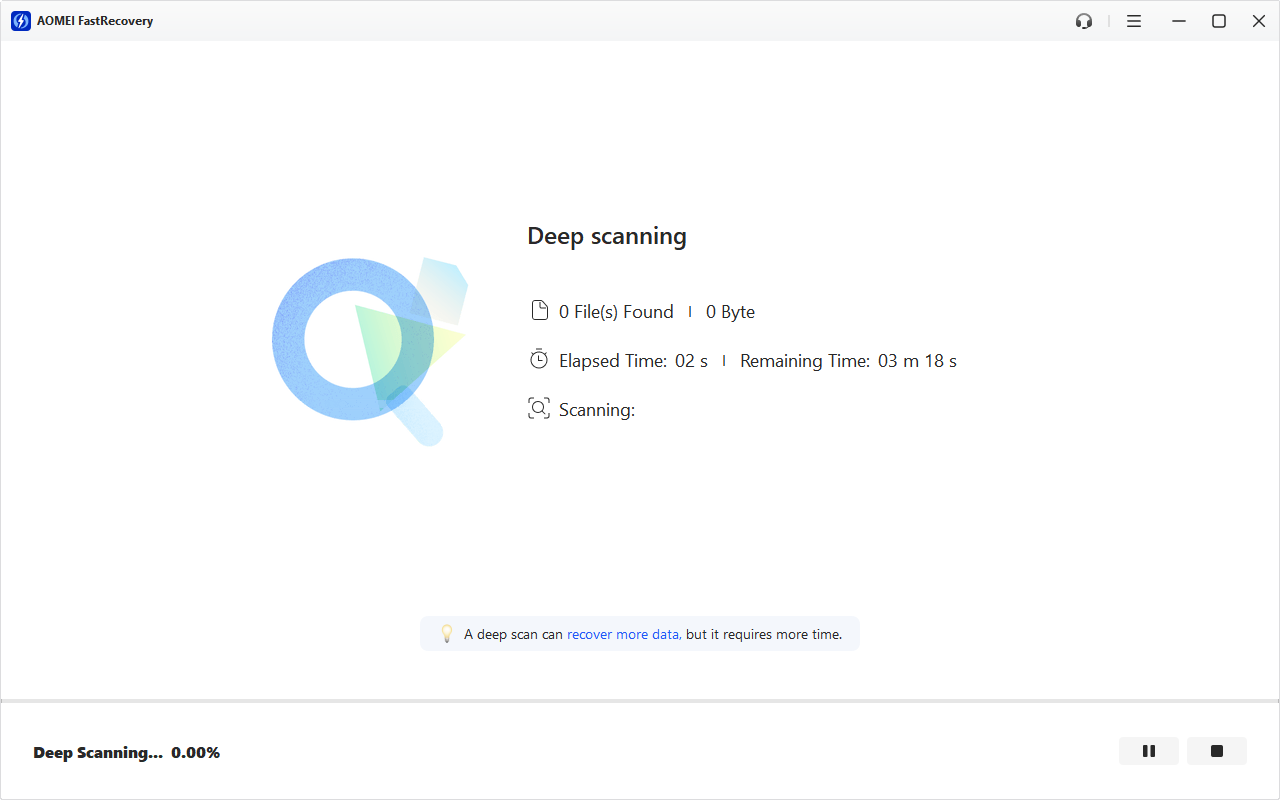
Step 3. Deep Scan will start automatically to find recoverable data. Scanning time varies with drive capacity, connection speed, and condition.
Step 4. Review the results under Type or Path. Search for a filename or extension, such as .jpg or .docx, sort the results, or use filters to narrow your search. Or select all data and click Recover.
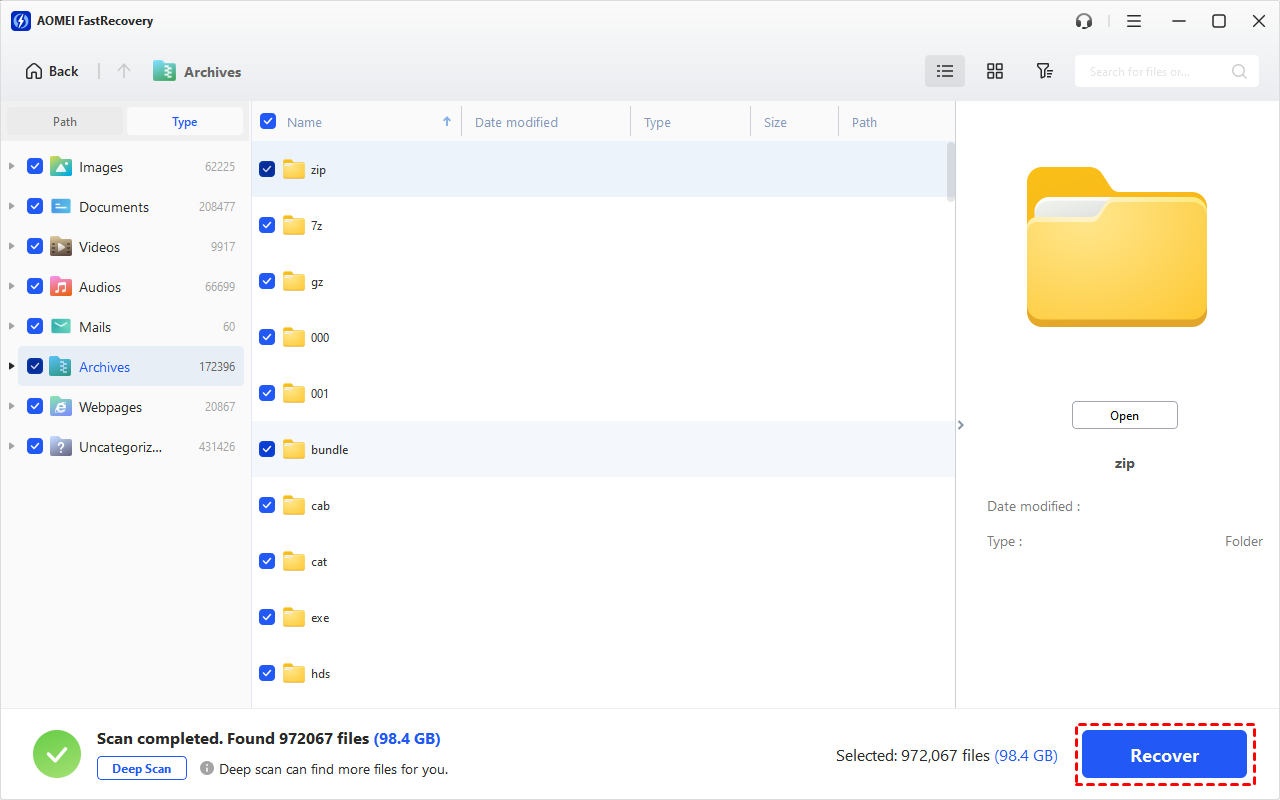
Step 5. Select a separate, healthy drive as the destination to avoid overwriting your data. Another folder on the formatted drive is not a safe destination.
The free edition recovers up to 500MB. Recovery beyond that allowance requires an upgraded edition.
Method 2: Recover Data from Formatted Hard Drive with Windows File Recovery
Best for: A formatted drive with a drive letter when you’re comfortable using commands;
Windows File Recovery is Microsoft’s free data recovery app to recover deleted documents, photos, videos, etc., from internal or external hard drive. Microsoft recommends Extensive mode after formatting an NTFS disk. It can also attempt recovery from FAT and exFAT storage, but it needs a different destination drive.
Step 1. Install Windows File Recovery from the Microsoft Store on your Windows PC. Confirm the drive letter of formatted drive (E:) and the destination (F:) in File Explorer.
Step 2. Open Windows File Recovery, approve the permission priority, and enter:
winfr E: F: /extensive
Replace both letters with yours. To recover deleted PDF and Word documents, type:
winfr E: F: /extensive /n *.pdf /n *.docx
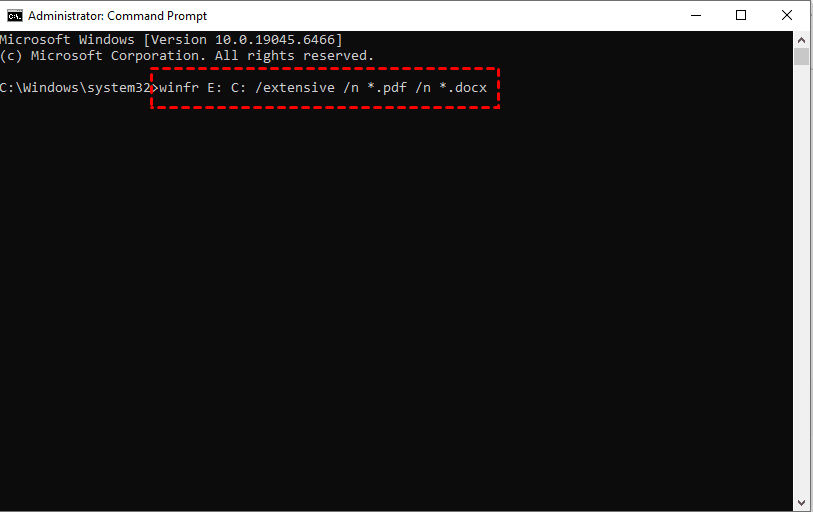
Remember to enter Y when prompted. To check the file system of the formatted drive, right-click it and select Properties in File Explorer.
After recovery, review the generated Recovery_ folder on the destination drive.
Method 3: Restore Files After Formatting a Hard Drive with File History
👍 Best for: Files included in a File History backup made before formatting; files outside that backup are not covered.
File History is a Windows backup feature that creates copies of your files, allowing you to restore previous versions even when the originals are no longer recoverable. However, having File History enabled doesn't guarantee that every folder on your drive was backed up.
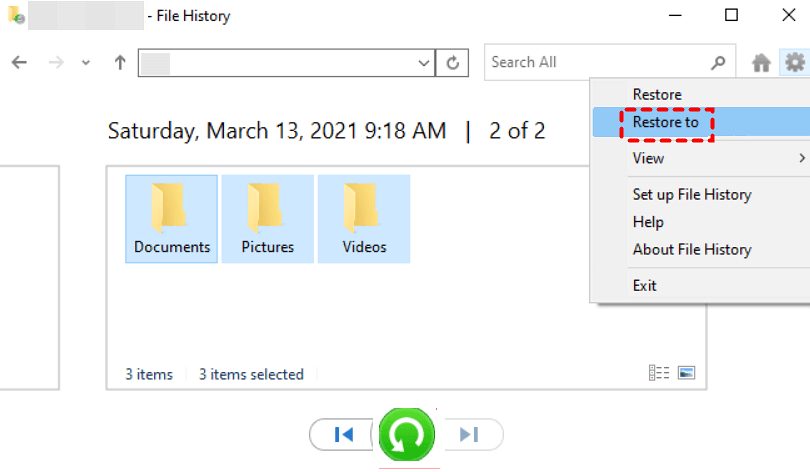
Step 1. Connect the drive containing your existing File History backup. Open Control Panel and select System and Security > File History > Restore personal files.
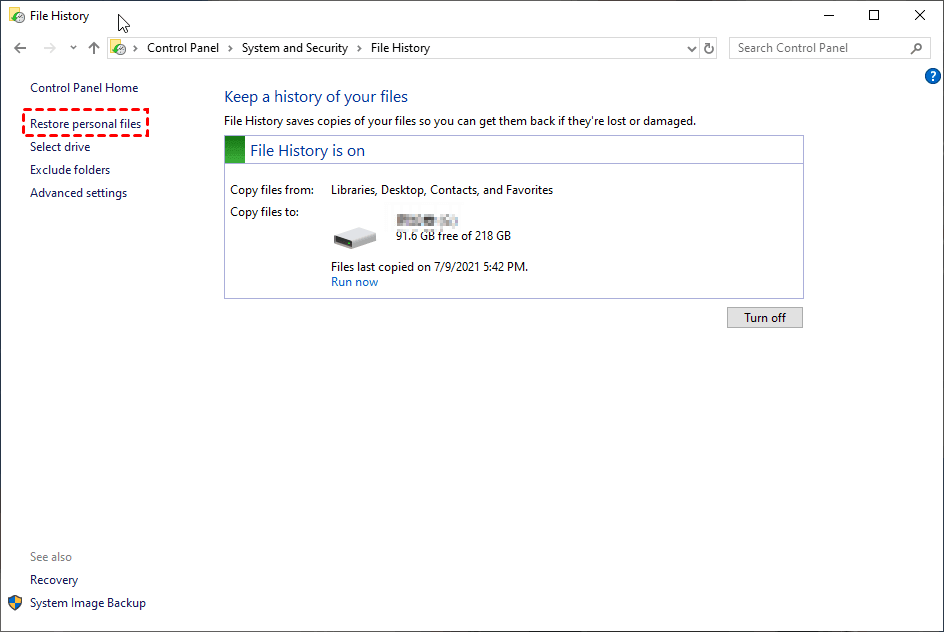
Step 2. Browse to the files or folders you need. Use the navigation arrows to select a backup from before formating.
Step 3. Select the files, right-click Restore, and choose Restore to. Pick a folder on a different, healthy drive so your data remains available for further recovery.
If Files Are Missing or Won’t Open
An empty scan does not automatically mean another program will recover everything. First, confirm that you scanned the correct drive and completed the scan without interrupting. Remove restrictive filename filters and browse by file type.
If results remain incomplete, consider what happened after formatting:
- New data was written: New files or an operating system installation may have overwritten parts of the original files.
- SSD with TRIM enabled: RIM and controller cleanup can make old data unavailable, even without new files being written.
- The volume was encrypted: Recovery depends on usable encryption information and credentials, as well as surviving file data.
- The drive behaves abnormally: Stop repeated scans if it clicks, disconnects, or becomes increasingly difficult to read.
Files that won’t open may be incomplete or damaged. Keep the original drive unchanged while you check other backups or seek professional advice. Don’t erase it simply because a scan produced a long file list.
FAQs About Unformatting a Hard Drive
Can CHKDSK or attrib undo formatting?
No. CHKDSK checks and repairs file system errors; /f switches modify the volume. Attrib changes file attributes. Neither recreates files removed by formatting. Consider using a recovery software or an existing backup.
Windows asked me to format the drive, but I clicked Cancel, how to recover data?
Clicking Cancel before formatting starts does not format the drive, but the become inaccessible, even show as RAW. To learn more, seerecover files from a RAW external hard drive. Don’t format it just to make it accessible.
Is a deleted partition the same as a formatted partition?
No. Formatting creates a file system within a volume; deleting a partition removes its partition entry. If you deleted a volume on an external disk, refer to: recover lost partition on external hard drive.
Will my original filenames and folders return?
Possibly, if enough file-system information survives. Otherwise, recovery may produce files with generated names or without their original folders. Check file contents rather than relying only on names.
Summary
Choose an unformat hard drive recovery route based on what remains available: scan a readable quick-formatted drive or restore files from a verified backup. For a graphical scan, start with AOMEI FastRecovery and recover your priority files to another drive.
Once you’ve checked the recovered files, keep a separate backup before putting the original disk back into use.

 as a preferred
source on Google
as a preferred
source on Google