




How to Recover Deleted Photos in Windows 11 (5 Methods)
To recover deleted photos in Windows 11, first check where the originals were saved. Follow the matching recovery method, understand its requirements, and check the recovered pictures before creating a separate backup.

By Ivy Updated on September 10, 2026


You deleted a folder while organizing your pictures, then realized it contained photos you still need. Even if you’ve emptied the Recycle Bin, there may be another way to retrieve them.
To recover deleted photos in Windows 11, check where the originals were stored. AOMEI FastRecovery can scan hard drive for deleted pictures, while cloud storage and existing backups may hold copies you can restore directly.
Do not save new files to the drive containing your deleted photos. If this is your system drive, keep computer use to a minimum, even background tasks can overwrite the data. Then, choose the method that matches your situation.
Match Your Situation to a Recovery Method
Microsoft Photos can display pictures from different locations. Check whether the originals were on your PC, an external drive, OneDrive, or iCloud Photos before choosing a recovery method.
| 🧩 Your situation | 👍 Best Method | 🔑 Key requirement |
|---|---|---|
| Photos remain in the Recycle Bin | Restore from the Recycle Bin | Photos haven’t been permanently removed |
| Photos were permanently deleted locally | AOMEI FastRecovery | A recognized drive containing recoverable data |
| Photos belonged to a cloud library | OneDrive or iCloud recovery | Photos remain in the service’s deleted-items area |
| A backup contains the pictures | File History | A backup made before deletion |
| You prefer a free command-line tool | Windows File Recovery | Supported local storage and a separate destination |
If you didn’t delete anything and files disappeared from an external hard drive, first check whether they’re hidden, moved, or inaccessible.
Method 1: Restore Photos from the Recycle Bin
👍 Best for: Restoring photos directly when they’re still in the bin.
When you delete photos normally in File Explorer, Windows usually moves them to the Recycle Bin first. You can restore them directly to their original folder without installing software. If you used Shift + Delete or emptied the bin, try one of the recovery methods below.
Step 1. Open Recycle Bin from the desktop. Search by filename or sort by Date Deleted to find your photos.
Step 2. Select the pictures, right-click, and choose Restore. Hold Ctrl while clicking to select several individual photos.
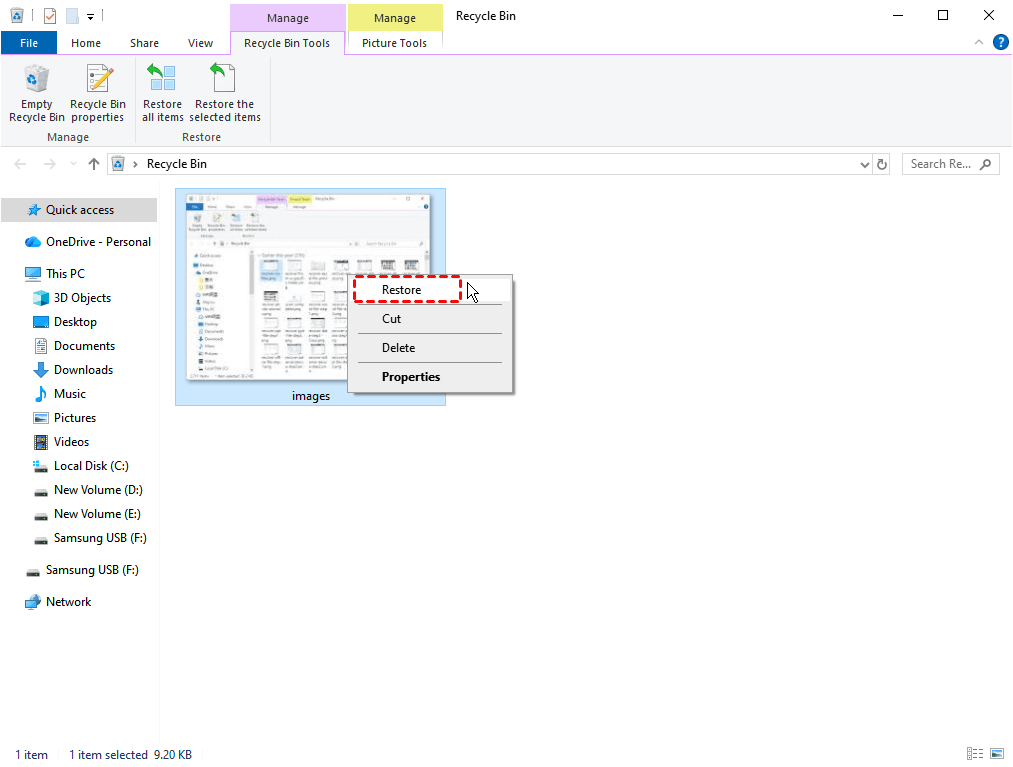
Step 3. Open their original folder and check the restored pictures. If you’re unsure where they’ll return, check Original Location in the bin before restoring them.
Ctrl + Z may undo deletion that was your last action in File Explorer. If you used Shift + Delete, emptied the bin, or files too large for the Recycle Bin, try one of the recovery methods below.
Method 2: Recover Deleted Photos with AOMEI FastRecovery
👍 Best for: Recovering permanently deleted photos from a detected drive; success depends on the remaining file data.
AOMEI FastRecovery is a reliable Windows photo recovery software that helps retrieve deleted pictures from your PC’s drive, external drives, USB disk, SD cards, and memory cards, including photos no longer in the Recycle Bin.
 AOMEI FastRecovery
- 🔎 Quick Scan, Then Deep Scan: Start with a Quick Scan to find recently deleted photos fast. If they're missing, Deep Scan searches more thoroughly.
- 📂 Flexible Browsing: Navigate results by image type or original folder - clean, intuitive, and beginner-friendly.
- 🚀 Pinpoint What You Need: Search, sort, and filter with thumbnail previews, so you know exactly which photo you're recovering.
- 💰 Free to Try: Recover up to 500MB for free. Need more? Upgrade for unlimited photo recovery.
 100% Secure
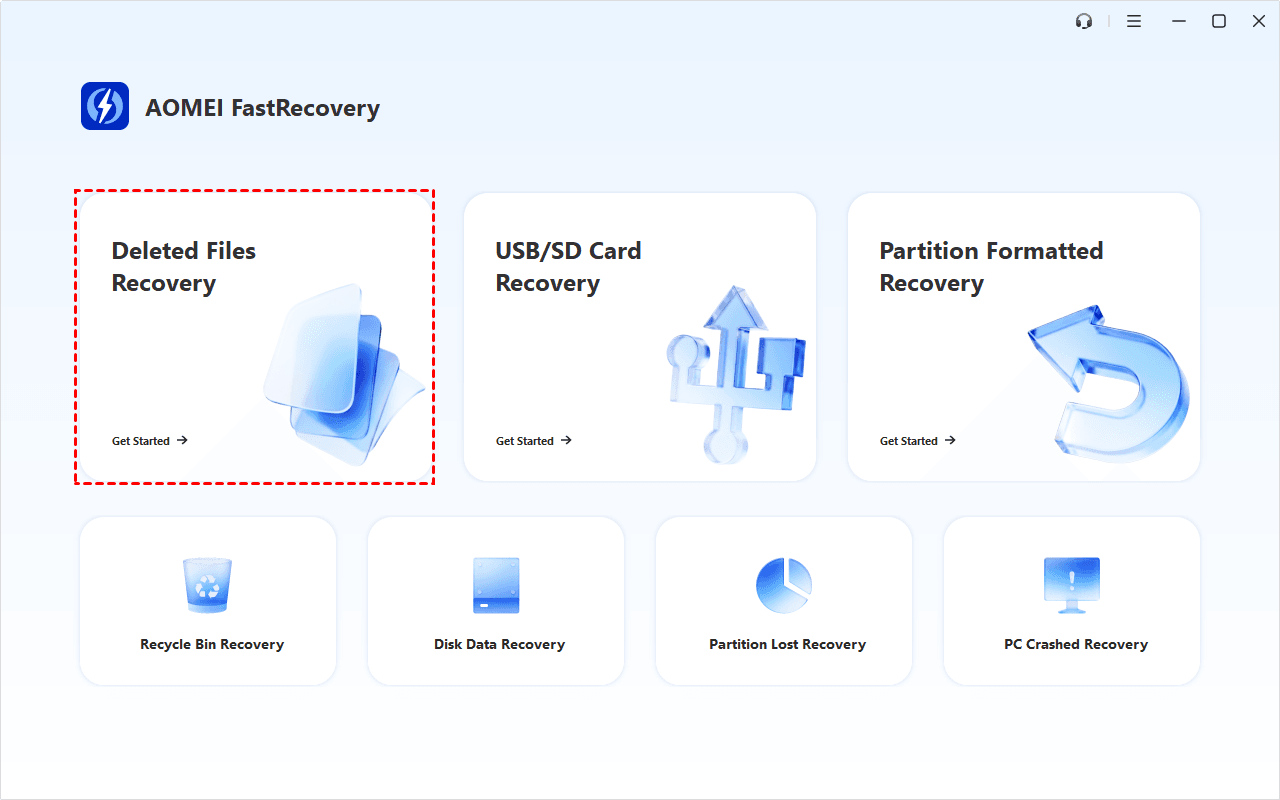
Step 1. Download and install AOMEI FastRecovery on a different drive from the one where the photos were deleted, then launch it and select Deleted Files Recovery.
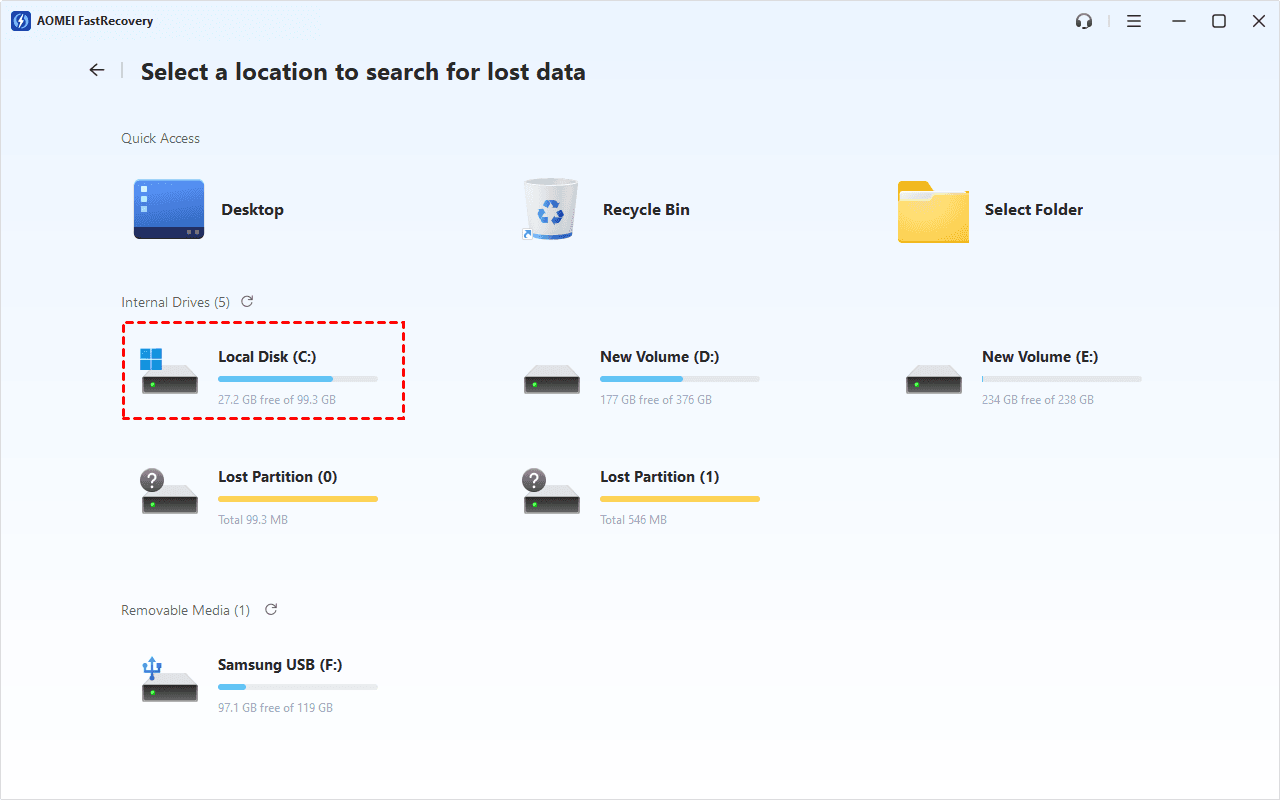
Step 2. Choose the drive that originally held the pictures, and click Scan.
Step 3. Review the results using Type to browse image formats or Path to check folders. Search for a filename or extension such as .jpg to narrow the results.
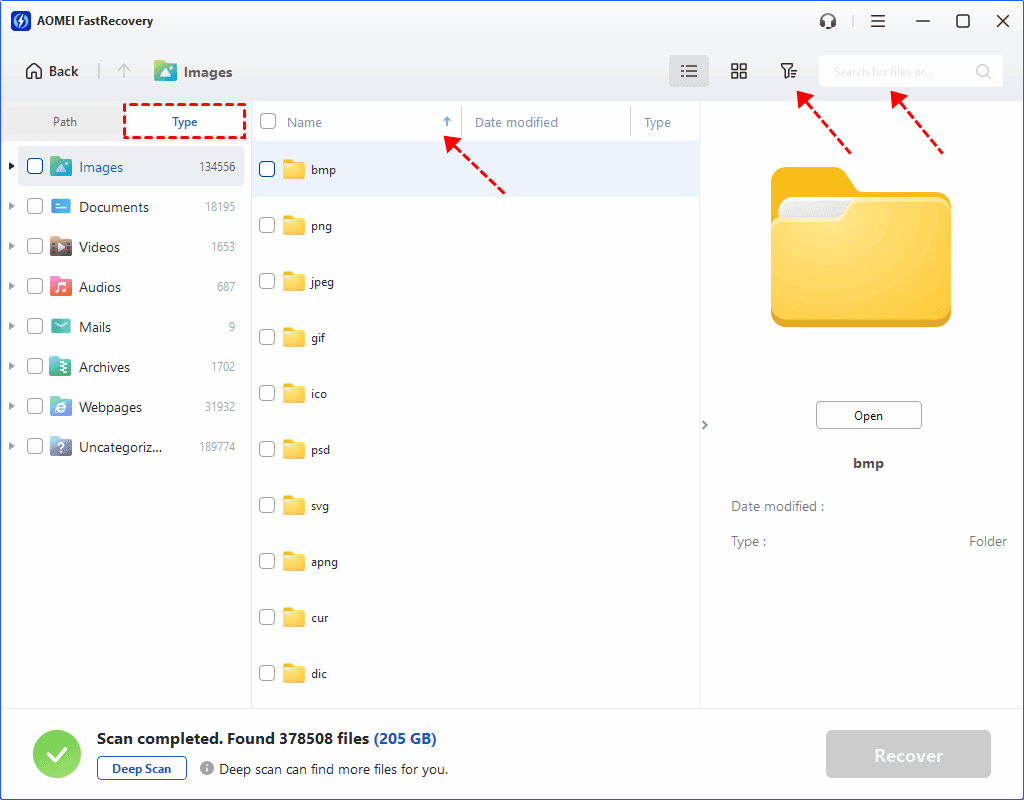
Step 4. If the required photos are missing after Quick Scan finishes, click Deep Scan to search more thoroughly.
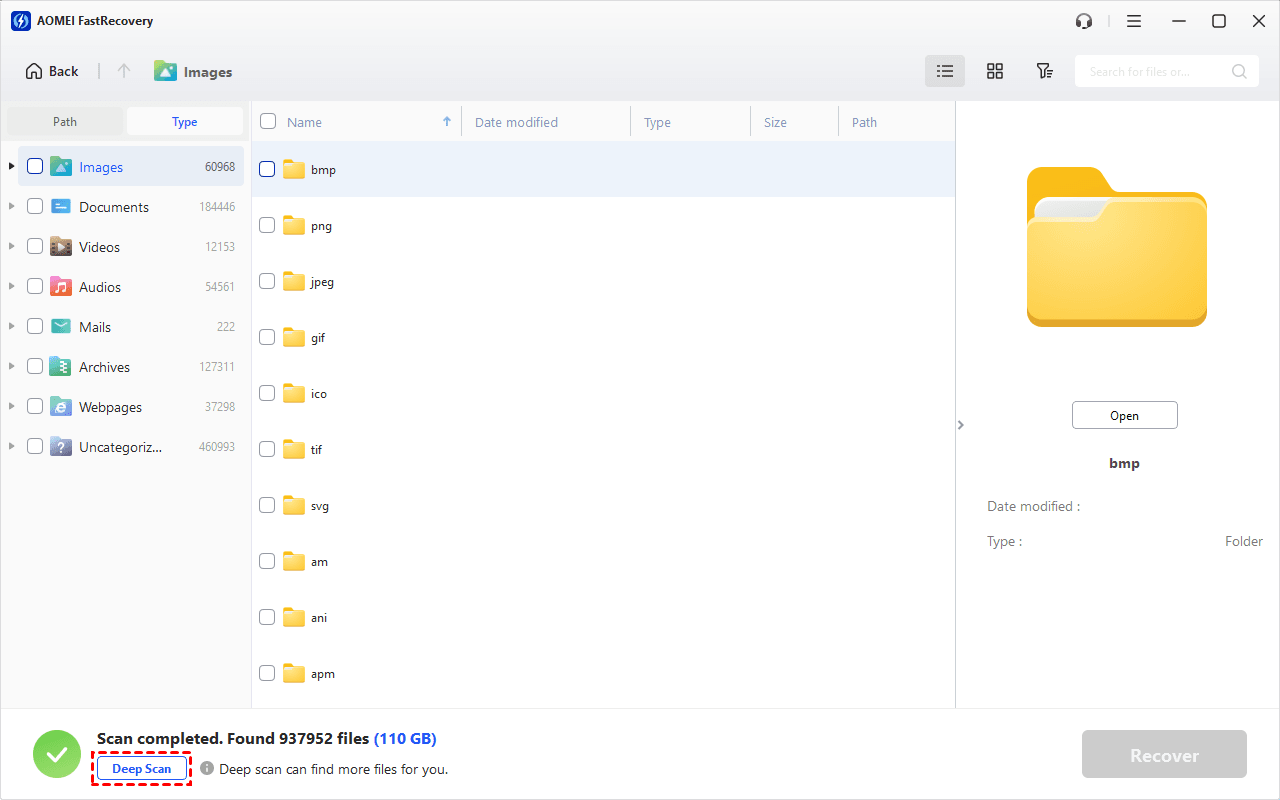
Step 5. Select your photos and click Recover. Save them to a different drive, then open the recovered copies to check them.
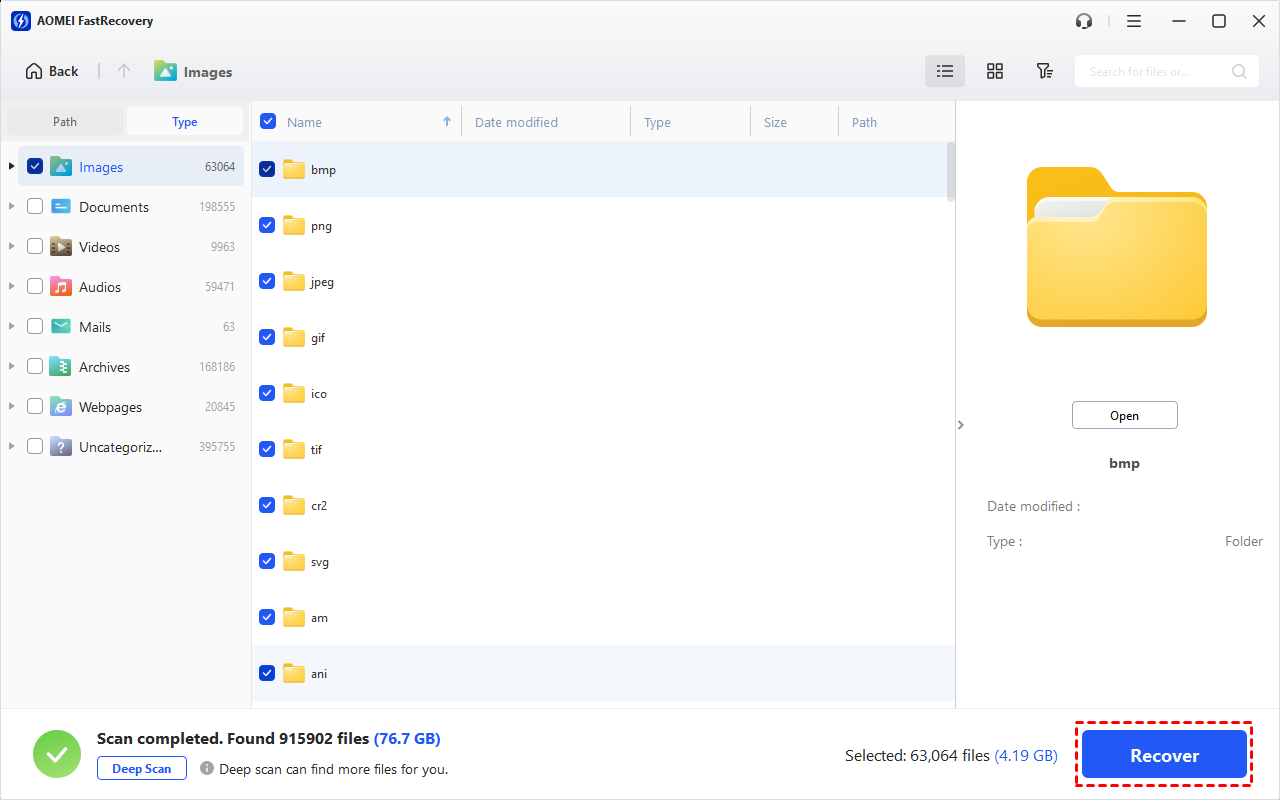
- The free edition includes scanning, thumbnail previews, and recovery of up to 500MB. Upgrade to unlock unlimited recovery and full preview.
- You can also recover specific image types instead of all files. See how to recover deleted JPEG/JPG files.
Method 3: Restore Photos from OneDrive or iCloud
👍 Best for: Retrieving pictures from cloud storage while they remain within the service’s recovery period.
If your photos were stored in OneDrive or iCloud Photos, they may still be available in the service’s online recovery area. This is separate from the Windows Recycle Bin. Sign in with the account that held your pictures and check for deleted photos before the recovery period expires.
Option 1: Restore Photos from OneDrive
In OneDrive, personal accounts normally retain deleted files for 30 days, while work or school accounts retain them for 93 days unless an administrator changes the setting.
Step 1. Open the OneDrive website in your browser and sign in with the Microsoft account that stored your photos.
Step 2. Open Recycle bin, select the pictures or folder you want, and click Restore.
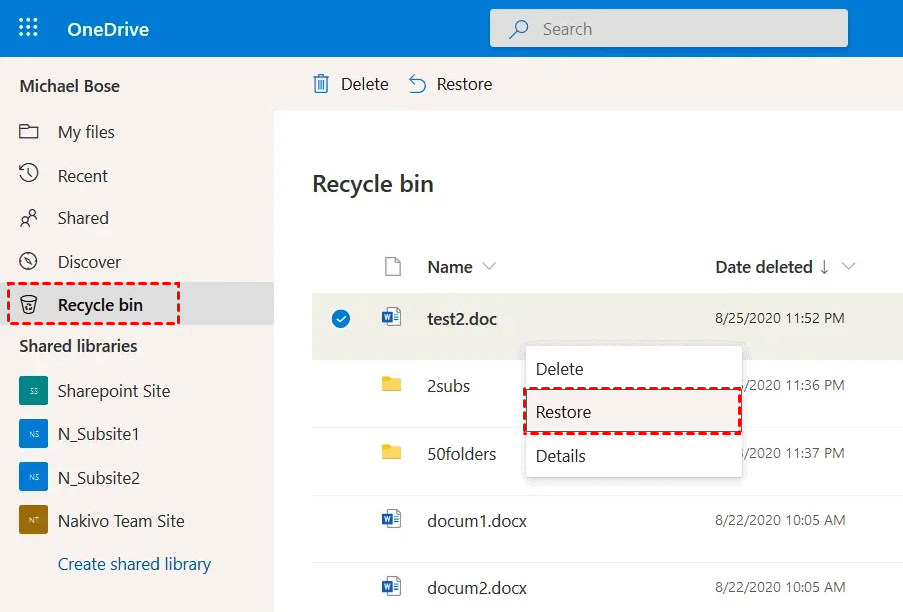
Step 3. Check their original OneDrive folder. Wait for the restored files to sync before looking for them on your PC.
Option 2: Restore Photos from iCloud
iCloud allows data recovery within 30 daysunless the photos have already been permanently removed.
Step 1. Sign in to iCloud in your browser and open Photos.
Step 2. Open Recently Deleted, select the pictures, and choose Recover.
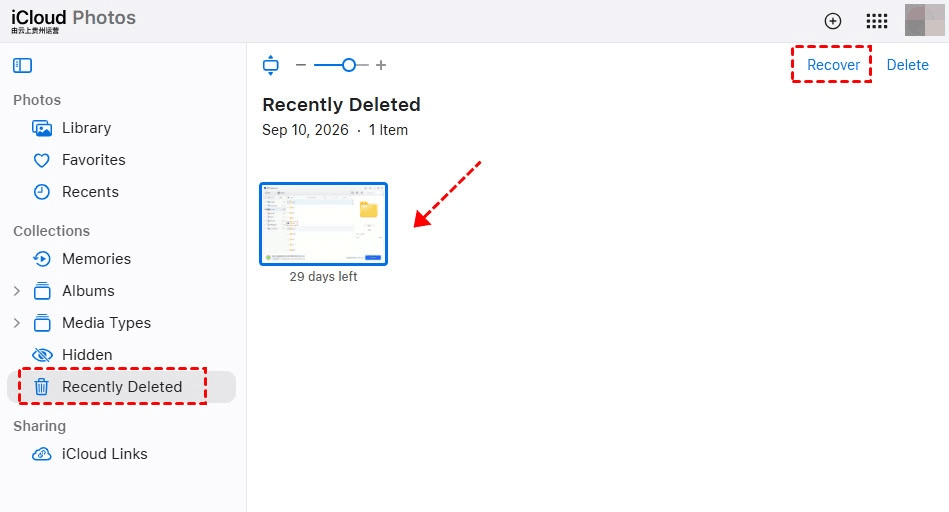
Step 3. Check your library and download a separate copy of restored photos.
Method 4: Restore Photos from File History Backups
👍 Best for: Restoring earlier copies when File History backed up the original folder before deletion.
File History is a Windows feature that saves backup copies of files in users folders. If it backed up your photos before deletion, you can restore them from an earlier folder version. This method requires an existing backup; turning on File History afterward won’t bring back previously deleted pictures.
Step 1. Connect the File History backup drive to your Windows PC. In File Explorer, right-click the folder containing deleted pictures and select Restore previous versions. Check Show more options if needed.
Step 2. Choose a folder version from before deletion. Expand Open and select Open in File History to check if your photos are there.
Step 3. Return to the selected folder version, expand Restore, and choose Restore to…. Save it elsewhere to avoid replacing deleted pictures.
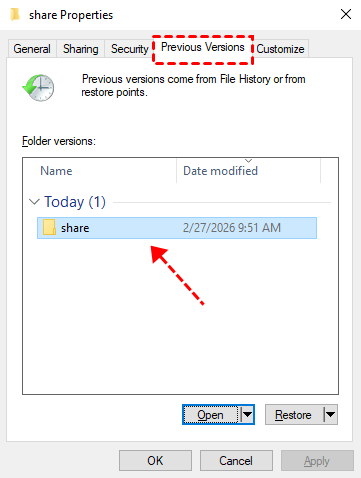
Open the restored folder and check the pictures. This can recover deleted photos in Windows 11, provided the necessary copies exist in your backup.
Method 5: Recover Deleted Photos with Windows File Recovery
👍 Best for: A free command line recovery attempt on local storage; cloud storage and network shares aren’t supported.
Windows File Recovery is Microsoft’s free command-line tool for retrieving deleted files from local storage. You enter a command to specify where to search, which photo formats to find, and where to save the results. The example below searches for JPG, JPEG, and PNG pictures and saves them to another drive.
Step 1. Download and install Windows File Recovery from Microsoft Store on a different drive, not the one containing deleted pictures. Check your source and destination drive letters in File Explorer > This PC.
Step 2. Open Windows File Recovery and approve the permission priority. For recently deleted photos on a healthy NTFS drive named D:, saving to E:, enter:
winfr D: E: /regular /n *.jpg /n *.jpeg /n *.png
Replace D: and E: with your actual drive letters. To check the source drive’s file system, right-click it in File Explorer and select Properties.
- The source and destination drives must differ.
- Use /extensive instead of /regular for FAT/exFAT storage or older deletions.
Step 3. Enter Y when prompted. Once recovery finishes, open the recovery folder created on the destination drive and check your photos.
Check Recovered Photos Before Backing Them Up
If a recovered picture won’t open, check whether your viewer supports its format, especially for HEIC or camera RAW files. Try another compatible viewer using the recovered copy.
The file may also be incomplete or damaged. Look for another copy in your cloud library, backups, or original memory card. SSD TRIM which lets a drive reclaim deleted storage space and subsequent writes can make photo data unavailable.
FAQs
Can I recover permanently deleted photos without a backup?
Possibly. Recovery software can search for photo data that remains on the drive. Results depend on overwriting, SSD behavior, and the drive’s condition.
Will System Restore bring back deleted photos?
System Restore addresses system configuration. Use a photo backup, cloud recovery, or a suitable file-recovery scan to retrieve deleted pictures.
Can I save recovered photos in another folder on the same drive?
Choose a different drive. Saving to another folder on the source drive can overwrite other deleted photos you still need.
To recover deleted photos in Windows 11, restore an available copy or scan the drive that held the originals. Once your pictures are back, check that they open and keep a separate backup.

 as a preferred
source on Google
as a preferred
source on Google