
[SOLVED] NVMe Detected But Not Bootable
This article describes how to fix the “NVMe detected but not bootable” issue in 8 simple and effective methods.
By Ivy Updated on July 9, 2025
The Issue: NVMe Detected in BIOS But Not Bootable
“Hi, everybody. I ran into the weirdest problem while building a pc for my sister. After everything was put together, I went to install windows, only to find out the nvme drive I installed wasn’t detected by windows. Next thing I did is go to the bios to try and figure out the problem, and I noticed the drive is recognized as a storage device by the bios, but its not a bootable device.”
- Question from tomshardware
This error prevents the system from loading the operating system during startup. Instead of booting up as usual, your system may display a blank screen, go into recovery mode, or show an error message like "No Bootable Device" or "Operating System Not Found".
This can be frustrating because, although the drive is physically there and working properly, it won't serve as a boot device. This issue can arise due to incorrect BIOS/UEFI settings, wrong boot mode, corrupted system files, or issues with the drive itself.
How to Fix the NVMe SSD Not Bootable Issue Effortlessly
Here are some useful troubleshooting solutions to fix the NVMe detected, but not bootable issue. At first, it's essential to ensure your NVMe drive is correctly installed and compatible with your system.
Fix 1: Check Your Motherboard
Check if your motherboard supports the correct M.2 PCIe lanes(Gen 3 or 4) and slot for NVMe drives. Some M.2 slots are only compatible with SATA drives, preventing it from being bootable.
Fix 2: Check the Physical Connections
NVMe drive can be loose or not fully seated, causing the “NVMe drive not bootable” issue. You can follow the steps below to check it.
Step 1. Power down your computer and unplug it from the power source.
Step 2. Open the case and locate the NVMe slot on your motherboard.
Step 3. Gently remove the NVMe drive and check both the slot and the connector for any dust, debris, or physical damage.
Step 4. Reinstall the NVMe drive, making sure it’s fully inserted into the slot and properly secured with screws if necessary. It should be snug and firmly connected.
Fix 3: Proper Seating of NVMe in the Motherboard
Improper seating can sometimes prevent the system from recognizing the NVMe drive as bootable. Be sure the drive is properly aligned and inserted into the M.2 slot at a 30-degree angle, which is sensitive. Then, gently press it down until it clicks into place.
Fix 4: Change Boot Mode to UEFI
You need to configure boot mode to UEFI in BIOS/UEFI settings, which is necessary for NVMe drives to be recognized as bootable devices.
Step 1. Restart your computer and press the BIOS key (e.g., F2, F10, ESC, etc) to access the BIOS/UEFI settings window.
Step 2. Navigate to the Boot section. Look for an option labeled Boot Mode, or similar, and switch from Legacy to UEFI.

Step 3. Press F10 to save your settings and exit BIOS/UEFI.
Fix 5: Update BIOS/UEFI Firmware
Be sure your BIOS/UEFI is up-to-date. Some older versions may require a firmware update to recognize NVMe drives or to allow booting from them.
Step 1. Enter the BIOS/UEFI settings. Then, check the BIOS version number on the main screen or in the System tab.
Step 2. Then, visit your PC or motherboard manufacturer’s website and check if there is a newer BIOS/UEFI version is available.
Step 3. At last, download the latest version to update it.
Fix 6: Check BIOS/UEFI Compatibility
In addition, there are some options in the BIOS/UEFI settings, which help recognize the NVMe SSD as a boot device and allow you to boot from it.
- Enable CSM (Compatibility Support Module)
- Set SATA Mode or Storage Configuration to AHCI
- Turn off Secure Boot
You can look for these options under the Boot, Advanced, or Security tab. Once found, enable or disable the corresponding feature.
👉 Enable CSM:
👉Set SATA Mode:
👉 Disable Secure Boot:
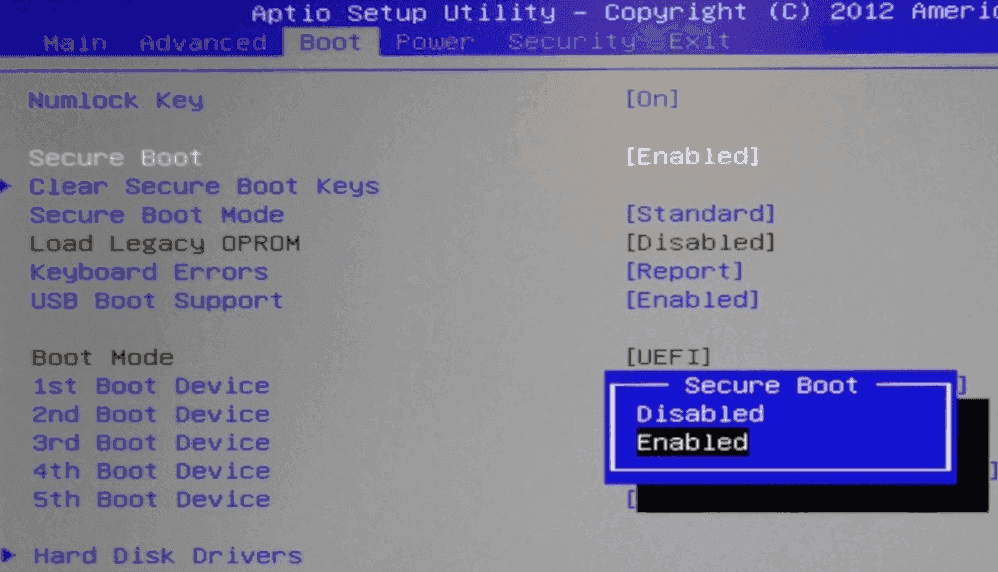
- Note: If there’s an option to select Standard or Custom under Secure Boot, choose "Custom" to disable Secure Boot.
Fix 7: Turn Off Intel VMD
Intel VMD relies on Intel RST drivers to work properly, so you can choose to disable it if the NVMe drive is not bootable.
Step 1. In the BIOS/UEFI settings and select Advanced Mode at the lower location.
Step 2. In the Advanced tab, click on System Agent (SA) Configuration.
Step 3. On the next screen, click VMD Setup Menu. You can choose to disable VMD completely or only the Map PCIE Storage under VMD.
Fix 8: Repair Boot Configuration
Sometimes, the issue arises from a corrupt or missing boot configuration. Here's how to rebuild it:
Step 1. Insert your Windows installation USB or recovery drive and press the BIOS key (e.g, F2, F10, ESC, etc) to boot from it.
Step 2. Select your language and other preferences, then click Repair your computer.
Step 3. Navigate to Troubleshoot > Advanced Options > Command Prompt.
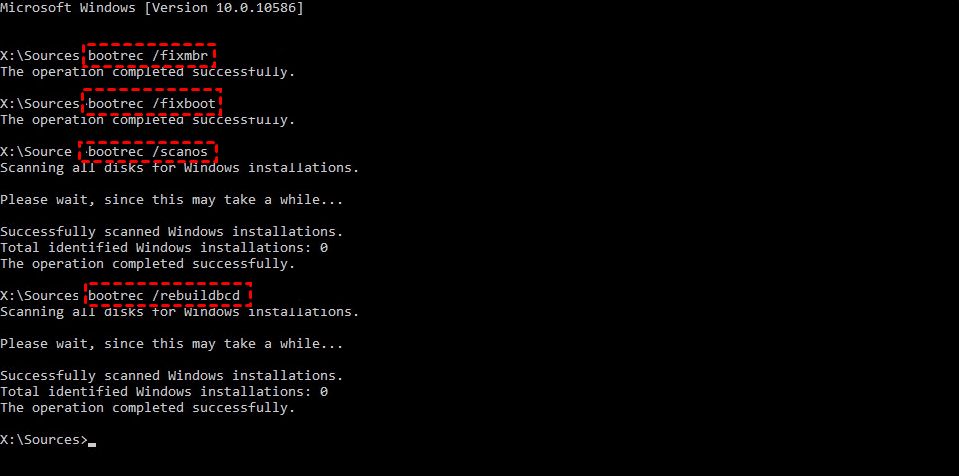
Step 4. Once you're in the Command Prompt window, type the following commands to repair the bootloader.
- bootrec /fixmbr
- bootrec /fixboot
- bootrec /scanos
- bootrec /rebuildbcd
Bonus Tip: Clone NVMe as Backup before Major Changes
You also don't want to lose any data after fixing an issue where NVMe is detected but not booting. If this is the case, the best practice is to clone NVMe drives as a backup beforehand, which requires reliable cloning software.
AOMEI Cloner offers users 3 cloning methods, among which Disk Clone supports cloning any types of disks, such as HDDs/SSDs, MBR/GPT disks, SATA/M.2/NVMe/PCIe, etc., and makes the cloned drive bootable. In addition, it still integrates with some useful cloning features:
- Intelligent Clone (default): Clone only the used sectors of a drive, making it easier to clone larger HDD to smaller SSD, e.g., clone 2TB HDD to 1TB SSD.
- SSD Alignment: Accelerate the reading and writing speed of the SSD disk.
- Edit Partitions: Automatically resize partitions of larger disks without human intervention. Optionally, convert disk types, from MBR to GPT or GPT to MBR, to make the two disks identical, greatly avoiding the cloned SSD won't boot issues.
- ...
Free download it to clone NVMe as a backup now!
Conclusion
You can easily fix the “NVMe detected but not bootable” in 8 simple and effective methods above. Be sure to check the motherboard and physical connection first.
Also, to avoid data loss during the repair process, it’s suggested to clone NVMe drive as a backup copy beforehand. It will include everything on the disk, such as operating system, programs, personal data, etc.
