
Complete Guide to Installing an M.2 SSD as a Secondary Drive
Upgrading your PC doesn’t always mean replacing your primary drive. Installing an M.2 SSD as a secondary drive is one of the simplest ways to add high-speed storage to your system. This guide will walk you through the whole process.
By Lily Updated on May 9, 2025
Running out of space or craving faster load times? Adding an M.2 SSD as a secondary drive is a simple, cost-effective solution. Most modern motherboards have M.2 slots, so you can expand storage without replacing your primary drive or managing cables.
This guide covers everything: checking compatibility, choosing the right SSD, installing it, and setting it up in Windows. Whether you’re a gamer, creative professional, or everyday user, this upgrade can breathe new life into your system in just a few minutes.
Besides using your M.2 SSD as a secondary drive, you can also use it as boot drive. Learn more >>
What You Need Before Installing an M.2 SSD
Before you install M.2 SSD as secondary drive, it’s essential to gather the right tools and verify that your system can support the upgrade.
1. Check Motherboard Compatibility
Not all M.2 slots are created equal. Before buying an SSD, verify the M.2 slot on your motherboard:
- Interface: SATA, NVMe (PCIe), or both
- Keying: B-Key, M-Key, or B+M-Key (must match your SSD)
- PCIe Lanes: Ensure the slot supports your SSD’s required lanes (especially for NVMe speeds)
You may consult your motherboard manual or manufacturer’s website for slot specs.
2. Choose the Right M.2 SSD
Select an M.2 SSD that matches your motherboard’s capabilities:
- Capacity: Common sizes range from 250GB to 2TB.
- Speed: NVMe drives are significantly faster than SATA M.2 drives.
- Form factor: The most common size is 2280 (22mm wide, 80mm long), but confirm your system supports the specific length.
3. Update Your BIOS (If Necessary)
Older BIOS versions may not recognize newer M.2 drives. Check your motherboard manufacturer’s support page for updates, especially if you're installing a high-capacity or Gen 4 NVMe SSD.
4. Gather the Right Tools
You don’t need much, but having the following on hand will make the process easier:
- A small Phillips-head screwdriver
- An anti-static wrist strap (recommended)
- The mounting screw for the M.2 slot (usually included with the motherboard)
5. Make a Backup
Although you’re installing the M.2 SSD as a secondary drive, it’s smart to back up important data just in case.
Step-by-Step Guide to Installing an M.2 SSD as a Secondary Drive
Installing an M.2 SSD may seem intimidating, but it’s actually a straightforward process—especially when you’re using it as a secondary drive. Learn how to install SSD as secondary drive as follows.
👉 Step 1: Power Down and Unplug Your PC
1. Shut down your computer completely.
2. Unplug the power cable and any peripherals.
3. Press the power button for 5 seconds to discharge residual electricity.
👉Step 2: Open the Case and Locate the M.2 Slot
1. Remove the side panel of your desktop case (usually secured with a few screws).
2. Locate the M.2 slot on your motherboard. It’s a small horizontal slot, often labeled and positioned near the PCIe slots or CPU.
3. Check if there’s already a mounting standoff and screw installed. If not, use the one included with your motherboard.
👉Step 3: Insert the M.2 SSD
1. Align the notch on your M.2 SSD with the key in the slot.
2. Insert the drive at a 30–45 degree angle into the M.2 slot.
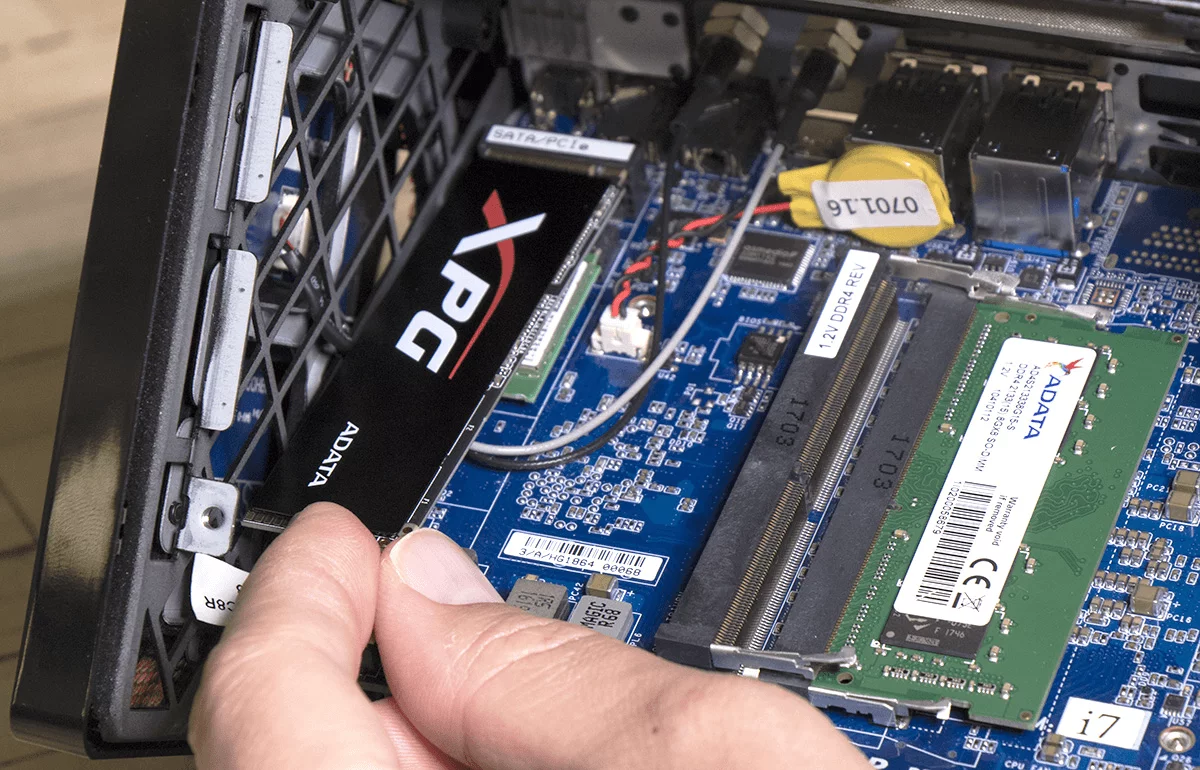
3. Once fully inserted, gently press the drive down flat against the standoff on the motherboard.
4. Use a small Phillips-head screwdriver to secure the M.2 SSD with the screw.
👉Step 4: Reassemble and Power On
1. Replace your side panel and plug everything back in.
2. Power on your PC and enter the BIOS/UEFI (usually by pressing Delete, F2, or F12 during startup) to confirm the system detects the new drive.
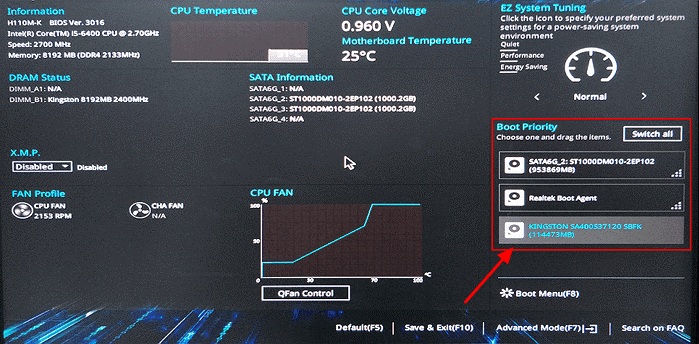
3. If it’s recognized, exit the BIOS and boot into Windows.
Setting Up Your New M.2 SSD in Windows
After physically installing your M.2 SSD as a secondary drive, Windows won’t automatically make it usable. You need to initialize and format the SSD to make it usable. Here’s how to do it:
1. Press Windows + X and select Disk Management.
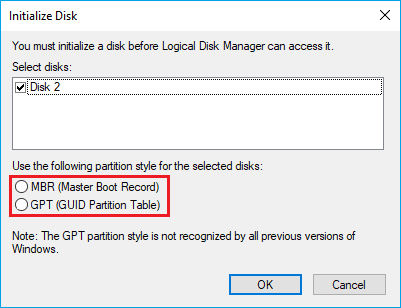
2. Windows will prompt you to initialize the new disk if it detects it. If not, locate the M.2 SSD manually, right-click on it and select Initialize Disk.
3. Choose a partition style and click OK to initialize the drive.
- GPT (GUID Partition Table) – Recommended for modern systems and SSDs.
- MBR (Master Boot Record) – For older systems or BIOS-based setups.
4. Once initialized, the drive will show as Unallocated. Right-click the unallocated space and choose New Simple Volume.
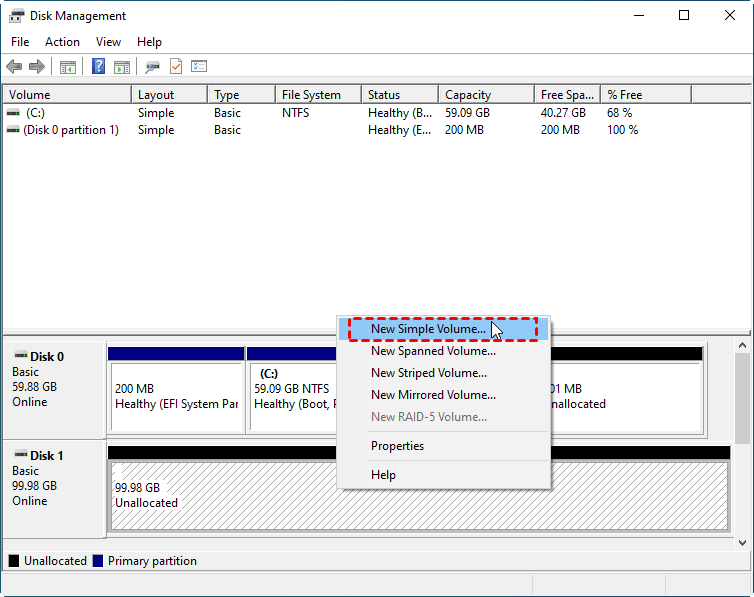
5. Follow the wizard to:
- Set the volume size (use the full size unless you have specific partition plans).
- Assign a drive letter (e.g., D:, E:).
- Choose the file system (NTFS is recommended).
- Give the volume a name (optional but helpful for organization).
6. Click Finish to format the drive. Your SSD is now ready for use and will appear in File Explorer as a new drive.
Bonus: How to Use M.2 SSD as Boot Drive
While using your M.2 SSD as a secondary drive offers excellent performance gains, turning it into your primary boot drive can supercharge your entire system. If you already have Windows installed on a slower SATA SSD or HDD, you can clone your existing system to the M.2 drive using the best cloning tool - AOMEI Cloner.

- Clone Entire Disk – Copy all partitions (OS, apps, and data) to another disk.
- Migrate OS to SSD/HDD – Easily transfer your OS (including boot files and system partitions) to a new SSD or HDD without reinstalling Windows.
- Automatic SSD Alignment – Optimizes SSD performance by aligning partitions correctly.
- Supports UEFI & Legacy Boot – Works with both modern UEFI and traditional Legacy BIOS systems.
Download AOMEI Cloner and follow the steps below to clone your old disk to the new M.2 SSD:
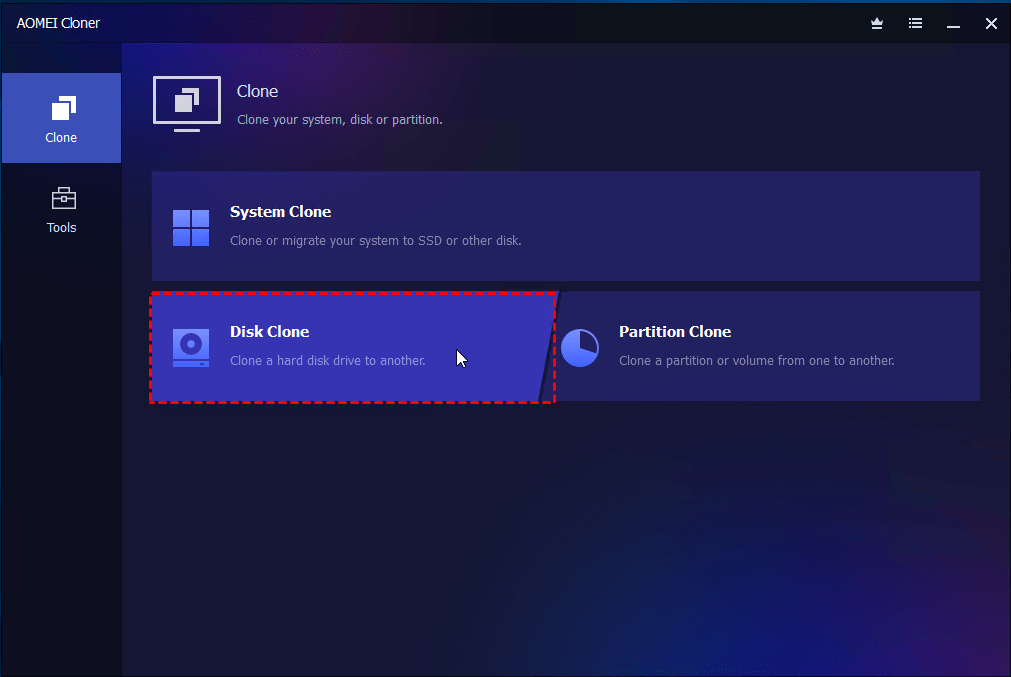
Step 1. Launch AOMEI Cloner and navigate to the Clone section, then choose Disk Clone.
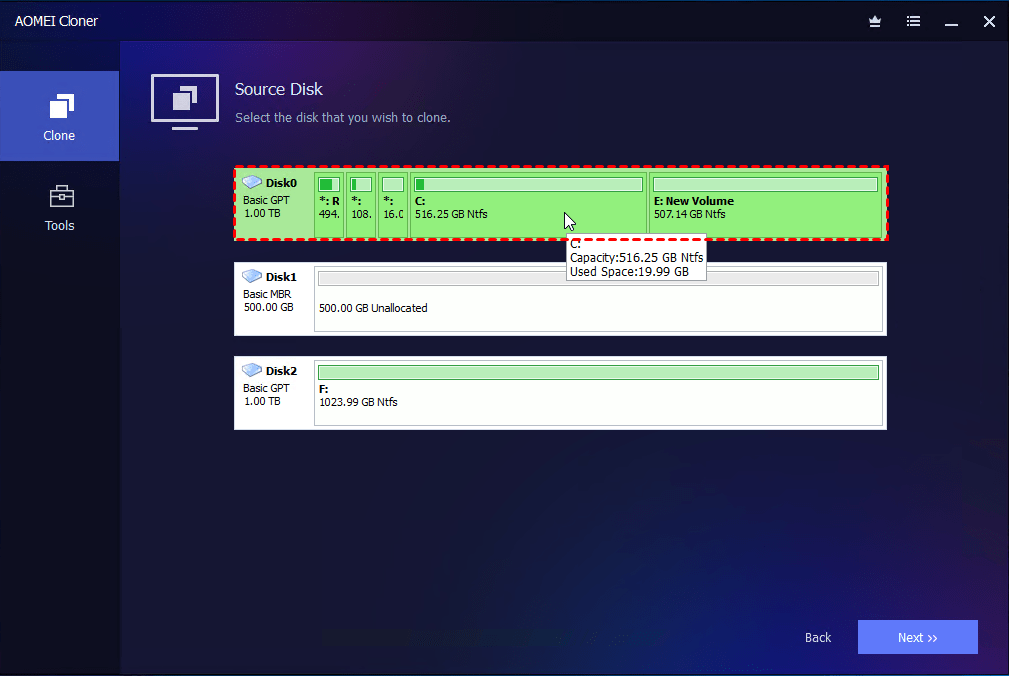
Step 2. Choose the current system disk as the source drive and select your M.2 SSD as the target.
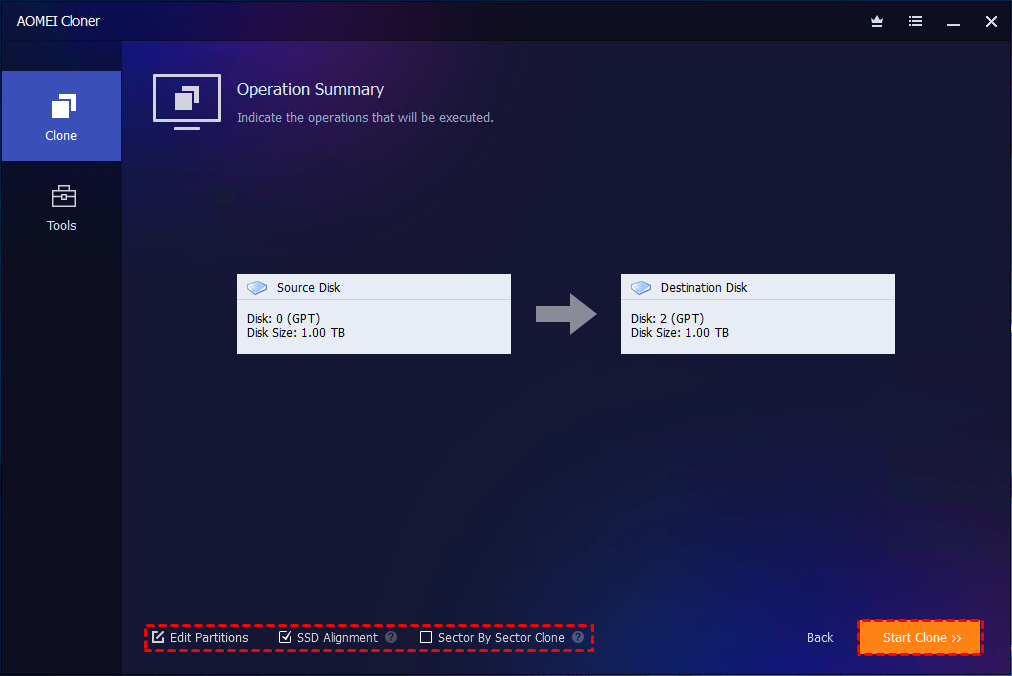
Step 3. For optimal SSD performance, ensure SSD Alignment is enabled before initiating the cloning process by clicking Start Clone.
Step 4. After cloning, restart your PC and enter the BIOS/UEFI to set the M.2 SSD as the first boot device. Your PC should boot successfully from the M.2 SSD.
Note: If everything works fine on the new M.2 SSD, you can format the old disk for reuse.
To Sum Up
Installing an M.2 SSD as a secondary drive is one of the easiest and most effective ways to upgrade your PC’s storage and performance. This guide walked you through the full process to ensure a smooth storage upgrade for you.
If you need to use the M.2 SSD as a boot drive, AOMEI Cloner can help you clone your existing system to the M.2 drive, so you don’t need to reinstall everything from scratch. Just try it out!
