How to Create Disk Clone in Windows Easily?
Disk cloning is a process that involves copying all data, partitions, and file systems from one disk to another disk. This operation holds significant significance in various usage scenarios:
Backup and Recovery: Disk cloning serves as a comprehensive backup strategy for disaster recovery. By regularly cloning the primary disk, you can ensure quick system and data recovery in cases of hardware failures, data corruption, or other catastrophic events.
Isolation Environments: For security and isolation needs, disk cloning can create isolated environments for sensitive operations, avoiding impacts on the primary system.
Upgrading to a Larger Disk: As our data storage needs grow, a larger disk becomes necessary. System cloning facilitates a seamless transfer of the entire system, along with all data and configurations, to a new and larger disk. This process ensures that we have sufficient storage space for our expanding data and allows the computer to function smoothly without storage-related performance issues.
Replacing Aging or Faulty Disks: As disks age or develop issues like bad sectors, their reliability, and performance may degrade. System cloning provides a solution to migrate the entire system to a brand new disk, eliminating potential problems and ensuring data integrity and stability. This replacement extends the lifespan of the system while minimizing the risk of data loss due to disk-related issues.
Create Disk Clone Step by Step
Prerequisites for Disk Clone
- Install AOMEI Cloner on the Windows system you want to clone.
- Connect the appropriate target disk and make sure the destination spaceshould be larger than or at least equal to the total used size of all systempartitions.
Note: Disk Clone is a paid feature, so you need to first upgrade to AOMEI Cloner Professional.
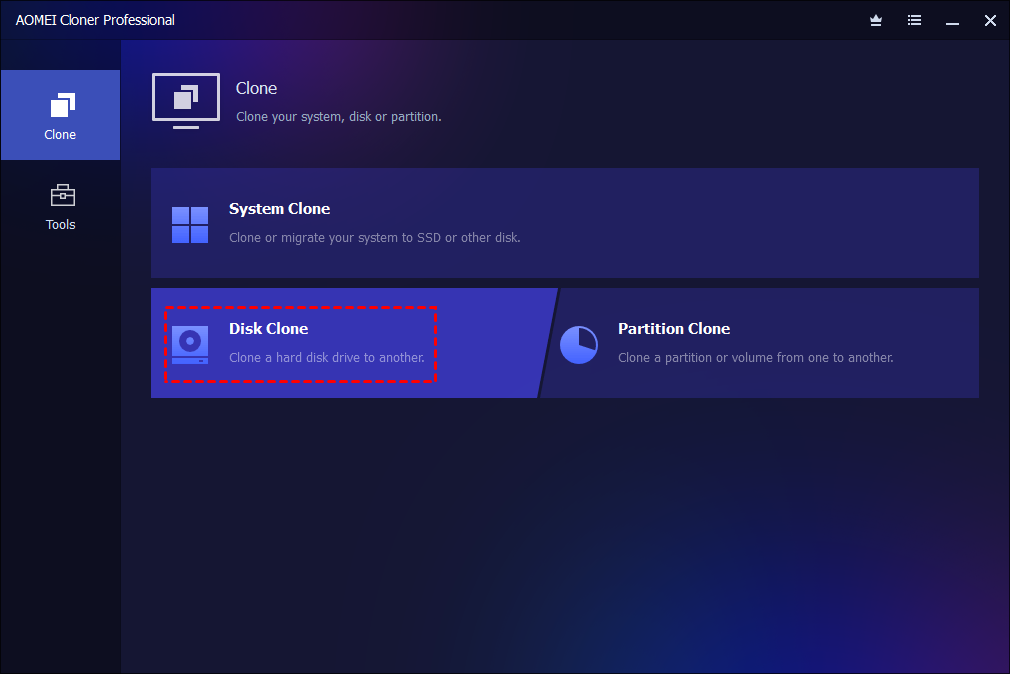
Step 1: Initiate Disk Clone
Launch AOMEI Cloner. Select "Clone" from the left-hand side menu and then select "Disk Clone".
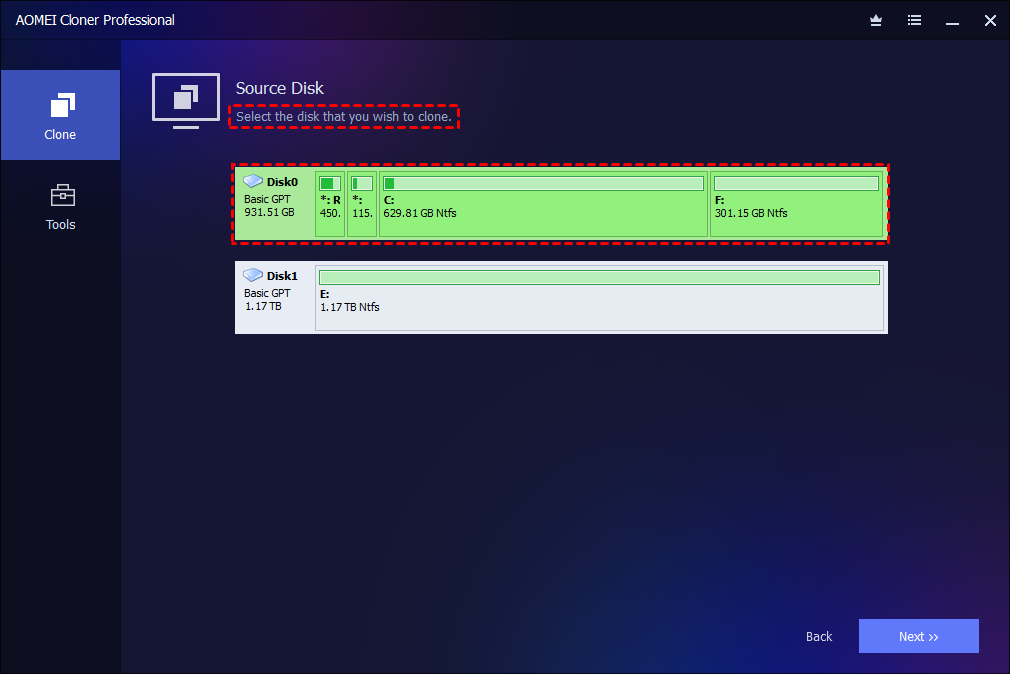
Step 2: Select Source Disk
Select the source disk that you want to clone and click Next.
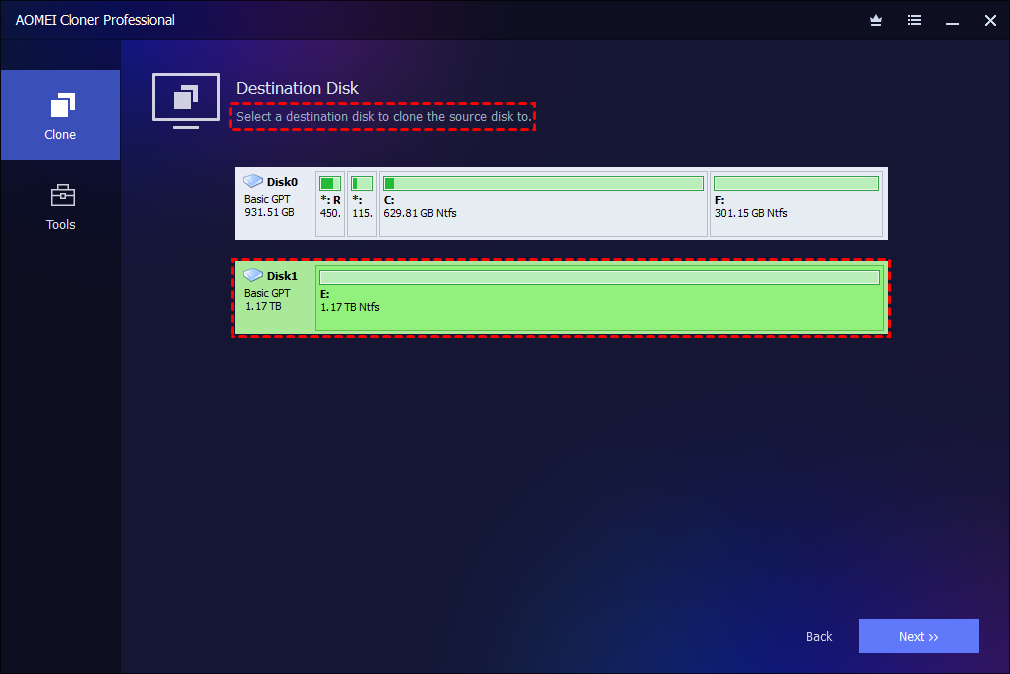
Step 3: Select Destination Disk
Select the destination disk to which the source disk will be cloned, and click Next.
Tips: The destination disk will be formatted and all existing data will be overwritten! Backup important files beforehand.
Step 4: Preview Clone and Edit Partition (Optional)
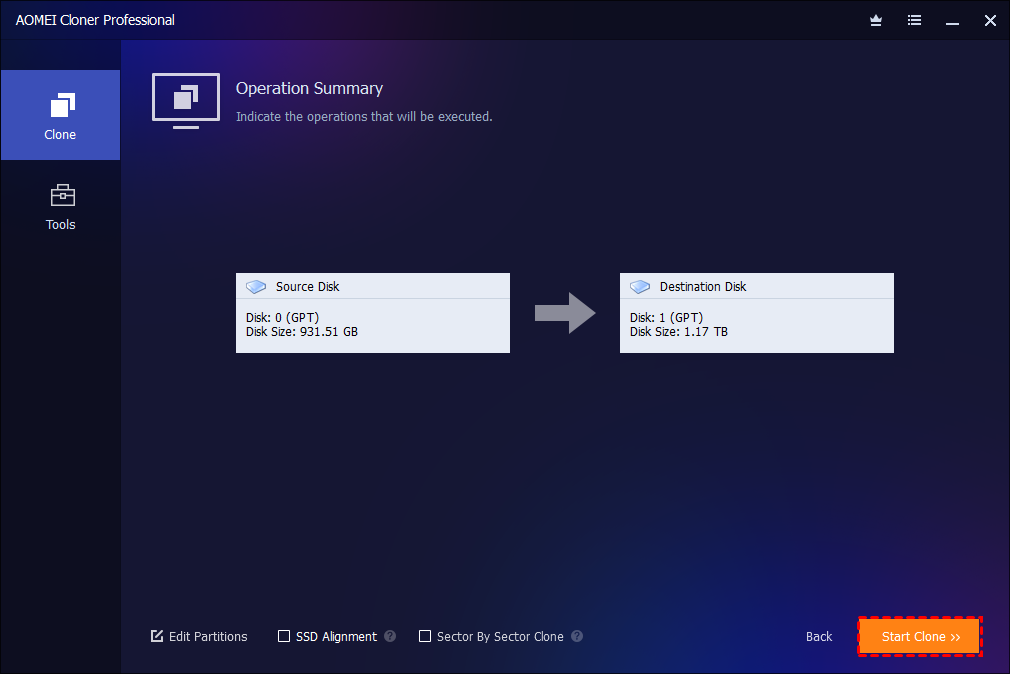
Preview the information of your source and destination disk. In the lower-left corner, set desired advanced settings as follows.
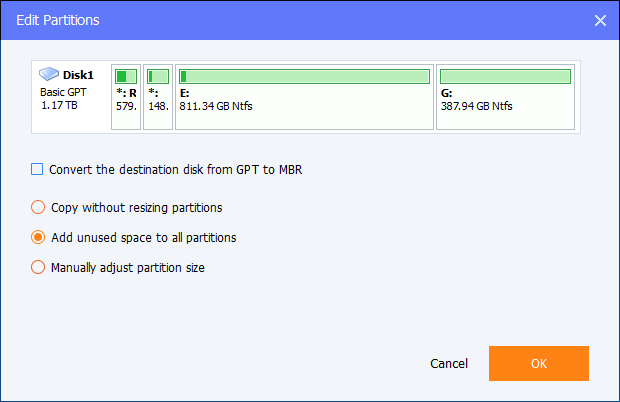
a) To adjust the size of the partitions on the destination disk if it's larger, you can select the "Edit Partitions" feature and one of the following options.
Important Option:
Convert the destination disk from GPT to MBR: 1. If the source disk is MBR but the destination disk is GPT, please tick this option so the destination GPT drive will be converted to MBR. In this way, it is able to boot from the cloned drive after the disk clone. 2. If the source disk is GPT but the destination disk is MBR, the option will be "Convert the destination disk from MBR to GPT". Please tick this option so the destination MBR disk will be converted to GPT. In this way, it is able to boot from the cloned drive after the disk clone. 3. If the source disk and the destination disk are both MBR/GPT, please do not tick this option.
-
Copy without resizing partitions: Do not make any changes to the partition sizes. If you want to clone disk to larger disk, select the last two options instead.
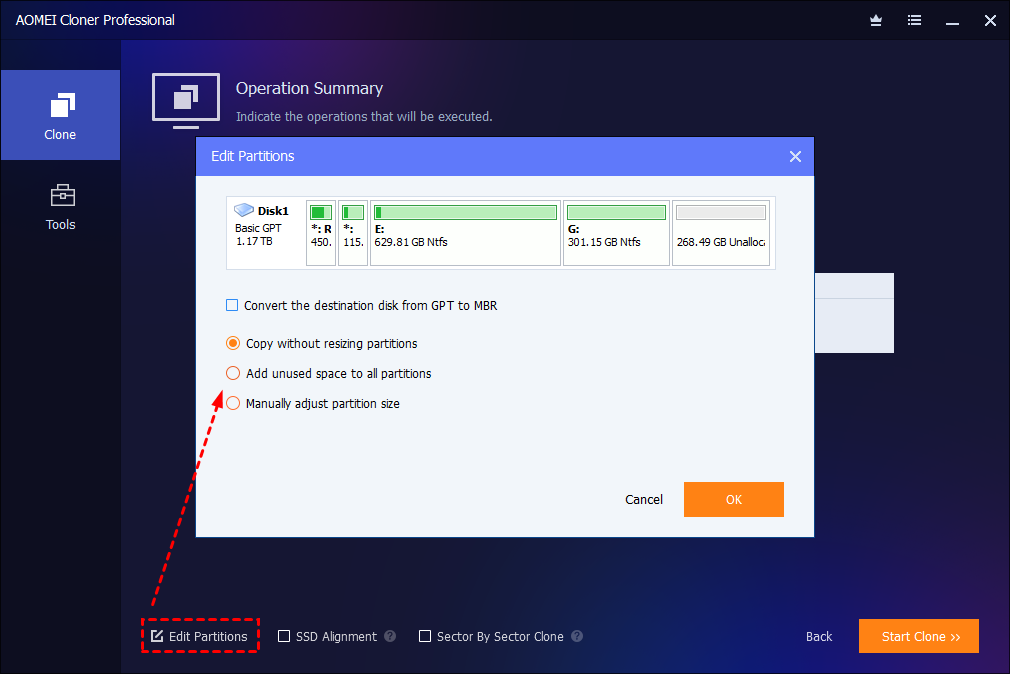
- Add unused space to all partitions: The destination disk partitions will be automatically resized to fit the entire disk, appropriate for the disk size.
-
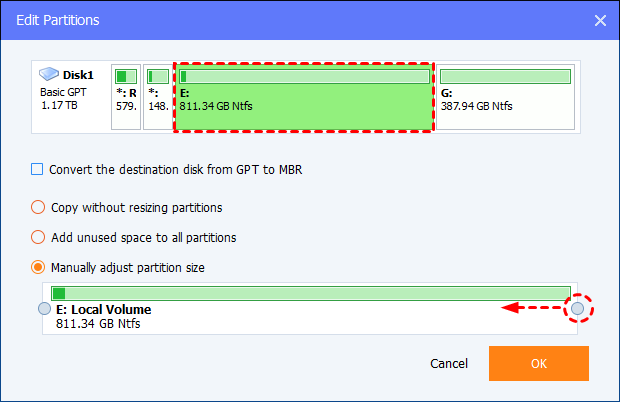
Manually adjust partition size: Manually adjust the partition size by dragging a slider bar. With this feature, you can simply select and modify the size of every partition as your requirements.
b) Sector by sector clone: This feature requires that the destination disk size must be equal to or larger than the source disk, and it will need more cloning time and disk space.
c) SSD Alignment: If you are cloning hard drive to an SSD (Solid-State Drive), we highly recommend you check this option for optimizing the performance of the SSD.
Step 5: Start Clone
Finally, click "Start Clone". Wait for the process to complete and then click "Finish".
Notes:
- To ensure the destination disk is accessible after cloning, you should install the target disk internally after cloning. Note if the source disk and target disk are of different types (one uses MBR mode and the other uses GPT mode), you have to modify the boot mode in BIOS/UEFI when you boot from the target drive.
- If the destination disk is locked by other programs or applications, then Backupper will request the computer to be restarted so as to execute the disk clone operation in "Restart Mode".
- If “Sector by sector clone” is selected, the “Edit Partitions” option is unavailable. And for encrypted disk, AOMEI Cloner will use the “Sector by sector clone” mode by default.
- If there are non-NTFS or FAT32 partitions on the source disk, AOMEI Clonerwill use “Sector by sector clone” mode to clone these partitions.
- The time to complete a disk clone task depends on the size of the source disk. Besides, the following aspects can also influence the operation speed: USB connection, bad sectors on the source or target disk, old computer configuration, etc.
- Disk Clone doesn’t support dynamic disks. Please use the System Clone or Partition Clone options to clone a dynamic disk.
How to Boot from the Cloned Drive after Disk Clone
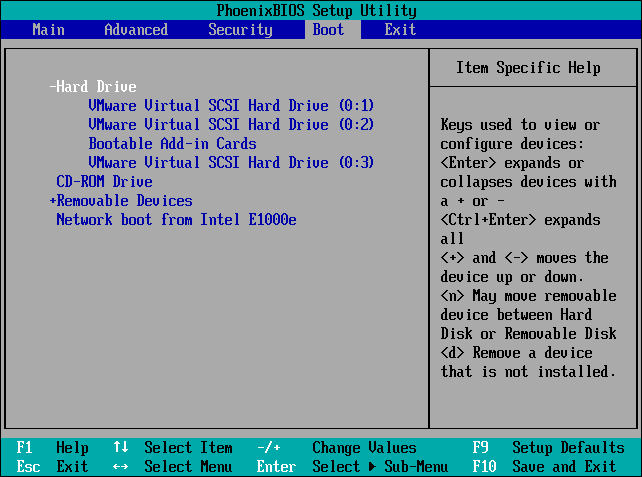
To boot Windows from the new disk, you need to restart the computer, enter the BIOS Settings, and change the boot drive. That's the whole process of using AOMEI Cloner to clone a hard disk. With it, you can easily clone a disk and boot from it successfully.
- Shut down the computer completely.
- Remove the source drive from the disk drive bay and install the newly cloned drive or SSD on it.
- Then restart the computer to let it boot from the new drive or SSD. You may need to enter the BIOS/UEFI settings and ensure the newly replaced disk is the first bootable device if it’s not bootable.
2. Please confirm that you are booting the destination disk on the same machine that you do the clone.
3. If the current system drive and the target drive are different disk types ( for example, one drive is MBR and the other one is GPT), it is recommended to convert the target drive to the same type as the source drive via Windows Disk Management and then do the clone.
4.If you indeed want toclone OS from MBR to GPT disk, please confirm that your motherboard supports EFI/UEFI boot. And, you also need to change the boot mode to UEFI when you boot from the cloned system.
Conclusion
Disk cloning is a crucial technological tool with broad applications in various situations, offering convenience and assurance to users, ranging from data protection to system migration.
Despite the numerous advantages of disk cloning, it's essential to proceed with caution before performing any cloning operations. Make sure to meticulously back up critical data and familiarize yourself with the tools and steps involved to avoid potential issues.
FAQs:
Q: Can I connect the destination drive via a USB connector during disk clone?
A: Yes, you can connect the destination drive via a USB connector during disk clone. But after successful disk clone process, please connect the cloned drive internally to boot from it.
Q: After disk clone, will the source system be deleted or not bootable?
A: Disk clone won’t take any effect on source system.
Q: After disk clone, how to change the drive letter of the system partition on the destination disk into C:?
A: When you boot from the cloned drive, Windows will assign letter C to this partition automatically, so you can't manually assign letter C: to the partition.