
How to Turn Off Automatic Updates in Windows 11
If you want to have more control over which updates are installed on your PC and when they are downloaded, you can try following methods on Windows 11.
By Delia Updated on December 10, 2024
Windows updates usually bring new features, improvements and bug fixes to your PC, but sometimes they can also bring new problems. And by default, Windows 11 downloads and installs various updates automatically, which can cause you to encounter updates when you are busy at work or when you want to turn your computer on/off, thus delaying some important operations. As a result, you may want to have more control over which updates are installed on your PC and when they are downloaded.
Whether you need to stop Windows 11 automatic updates temporarily or permanently, here are a few ways to do so.
*All of the following actions are reversible. If you find that updating manually is a hassle, you can easily re-enable automatic update.
Method 1: Temporarily stop Windows 11 automatic updates in Settings
One of the easiest ways to stop automatic Windows updates is to use the "Pause updates" option. But it will only pause automatic updates for 7 days, not stop it completely. So if you just want to push back the updates and don't want to check for them manually for a long time, you can try this method.
1. Press Win + I to open the Settings app.
2. Select the "Windows Update" option on the left sidebar.
3. Then you can click "Pause updates" under More options to pause the update for a period of time.
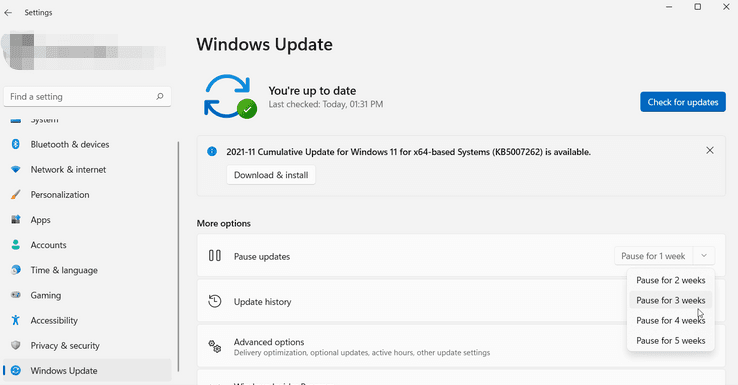
This setting will completely disable updates for 1 week (up to 5 weeks). After the time limit, the updates will automatically resume.
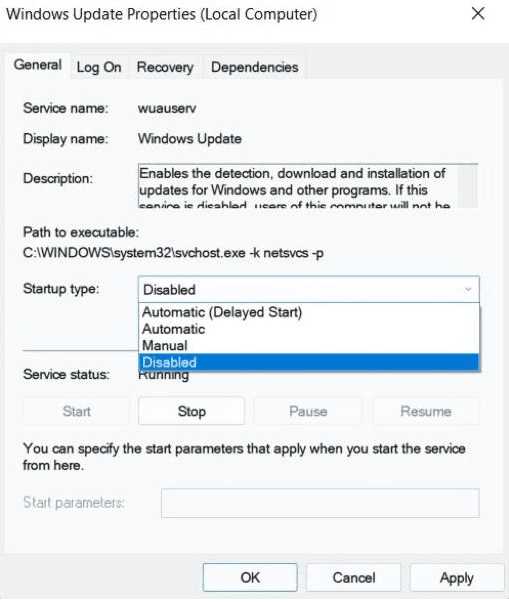
Method 2: Stop Windows Update service
If you are looking for a longer term solution to stop automatic updates, you can consider using Windows Services.
1. Use the Win + R key combination to bring up the Run window.
2. Type "services.msc" in the text box and press Enter to open the Services window.
3. Find "Windows Update" in the service, double click to open it
4. Then set the startup type to "Disabled" and "Apply" the change, and then click "Stop" below the Service status to disable automatic updates.
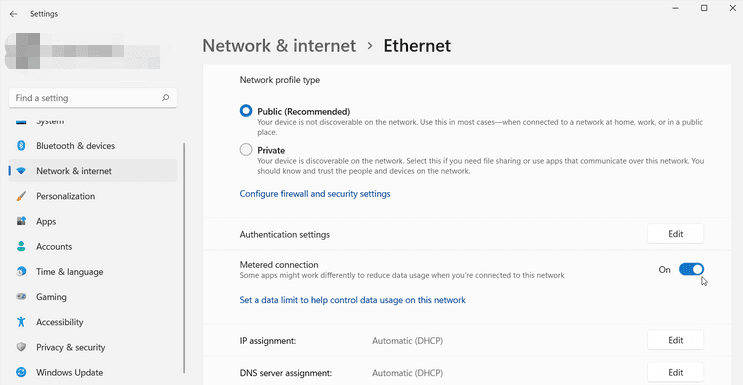
Method 3: Set metering connection to stop Windows 11 automatic updates
Windows 11 does not automatically download updates through the metering connection, which means you can restrict automatic updates on your system in this way.
1. Open Settings and select "Network & internet" from the left pane
2. Click “Properties” next to the network you are using.
3. Click the toggle switch next to "Metered connection" to turn it on.
4. When you're done, click "Windows Update" in the left pane, then click "Advanced options".
5. Under the section called "Download updates over metered connections", click the toggle button to turn it on.
Note: Some background processes that rely on the Internet may also be turned off.
Method 4: Turn off Windows 11 automatic updates via registry
The fourth and final method involves making changes to the registry. Therefore, it is important to proceed with caution and perform the following steps carefully.
1. Press Windows + R to bring up the Run window
2. Type "regedit.exe" in the box, and then press Enter to open the Registry Editor.
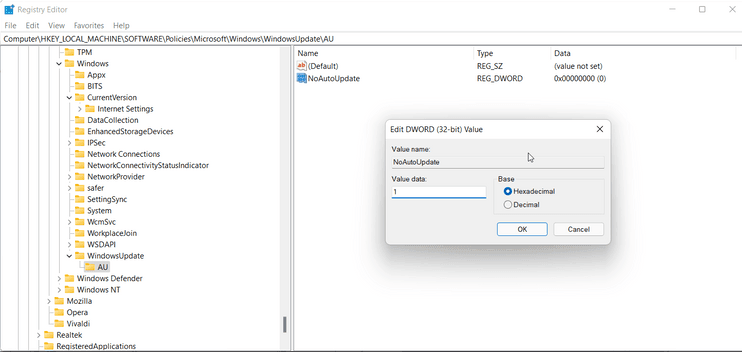
3. Navigate to the following path.
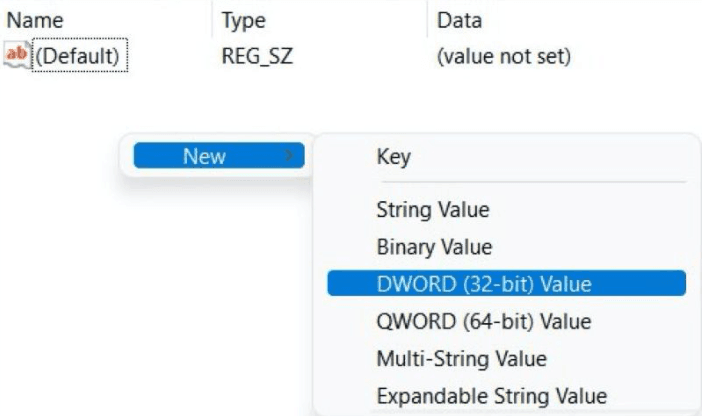
4. Right-click on any blank area on the right half of the screen and select “New” > “DWORD (32-bit) Value” and name it "NoAutoUpdate".
5. Now, double-click this new value and set its "Value data" to 1. Click “OK”, and then restart the device to apply the changes.
Method 5: Disable Windows 11 Automatic Updates via Group Policy
On compatible versions of Windows (Windows 11 Pro and higher), you can disable automatic updates using the Group Policy Editor.
1. Press Win + R to open the Run window.
2. In the dialog box, type "gpedit.msc" and click Enter to open the Group Policy Editor.
3. Then navigate to Computer Configuration > Administrative Templates > Windows Components > Windows Update.
4. Double-click “Manage end-user experience”, and double-click “Configure Automatic Updates” on the right pane.
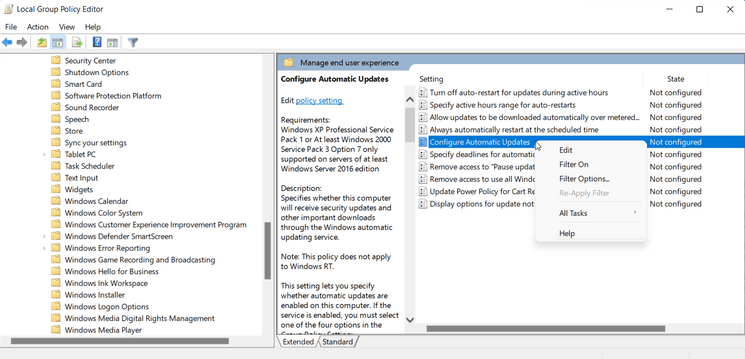
5. Select “Disabled” and click “Apply” and “OK” to save the changes.
Restart your PC and Windows 11 will no longer bother you with automatic updates. Of course, you can still install updates manually if needed.
