How to Share Files/Folders over Network in Windows 11
If two computers need to share data on the same LAN, then sharing folders via network is a better way compared to USB flash drive. Here's how to enable network file sharing in Windows 11.
By Delia Updated on December 10, 2024
USB flash drives used to play an important role in transferring data between computers, but for users who need to transfer or share data frequently, this method has some inconveniences. For example, it can only be used to transfer data manually, and when there is a newer version of data on one end, you can only plug in the USB again, save the data, and then transfer it to the other end.
If two computers need to share data on the same LAN, then sharing folders via network is obviously a better way. This saves the user time in uploading and downloading files, and also keeps the file versions up to date.
But how to create a shared folder in Windows 11 to share files between computers on the network? Here are the detailed steps.
Step 1: Turn on Network Discovery
To share a folder on a network, you should first open Network Discovery in Windows 11 to allow viewing of other computers and devices on the same network.
1. Press Windows + I to open the Settings app.
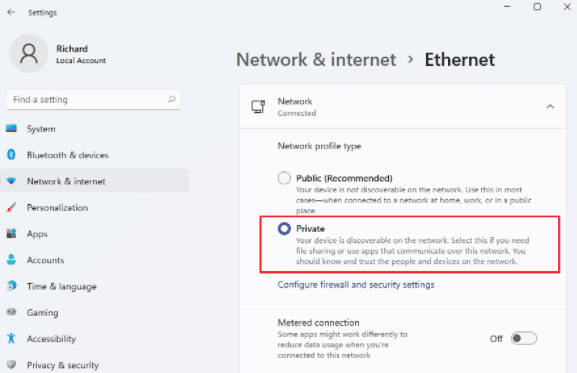
2. Select "Network & internet" in the left sidebar, then select "Ethernet" in the right pane of the screen.
3. In the Ethernet Settings pane, under Network Profile Type, select "Private". This will allow discovery of devices in your network, which applies to trusted homes, workplaces, and networks. If you select the Public profile, your device will not be discoverable on the network.
Step 2: Turn on file and printer sharing
This setting will allow other computers or devices to access the files, folders, or printers you have shared from this particular computer.
1. Search for "Control Panel" in the Start menu and click to open it.
2. Select "Network and Internet" > "Network and Sharing Center".
3. Next, select "Change advanced sharing settings".
4. In Advanced sharing settings, make sure that network sharing and file and printer sharing are turned on under the Private menu.
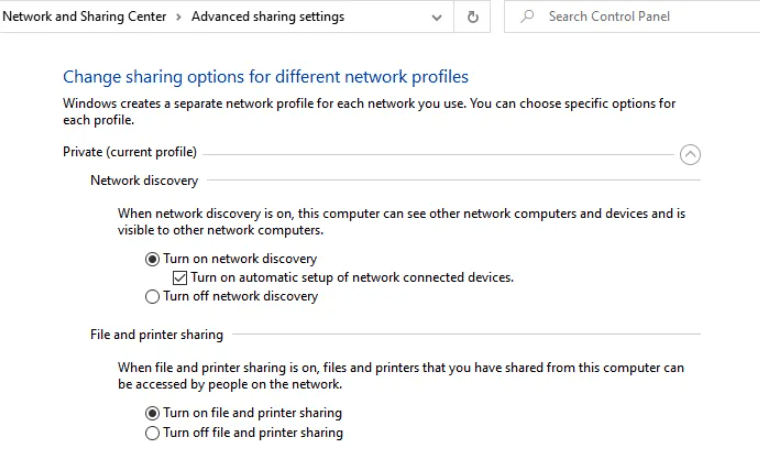
5. Then scroll down to expand the All Networks menu and select "Turn on sharing..." so that everyone with network access can read and write files in the public folder under Public folder sharing.
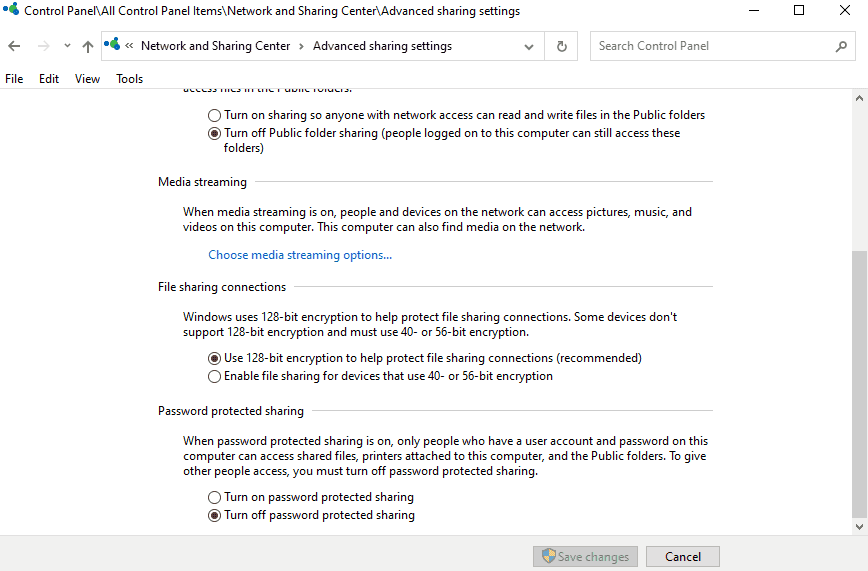
You can also turn password protection on or off as needed (which allows only people with the account name and password for the computer to access the shared files)
Step 3: Share a folder in Windows 11
The next step is to share the folder so that other computers can access the files in the folder.
1. You can either create a new folder or navigate to an existing folder, right-click it and choose "Properties".
2. Switch to the "Sharing" tab, click "Share..." and hit the down arrow to choose who you want to share the folder with. If you want to allow everyone on the network to access this folder, just choose "Everyone" and Click "Add" > "Share".
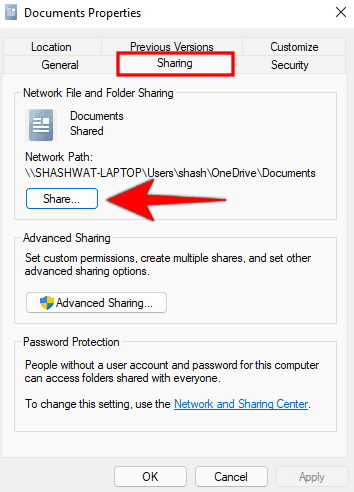
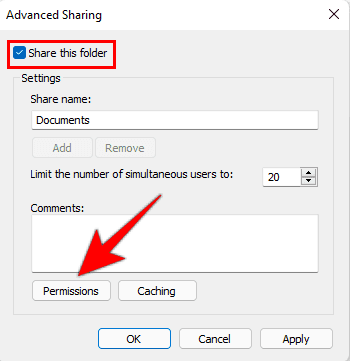
3. Back to the Sharing tab, click "Advanced Sharing..." and tick "Share this folder". Then in the section below, you can give it a name, and edit its “Permissions” to allow specific groups of users to access or modify the folder.