




How to Transfer Videos from iPad to Computer in 6 Ways
This guide explains how to transfer videos from iPad to computer based on your computer system, video size, storage location, internet connection, and preferred transfer method.

By Ivy Updated on August 21, 2026


You’ve recorded several long videos on your iPad, and now they are taking up too much storage. You may want to edit them on a computer, create a local copy, or move them somewhere safe before deleting them from your iPad.
The right method depends on the size and location of your videos and whether you use a Windows PC or Mac. For large or multiple videos going to Windows, a direct cable connection is usually practical. If the videos are already synced with iCloud Photos, you can download them without connecting your iPad.
Which Tool Should You Use?
Use this table to choose a method before following the detailed instructions.
| Tool | 👍 Best for | Requirements | When not to use it |
|---|---|---|---|
| AOMEI FoneBackup | Select and transfer large or multiple videos to Windows | Windows PC and USB cable | You use a Mac |
| Microsoft Photos | Import videos from the iPad Photos library | Apple Devices app and USB cable | The originals exist only in iCloud |
| File Explorer | Manually copy videos from DCIM | USB cable | Videos are stored inside another app |
| iCloud Photos | Download synced videos without a cable | Enough iCloud storage and a stable internet | You need a quick offline transfer |
| Mail Drop | Send 1 video of up to 5GB | Mail and an internet connection | The video is over 5GB or you have many videos |
| Photos or AirDrop | Move videos from iPad to Mac | A USB cable or a nearby Mac | You need to transfer videos to Windows |
Before starting, check where the video is stored.
- Videos recorded with the iPad camera normally appear in Photos.
- A video downloaded by another app may be in Files or remain inside that app.
If a video is in Files, you can save it to iCloud Drive and download it on your computer. However, iCloud Drive is not included as a separate method here because it is mainly intended for files rather than videos in the Photos library.
Method 1. Transfer Large Videos from iPad to PC with AOMEI FoneBackup
👍 Best for: Selecting and transferring large or multiple videos to a Windows PC without uploading them to cloud storage.
AOMEI FoneBackup is an iPhone and iPad backup and transfer tool for Windows PCs. It transfers videos through a direct USB connection and lets you select the content you want before starting.
This method may be useful when:
- You want to preview videos by data type before selecting them.
- You do not want to search through several DCIM folders.
- You want to choose a PC folder, external drive, USB stick, NAS, etc., as the destination.
- You do not have enough iCloud storage for your videos.
 AOMEI FoneBackup
Free iPhone and iPad data transfer software for Windows
The free iPhone to PC transfer feature supports up to 30 files per day. For unlimited transfer, requires an upgrade.
Step 1. Connect your iPad to the Windows PC with a USB data cable. Unlock the iPad and tap Trust if prompted.
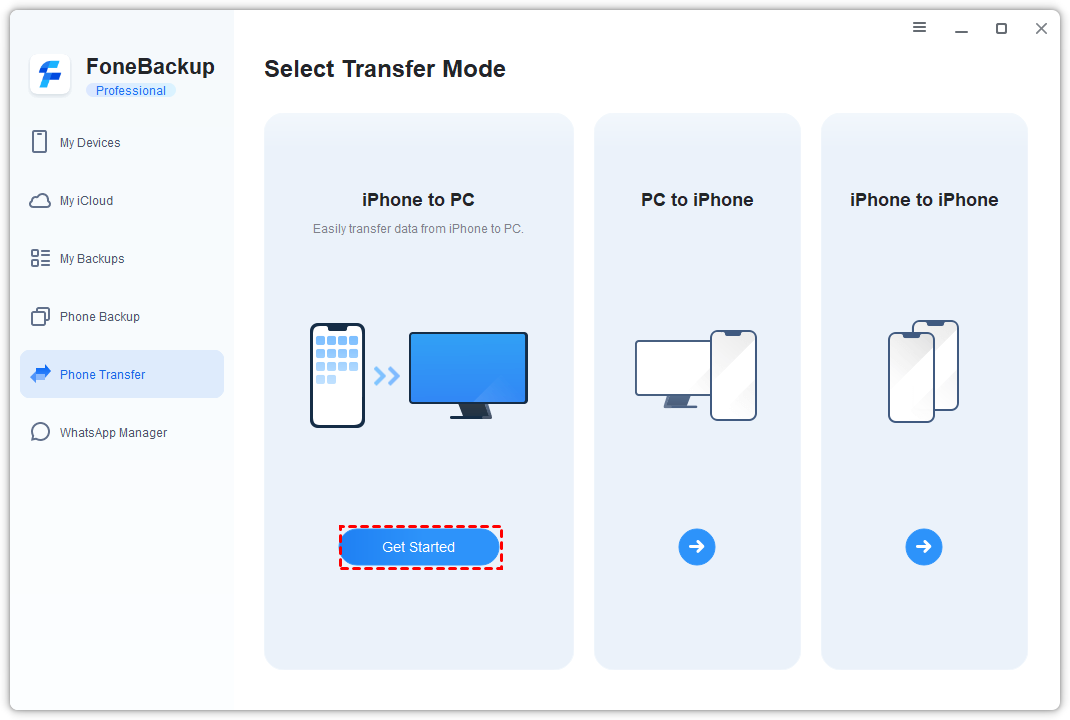
Step 2. Launch AOMEI FoneBackup, click Phone Transfer, move to iPhone to PC, and tap Get Started.
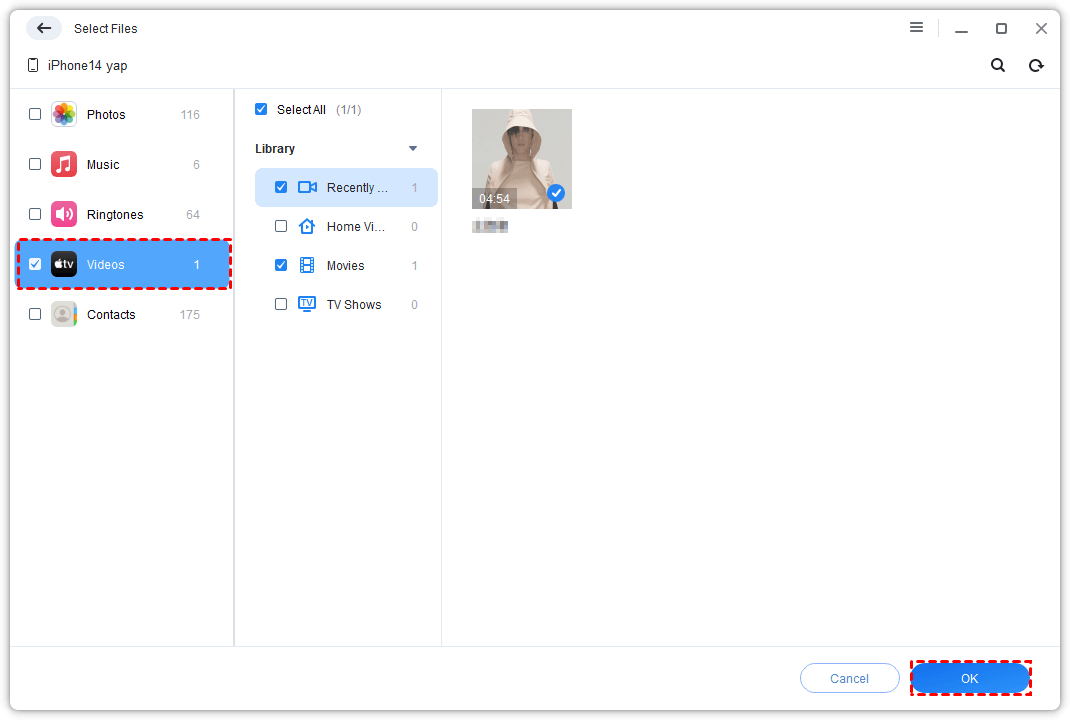
Step 3. Click a data type icon, such as Videos, to view the available videos. Select all videos in that category or choose individual videos.
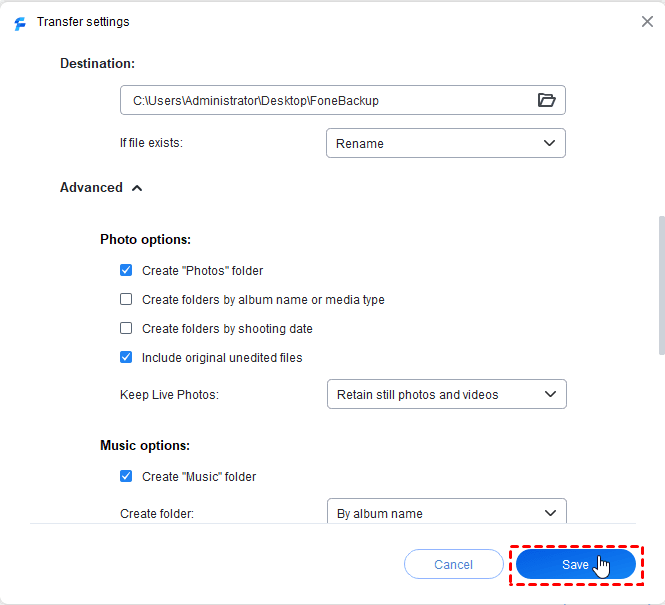
Step 4. Click Transfer Settings and select where to save the videos. You can choose a folder on the PC, external drive, USB stick, NAS, and more.
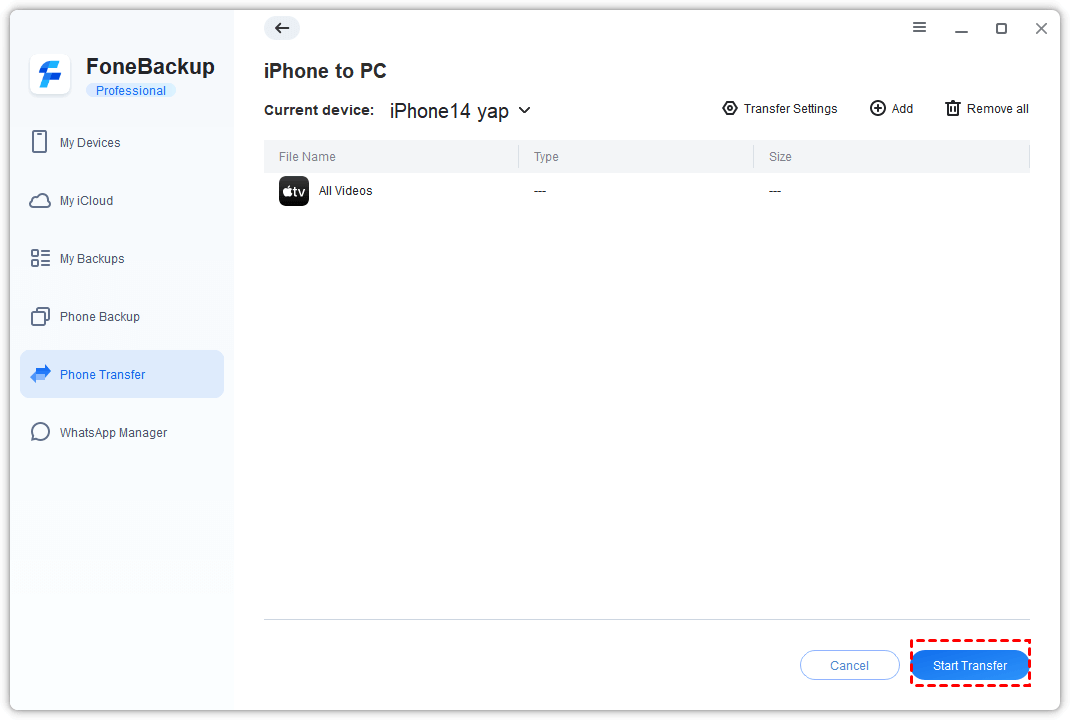
Step 5. Click Start Transfer and keep the iPad connected until the process finishes.
Open several transferred videos on the PC before deleting the originals from your iPad.
Method 2. Import Videos from iPad to PC using Microsoft Photos
👍 Best for: Importing videos from the iPad Photos library with a built-in Windows app.
Apple recommends installing the Apple Devices app before importing photos and videos to a Windows PC. You also need a USB cable that supports data transfer rather than charging only.
Step 1. Install Apple Devices from the Microsoft Store if it is not already on your PC. Connect your iPad to the PC and unlock it. Tap Trust when the connection prompt appears.
Step 2. Open Photos on Windows and select Import.

Step 3. Select your connected iPad and wait while Windows finds the available photos and videos.
Step 5. Choose the videos you want, change the destination if needed, and click Import again.
If iCloud Photos is set to optimize iPad storage, some original videos may exist only in iCloud. Download the originals to the iPad first or use the iCloud Photos method below.
Method 3. Copy iPad Videos to PC through File Explorer
👍 Best for: Manually copying Camera Roll videos without installing transfer software.
File Explorer lets you access photos and videos stored in the iPad’s DCIM folders. It does not display every file or app folder on the device.
Step 1. Connect and unlock your iPad. Tap Trust if prompted.
Step 2. Open File Explorer and select This PC.
Step 3. Open your iPad, then go to Internal Storage > DCIM. Browse folders such as 100APPLE and 101APPLE to locate the videos you need.
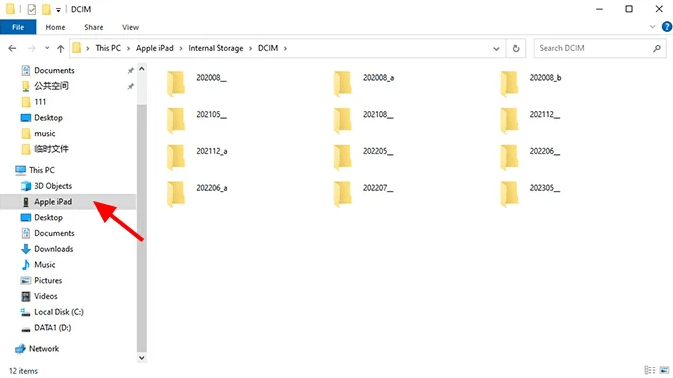
Step 4. Copy the selected videos and paste them into a folder on your PC.
If the iPad appears but its videos do not, keep the iPad unlocked and try another data cable or USB port. Videos stored only in iCloud or inside another app may not appear in DCIM. You can check videos not showing up on a PC if the problem continues.
Method 4. Download iPad Videos to Computer via iCloud Photos
👍 Best for: Accessing videos already synced to iCloud Photos without connecting your iPad.
This method requires enough iCloud storage and time for the original videos to upload.
Step 1. On the iPad, open Settings > [your name] > iCloud > Photos and turn on Sync this iPad if needed.
Step 2. Connect the iPad to Wi-Fi and power, then allow enough time for the videos to upload.
Step 3. On the computer, visit iCloud.com and sign in with the same Apple Account. Open Photos to access your videos.
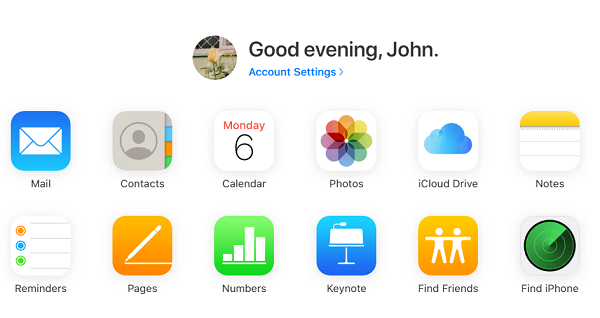
Step 4. Select the videos you want and click Download.

For more control, open More Download Options and choose:
- Unmodified Originals to keep the captured or imported format.
- Highest Resolution to download the best available quality.
- Most Compatible when Windows compatibility is more important than retaining the original format.
If you regularly access iCloud Photos on a Windows PC, you can also install iCloud for Windows.
Method 5. Send a Large iPad Video using Mail Drop
👍 Best for: Sending 1 video of up to 5GB to yourself or another recipient.
Mail Drop uploads the attachment and sends a download link. It does not use your normal iCloud storage allowance, but it is not suitable for transferring a large collection of videos.
Step 1. Open Photos on the iPad. Select the video, tap Share, and select Mail.
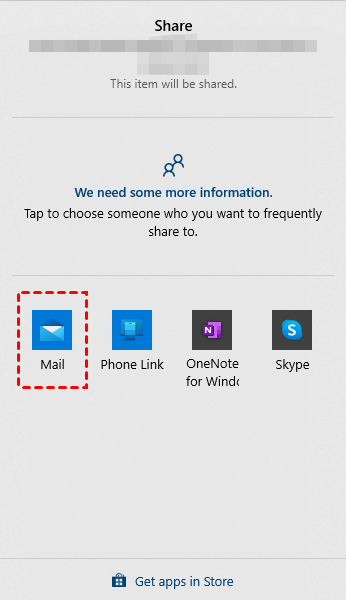
Step 2. Enter your email address or the recipient’s address and tap Send. If the attachment is too large for regular email, select Use Mail Drop when prompted.
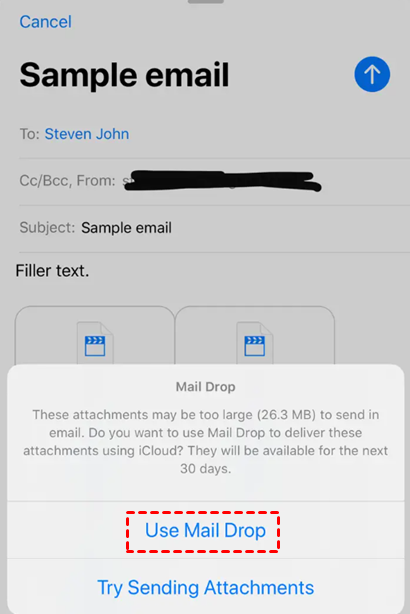
Step 3. Open the email on the computer and download the video.
Mail Drop accepts messages with attachments up to 5GB. The recipient has 30 days to download them. Upload and download times depend on the video size and internet speed.
Method 6. Transfer Videos from iPad to Mac using Photos or AirDrop
👍 Best for: Moving videos to a nearby Mac with either a cable or a wireless connection.
For multiple or large videos, import them through Photos. AirDrop is convenient when you only need to send a few videos.
Import Videos using Photos
Step 1. Connect the iPad to the Mac. Click Allow on the Mac if an accessory permission prompt appears.
Step 2. Open Photos. Select the iPad in the sidebar if the Import screen does not appear automatically.
Step 3. Unlock the iPad and tap Trust if asked.
Step 4. Select the videos and click Import Selected. You can also choose Import All New Photos to import all new photos and videos.
Send Videos using AirDrop
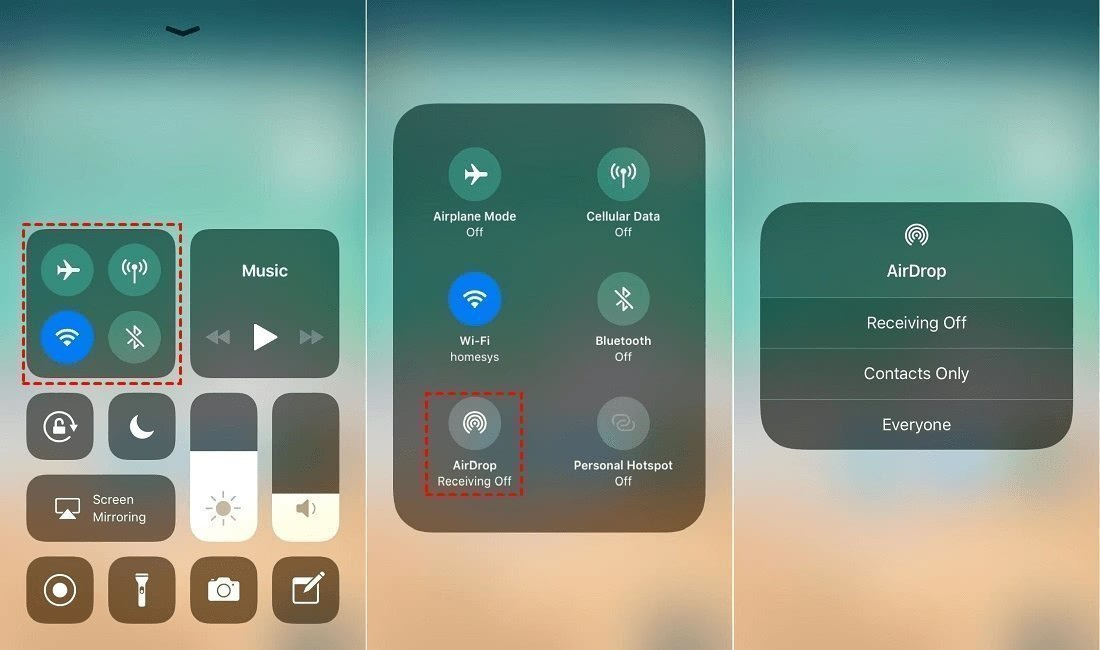
Step 1. Turn on Wi-Fi and Bluetooth on the iPad and Mac. Be sure your AirDrop is On.
Step 2. Open Photos on the iPad. Then, select the videos, and tap Share > AirDrop.
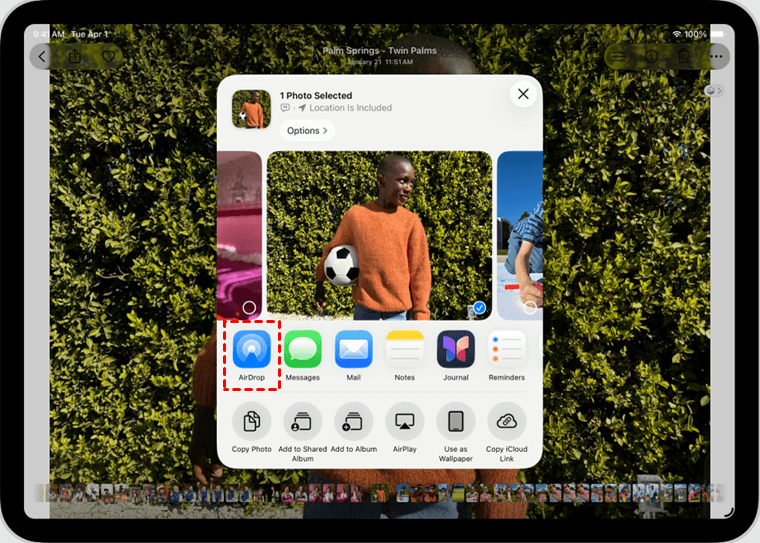
Step 4. Choose your Mac.Accept the transfer on the Mac and wait for it to finish.
AirDrop performance depends on the distance between the devices, wireless interference, and file size. Use Photos with a cable if a large AirDrop transfer stops repeatedly.
💬 Check the transferred videos before deleting anything:
- Confirm that the expected number of videos arrived.
- Open several videos and check that they play.
- Compare important file names, durations, or sizes.
- Keep the originals until the transfer has been verified.
If a transferred video does not play on Windows, the transfer may still have succeeded. Videos recorded in HEVC/H.265 can require a compatible Windows extension or media player.
Compare the 6 Video Transfer Methods
| Tool | Windows | Mac | Cable needed | Large videos? | Key limitation |
|---|---|---|---|---|---|
| AOMEI FoneBackup | Yes | No | Yes | Yes | Free transfer is limited to 30 files per day |
| Microsoft Photos | Yes | No | Yes | Yes | Originals must be available on the iPad |
| File Explorer | Yes | No | Yes | Sometimes | Limited to accessible DCIM content |
| iCloud Photos | Yes | Yes | No | Depends on storage and internet speed | Requires upload and download time |
| Mail Drop | Yes | Yes | No | Up to 5GB | Download link expires after 30 days |
| Photos or AirDrop | No | Yes | Optional | Yes with Photos and a cable | Requires a Mac |
For multiple or large videos going to Windows, start with a direct connection.
- Choose AOMEI FoneBackup for selective transfer and flexible destination.
- Use Microsoft Photos for a built-in import method
- Try File Explorer for basic manual copying.
FAQs
1. Why are my iPad videos not showing up on my PC?
The iPad may be locked, the computer may not have permission, or the USB cable may support charging only. Videos stored only in iCloud or inside another app may also be missing from DCIM. Unlock the iPad, tap Trust, try another data cable, and confirm that the original video is available locally.
2. Can I transfer a 10GB video from iPad to PC?
Yes, but Mail Drop cannot send it because its limit is 5GB. Use AOMEI FoneBackup, Microsoft Photos, File Explorer, or iCloud Photos if you have enough cloud storage and a stable connection.
3. Will transferring an iPad video reduce its quality?
Copying or importing the original video normally preserves its quality. When downloading through iCloud.com, select Unmodified Originals or Highest Resolution. Choosing Most Compatible may change the format for easier playback.
4. Why can’t Windows play the transferred video?
The video may use HEVC/H.265. Install a compatible video extension or use a media player that supports HEVC. For future recordings, you can open Settings > Camera > Formats and select Most Compatible, although this will not convert videos already recorded.
5. Can I transfer iPad videos without iTunes or iCloud?
Yes. AOMEI FoneBackup, Microsoft Photos, and File Explorer can transfer videos through a USB connection without iTunes or iCloud. On a Mac, you can use Photos or AirDrop.
Summary
Here is the simple way to choose how to transfer videos from iPad to computer:
- For multiple or large videos going to Windows, use AOMEI FoneBackup or Microsoft Photos.
- For manual copying from DCIM, use File Explorer.
- For videos already synced online, use iCloud Photos.
- For 1 video under 5GB, use Mail Drop.
- For a Mac, use Photos for large transfers or AirDrop for a few videos.
If you want to choose individual iPad videos and save them directly to a Windows folder or external drive, AOMEI FoneBackup provides a clear transfer method without requiring cloud storage.

 as a preferred
source on Google
as a preferred
source on Google