




How to Transfer Photos from Computer to iPhone in 6 Ways
This guide explains how to transfer photos from computer to iPhone and choose the right method based on photo quantity, cloud access, computer system, and where the transferred pictures need to appear.

By Ivy Updated on August 27, 2026


You’ve saved old family pictures, camera photos, or edited images on your computer. Now you want them in the Photos app on your iPhone, but dragging the files into the iPhone’s DCIM folder does not work.
The right method depends on your computer and how you want to manage the imported pictures.
- On Windows, AOMEI FoneBackup can import selected photos through USB, while Apple Devices can sync complete folders.
- For cloud transfers, consider iCloud Photos or Google Photos.
- If you use a Mac, AirDrop is the simplest option for a small batch.
Choose the Right Photo Transfer Method
Before following the steps, decide where the photos should appear and whether you need to delete them directly from your iPhone.
| 🧩 Your situation | 🎯 Recommended method | ❌ Main limitation |
|---|---|---|
| Import selected PC photos into a chosen iPhone album | AOMEI FoneBackup Data Explorer | Free Edition imports 30 files per day |
| Sync organized Windows folders | Apple Devices | Synced photos are managed from the PC |
| Keep one library updated across devices | iCloud for Windows | Uses iCloud storage |
| Upload several JPEG images without installing software | iCloud.com | Limited browser upload formats |
| Access pictures across different platforms | Google Photos | Pictures may remain in Google Photos |
| Send pictures from a nearby Mac | AirDrop | Not available on Windows |
You cannot normally copy computer photos into an iPhone DCIM folder with Windows File Explorer. Windows can read photos stored locally by the iPhone, but iOS does not treat DCIM as a writable folder for ordinary PC imports.
Method 1. Transfer Photos from Computer to iPhone with AOMEI FoneBackup
👍 Best for: Choosing specific pictures on a Windows PC and importing them into an iPhone album through USB.
AOMEI FoneBackup is an iPhone backup and transfer tool for Windows PCs. It provides a standard PC to iPhone transfer and a separate Import to Device feature for designated albums.
 AOMEI FoneBackup
-
🔄 3 Transfer Modes: PC to iPhone, iPhone to PC, and iPhone to iPhone.
-
🔌 Local Transfer: Move files via USB cable - no cloud upload or WiFi required.
-
🎯 Flexible Selection: Add individual photos or entire folders.
-
📂 Album Management: Import photos directly into a designated album and delete them right from the Photos app.
-
💰 Free Tier: up to 30 files per day to your iPhone or computer; Pro version unlocks unlimited transfers.
 100% Secure
Option 1. Import Photos into a Designated Album
Choose this option when you want the photos in a specific album and need to delete them normally from the iPhone later. Note AOMEI FoneBackup must be installed on both the Windows PC and iPhone.
Step 1. Install AOMEI FoneBackup on your Windows PC and iPhone. Connect the iPhone with a USB data cable, unlock it, and tap Trust if prompted.
Step 2. Open AOMEI FoneBackup on the PC, go to My Devices and select Data Explorer.

Step 3. Expand User Albums, then select the album where you want to place the computer photos.
Step 4. Open AOMEI FoneBackup on the iPhone. Keep the app open and the iPhone screen on during the transfer.
Step 5. Return to the PC and click Import to Device > Import Files.
Step 6. Select the required pictures and click Start. Wait untill the process is complete.
When the transfer finishes, open the chosen album in Photos. Confirm that the pictures appear and can be deleted normally before importing a large collection.
Option 2. Use the Standard PC to iPhone Transfer
Choose this option when the default AOMEI FoneBackup album is acceptable.
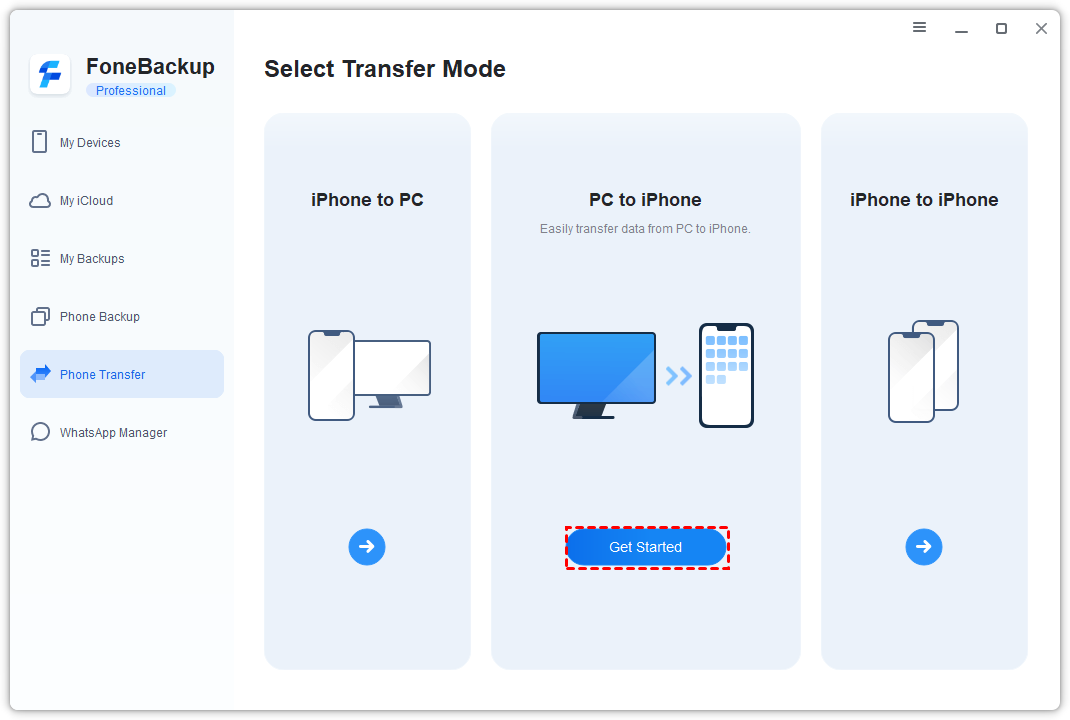
Step 1. Open AOMEI FoneBackup on the PC. Select Phone Transfer > PC to iPhone, and click Get Started.
Step 2. Click the blue folder icon to add photos or folders. You can also drag the items into the transfer window.
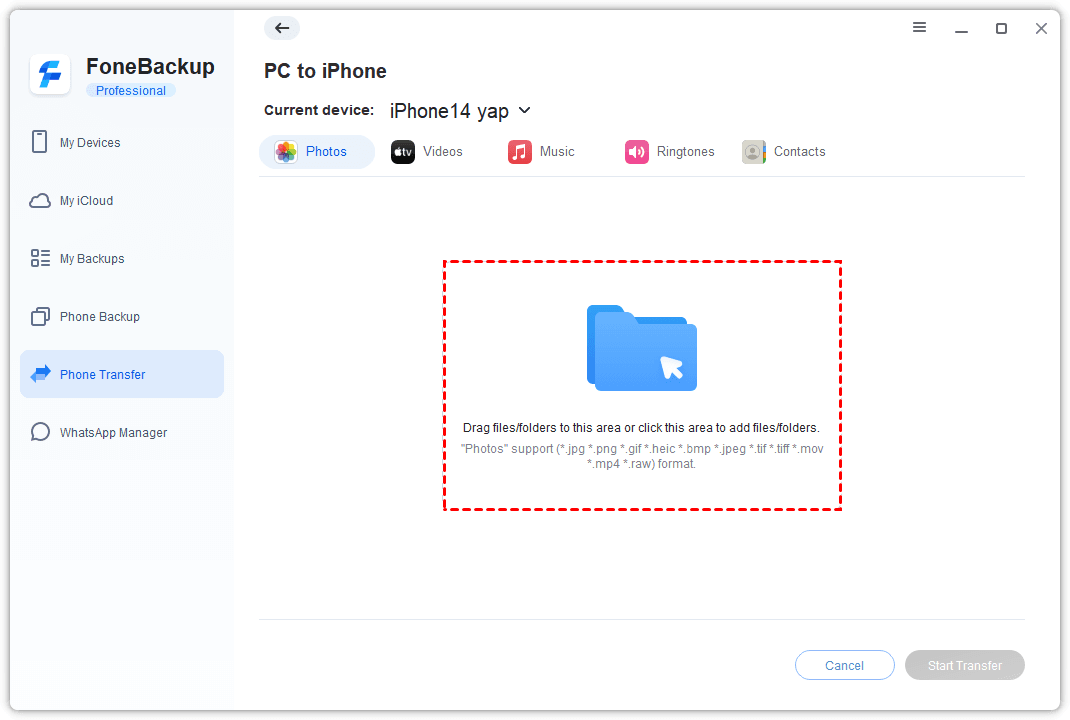
Step 3. Click Start Transfer and keep the devices connected until the transfer finishes.
The pictures are stored in the AOMEI FoneBackup album by default. Photos added through this standard Transfer feature cannot be deleted directly from the iPhone Photos app. Use Data Explorer instead when direct deletion or a designated album is important.
Method 2. Sync Photos from Windows to iPhone with Apple Devices
👍 Best for: Syncing all or selected photo folders through Apple’s Windows device-management app.
Apple Devices can sync pictures from a Windows photo library or folder to an iPhone. This is folder synchronization rather than an ordinary camera-roll import. You manage the synced collection from the computer.
Step 1. Install and open Apple Devices on your Windows PC. Connect and unlock the iPhone, then approve Trust this Computer if asked.
Step 2. Select your iPhone in the sidebar, then select Photos.
Step 3. Select Sync Photos to your device from, then choose Pictures to add your pictures. Or click Choose folder if you are photos are not saved in the Pictures folder.
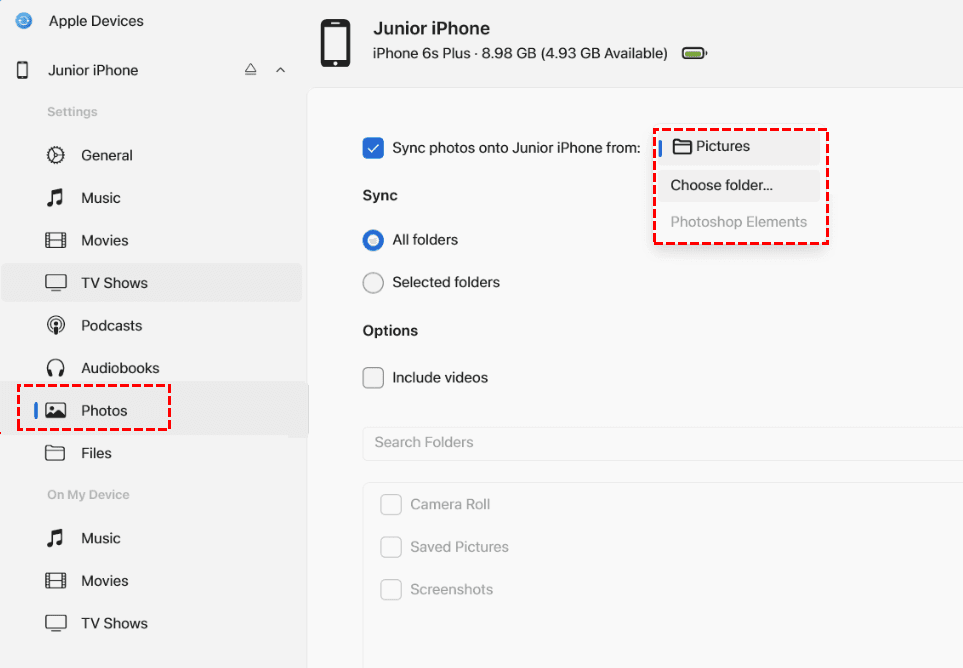
Step 4. Choose All folders or Selected folders. Select the required folders or albums and click Apply. Keep the iPhone connected until syncing finishes.
Method 3. Add Photos to iPhone with iCloud for Windows
👍 Best for: Keeping the same photo library updated across a Windows PC, iPhone, and other Apple devices.
iCloud Photos makes pictures added from your computer available in the iPhone Photos app. It is convenient for ongoing synchronization, but the pictures use your iCloud storage and require an internet connection.
Step 1. On the iPhone, open Settings > [your name] > iCloud > Photos, then turn on Sync this iPhone.
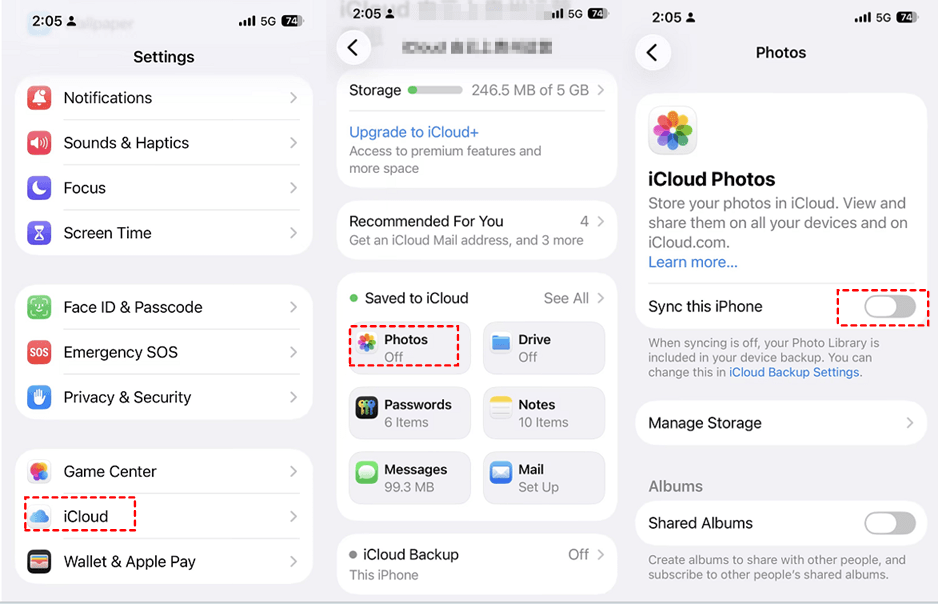
Step 2. Install and open iCloud for Windows. Sign in with the same Apple Account used on the iPhone.
Step 3. Open the options beside iCloud Photos, turn on iCloud Photos, and save the setting.
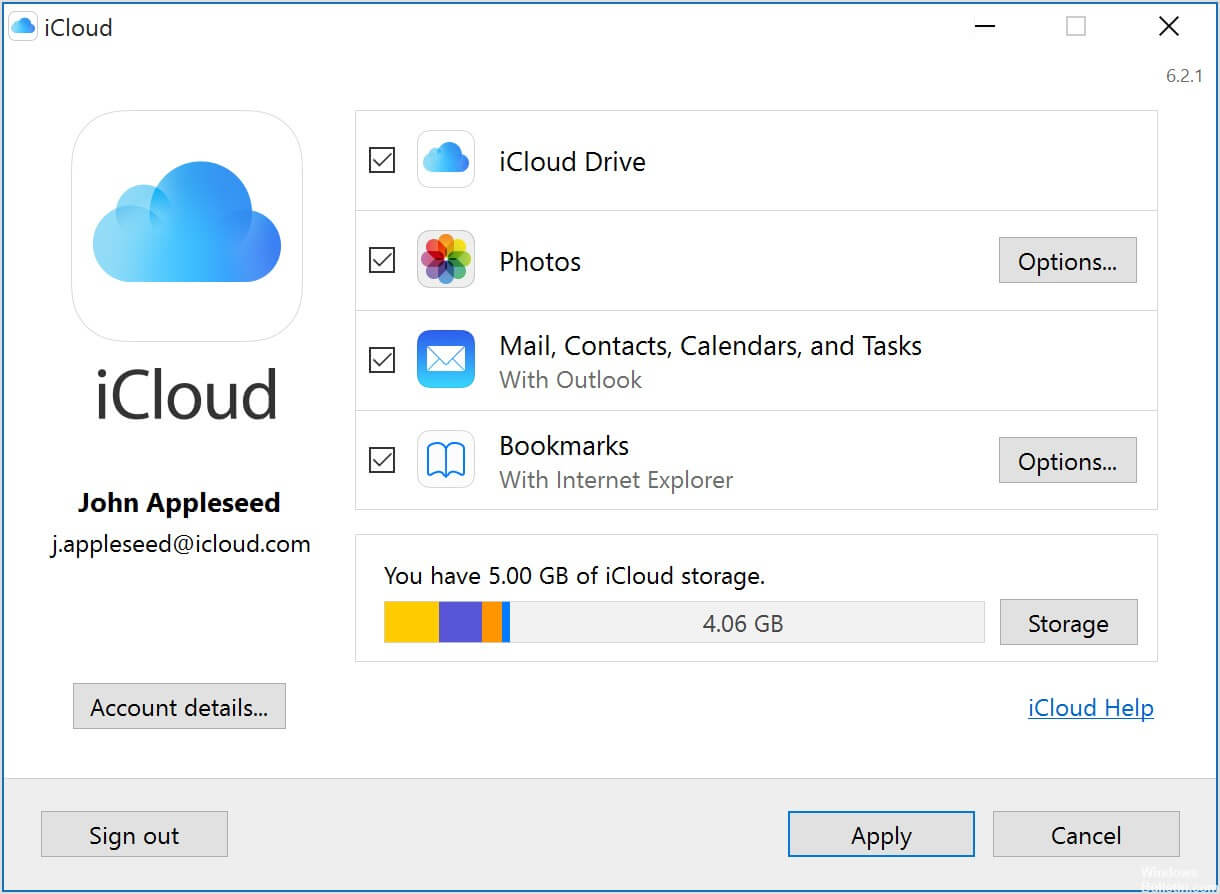
Step 4. Open File Explorer and select iCloud Photos in the navigation pane. Drag the pictures on your computer into this folder.
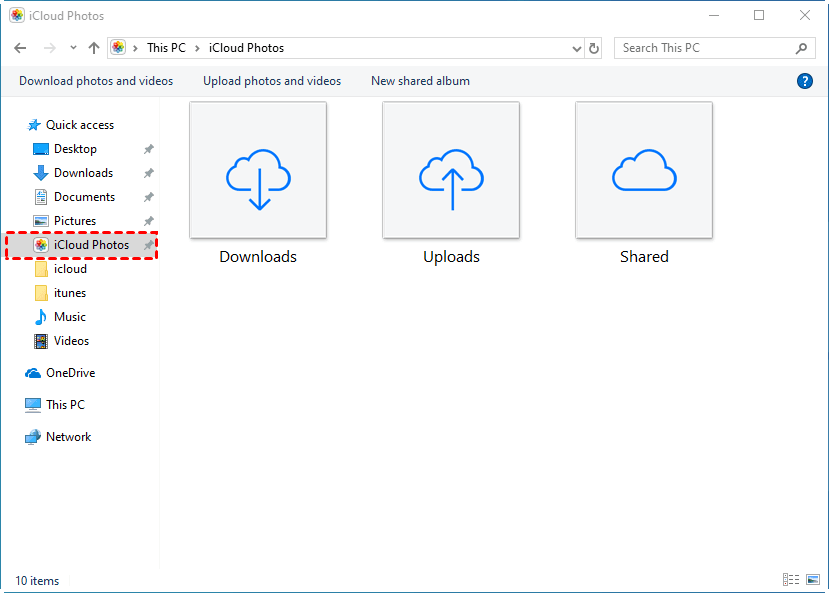
Keep both devices online while the pictures upload. Open Photos on the iPhone to check the result.
Method 4. Upload Photos from Computer to iPhone through iCloud.com
👍 Best for: Uploading a small group of pictures without installing iCloud for Windows.
Pictures uploaded to your personal library on iCloud.com become available on devices that have iCloud Photos enabled. This method primarily supports JPEG files. Use iCloud for Windows or another method for a collection containing other formats.
Step 1. On the iPhone, confirm that Sync this iPhone is enabled under Settings > [your name] > iCloud > Photos.
Step 2. On the computer, open iCloud.com and sign in to your Apple Account.
Step 3. Select Library or an album, then click Upload to select the pictures on the computer. Wait for the upload to complete before closing the browser.

Method 5. Move Photos from Computer to iPhone with Google Photos
👍 Best for: Viewing pictures across Windows, macOS, Android, and iPhone with the same Google Account.
Google Photos is useful when you already store pictures in Google’s cloud. However, viewing a picture in Google Photos does not necessarily mean that a local copy has been added to Apple Photos.
Step 1. Open photos.google.com on the computer and sign in.
Step 2. Select Create and add photos > Import photos, then choose the required pictures. You can also drag photos into the browser window.
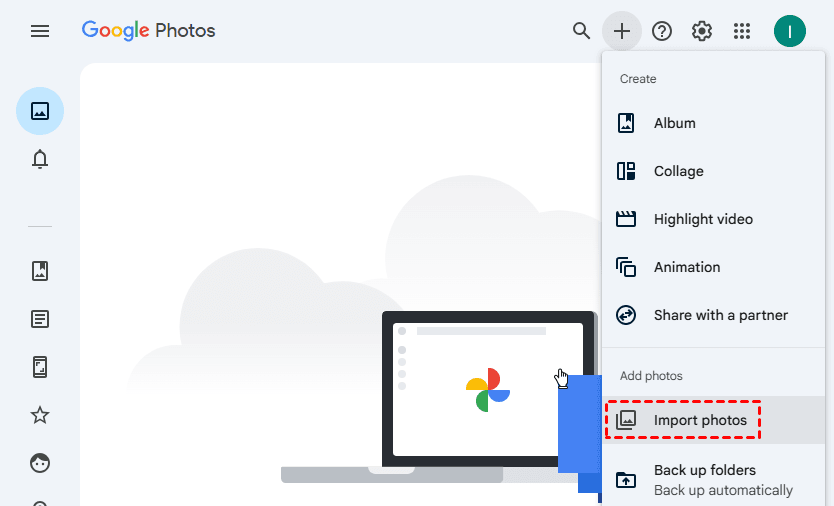
Step 3. Install Google Photos on the iPhone and sign in with the same Google Account.
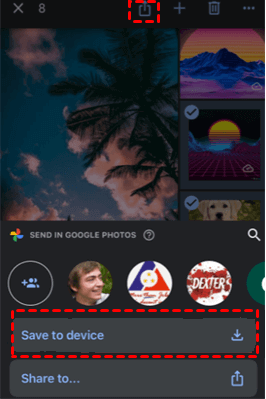
Step 4. Open the uploaded pictures. If you need local copies in Apple Photos, select them and use Download or Save to device when available.
Google Account storage is shared among Google Photos, Google Drive, and Gmail. Check your available storage before uploading a large photo library.
Method 6. Send Photos from Mac to iPhone with AirDrop
👍 Best for: Wirelessly sending a small or moderate group of pictures from a nearby Mac.
AirDrop works between Apple devices. Turn on Wi-Fi and Bluetooth on both devices and keep them within about 10 meters of each other.
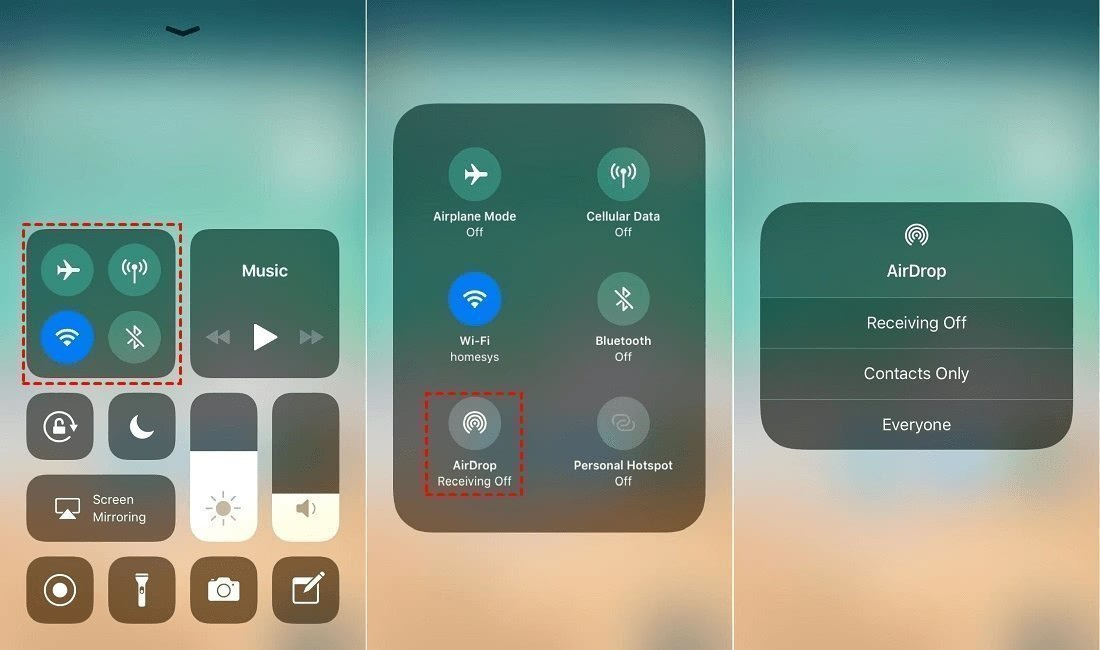
Step 1. On the iPhone, open Control Center and press the network-controls group. Select AirDrop, then choose Contacts Only or Everyone.
Step 2. On the Mac, select the pictures and click Share > AirDrop.
Step 3. Select your iPhone. Accept the transfer on the iPhone if prompted.
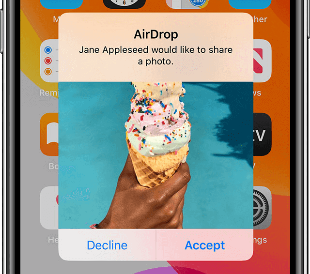
When both devices use the same Apple Account, the transfer may be accepted automatically. Photos sent from a compatible photo app are normally saved in Photos. For a very large Mac library, Finder or iCloud Photos is usually more practical than many separate AirDrop batches.
💬 Before you finish, check the transferred photos:
- Open the expected destination, such as the selected user album, the AOMEI FoneBackup album, Apple Photos, or Google Photos.
- Compare the number of pictures with your original computer selection.
- Open several pictures at full size and confirm that they are readable.
- Check whether you can edit and delete imported pictures if those actions matter to you.
- Keep the original computer files until you have confirmed the transfer.
- If pictures are missing, retry a small batch before repeating the full transfer.
Compare the 6 Ways to Transfer Photos to iPhone
| Method | Connection | 👍 Best for | Decisive limitation |
|---|---|---|---|
| AOMEI FoneBackup | USB | Selected Windows photos and designated albums | Free import is limited to 30 files per day |
| Apple Devices | USB or configured Wi-Fi sync | Organized PC folder syncing | Synced collection is managed from the PC |
| iCloud for Windows | Internet | Continuous Apple Photos syncing | Uses iCloud storage |
| iCloud.com | Internet | Occasional browser uploads | Limited upload formats |
| Google Photos | Internet | Cross-platform photo access | Saving to Apple Photos may require another step |
| AirDrop | Local wireless | Mac-to-iPhone transfer | Apple devices only |
Top recommendations:
- Use AOMEI FoneBackup Data Explorer when you want to select Windows photos, choose an album, and manage the imported pictures directly on the iPhone.
- Choose Apple Devices when you prefer folder-based synchronization.
- Choose iCloud Photos when all your devices should share one library.
- Google Photos is better for cross-platform access, while AirDrop is the simplest choice for nearby Apple devices.
FAQs
1. Why can’t I drag photos into the iPhone DCIM folder?
Windows can read locally stored iPhone photos through DCIM, but iOS does not normally allow File Explorer to write computer pictures into that folder. Use a supported import, cloud, or synchronization method instead.
2. Why is Sync Photos missing in Apple Devices?
The option is usually missing because iCloud Photos is enabled. Apple Devices does not display manual photo-syncing controls while iCloud Photos manages the library.
3. Can I transfer thousands of photos at once?
Yes, but the best method depends on how you want to manage them. Apple Devices can sync organized folders, while iCloud Photos can upload a large library if you have enough cloud storage. AOMEI FoneBackup Pro supports unlimited PC-to-iPhone imports, while Free Edition is limited to 30 files per day. Test a small batch first.
4. Can I delete photos imported with AOMEI FoneBackup?
It depends on the import method. Photos imported through Data Explorer → Import to Device can be deleted directly in Photos. Pictures added through the standard Phone Transfer → PC to iPhone feature cannot be deleted directly from the iPhone Photos app.
5. Will transferring photos reduce their quality?
A direct file import or original-quality cloud upload can preserve the photo file, but the result depends on the method, cloud settings, and supported format. Avoid email attachments when original quality matters because some services may resize large images.
6. Will transferring photos erase pictures already on my iPhone?
Most import methods add pictures rather than replace an unrelated local library. Apple Devices works differently because it synchronizes selected computer folders. Changing the folder selection and syncing again can change the synced photo collection.
Summary
- Choose AOMEI FoneBackup Data Explorer to import selected Windows photos into a designated album that you can manage from the iPhone.
- Use the standard PC to iPhone transfer only when its default album and deletion limitation are acceptable.
- Choose Apple Devices for an organized folder-syncing arrangement.
- Choose iCloud Photos when you want one photo library across multiple devices.
- Choose Google Photos when cross-platform access is more important than immediate placement in Apple Photos.
- Choose AirDrop for a quick transfer from a nearby Mac.
For a Windows PC without enough iCloud storage, AOMEI FoneBackup provides a direct USB import path. Use Data Explorer when album choice and normal deletion on the iPhone are important.

 as a preferred
source on Google
as a preferred
source on Google