



How to Transfer Non-Purchased Music to a New iPhone
This guide explains how to transfer non purchased music to new iPhone based on where your songs are stored, with options for an old iPhone, computer, or cloud music library.

By Ivy Updated on September 1, 2026


You’ve finished setting up your new iPhone, but the MP3 files, CD imports, or downloaded songs you enjoyed on the old device are missing. Quick Start or an iCloud restore may bring back many types of data without restoring music that was originally synced from a computer.
The right method depends on where the usable copy of your music is now.
- If the songs remain on a PC or Mac, sync that library to the new iPhone.
- If the only copy is on the old iPhone, first export it to a Windows PC with AOMEI FoneBackup, then import it to the new device.
Before You Start: Identify the Music Source
“Non-purchased music” can refer to several kinds of audio. They may look similar in the Music app, but they do not follow the same transfer rules.
- Computer-synced music: MP3, AAC, WAV, CD imports, and other local songs previously added from a PC or Mac.
- Apple Music subscription downloads: Offline copies connected to an active subscription. They are not unrestricted audio files that you can permanently export.
- Cloud library music: Songs matched or uploaded through Sync Library. These should become available after you sign in with the same Apple Account and enable the feature.
- App-stored audio: Recordings, DJ mixes, lessons, or downloads stored inside Files or another app instead of the main Music library.
- iTunes Store purchases: These are purchased items and can normally be downloaded again with the Apple Account used to buy them.
Which Method Should You Use?
Use this quick guide to choose a method:
| 🧩 Your situation | ✅ Recommended method | ❌ Do not use it when |
|---|---|---|
| The only copy is on the old iPhone | AOMEI FoneBackup | The tracks are protected Apple Music downloads |
| The original files are on a Windows PC | Apple Music and Apple Devices | You need to extract songs from the old iPhone |
| The original files are on a Mac | Music and Finder | The Mac does not contain the required songs |
| The library is already in Apple Music cloud storage | Sync Library | You do not have Apple Music or iTunes Match |
| Audio is stored inside another app | The app’s export or File Sharing feature | The audio appears only in the Music library |
Before changing any sync settings, keep the old iPhone and the original computer files. Do not erase or trade in the old device until you have played several songs on the new iPhone and confirmed that the transfer is complete.
Method 1: Transfer Non-Purchased Music from an Old iPhone with AOMEI FoneBackup
👍 Best for: Music whose only accessible copy is on the old iPhone - requires a Windows PC and 2 USB transfer stages.
AOMEI FoneBackup is an iPhone data transfer software that can transfer non-purchased music from iPhone to computer and then import to new iPhone.
 AOMEI FoneBackup
- Transfer music from old iPhone to new iPhone or use your computer as middleman.
- Select individual songs instead of syncing a complete library.
- Save music to any PC folder or drive.
- Add music, not replace - You don't need to erase iPhone before transfer.
- Free transfer allows up to 30 files per day.
 100% Secure
Stage 1: Export Music from Old iPhone to Windows PC
Step 1. Download and install AOMEI FoneBackup on your Windows PC. Connect and unlock the old iPhone, tap Trust if a trust request appears.
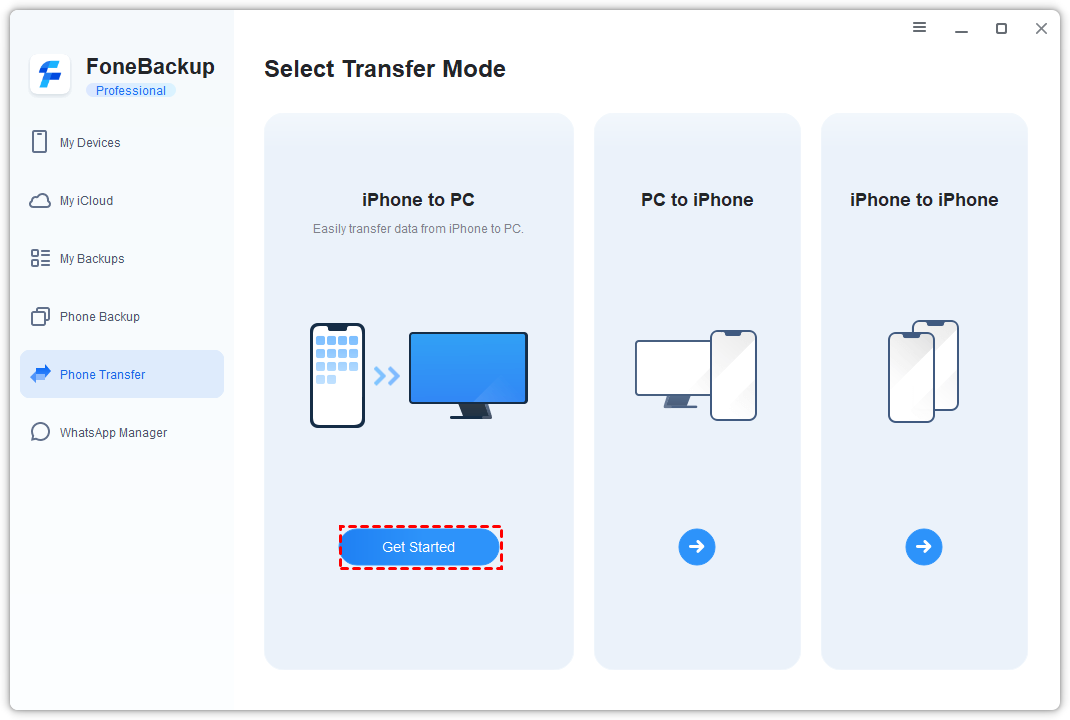
Step 2. In AOMEI FoneBackup, select Phone Transfer > iPhone to PC and click Get Started.
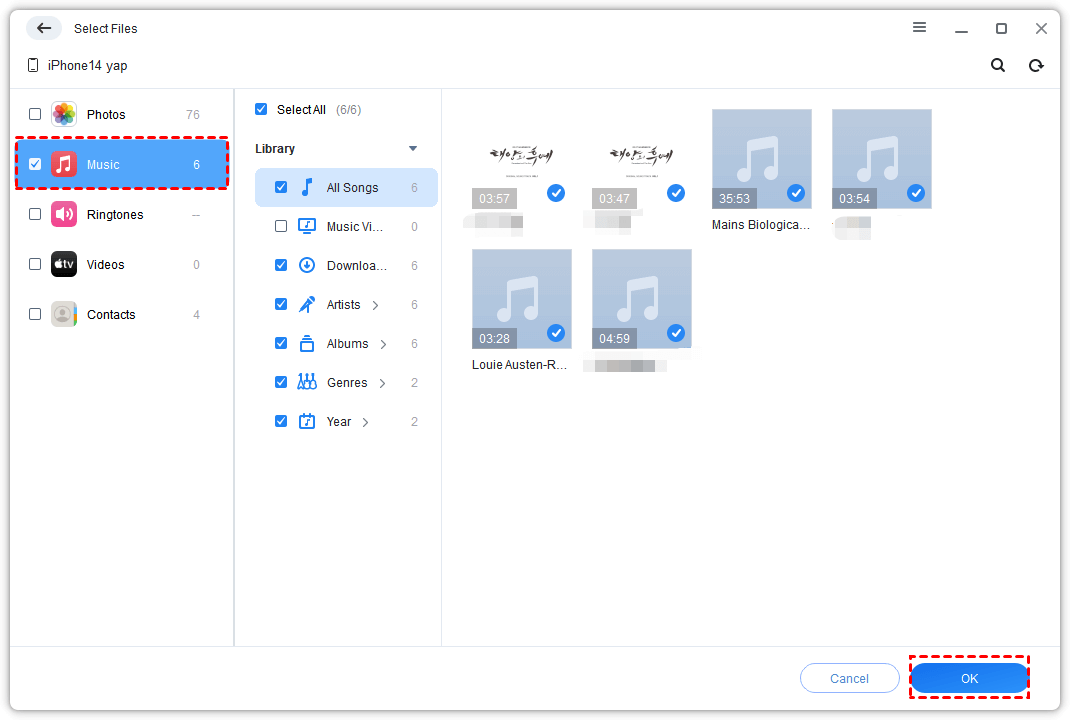
Step 3. Select Music. Wait for the available songs to load, choose the tracks you need, and click OK.
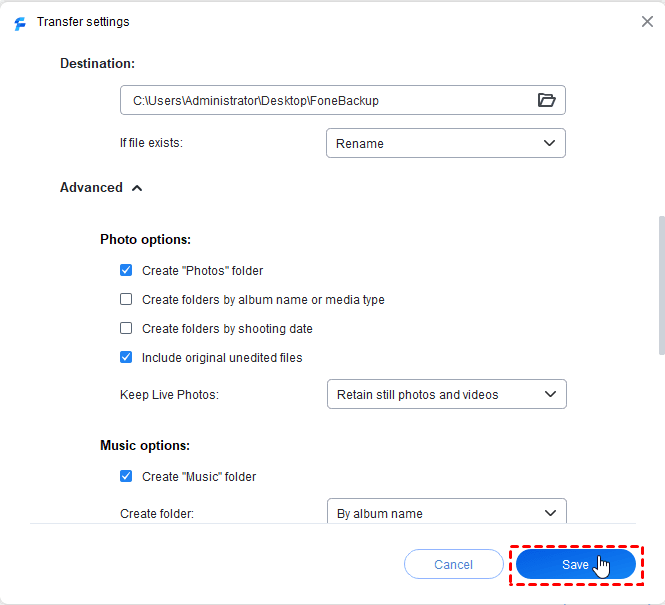
Step 4. Click Transfer Settings, and choose a PC folder for your music. Click Save.
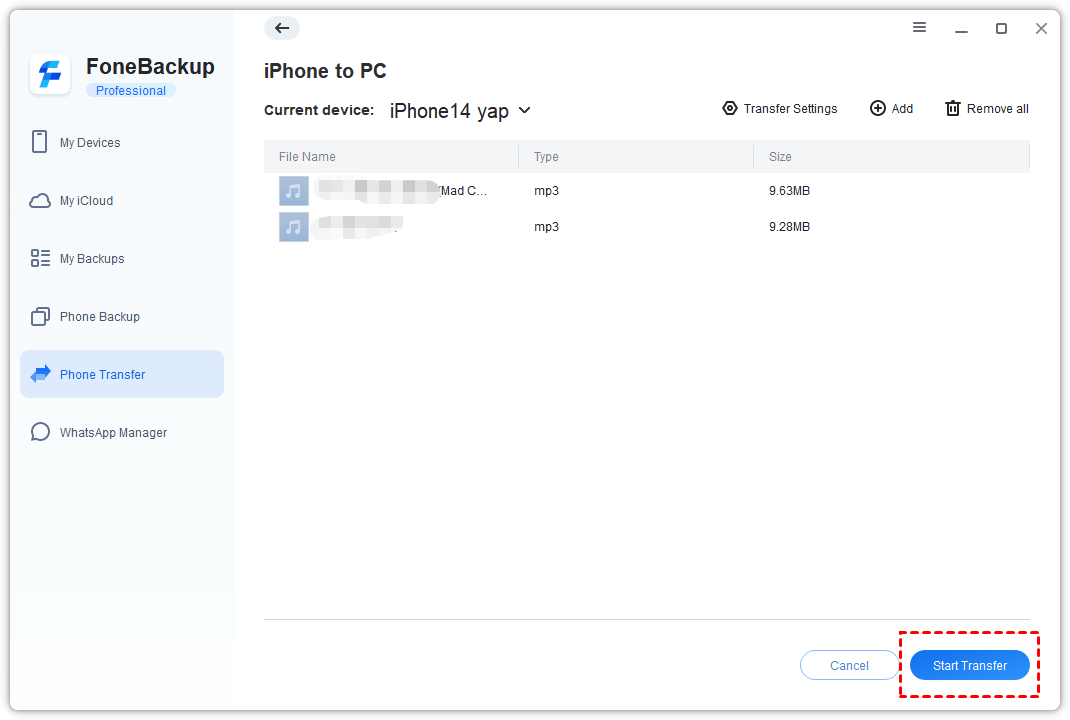
Step 5. Back to main screen, click Start Transfer. Keep the old iPhone connected until the transfer finishes.
Stage 2: Import Non-Purchased Music to New iPhone
Step 1. Disconnect the old iPhone. Connect and unlock the new iPhone, tap Trust when prompted.
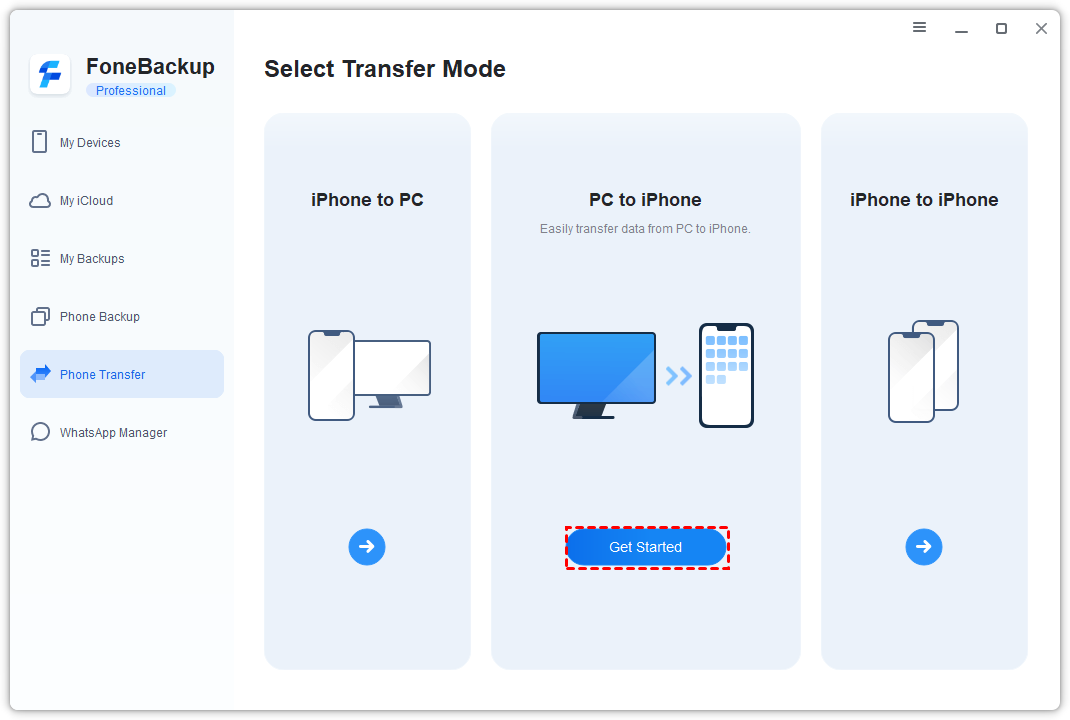
Step 2. Open AOMEI FoneBackup. Select Phone Transfer > PC to iPhone, and click Get Started.
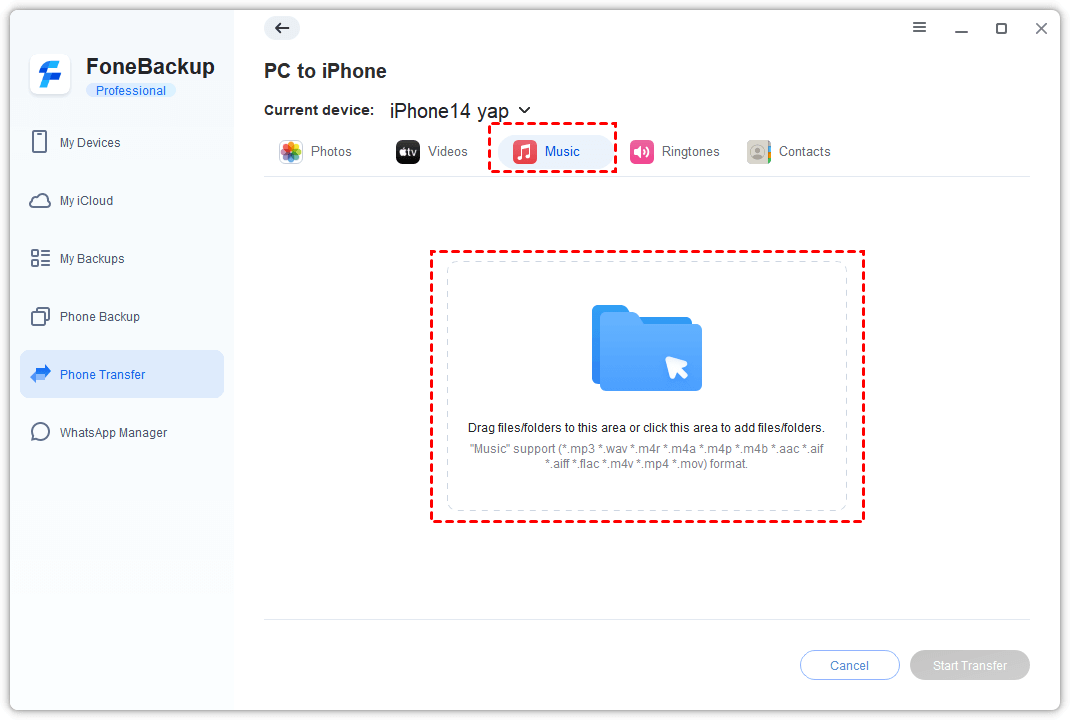
Step 3. Click the blue folder icon. Add the exported music files or the folder to the transfer window. Click Start Transfer to proceed.
Transferred songs should appear under Library > Downloaded in the Music app. If the Music list is empty, the audio may be cloud-only, protected, or stored inside another app.
Method 2: Transfer Non-Purchased Music from Windows with Apple Devices
👍 Best for: Local songs that still exist on your Windows PC - official and free, but syncing may replace music from another computer library.
Current Windows music syncing uses both the Apple Music app and Apple Devices. First add your MP3 files or CD imports to the Apple Music library on the PC.
Stage 1: Add Non-Purcahsed Music to Apple Music
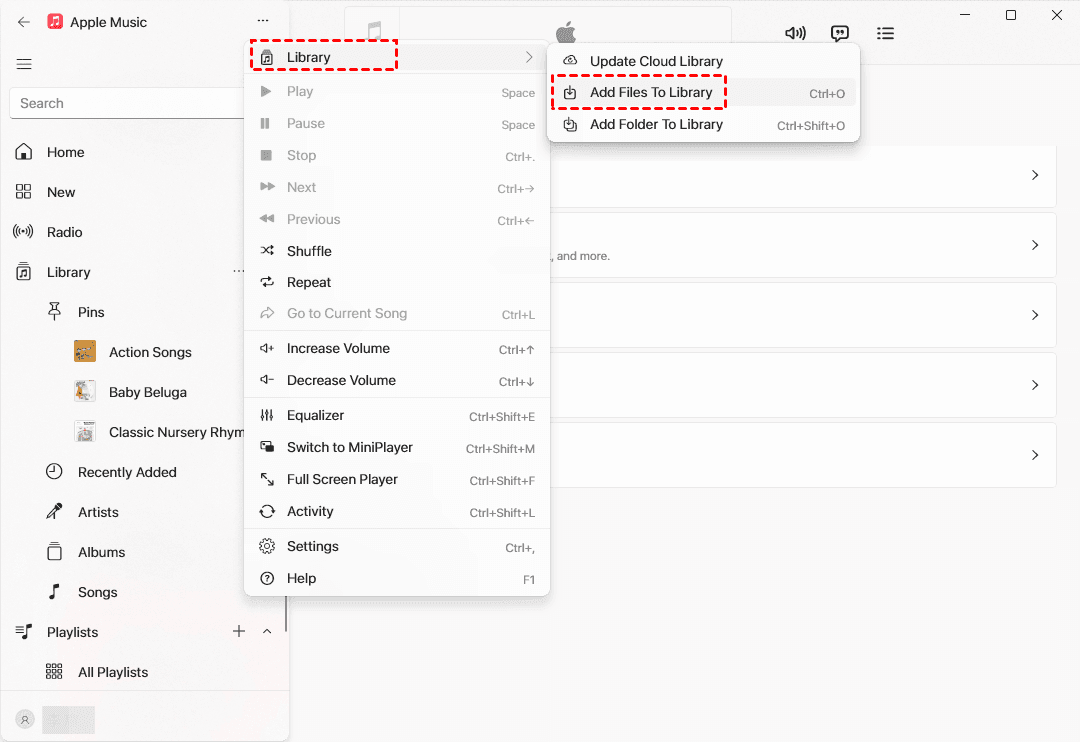
Step 1. Open the Apple Music app on Windows. Click Open Navigation > Sidebar Actions > Add Files to Library or Add Folder to Library.
Step 2. Browse your computer to find and select non-purchased music, click Open. If you select a folder, Apple Music imports all supported songs inside it.
Stage 2: Transfer Non-Purchased Music to New iPhone
Step 1. Connect the new iPhone to the PC with a USB cable. Unlock it and approve Trust if asked.
Step 2. Open Apple Devices and select the iPhone in the sidebar.
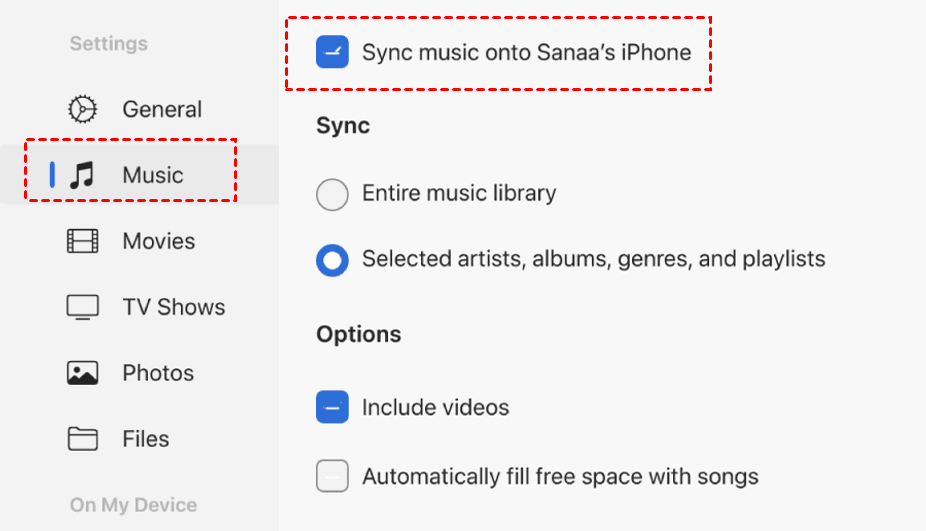
Step 3. Select Music, then enable Sync music onto [device name]. Plus, choose Entire music library or Selected artists, albums, genres, and playlists and click Apply.
If Apple Music Sync Library is enabled, manual music syncing may be unavailable. Use Method 3 instead, or turn off Sync Library only after confirming that you understand how the change will affect the current library.
Also watch for an “Erase and Sync” message. An iPhone can sync with only 1 Apple Music library at a time, so accepting that message can replace music previously synced from another computer.
Method 3: Move a Cloud Music Library with Sync Library
👍 Best for: Music already matched or uploaded through Apple Music or iTunes Match - requires a subscription and the same Apple Account.
Sync Library can make your cloud music library available on the new iPhone without a cable. However, Apple states that Apple Music is not a backup service. Keep a separate copy of irreplaceable local files.
Step 1. On the computer containing your complete music library, open the Apple Music app and confirm that it uses the same Apple Account as the subscription.
Step 2. On Windows, click Open navigation > Sidebar Actions > Settings > General, then enable Sync Library. Or on a Mac, choose Music > Settings > General and enable Sync Library.
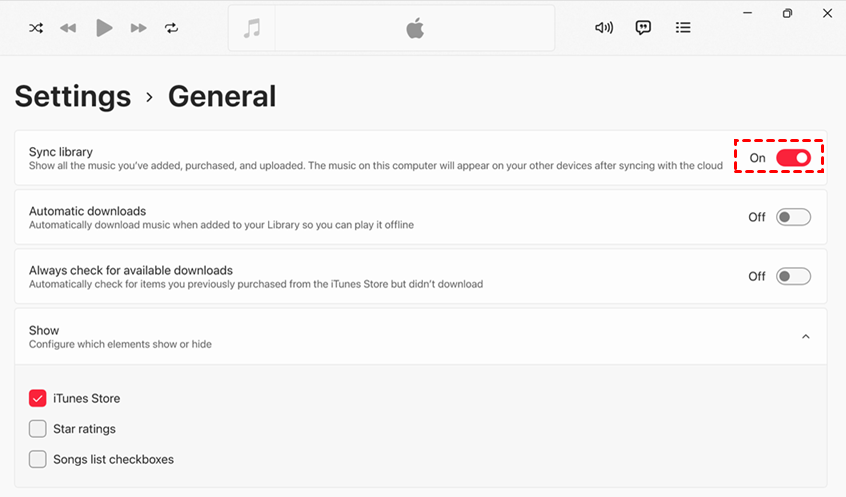
Step 3. Wait for the computer library to finish updating. Do not shut down the computer while tracks are still being matched or uploaded.
Step 4. On the new iPhone, confirm you are logging in the same Apple Account in the Music app.
Step 5. Open Settings > Music and turn on Sync Library. Wait for the library to appear. Download any songs you want to keep available offline.
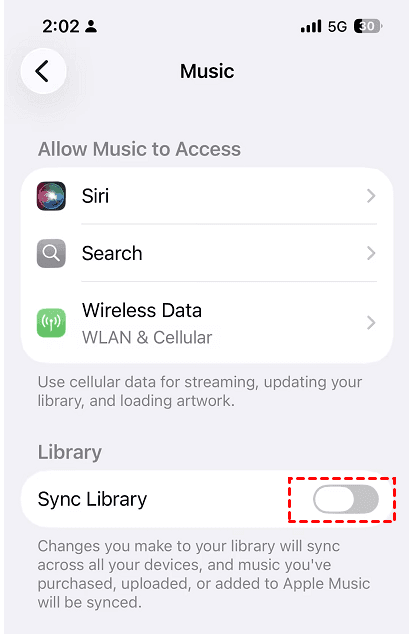
This method does not extract music whose only copy is trapped on the old iPhone. In that situation, return to Method 1 before changing or erasing the old device.
💬 Check the result before removing anything:
- Play several songs with the new iPhone offline.
- Confirm that the expected albums and tracks appear.
- Check whether titles, artists, artwork, and playlists are complete.
- Keep the old iPhone and computer copies until the check is finished.
- If items are missing, identify whether they were local, cloud-only, protected, or stored in another app, then retry the matching method.
Which Music Transfer Method Should You Choose?
| Method | 👍 Best for | Main requirement | Key limitation |
|---|---|---|---|
| AOMEI FoneBackup | Only copy remains on old iPhone | Windows PC and USB cables | Free Transfer is limited to 30 files/day in each direction |
| Apple Devices/Finder | Original computer files remain available | Windows PC or Mac library | Syncing can replace music from another library |
| Sync Library | Existing cloud music library | Apple Music or iTunes Match | It is not a backup or phone-to-computer extractor |
Here is the simple decision:
- use Apple Devices or Finder when you still have the original computer library.
- Use Sync Library when the music is already stored in Apple’s cloud library.
- Choose AOMEI FoneBackup when supported local songs must first be recovered from the old iPhone through a Windows PC.
FAQs
1. Does Quick Start transfer non-purchased music to a new iPhone?
Do not rely on Quick Start alone for computer-synced music. Data, purchased content, and items stored in iCloud may return, but local songs originally synced from a computer may need to be synced or imported again.
2. Can I transfer non-purchased music without a computer?
Only in some situations. Sync Library can restore a cloud music library, and an app may let you share its own audio files. Moving locally synced Music-library tracks from one iPhone to another normally requires access to a computer or a cloud library.
3. Can Apple Music downloads be converted into normal MP3 files?
No. Offline Apple Music subscription downloads are protected service content, not permanent MP3 files. Sign in to Apple Music on the new iPhone and download them again while the subscription remains active.
4. Why does a song play on the old iPhone but not appear in a transfer tool?
The song may be protected, cloud-managed, or stored in another app. Check Files and the original app for Share, Export, or cloud-storage options. Local playback alone does not prove that the track is an unrestricted audio file.
5. Will my playlists and song details transfer?
It depends on the method and the source data. Sync Library is more suitable for an existing cloud-managed library. File transfers focus on the audio files, so playlists, ratings, artwork, or some metadata may not transfer completely. Check these details before erasing the old iPhone.
Summary
To transfer non-purchased music to iPhone, you have the following options. Select one based on your situation:
- Use Apple Devices or Finder when the original MP3 files or CD imports remain on your computer.
- Use Sync Library when your music is already matched or uploaded through Apple Music or iTunes Match.
- Use an app’s export feature when the audio is stored in Files or a third-party app.
- Use AOMEI FoneBackup when you can't directly add music to a new iPhone. It allows you to use PC as a middleman.

 as a preferred
source on Google
as a preferred
source on Google