




4 Ways to Transfer Music from Windows 10 to iPhone
Need to transfer music from Windows 10 to iPhone? This guide covers 5 proven methods - AOMEI FoneBackup (30 files/day free), iTunes, cloud services, and iCloud Music Library. No data loss, no iTunes hassles. Keep reading.

By Ivy Updated on July 16, 2026


You've just downloaded a batch of new songs on your Windows 10 PC, and now you want them on your iPhone. But you've heard horror stories about iTunes wiping out existing music. You're not sure which method is safe, which one is fast, and which one won't erase what's already on your phone.
This guide compares 4 proven ways to transfer music from Windows 10 to iPhone - from the fastest free method to cloud-based alternatives. Start with the one that fits your situation.
Quick Guide: Which Method Should You Use?
| Your Situation | Best Method | Why |
|---|---|---|
| A few songs (≤30) and want to keep existing music | Method 1: AOMEI FoneBackup Free | Free for 30 files/day - no data erasure, fast USB transfer |
| Lots of music (>30), want to keep existing songs | Upgrade AOMEI FoneBackup or Method 2: iTunes | Pro unlocks unlimited transfers; iTunes requires careful manual setup. |
| A few songs, without installing extra software | Method 2: iTunes (Manual Mode) | Official tool, but requires careful setup to avoid erasing music |
| A few songs, prefer wireless transfer | Method 3: Cloud Services (Dropbox, Google Drive) | Wireless, 2- 15 GB free storage, but requires download on iPhone |
| Already use Apple Music or iCloud Music Library | Method 4: iCloud Music Library | Seamless cloud sync may require a subscription |
Not sure where to start? Try Method 1 first - it's the fastest and safest option for most users, and it won't erase your existing music. The free version handles up to 30 files per day.
Method 1: Transfer Music with AOMEI FoneBackup (Fastest & No Erase)
🔥 Best for: Small to medium transfers - fast, selective, no iTunes, no data erasure. Free for 30 files/day; Pro for unlimited bulk transfers.
AOMEI FoneBackup is a free iPhone data transfer tool designed for Windows users. It transfers music via USB cable - no iCloud, no Wi-Fi, no iTunes. Unlike iTunes, it adds music to your iPhone without erasing what's already there.
 AOMEI FoneBackup
- 3 transfer modes: iPhone to PC, PC to iPhone, iPhone to iPhone. No Wi-Fi, iCloud, or Apple ID needed.
- No data erasure: Adds music without removing existing ones.
- Fast transfer: Transfer music in minutes, not hours.
- Selective transfer: Choose exactly which songs to move, purchased or non-purchased. Preview files before transferring.
- Wide compatibility: Works with the latest iPhone models and iOS versions
- Free version available: 30 files/day free; Pro for unlimited transfer
 100% Secure
 How to transfer music from Windows 10 to iPhone with AOMEI FoneBackup:
Step 1. Download and install AOMEI FoneBackup on your Windows PC. Connect your iPhone to your computer using a USB cable. Unlock your iPhone and tap "Trust" when prompted.
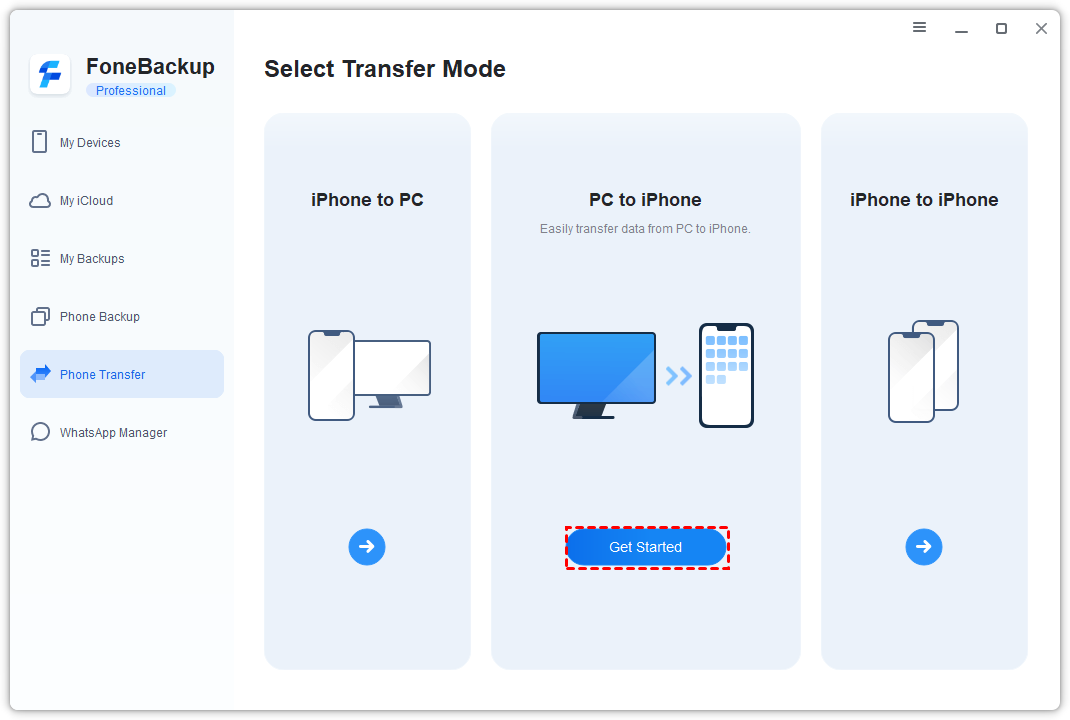
Step 2. Launch the software, click Phone Transfer on the left pane, choose PC to iPhone mode, and click Start Transfer.
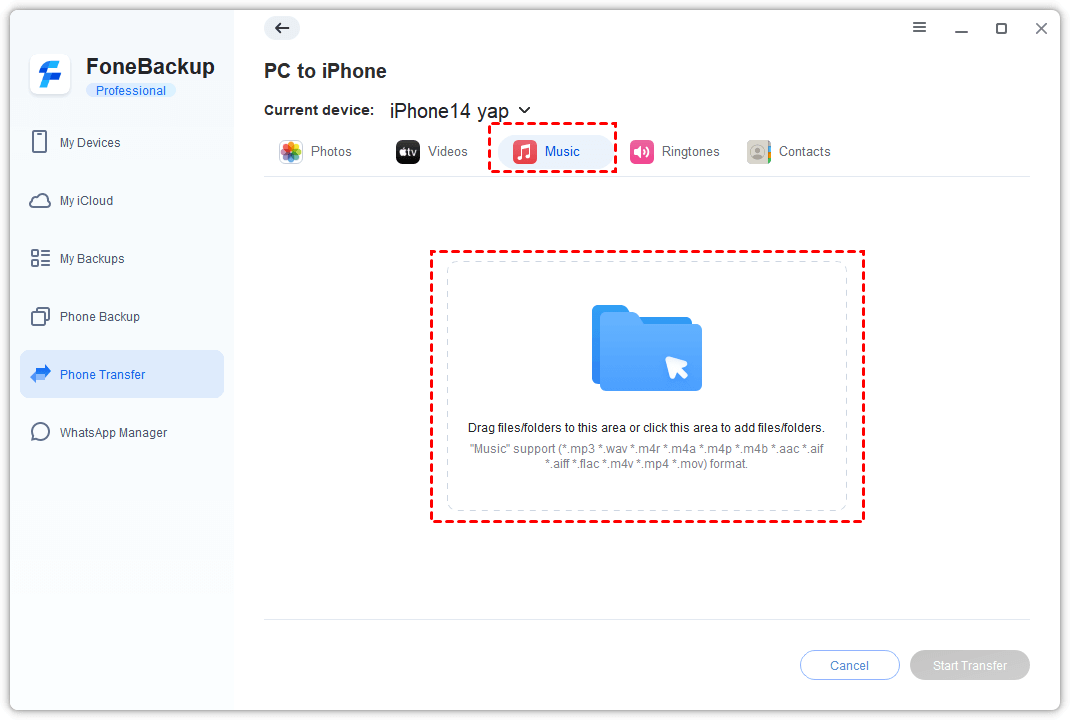
Step 3. Select the Music option, click the file icon to browse, and choose the songs you want to transfer to your iPhone.
Step 4. Once confirmed, click Start Transfer to transfer music from Windows 10 to iPhone.
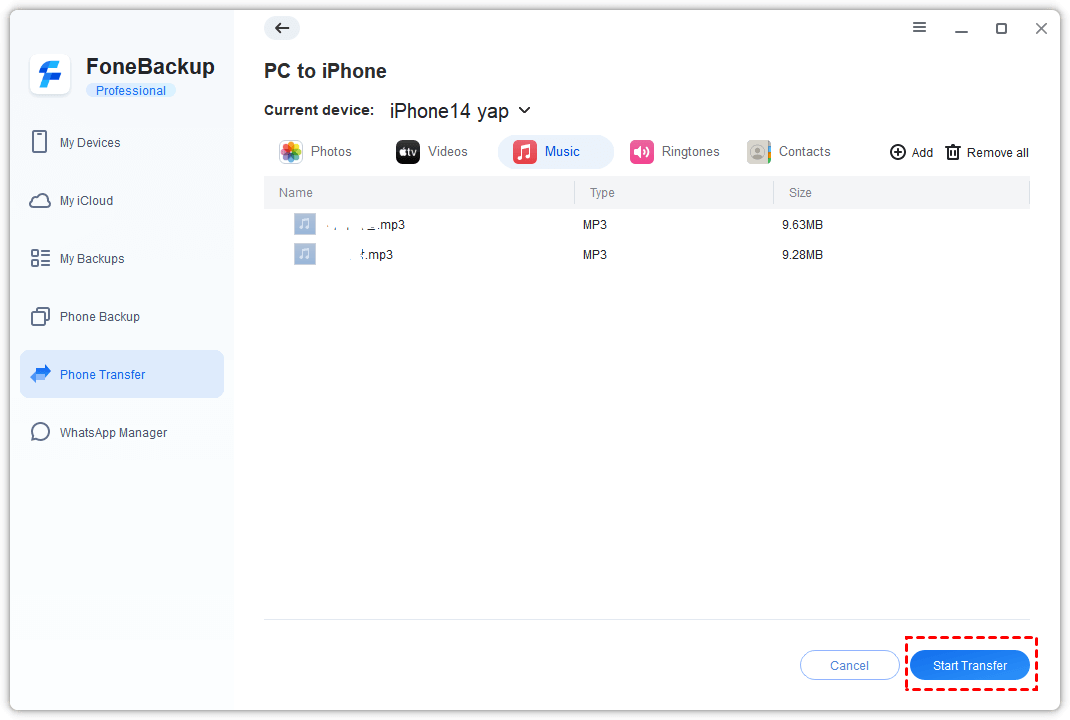
Wait for the process to complete. Your music will be added to your iPhone without erasing existing songs.
Method 2: Transfer Music from Windows 10 to iPhone with iTunes (Manual Mode)
👍 Best for: Users who prefer Apple's official tool and don't mind extra setup steps.
iTunes is Apple's official application for managing iOS devices. However, iTunes has limitations: it requires you to pair your computer with your iPhone, and if you're not careful, syncing can erase existing music.
Before you start:
-
To transfer music from iTunes to iPhone, you may need to go to Settings > Music on your iPhone and turn off iCloud Music Library.
-
iTunes can erase existing music if you don't set it to manual mode. Always check "Manually manage music and videos" before syncing. Or skip to Method 1.
How to transfer music with iTunes (without erasing existing songs):
Step 1. Connect your iPhone to your PC via a USB cable and run the latest version of iTunes. For the first connection, click Continue on your PC and tap Trust on your iPhone.
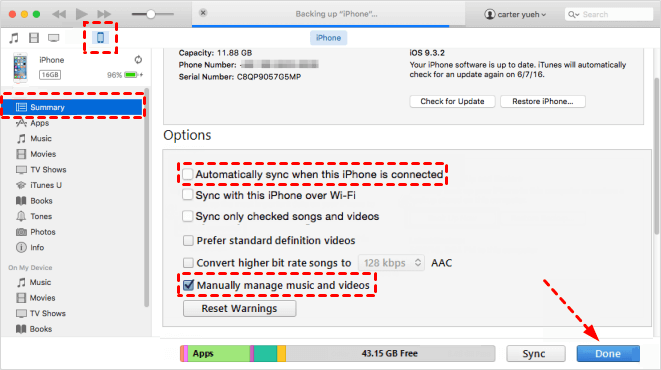
Step 2. Click the Device icon, go to Summary, uncheck Automatically sync when this iPhone is connected, and check Manually manage music and videos.
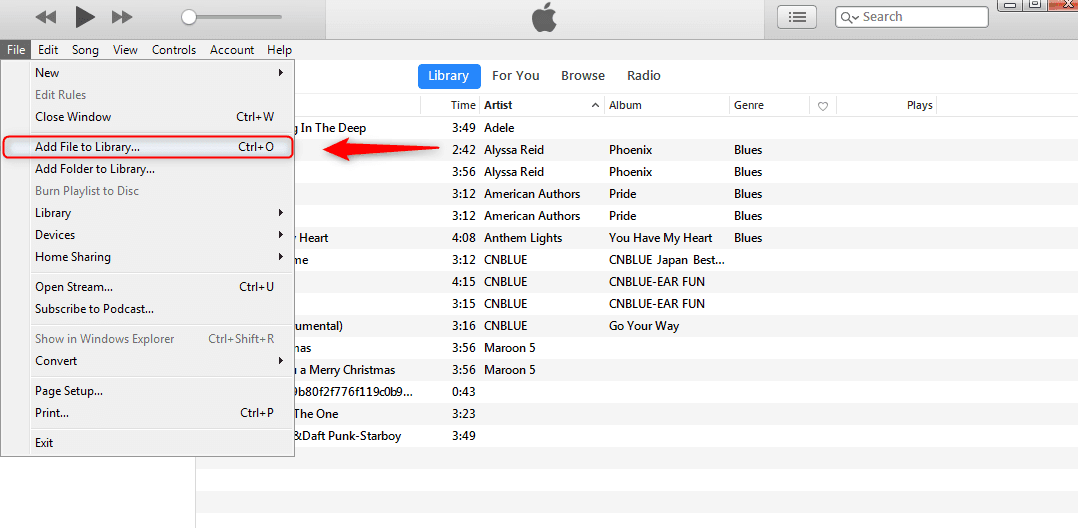
Step 3. Click File and select Add File to Library to add music files to iTunes.
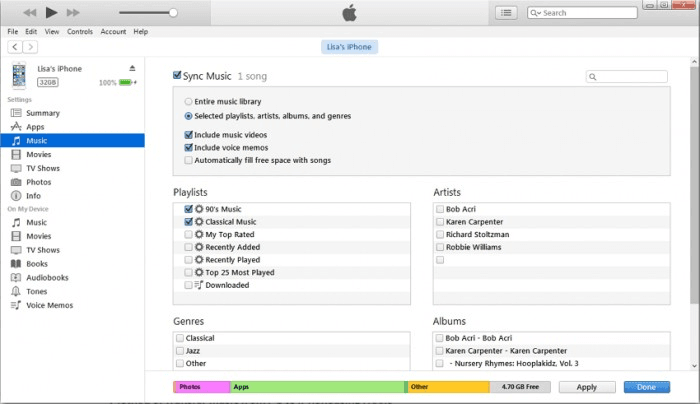
Step 4. Go to Music, select Sync Music, either sync entire music library or selected playlists, and click Apply to sync music.
Method 3: Transfer Music via Cloud Services (Dropbox, Google Drive)
👍 Best for: Wireless transfers - no USB cable needed, but requires internet and downloading on iPhone.
If you want to transfer music from Windows 10 to iPhone without iTunes, cloud services like Dropbox, Google Drive, or Amazon Cloud are great options. They function like containers where you can store your files. Here we use Dropbox (with 2GB free tier) as an example.
How to transfer music with Dropbox:
Step 1. Sign up for a Dropbox account and download Dropbox on both your computer and iPhone. Log in to your account on both devices.
Step 2. Copy and paste the songs you want to transfer into the Dropbox folder on your PC and wait for them to upload.
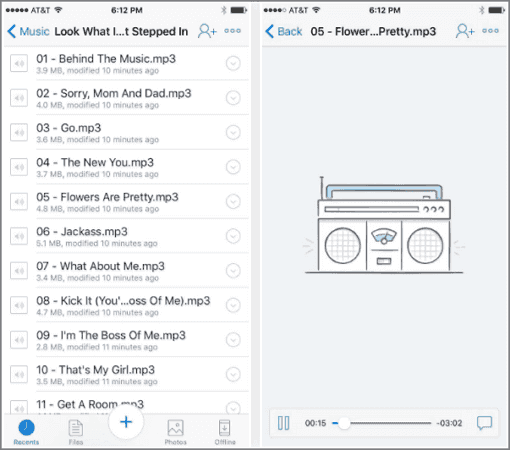
Step 3. Open the Dropbox app on your iPhone. You can listen to the songs directly via the network. To save a song for offline listening, swipe the song from left to right and tap the Star to mark it as a favorite.
Method 4: Transfer Music via iCloud Music Library
👍 Best for: Users who already subscribe to Apple Music or iCloud Music Library.
If you have an Apple Music subscription, you can use iCloud Music Library to sync your music across devices. This method allows you to upload your PC music to iCloud and access it on your iPhone.
Step 1. Download and install iCloud for Windows from the Apple website. Open it, sign in with your Apple ID, and enable iCloud Music Library in the iCloud settings.
Step 2. Open iTunes (it may be installed automatically). Sign in to the iTunes Store with the same Apple ID.
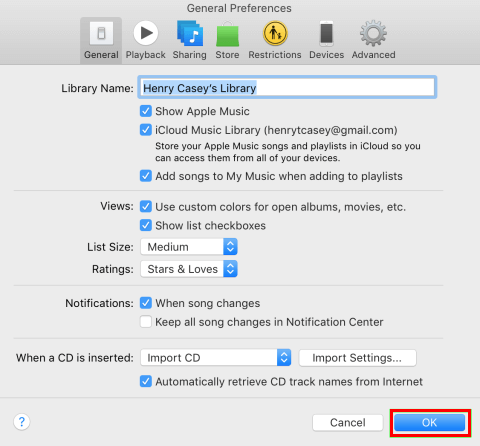
Step 3. In iTunes, go to Edit > Preferences > General and make sure iCloud Music Library is checked. You can then add music files to your iTunes library; they will automatically upload to iCloud.
Step 4. On your iPhone, go to Settings > Music, and turn on iCloud Music Library.
Step 5. Open the Music app on your iPhone. Your uploaded music will appear after a few moments.
Quick Comparison: Which Method Should You Choose?
| Method | Speed | Quality | Wi-Fi Needed | Software Required | Erases Existing Music | 👍 Best For |
|---|---|---|---|---|---|---|
| AOMEI FoneBackup | Fast | Original | ❌ | ✅ | ❌ |
Free: ≤30 songs/day Pro: unlimited bulk transfers |
| iTunes | Medium | Original | ❌ | ✅ | ✅ (if not manual) | Official tool, careful users |
| Cloud Services | Slow | Original | ✅ | ✅ | ❌ | Wireless, small batches |
| iCloud Music Library | Medium | Original | ✅ | ✅ | ❌ | Apple Music subscribers |
FAQs
#1. How do I transfer music from my laptop to my iPhone using USB?
You have two options: use AOMEI FoneBackup (Method 1) or iTunes (Method 2). AOMEI FoneBackup is recommended for its speed and no-data-erasure guarantee. Note that the free version supports 30 files per day; upgrade to Pro for unlimited transfers.
#2. Can I drag and drop music to iPhone without iTunes?
Yes. AOMEI FoneBackup and cloud storage services like Google Drive and Dropbox both allow you to drag and drop music. AOMEI FoneBackup is faster and doesn't require internet, while cloud services allow wireless transfer when you have an internet connection.
#3. Will transferring music with AOMEI FoneBackup erase my existing songs?
No. AOMEI FoneBackup adds music to your iPhone without removing anything already on it. Unlike iTunes, it won't erase your existing music library.
#4. What music formats does AOMEI FoneBackup support?
AOMEI FoneBackup supports both purchased and non-purchased music, including common formats like MP3, M4A, AAC, and more.
#5. How much free storage do cloud services offer?
Dropbox offers 2 GB free, Google Drive offers 15 GB free, and Amazon Cloud offers 5 GB free. Choose based on your music library size.
Final Words
Transferring music from Windows 10 to iPhone doesn't have to be complicated or risky. With the right method, you can get your songs onto your iPhone quickly and safely without losing what's already there.
Here's the simple rule:
-
Start with Method 1 (AOMEI FoneBackup) if you want the fastest, most flexible transfer - no iTunes, no data erasure, no Wi-Fi needed. The free version handles 30 files/day, and Pro removes all limits.
-
Use Method 2 (iTunes) only if you're comfortable with manual sync settings and don't mind the risk of erasing existing music.
-
Use Method 3 (Cloud Services) if you prefer a wireless solution and only need to transfer a few songs.
-
Use Method 4 (iCloud Music Library) if you already have an Apple Music subscription.
The bottom line: Your music is worth protecting. Choose the method that fits your needs and start transferring today.

 as a preferred
source on Google
as a preferred
source on Google