




How to Send Ringtones from iPhone to iPhone in 4 Ways
This guide explains how to send ringtones from iPhone to iPhone, whether you are setting up a new device, restoring a purchased tone, or sharing a custom audio file.

By Ivy Updated on August 25, 2026


You have moved to a new iPhone, or perhaps you want to share a custom ringtone with a friend. The file may be easy to send, but getting it to appear under Settings > Sounds & Haptics > Ringtone is a different task.
The right way to send ringtones from iPhone to iPhone depends on where the ringtone came from.
- Use Quick Start for a new device
- Redownload tones purchased from Apple
- Share a custom audio file and install it with GarageBand.
- If you prefer a Windows PC, you can also use it as a bridge to send singtones.
Choose the Right Ringtone Transfer Method
Check the ringtone type before following a method. A purchased ringtone and a custom audio file cannot always be transferred in the same way.
| 🧩 Your situation | 🛠️ Recommended method | 💡 Why choose it |
|---|---|---|
| Your new iPhone is not set up yet | Quick Start | Move your device data during initial setup |
| You bought the ringtone from Apple | Download All Purchased Tones | Restore eligible purchases through your Apple Account |
| You still have the custom audio file | AirDrop and GarageBand | Share and install an individual custom ringtone |
| You want to migrate the old iPhone through a Windows PC | AOMEI FoneBackup iPhone to iPhone | Transfer the source device’s data and settings in one operation |
If the custom ringtone exists only in the old iPhone’s ringtone list, skip to the section about missing source files. An installed ringtone cannot normally be shared directly from Settings.
Method 1. Transfer Ringtones to a New iPhone with Quick Start
👍 Best for: Moving to a new iPhone that has not completed initial setup.
Quick Start can transfer your apps, settings, and other content from your old iPhone during setup. It is the most convenient starting point when you want to move more than just 1 ringtone.
However, Apple does not promise that every custom ringtone will appear after the migration. Check the ringtone list when the transfer finishes.
Step 1. Connect your old iPhone to Wi-Fi, turn on Bluetooth, and place it near the new iPhone.
Step 2. Turn on the new iPhone. When the Set Up New iPhone prompt appears on the old iPhone, tap Continue.
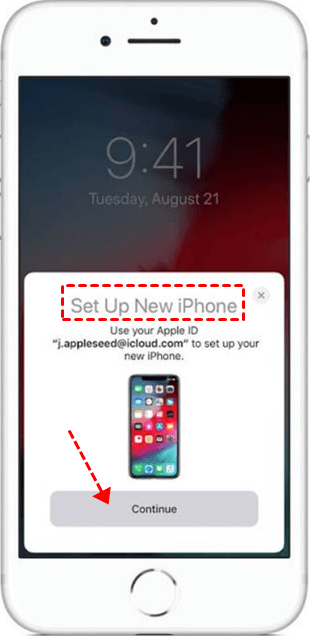
Step 3. Use the old iPhone to scan the animation displayed on the new iPhone. When prompted, enter your old iPhone’s passcode on the new device.
Step 4. Connect the new iPhone to Wi-Fi or a cellular network. Follow the prompts to activate cellular service and set up Face ID or Touch ID.
Step 5. On the Transfer Your Data screen, tap Transfer from iPhone to copy data directly from the old iPhone. Or tap Download from iCloud to download apps and data from an existing iCloud backup instead.
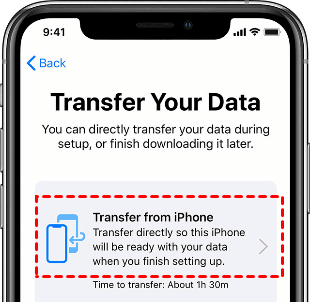
Step 6. Keep both iPhones near each other and connected to power until the transfer finishes.
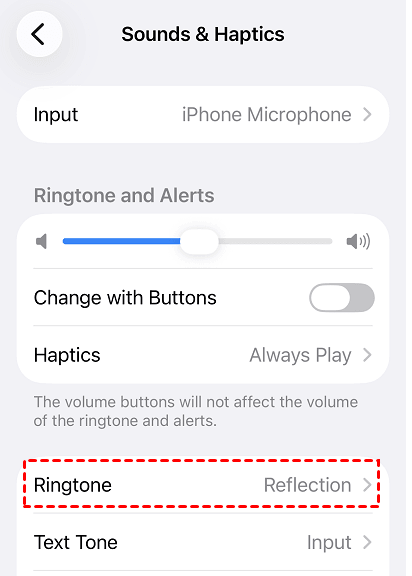
On the new iPhone, open Settings > Sounds & Haptics > Ringtone. If a purchased tone is missing, use Method 2. If a custom ringtone is missing, continue with Method 3.
Do not erase the old iPhone until you confirm that your important content and ringtone files are available on the new device.
Method 2. Restore Purchased Ringtones on the New iPhone
👍 Best for: Ringtones bought from Apple’s Tone Store with the same Apple Account.
You do not need to extract a purchased ringtone from the old iPhone. Apple links eligible Tone Store purchases to your Apple Account, so you can download them again on another iPhone.
Step 1. Sign in to the new iPhone with the Apple Account used to buy the ringtone. Open Settings > Sounds & Haptics > Ringtone or another alert type you want to change.
Step 2. Tap Download All Purchased Tones.
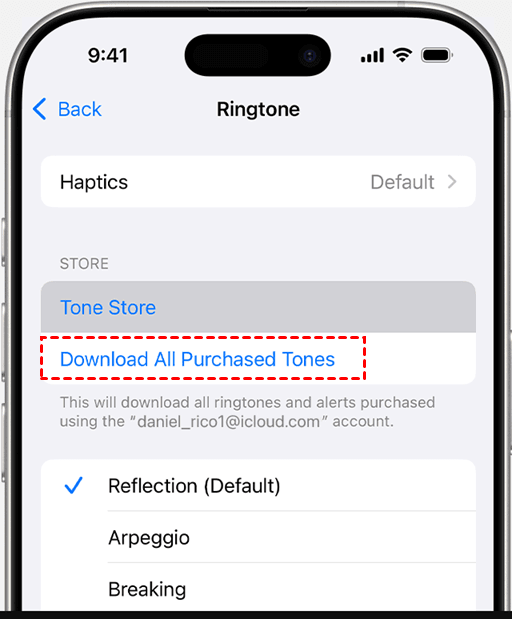
After the download, tap the ringtone to preview and select it.
You may not see Download All Purchased Tones if all eligible tones are already downloaded or the account has no eligible purchases. Apple also notes that some previously purchased tones may no longer be available for download. Tone Store availability can vary by country or region.
A song purchased from the iTunes Store is not automatically a purchased ringtone. If you have an eligible local audio file instead, use the next method.
Method 3. Share a Custom Ringtone with AirDrop and GarageBand
👍 Best for: Sending a custom ringtone to a friend or another iPhone when you still have the original audio file.
AirDrop can send an .m4r, .m4a, .mp3, or another accessible audio file. However, receiving the file does not always add it to the ringtone list. The recipient can use Apple’s GarageBand app to export the audio as a ringtone.
Part 1. Send the Ringtone File with AirDrop
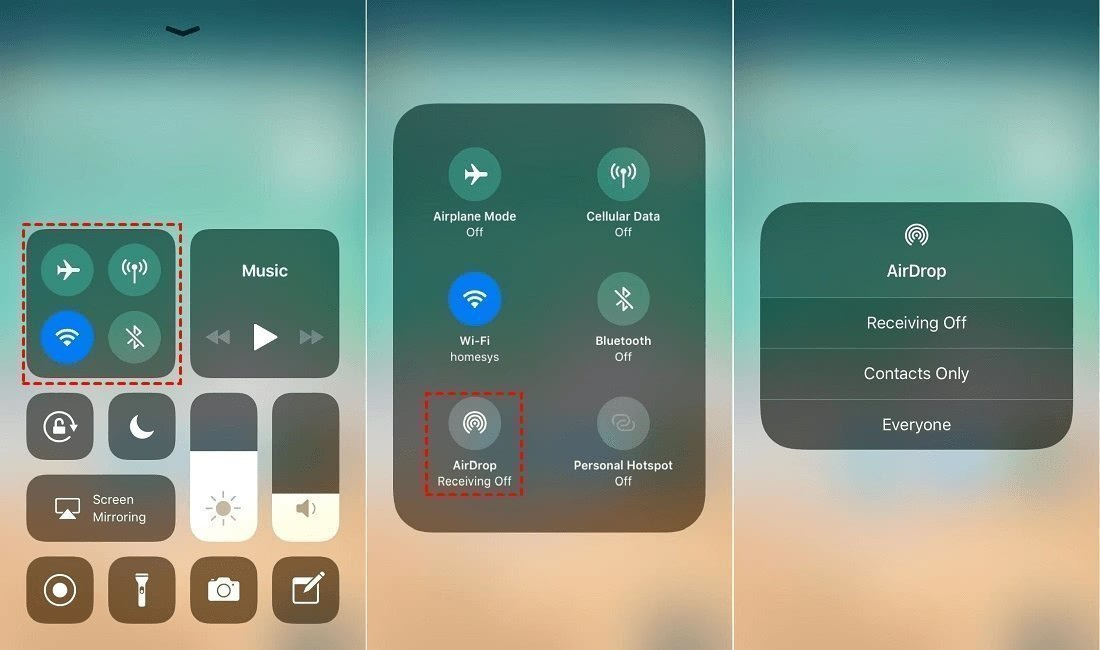
Step 1. Turn on Wi-Fi and Bluetooth on both iPhones. Make sure AirDrop receiving is enabled on the target iPhone.
Step 2. On the source iPhone, open Files. Locate and select the audio file, tap Share, and choose AirDrop.
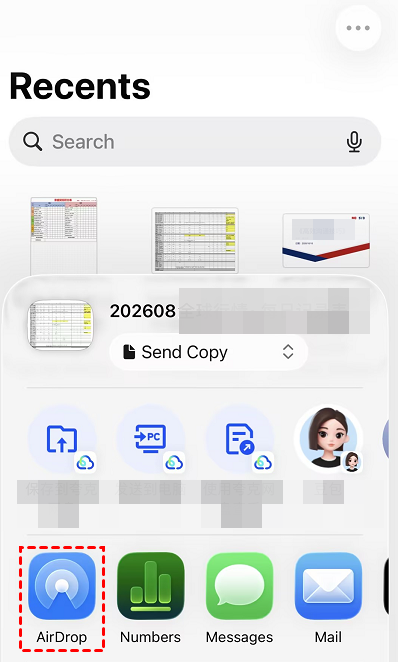
Step 3. Select the target iPhone. Tap Accept on that iPhone if a confirmation appears, then save the file in Files.
You can also send the file through Mail or store it in iCloud Drive. These choices only change how the file reaches the target iPhone. The installation process is the same.
Part 2. Install the Received File with GarageBand
Install GarageBand from the App Store before starting if it is not already on the target iPhone.
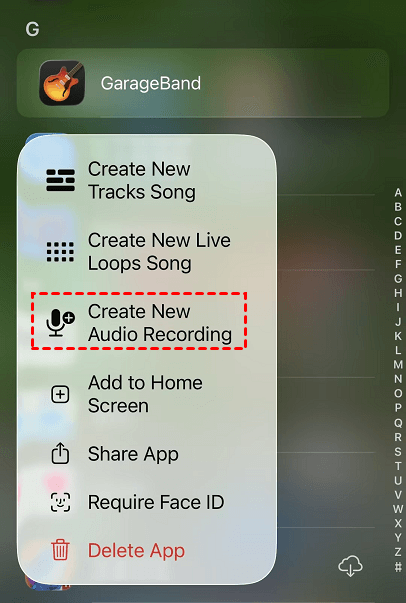
Step 1. Touch and hold the GarageBand icon on the Home Screen, then tap Create New Audio Recording.
Step 2. Tap the Tracks button. Select the instrument track, then tap the Loops Browser button.
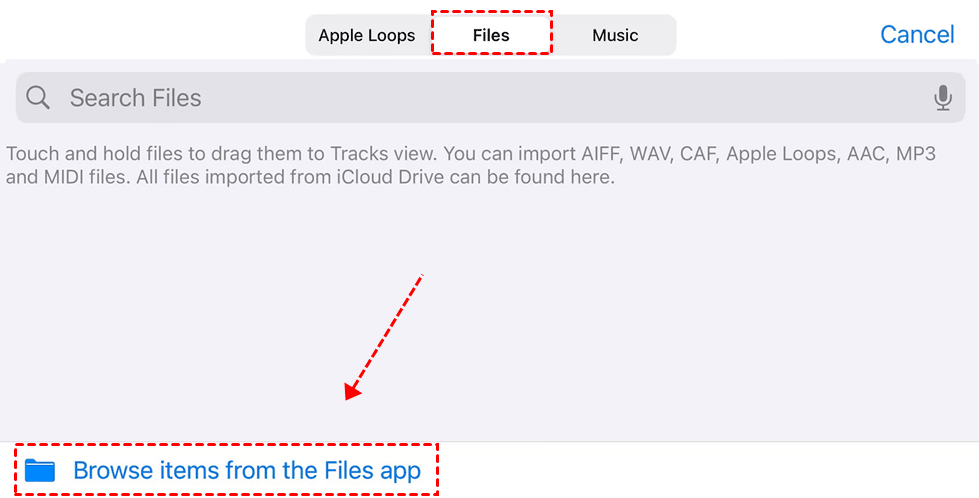
Step 3. Tap Files > Browse items from the Files app. Touch and hold the file and drag it to the beginning of the Tracks view.
Step 4. Trim the audio if necessary. An iPhone ringtone can be up to 30 seconds long, and there should be no empty space before the audio starts.
Step 5. Tap the Navigation button and choose My Songs.

Step 6. Tap the More button, tap Select, and select the project you created.
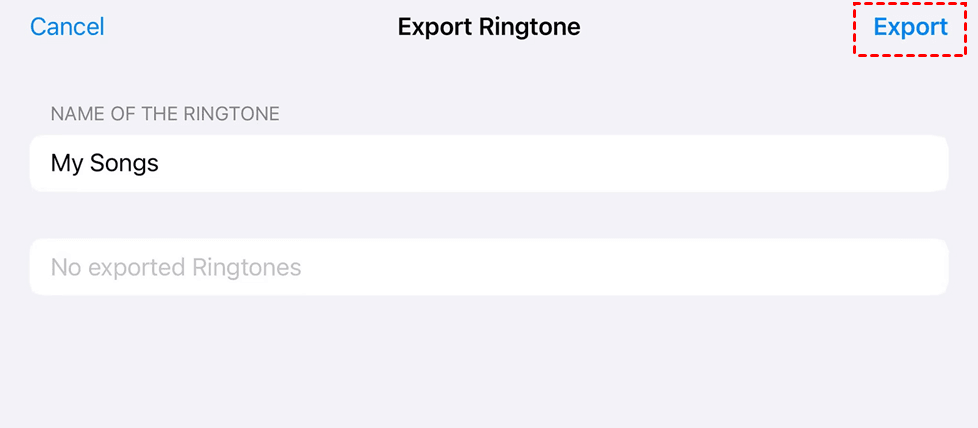
Step 7. Tap Share > Ringtone. Enter a name and tap Export.
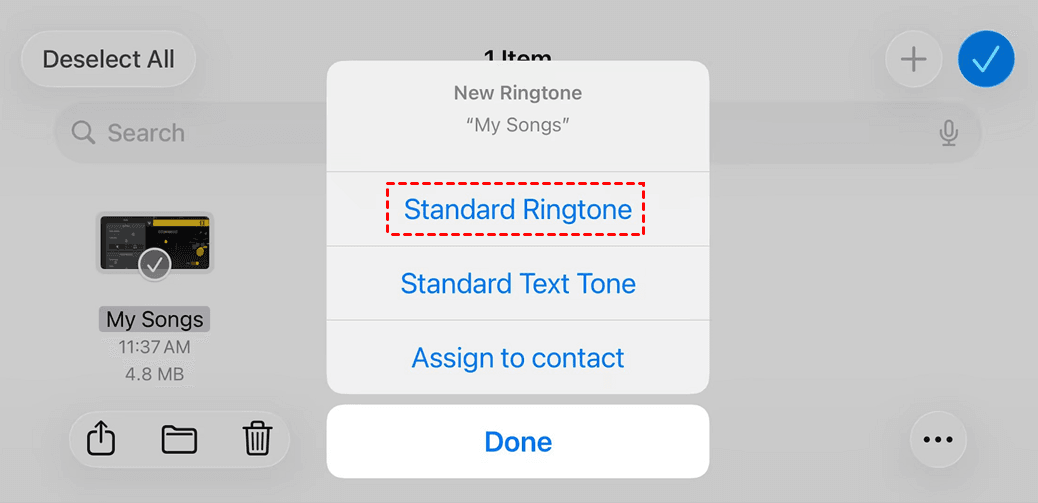
Step 8. After the export finishes, tap Use sound as. Choose Standard Ringtone, Standard Text Tone, or Assign to contact.
If a song appears dimmed in GarageBand, it may not be downloaded to the iPhone or may be protected. A protected Apple Music track cannot be used as a ringtone. Use an unprotected audio file that you are allowed to use.
Method 4. Move a Ringtone File Between iPhones with AOMEI FoneBackup
👍 Best for: Moving your data and settings from an old iPhone to a new iPhone through a Windows PC.
AOMEI FoneBackup is an iPhone backup and transfer tool for Windows PCs. Its can transfer music files, including .m4r, .m4a, .mp3, and .wav. from iPhone to iPhone without iCloud or Apple ID required. Or combine iPhone to PC and PC to iPhone to transfer data. It depends on whether you want to select specific ringtones.
 AOMEI FoneBackup
iPhone backup and transfer tool for Windows PCs
Before you begin:
- The iPhone to iPhone method performs a full device migration and the existing data on the target iPhone will be overwritten.
- Be sure your iPhone have enough available storage and updated.
- The iOS version on the target iPhone cannot be lower than that on the source iPhone.
- Some content connected to iCloud, Apple Music, or the iTunes Store is not included.
Step 1. Download and install AOMEI FoneBackup on the Windows PC. Connect both iPhones with USB cables, unlock them and tap Trust if asked.
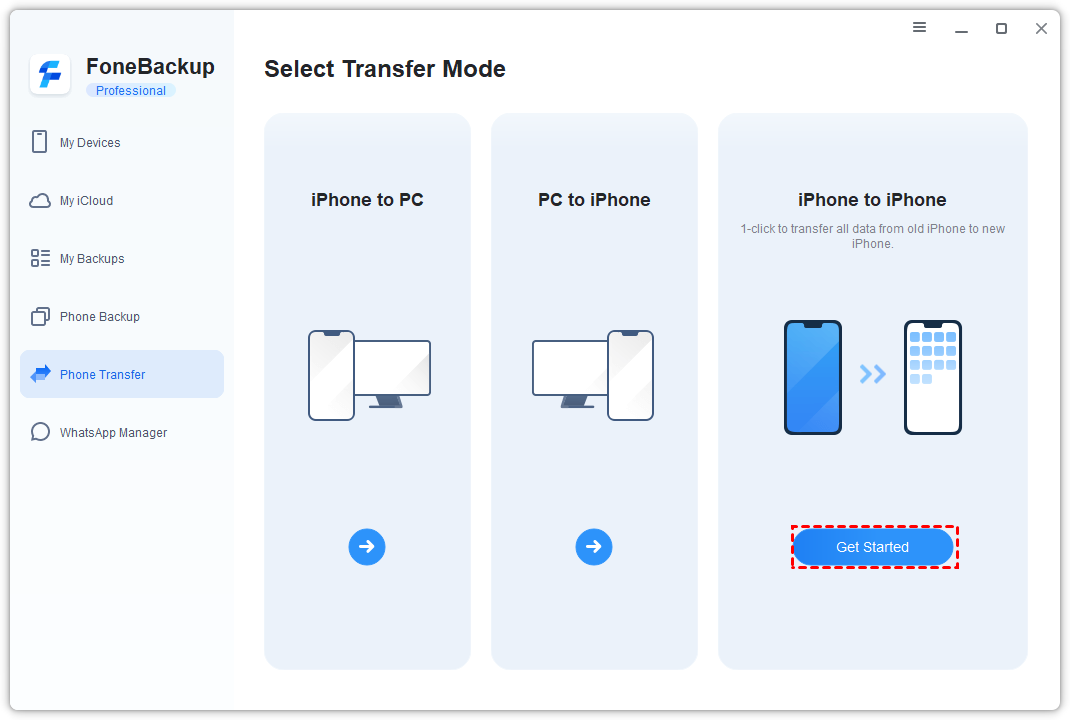
Step 2. In AOMEI FoneBackup, select Phone Transfer > iPhone to iPhone and click Get Started.
Step 3. Confirm that the old iPhone is shown as the source and the new iPhone as the target. Switch their positions if necessary.
Step 4. Enable Backup Encryption if you need to transfer protected data such as Health, Activity, or Keychain information. Keep the password in a safe place.
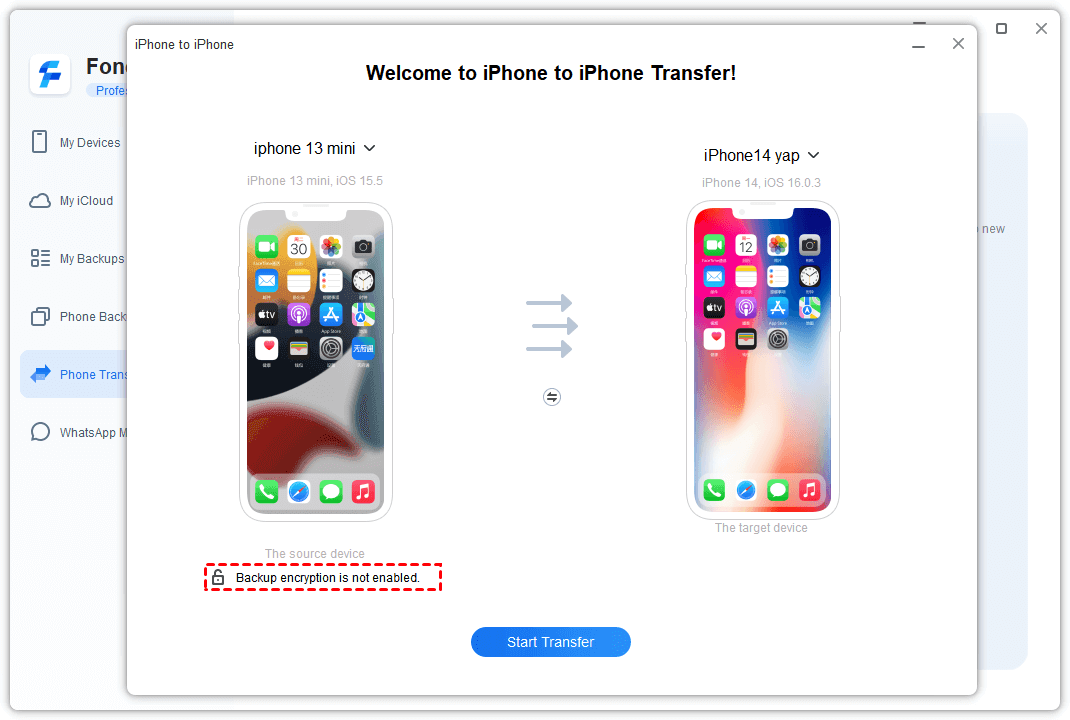
Step 5. Click Start Transfer and keep both iPhones connected. The target iPhone will restart when the transfer is complete.
After the restart, open Settings > Sounds & Haptics > Ringtone on the target iPhone. Check whether the required ringtone appears and play it before erasing the source iPhone.
If the ringtone is missing, it may not have been included in the transferable system data. For a Tone Store purchase, use Download All Purchased Tones. For a custom ringtone whose source file is still available, use AirDrop and GarageBand instead.
What If the Ringtone Exists Only on the Old iPhone?
You may see the custom ringtone under Settings > Sounds & Haptics > Ringtone but have no original file. This is the hardest situation because the Settings app does not provide a Share or Export button for installed ringtones.
Before recreating the ringtone, check these locations:
- Files > On My iPhone
- Files > iCloud Drive
- GarageBand My Songs
- Downloads, Music, or ringtone folders on an old PC or Mac
- Email or cloud-storage accounts previously used to send the file
- The original .m4r, .m4a, .mp3, or .wav file
If you find a GarageBand project, open it and export it again as a ringtone. If you find the audio file, send it to the target iPhone and use GarageBand.
If neither the project nor the source audio exists, do not erase the old iPhone yet. You may need to obtain or recreate the audio instead of trying to share the installed entry from Settings.
Ringtone Transfer Methods Compared
| Method | 👍 Best for | Computer needed | Key limitation |
|---|---|---|---|
| Quick Start | Setting up a new iPhone | No | Custom tones may still need separate handling |
| Download All Purchased Tones | Eligible Tone Store purchases | No | Not for homemade or imported tones |
| AirDrop and GarageBand | Sharing an accessible custom audio file | No | Require a separate ringtone export |
| AOMEI FoneBackup iPhone to iPhone | Complete wired device migration | Yes | Require Pro and overwrites data on the target iPhone |
Here is the simple options:
- Use Quick Start first when the target is a new iPhone.
- For a purchased ringtone, downloading it again is simpler than transferring it.
- For a custom file, AirDrop followed by GarageBand provides the clearest phone-to-phone transfer.
- Choose AOMEI FoneBackup when you need a Windows PC to store or move an accessible audio file.
FAQs
1. Can I AirDrop a ringtone from iPhone to iPhone?
Yes, if the ringtone or its source audio is available in Files or another app with a Share button. AirDrop sends the file, but the recipient may still need to export it as a ringtone with GarageBand.
2. Why didn’t my custom ringtones transfer to my new iPhone?
A custom tone may be missing if its source file or GarageBand project was not available during migration. Check Files, iCloud Drive, GarageBand, and the computer originally used to create it.
3. Why is Download All Purchased Tones missing?
The option may not appear if all eligible tones have already been downloaded or the current Apple Account has no eligible ringtone purchases. Some older purchased tones may also be unavailable.
4. Can I use an Apple Music song as an iPhone ringtone?
GarageBand can use a downloaded, unprotected song from the Music library. If the song is protected or appears dimmed, it cannot be imported as a ringtone.
Summary
The simplest way to send ringtones from iPhone to iPhone depends on the ringtone’s source:
- Use Quick Start when you are setting up a new iPhone.
- Use Download All Purchased Tones for eligible Tone Store purchases.
- Use AirDrop and GarageBand when you have the original custom audio file.
- Use AOMEI FoneBackup iPhone to iPhone when you want a complete wired migration and accept that the target device will be overwritten.
Before erasing the old iPhone, confirm that the ringtone appears under Settings > Sounds & Haptics > Ringtone on the target device.

 as a preferred
source on Google
as a preferred
source on Google