




New iPhone Not Turning On After Transfer? Try These Safe Fixes
If your new iPhone is not turning on after transfer, follow this guide to identify its screen state, try non-erasing fixes first, and safely complete the migration.

By Ivy Updated on August 26, 2026


You’ve finished moving data from your old iPhone, but the new iPhone now has a black screen, stays on the Apple logo, or does not respond to the Side button. It is easy to assume that the transfer has damaged the phone, but the device may simply need more time, power, or a forced restart.
If your new iPhone is not turning on after transfer, do not erase it immediately. First, check what appears on the screen. A completely black screen and a motionless progress bar require different fixes.
Check What Is on the New iPhone Screen First
Use this quick guide before choosing a fix.
| 👁🗨 What you see | ✅ What to do first | ❌ What to avoid |
|---|---|---|
| Completely black screen | Force restart the iPhone | Do not restore it immediately |
| Low-battery image | Charge it and check the power connection | Do not repeatedly press the buttons |
| Apple logo with a progress bar | Check whether the bar has moved within 1 hour | Do not interrupt an active migration |
| “Preparing to Transfer” or another setup screen | Restart both iPhones and retry Quick Start | Do not erase the old iPhone |
| Sound or vibration but no visible screen | Force restart, then seek service if needed | Do not assume the transfer is still running |
Keep your old iPhone unchanged until the new device starts correctly and you have checked the transferred content. Do not trade in, erase, or reset the old phone while troubleshooting.
Method 1. Fix a Black Screen with a Force Restart
👍 Best for: A new iPhone with a completely black or frozen screen - does not erase the device.
A force restart can reload an unresponsive iPhone without deleting its data. The timing matters: press the Volume buttons quickly, but hold the Side button.
Step 1. Press and quickly release the Volume Up button. Then, press and quickly release the Volume Down button.
Step 2. Press and hold the Side button until the Apple logo appears. This may take longer than 10 seconds.
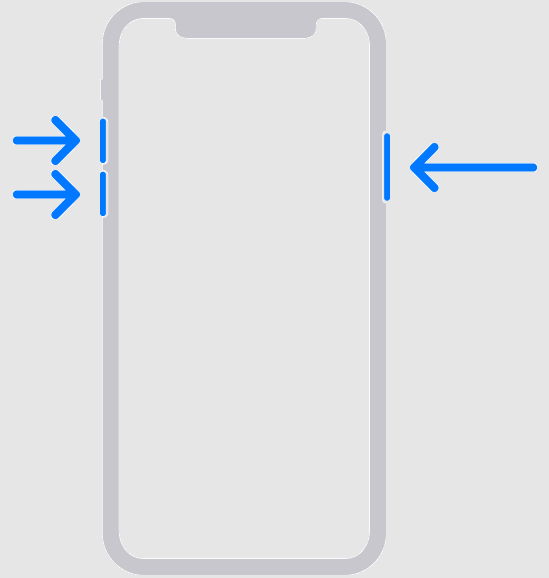
Step 3. Release the Side button when you see the Apple logo. If the phone starts, leave it connected to power while it finishes loading your apps and data.
If nothing appears, move to the charging check.
Method 2. Charge and Force Restart an Unresponsive iPhone
👍 Best for: A phone that shows no response or displays a low-battery image - requires a working cable, adapter, and outlet.
A long transfer can use considerable battery power. Quick Start is designed to run while both devices remain connected to power, so a new iPhone may become unresponsive if its battery becomes too low.
- Connect the new iPhone to a working wall outlet with a compatible charging cable and power adapter.
- Check the cable, adapter, outlet, and charging port if no charging image appears.
- Leave the iPhone charging for 1 hour, then try the force-restart sequence again.
If charging and a force restart do not bring the screen back to life, the device may need service.
Method 3. Fix an iPhone Stuck on the Apple Logo with Recovery Mode
👍 Best for: An Apple logo and progress bar that have not moved for at least 1 hour - requires a Mac or Windows PC.
An Apple logo during migration does not always mean the iPhone has failed. If the progress bar is still moving, allow the process to continue. Take action only when the bar has remained in the same position for at least 1 hour.
- Use Finder on a current Mac.
- On Windows, use the latest Apple Devices app or iTunes.
- Older Macs running macOS Mojave or earlier also use iTunes.
Step 1. Connect the new iPhone to the computer with a USB cable. Then, open Apple Devices on your Windows PC. You can also use Finder or iTunes.
Step 2. Press and quickly release Volume Up, then press and quickly release Volume Down.
Step 3. Press and hold the Side button. Keep holding it after the Apple logo appears, and release it only when you see the Connect to Computer screen.
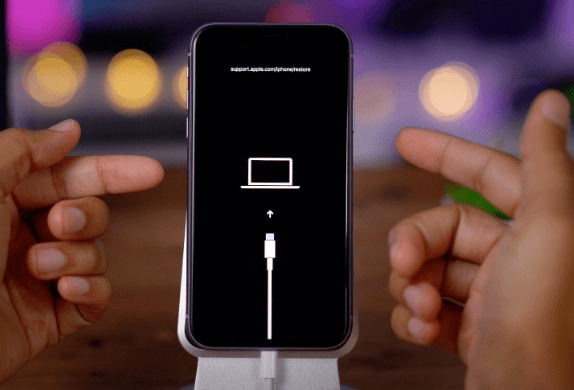
Step 4. Return to your Apple device, where a pop-up window will appear offering the options to Update or Restore. Select Update, then click again to confirm your selection.
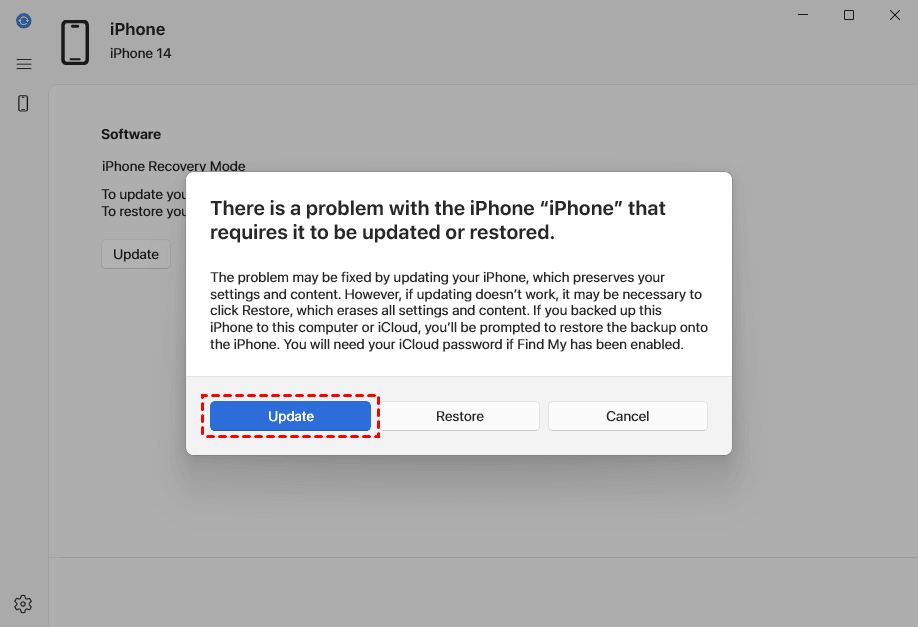
The Update option attempts to reinstall iOS without erasing the transferred data. Keep the iPhone connected while the software downloads and installs.
If the download takes more than 15 minutes and the iPhone leaves the recovery screen, let the download finish. Then, repeat the button sequence to enter recovery mode again.
Method 4. Restore the New iPhone as a Last Resort
👍 Best for: An iPhone that recovery mode cannot update - erases the new iPhone and requires another transfer.
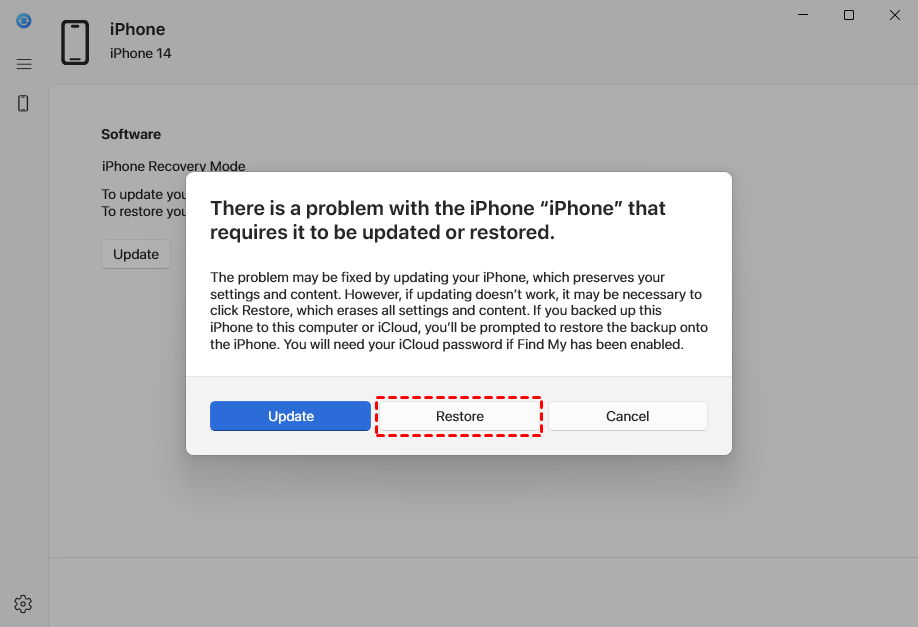
Use Restore only after the Update option fails. Restoring reinstalls iOS and removes the data currently stored on the new device. So be sure to create a full iPhone backup before continuing.
Step 1. Open Finder, Apple Devices, or iTunes on your Windows PC or MacOS. Connect the new iPhone to the computer and enter iPhone recovery mode again.
Step 2. This time, click Restore in the pop up window, Then, follow the on-screen instructions to restore and update your iPhone.
Do not erase your old iPhone. You will need it or a valid backup to transfer the data again.
Check the result before another transfer:
- The new iPhone reaches the Hello screen.
- The touchscreen and buttons respond normally.
- The phone stays on without restarting.
- The old iPhone still contains the original data.
- A recent backup is available when possible.
If the new iPhone still freezes or shuts down before you start another transfer, stop troubleshooting and contact Apple Support.
Which Fix Should You Choose?
| Method | ✅ Use it when | Data effect | Main requirement |
|---|---|---|---|
| Force restart | The screen is black or frozen | Does not normally erase data | Correct button sequence |
| Charge and retry | The phone has no power response | Does not erase data | Working charger |
| Recovery Mode Update | The Apple logo has been stuck for at least 1 hour | Attempts to preserve data | Mac or Windows PC |
| Recovery Mode Restore | Update failed | Erases the new iPhone | Original data or backup must remain available |
Start with a force restart for a black screen. Wait before intervening if an Apple logo progress bar is still moving. Choose Restore only when the safer fixes fail.
When Should You Contact Apple?
Arrange support or service when:
- The iPhone remains completely unresponsive after charging and a force restart.
- A computer cannot detect the iPhone in recovery mode.
- A damaged or stuck button prevents you from entering recovery mode.
- Finder, Apple Devices, or iTunes cannot update or restore the device.
- The iPhone becomes unusually hot.
- The phone makes sounds or vibrates but the display remains black.
- There may be liquid or physical damage.
A new device may also be covered by Apple’s return, warranty, or service options. Avoid attempting unofficial hardware repairs before checking the available support.
Transfer Your Data Again After the iPhone Starts
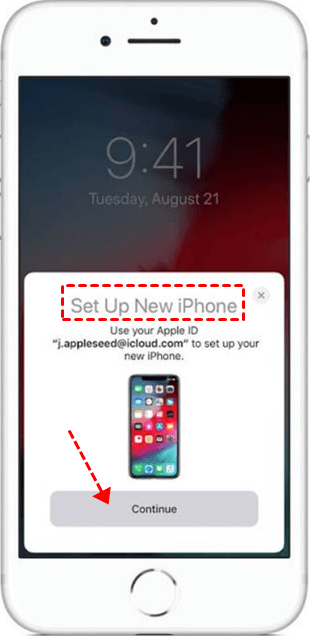
Once the new iPhone works normally, you can retry Quick Start. Keep both devices near each other and connected to power until the migration finishes on both screens.
Before starting:
- Confirm that Wi-Fi and Bluetooth are enabled.
- Keep both iPhones plugged in.
- Do not use or separate the devices during a direct transfer.
- Make sure the new iPhone has enough storage.
- Keep the old iPhone and its data until you verify the result.
If the Quick Start prompt disappears from the old iPhone, restart both devices and begin again.
AOMEI FoneBackup: Retry the Transfer on a PC
If Quick Start fails again, try AOMEI FoneBackup - an iPhone backup and transfer tool for Windows PCs. It provides a way to move or protect your data after both iPhones are working normally.
 AOMEI FoneBackup
- Direct transfer: Move data between two iPhones, or use your PC as a middleman. No iCloud or WiFi required.
- Free transfer: Export up to 30 files per day to a computer or another iPhone.
- Selective transfer: Preview and pick what you want to move. No more digging.
- Full device backup: Back up photos, music, contacts, ringtones, and more - save them anywhere you like.
- Advanced features: Selective backup and recovery, iPhone to iPhone transfer, export ringstone, etc., require Pro Edition.
 100% Secure
To transfer data directly between the 2 iPhones:
Step 1. Connect both iPhones to your Windows PC with a compatible USB data cables.
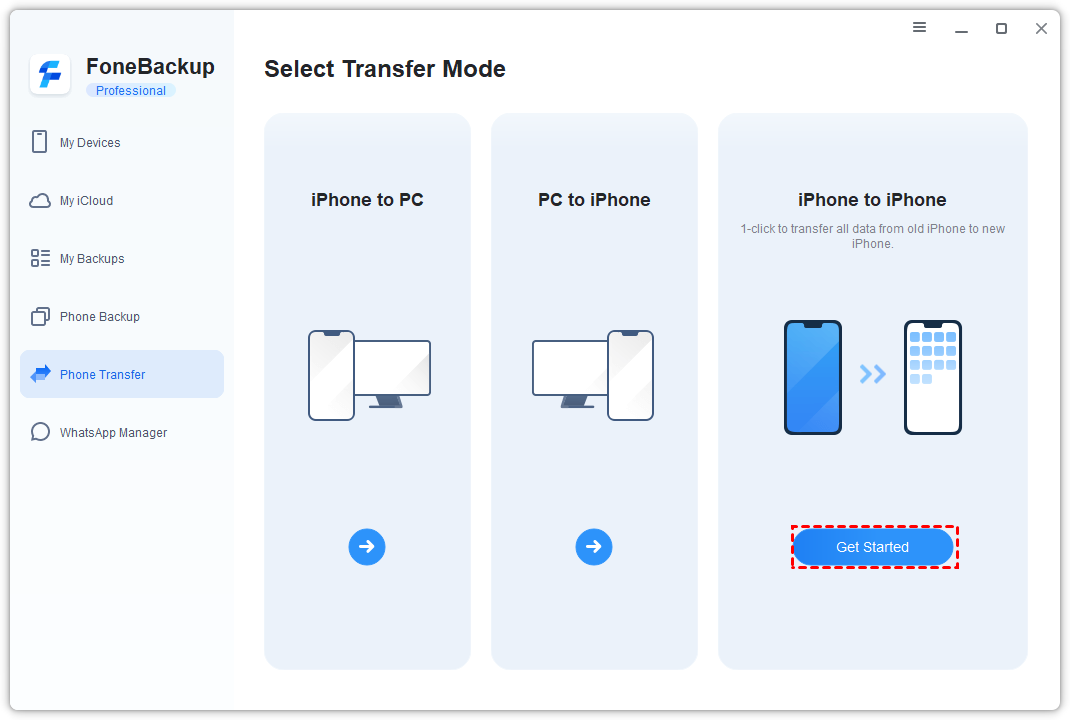
Step 2. Open AOMEI FoneBackup, select Phone Transfer > iPhone to iPhone, and tap Get Started.
Step 3. Check the source and target devices carefully. The new iPhone must be the target. Switch the direction if needed. Enable backup encryption for security and click Start Transfer.
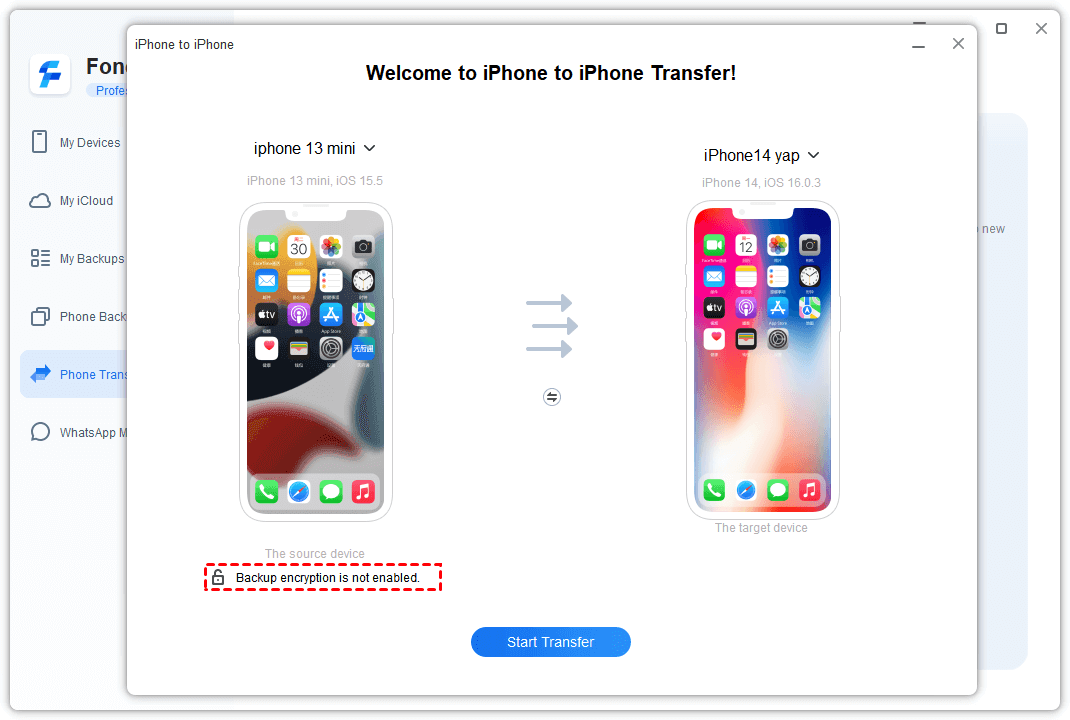
Keep both devices connected until the process finishes.
If only 1 cable is available, use Phone Backup to create a backup of the old iPhone on the PC. You can then restore that backup to the new iPhone.
FAQs
1. Will a force restart erase the transferred data?
No. A force restart does not normally erase the iPhone. It only forces the device to restart when the screen or software is unresponsive.
2. How long should I wait at the Apple logo?
If the Apple logo has a progress bar, check whether the bar is moving. Wait until it has remained completely unchanged for at least 1 hour before using recovery mode.
3. Should I choose Update or Restore in recovery mode?
Choose Update first because it attempts to reinstall iOS without erasing the phone. Choose Restore only if Update fails and the original data remains safely available elsewhere.
4. Why does the old iPhone say the transfer is complete while the new one is black?
The new iPhone may still be restarting, loading transferred information, or recovering from a temporary software freeze. Try the force-restart procedure before erasing or restoring it.
5. Can I repeat Quick Start without deleting my old iPhone?
Yes. Keep the old iPhone unchanged. If the new iPhone must be restored, set it up again and repeat Quick Start using the original data on the old device.
Summary
If your new iPhone is not turning on after transfer, use the screen state to choose the next action:
- For a completely black screen, try a force restart and then charge the iPhone.
- For an Apple logo with a moving progress bar, continue waiting.
- For a progress bar that has not moved for at least 1 hour, use recovery mode and choose Update.
- Use Restore only when Update fails and the old data or backup is still available.
- Contact Apple when the phone remains unresponsive or cannot be updated or restored.
After the new iPhone works normally, retry Quick Start under the correct power and connection conditions. If Quick Start repeatedly fails and you have a Windows PC, AOMEI FoneBackup can create a Full Backup on the PC, while Pro Edition also supports direct iPhone-to-iPhone transfer and full-device restore to another iPhone.

 as a preferred
source on Google
as a preferred
source on Google