




5 Best iOS to PC File Transfer Methods for Windows
Explore 5 iOS to PC file transfer methods with clear instructions, supported data, connection requirements, and limitations to choose the right way to move your files.

By Ivy Updated on September 2, 2026


Your iPhone is almost full, so you want to move photos, videos, music, or documents to your Windows PC. However, connecting the iPhone does not give Windows access to every file in one place. Photos, iCloud Drive files, and documents stored inside apps may require different transfer methods.
The best iOS to PC file transfer method depends on what you want to copy.
- AOMEI FoneBackup is suitable for selecting supported media and choosing a PC folder.
- Windows Photos handles Camera Roll photos and videos, while Apple Devices works with documents from compatible apps.
- You can also use iCloud or LocalSend for wireless transfer.
Which iOS to PC File Transfer Method Should You Use?
Use this table to select a method before following the detailed instructions.
| 📦 What you need to transfer | ✅ Recommended method | 🔑 Requirement |
|---|---|---|
| Selected photos, videos, or music | AOMEI FoneBackup | USB connection |
| Camera Roll photos and videos | Windows Photos | Data-capable USB cable |
| Documents stored inside supported apps | Apple Devices | The app must support File Sharing |
| Photos or files already synced to iCloud | iCloud for Windows | Internet and sufficient iCloud storage |
| Accessible files without a cable or cloud upload | LocalSend | Both devices must use the same local network |
The file location matters as much as the file type:
- Items in the Photos app can be imported with Windows Photos or accessed through iCloud Photos.
- Files in iCloud Drive can appear in File Explorer after iCloud synchronization.
- Documents stored inside an app are available through Apple Devices only when that app supports File Sharing.
- Windows cannot browse the entire On My iPhone location as if the iPhone were a USB drive.
- An iPhone backup is intended for restoration. It is different from exporting files that you can open directly on the PC.
Method 1. Transfer Selected iPhone Files with AOMEI FoneBackup
👍 Best for: Selecting supported iPhone media and saving it to a chosen Windows folder without using cloud storage.
AOMEI FoneBackup is a free iPhone data transfer software that lets you preview and transfer photos, videos, and music from an iPhone to a Windows PC. You can choose individual items and decide where you want to store data.
The transfer uses a USB connection, so it does not depend on your Internet speed or available cloud storage. The Free Edition can transfer up to 30 files per day from an iPhone to a computer.
 AOMEI FoneBackup
Free iPhone data transfer software for Windows
Photos stored only in iCloud cannot be exported directly. Download them to the local Photos library on the iPhone before starting.
How to Transfer Files from iPhone to PC:
Step 1. Download, install, and open AOMEI FoneBackup on your Windows PC. Connect the iPhone with a USB data cable, unlock the iPhone and tap Trust if the device asks whether you trust the computer.
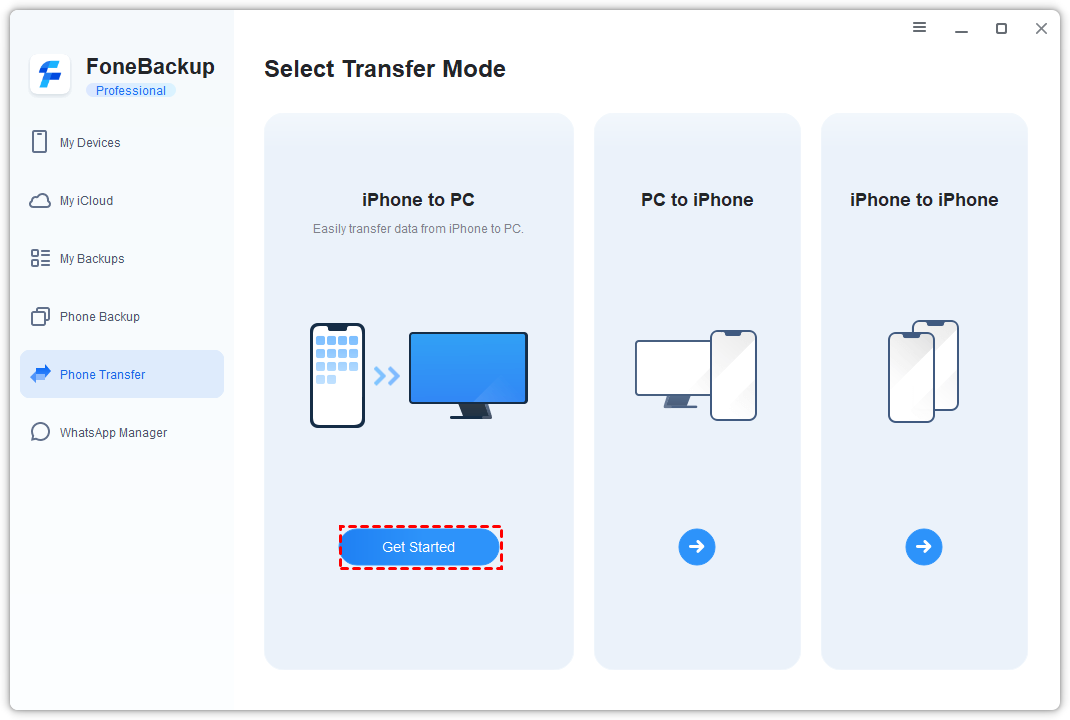
Step 2. In AOMEI FoneBackup, select Phone Transfer. Move to iPhone to PC and click Get Started.
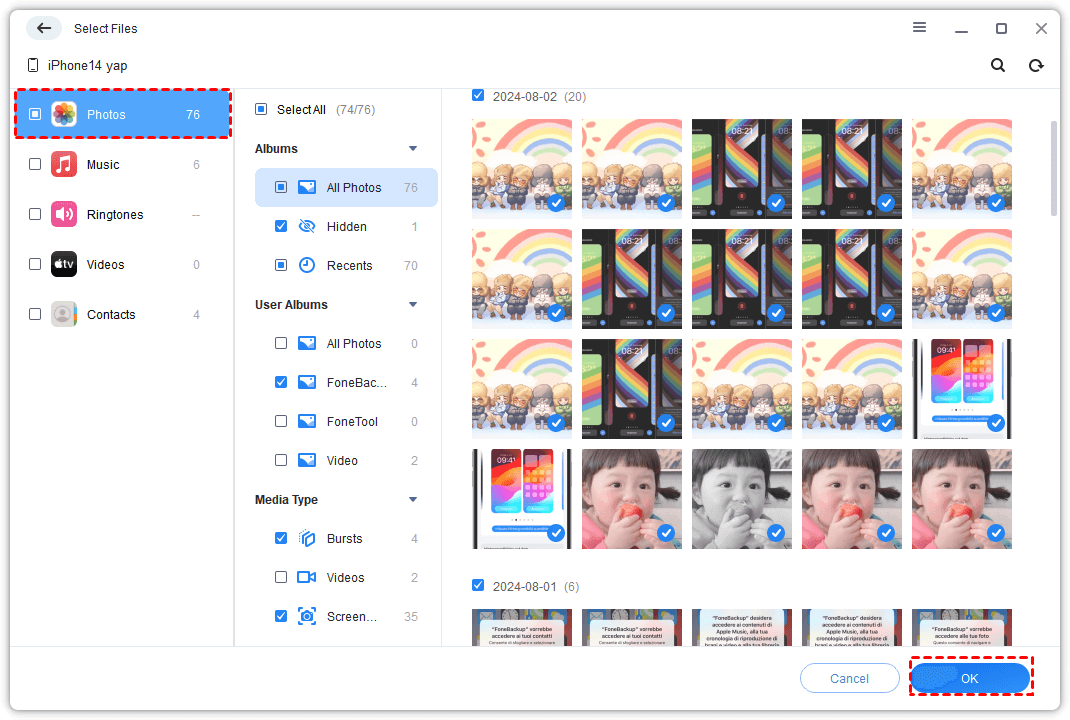
Step 3. Click the folder or plus icon. Open Photos, Music, or Videos, select the files you want to transfer, and click OK.
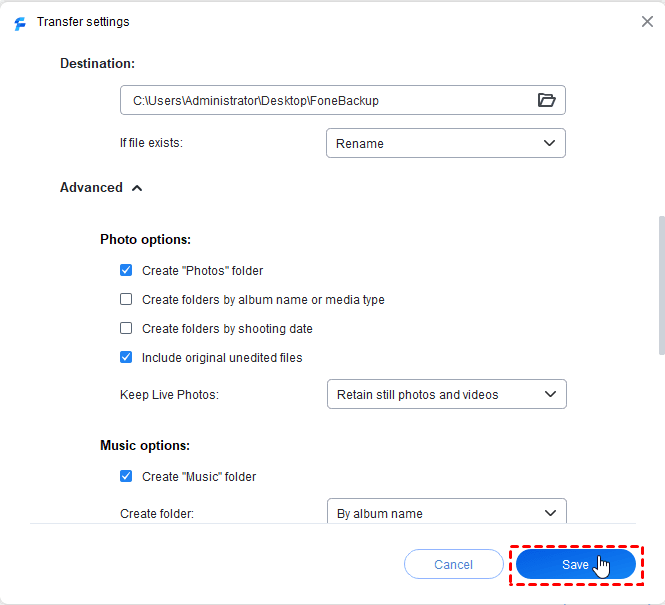
Step 4. Open Transfer Settings and choose a destination folder on the PC. Click Save to continue.
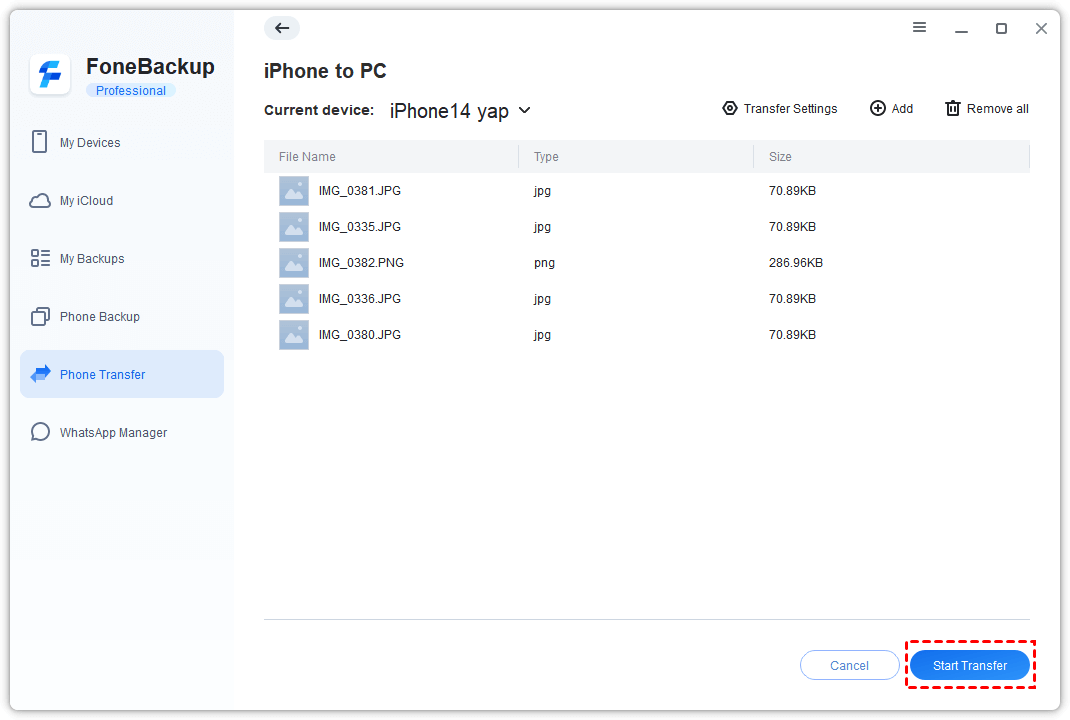
Step 5. Confirm the transfer settings, click Start Transfer. Keep the iPhone connected until the transfer finishes.
Afterward, open the destination folder and test several transferred files. Confirm that the item count and file contents are correct before removing anything from the iPhone.
Method 2. Import iPhone Photos and Videos with Windows Photos
👍 Best for: Importing photos and videos from the iPhone Photos library with a built-in Windows app.
Windows Photos provides a direct way to import iPhone photos and videos on Windows 10 or Windows 11. It lets you select the media to import and choose where to store it.
How to Import iPhone Photos and Videos:
Step 1. Connect the iPhone to the PC using a USB data cable, unlock the iPhone, tap Trust if a request appears.
Step 2. On the Windows PC, open Photos from the Start menu. Then, select Import > Apple iPhone.
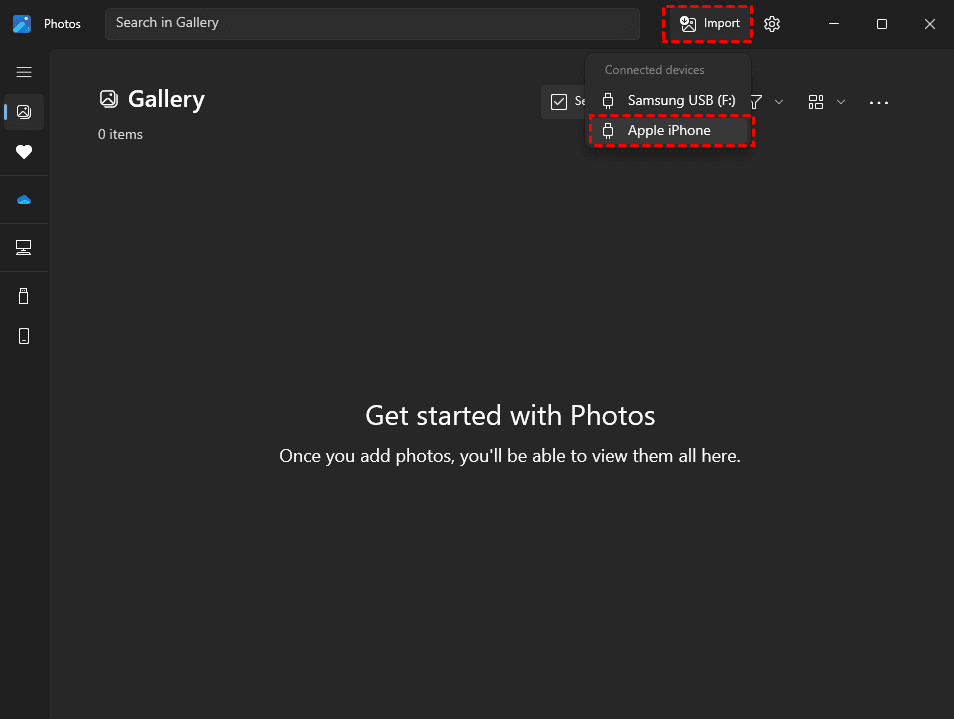
Step 3. Wait while Windows finds the available photos and videos. Select the items you want to copy, click Add > Import to transfer photos or videos.
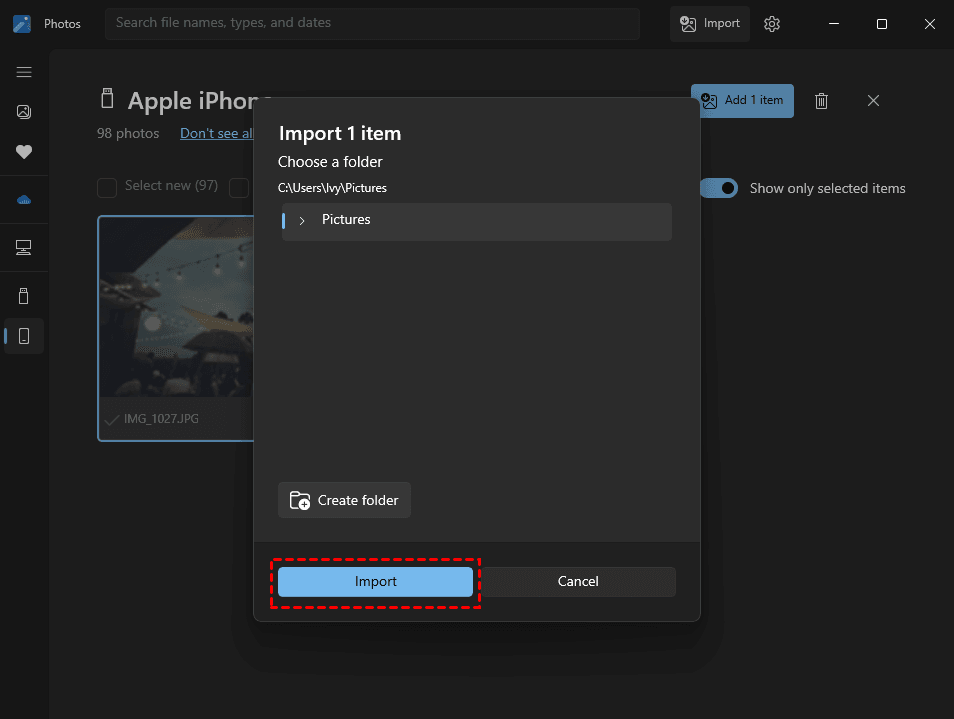
The default location is your Pictures folder. To change this, click Create folder and select where you'd like to save your photos.
Method 3. Transfer App Documents with Apple Devices
👍 Best for: Transferring documents between a Windows PC and iPhone apps that support File Sharing.
On Windows 10 or later, Apple Devices is Apple’s current app for managing an iPhone and transferring documents from compatible apps. It replaces the older iTunes File Sharing process on supported Windows systems.
How to Transfer iPhone App Files to PC with Apple Devices:
Step 1. Download, install and open Apple Devices on the Windows PC. Connect the iPhone with a USB cable. Unlock it and tap Trust if prompted.
Step 2. Select the iPhone in the Apple Devices sidebar, then click Files. A list of apps that support File Sharing will appear.
Step 3. Select the app that contains the documents you want, then specific files and click Save.
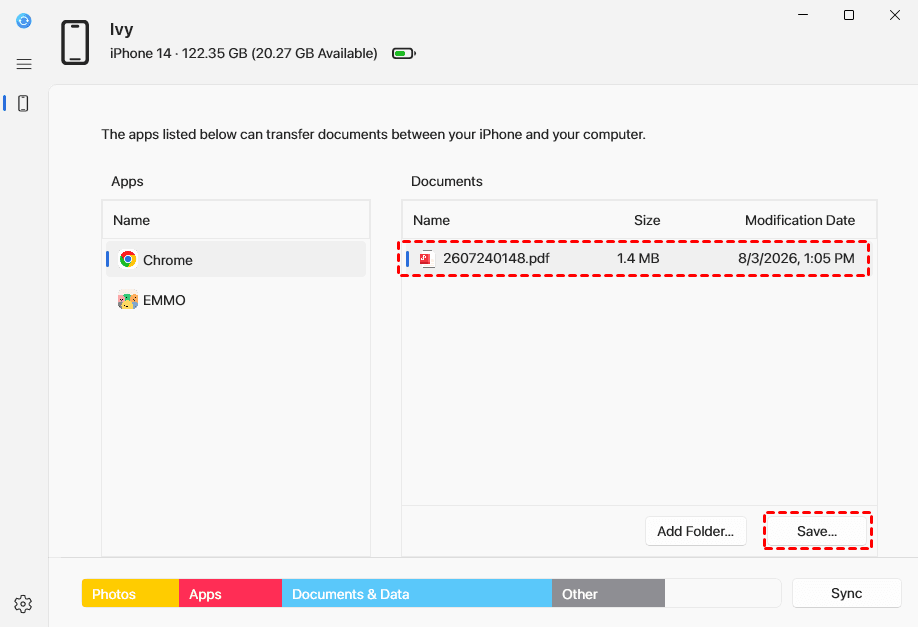
Step 4. Choose a PC folder, then click Save again. It will transfer files from iPhone t o PC directly.
If the Files section is missing, no installed app is currently exposing documents through File Sharing. This does not mean that the iPhone is empty.
Method 4. Transfer iPhone Files with iCloud for Windows
👍 Best for: Accessing photos and documents that are already synchronized with iCloud.
iCloud for Windows can display iCloud Photos and iCloud Drive in Windows File Explorer. It is useful when you already keep your photos or documents in iCloud and want them to remain available across devices.
Apple provides 5 GB of iCloud storage with a standard account. If the available storage is insufficient, new photos or documents may not finish uploading.
Transfer iPhone Photos to PC with iCloud
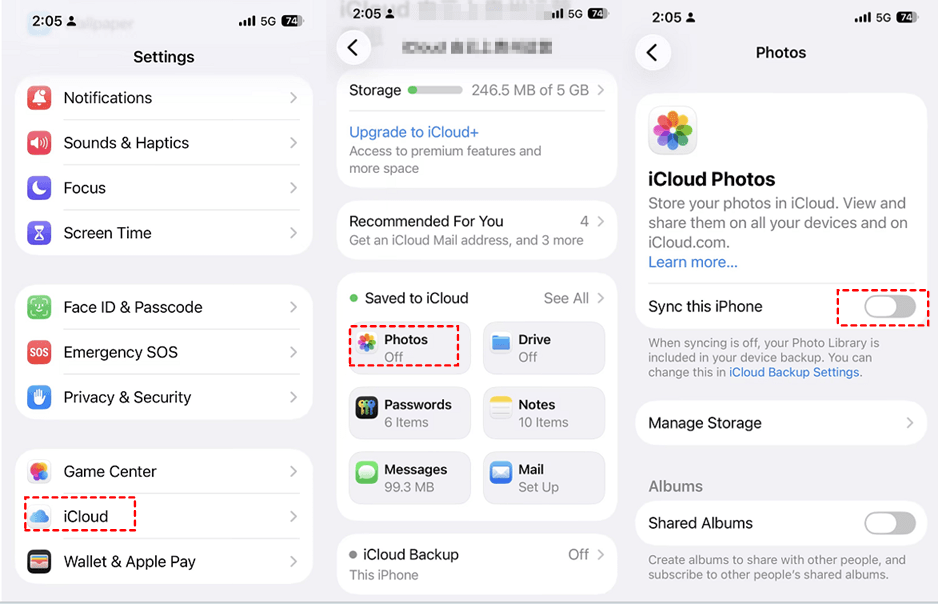
Step 1. On the iPhone, open Settings, tap your name, and select iCloud. Then, tap Photos, and turn on Sync this iPhone.
Step 2. On the PC, install and open iCloud for Windows. Sign in with the same Apple Account used on the iPhone.
Step 3. Check iCloud Photos to enable synchronization.
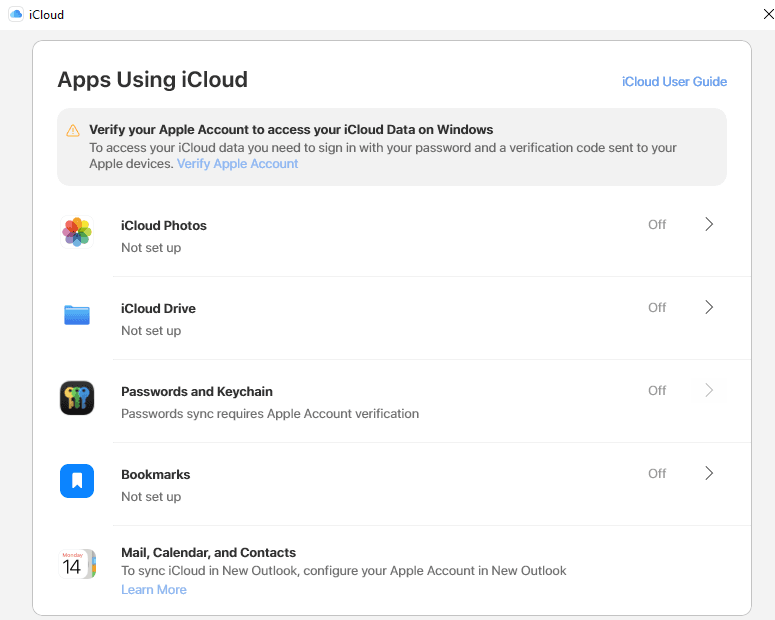
Step 4. Open File Explorer, then select iCloud Photos in the navigation pane.

Step 6. Double-click a photo or video to download and open it. To keep an independent copy, copy the downloaded item to a folder outside iCloud Photos.
Transfer iCloud Drive Files to PC
Step 1. On the iPhone, go to Settings > [your name] > iCloud. Then, tap Drive, and turn on Sync this iPhone.
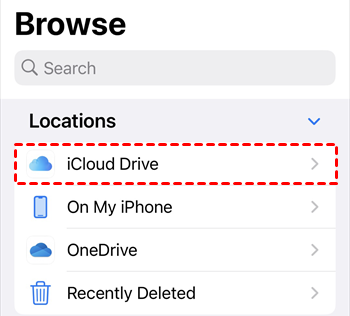
Step 3. Open the Files app. Tap Browse, select iCloud Drive, and move or save the required documents there.
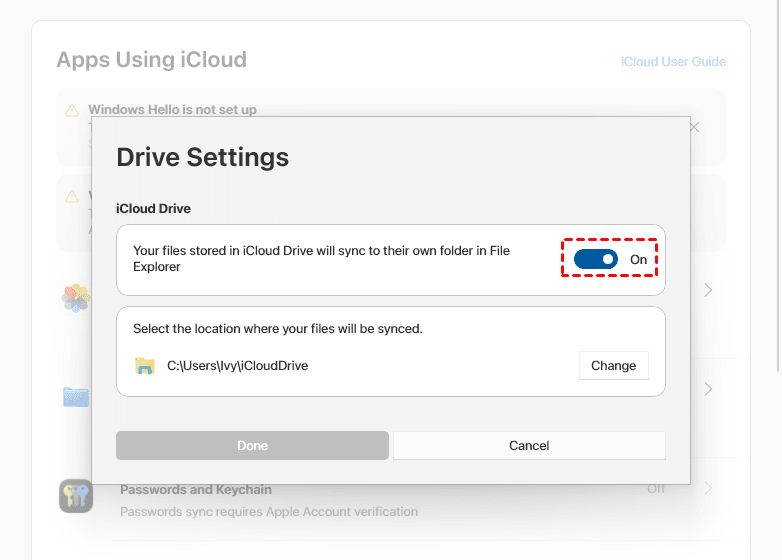
Step 4. On the PC, open iCloud for Windows and turn on iCloud Drive.
Step 5. Open File Explorer and select iCloud Drive.
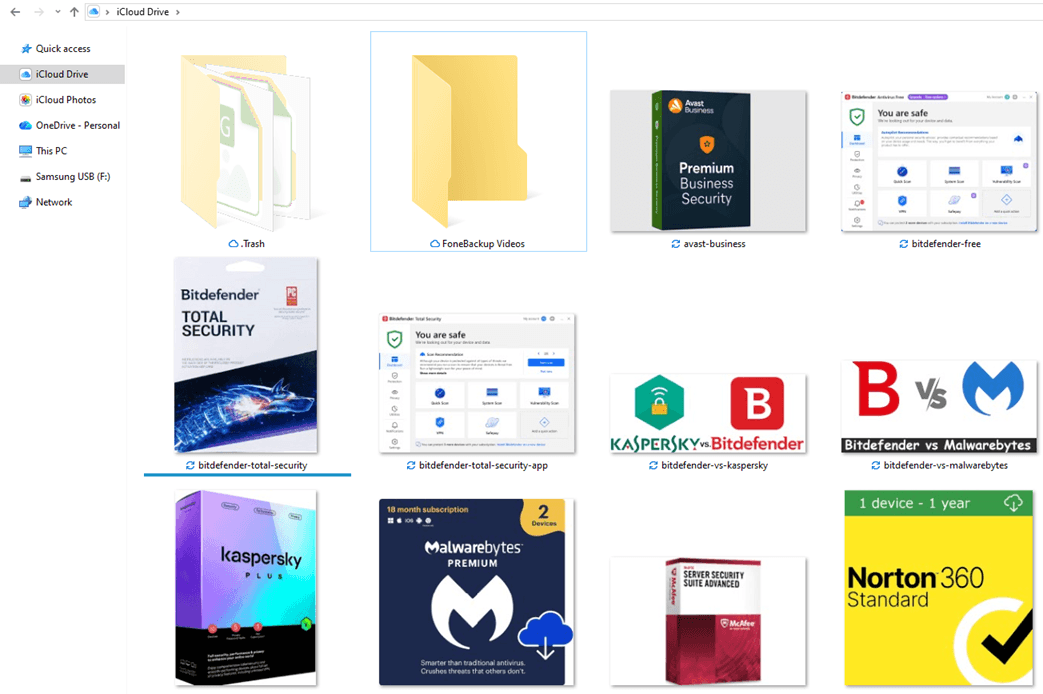
Step 6. Double-click a file to download it. Copy it to another PC folder if you want an independent local copy.
Be careful when deleting or moving synchronized items. Depending on the version of iCloud for Windows and the action used, the change may also appear on the iPhone and other connected devices.
Method 5. Transfer iPhone Files Wirelessly with LocalSend
👍 Best for: Transferring accessible files wirelessly between an iPhone and PC without an account or cloud upload.
LocalSend is an open-source file-sharing app for iOS and Windows. It sends selected files through the local network instead of uploading them to a third-party cloud account.
You can use it for photos, videos, documents, and other files available through the iOS share menu or the LocalSend file picker. It does not provide unrestricted access to every iPhone folder and does not create a restorable device backup.
How to Transfer Files from iPhone to PC Wirelessly:
Step 1. Download, install and open LocalSend on both the iPhone and Windows PC. Connect both devices to the same local Wi-Fi network. Allow local network access on the iPhone if requested.
Step 2. On your iPhone, open LocalSend and select Send.
Step 3. Choose Files, Folder or another available item type, then select the files you want to transfer.
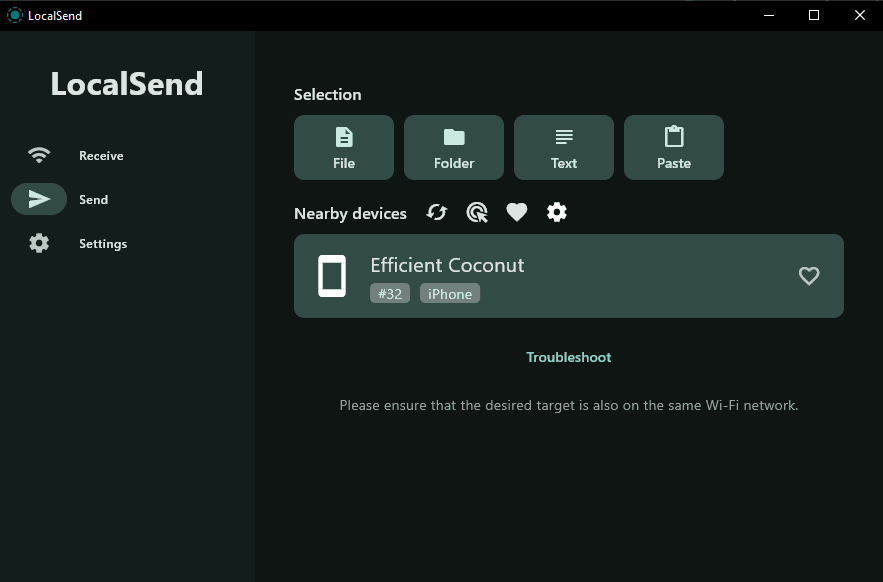
Step 4. Select the Windows PC from the list of nearby devices.
Step 5. Accept the incoming transfer on the PC if LocalSend requests confirmation.
If the devices cannot find each other, confirm that they are connected to the same network and allow LocalSend through the Windows firewall. Restarting the app on both devices may also refresh device discovery.
💬 Verify your transferred files before deleting the originals:
- Open several transferred photos, videos, songs, or documents.
- Check that large videos play from beginning to end.
- Compare the number of selected and transferred items.
- Review important filenames, dates, and folders.
- If files are missing or damaged, keep the iPhone copies and repeat the transfer in smaller batches.
Comparison of the 5 iOS to PC File Transfer Methods
| Method | 👍 Best for | Connection | Main limitation |
|---|---|---|---|
| AOMEI FoneBackup | Selected photos, videos, and music | USB | Free Edition transfers 30 files per day |
| Windows Photos | Photos library import | USB | Photos and videos only |
| Apple Devices | Documents from compatible apps | USB | Limited to File Sharing apps |
| iCloud for Windows | Synced photos and documents | Internet | Depends on iCloud storage |
| LocalSend | On-demand wireless file sharing | Local Wi-Fi | Both devices must run the app |
Here is the simple rule:
- Use AOMEI FoneBackup when you want to select supported media and choose a destination folder.
- Choose Windows Photos for a simple Camera Roll import. Apple Devices is more suitable for documents inside File Sharing apps.
- If your content is already stored in iCloud, iCloud for Windows provides continuing access.
- LocalSend is the more suitable method for quick wireless transfers that do not need cloud storage.
FAQs
1. Can Windows access everything under On My iPhone?
No. Windows cannot browse the complete On My iPhone location as ordinary external storage. Apple Devices only displays documents from apps that support File Sharing. For other files, use the relevant app’s Share, Export, Files, or cloud option.
2. Is Apple Devices better than iTunes for Windows 11?
Apple Devices is the current Apple app for file sharing and device management on Windows 10 or later. The older iTunes instructions are mainly relevant to older Windows environments.
3. How can I transfer large videos from iPhone to PC?
For many large videos, use a USB method such as Windows Photos or AOMEI FoneBackup instead of uploading everything through the Internet. Make sure the full-resolution videos are stored locally on the iPhone before starting.
4. Can I transfer iPhone files to PC without iCloud?
Yes. AOMEI FoneBackup, Windows Photos, and Apple Devices use a USB connection for supported content. LocalSend transfers accessible files through the local network without using iCloud.
5. Can I AirDrop files from iPhone to Windows?
AirDrop does not natively support Windows PCs. LocalSend provides a similar nearby-device experience, but it requires the app on both devices and access to the same local network.
6. Why are some iPhone photos missing on the PC?
Some originals may exist only in iCloud, or the USB connection may have stopped during the import. Download the originals to the iPhone, keep the phone unlocked, and repeat the transfer in smaller groups.
Summary
The right iOS to PC file transfer method depends on the location of your files and the way you want to connect:
- Use AOMEI FoneBackup to select supported photos, videos, or music and choose a Windows destination folder.
- Use Windows Photos for a direct Camera Roll photo and video import.
- Use Apple Devices for documents stored inside apps that support File Sharing.
- Use iCloud for Windows for photos and files already synchronized through iCloud.
- Use LocalSend to send accessible files over the same local network without a cloud upload.
If you want a guided USB transfer with media selection and destination control, try AOMEI FoneBackup. Check the Free Edition’s 30-file daily transfer limit before beginning a large export.

 as a preferred
source on Google
as a preferred
source on Google