



Add MP3 to Apple Music on iPhone: 3 Practical Ways
This guide explains 3 current ways to move local MP3 files into the Music app on iPhone, including cloud syncing, cable syncing, and a selective Windows transfer.

By Ivy Updated on July 24, 2026


You downloaded an MP3 to the Files app, but it still does not appear beside your other songs in Music. That is frustrating when you want one library and normal playback controls. On a Windows PC, you have 3 practical choices:
- use Apple Music Sync Library if you subscribe
- sync by cable with Apple Devices
- transfer selected files with AOMEI FoneBackup
Below, we walk through each method so you can finally play that track alongside the rest of your music.
Can You Directly Add an MP3 from Files to Music?
The iPhone Files app can open an MP3, but it does not provide an Add to Music command for a local audio file. To add MP3 to Apple Music on iPhone, first place the file on a Windows PC. You can then upload it through Sync Library or transfer it over a cable.
If the MP3 already sits on your computer, skip the export steps below. If it is only in Files, move it to iCloud Drive and download it on the computer:
Step 1. Open Files on your iPhone, tap the three-dots icon, then select.
Step 2. Tap the Folder icon and < to select iCloud Drive as the location. You can then select a folder in iCloud Drive to save the MP3 files. Once done, click Copy.
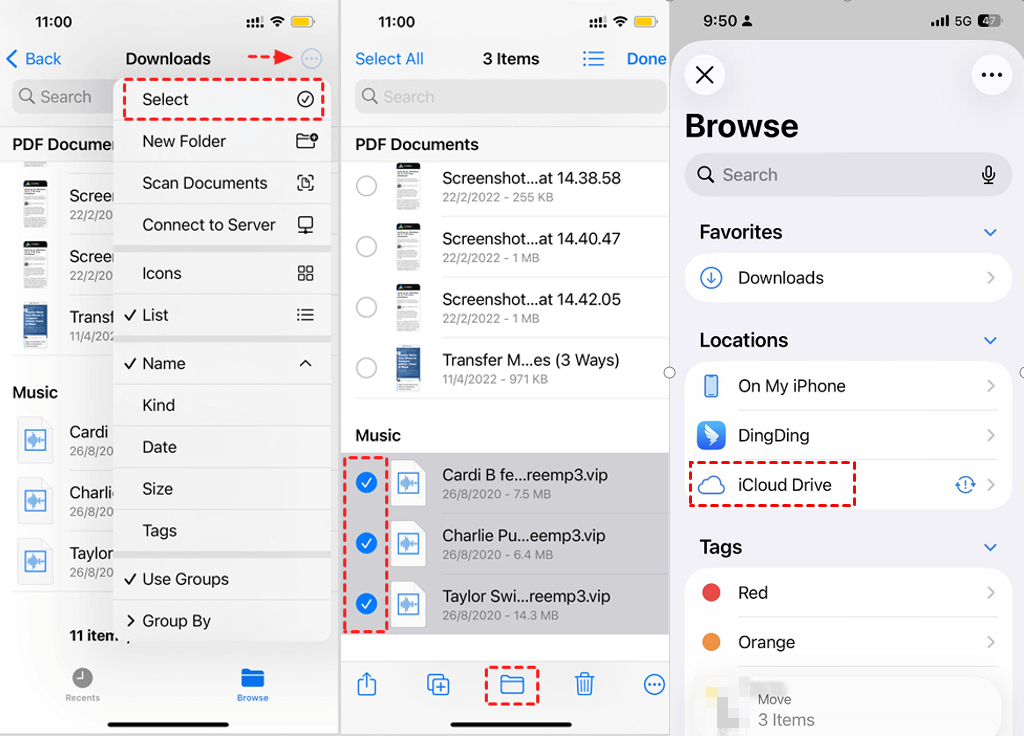
Step 3. On the computer, sign in to iCloud.com, open iCloud Drive, select the MP3, and click the Download button. Play the file once before importing, just to make sure it isn't corrupted.
Which Method Fits You? Pick yours
|
❓ Your situation |
🎯 Use this method |
❌ Do not use it when |
|
You subscribe to Apple Music and want the MP3 on all your devices |
You do not have an Apple Music or iTunes Match subscription |
|
|
You want an Apple method and are comfortable syncing by cable |
Apple Devices on Windows |
Sync Library is on, because cloud syncing and manual music syncing conflict |
|
You want to select individual MP3 files without managing the Apple Music library |
You want cloud access without keeping the PC involved |
Method 1: Use Sync Library with an Apple Music Subscription
This is the smoothest option when you already subscribe to Apple Music or iTunes Match. The computer uploads or matches your imported MP3, and the song then appears on devices signed in to the same Apple Account. Keep the computer online until its cloud status finishes updating.
Step 1. Open the Apple Music app. Select the sidebar actions button, choose Import, select the MP3 or its folder, and click Open.
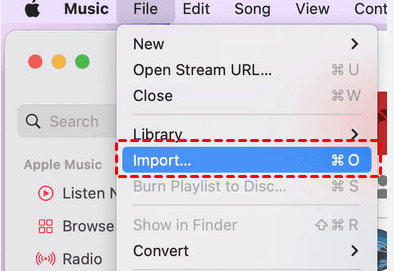
Step 2. On the sidebar actions menu, choose Settings > General, and turn on Sync Library.
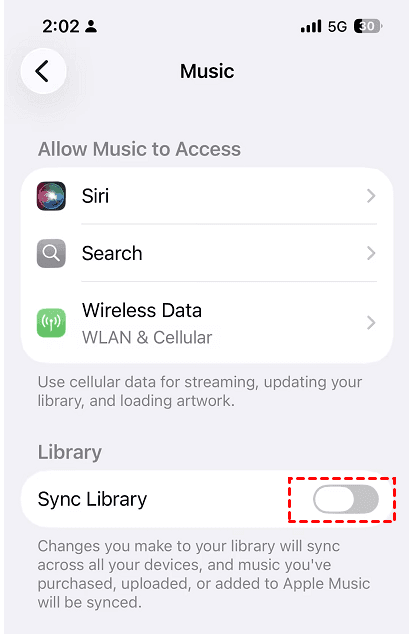
Step 3. On your iPhone, go to Settings > Apps > Music, then turn on Sync Library. Use the same Apple Account on both devices.
Method 2: Add MP3 to Apple Music on iPhone with Apple Devices
Choose this route when you do not use Sync Library or prefer a local cable transfer. Import the MP3 into the computer's Music library first.
Step 1. On your computer, open Apple Music and manually copy MP3s to the Windows music library folder. Connect the iPhone to your computer, and tap Trust if asked.
Step 2. Click your device (username's iPhone) in Apple Devices. Then, select Music, check Sync music to [device name], and choose Entire library or Selected artists, albums, genres, and playlists.
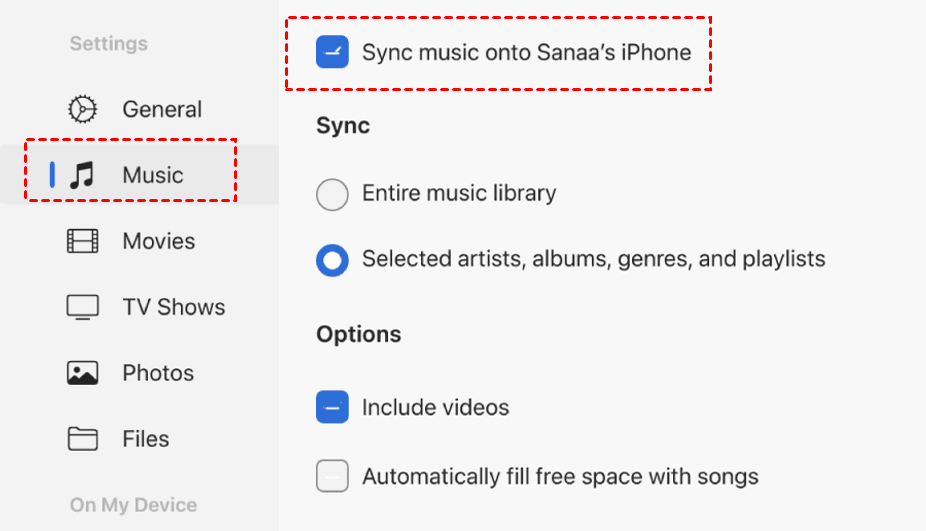
Step 3. Select the items you want and click Apply. When syncing finishes, use the Eject button before disconnecting.
Method 3: Selectively Transfer MP3 to Apple Music on iPhone with AOMEI FoneBackup
If you use Windows operating system and want to add specific files without building or syncing an Apple Music library, AOMEI FoneBackup can transfer music from PC to iPhone through its Phone Transfer workflow.
 AOMEI FoneBackup
- 🔄 3 Transfer Modes: Transfer MP3 from PC to iPhone, iPhone to PC, or between two iPhones without iCloud or Wi-Fi required.
- ✅ Selective Transfer: Add MP3 files instead of replacing your music library.
- 💾 Flexible storage: In addition to iPhone, you can also save MP3 files to your computer, external hard drive, USB drive, and more.
- 🆓 Free version available: 30 files/day free; Pro for unlimited transfer.
- 📱 Wide compatibility: Supports all iOS versions and all iPhone models.
 100% Secure
Step 1. Install and open AOMEI FoneBackup on your Windows PC. Then, connect your iPhone using a USB cable, and tap Trust when prompted.
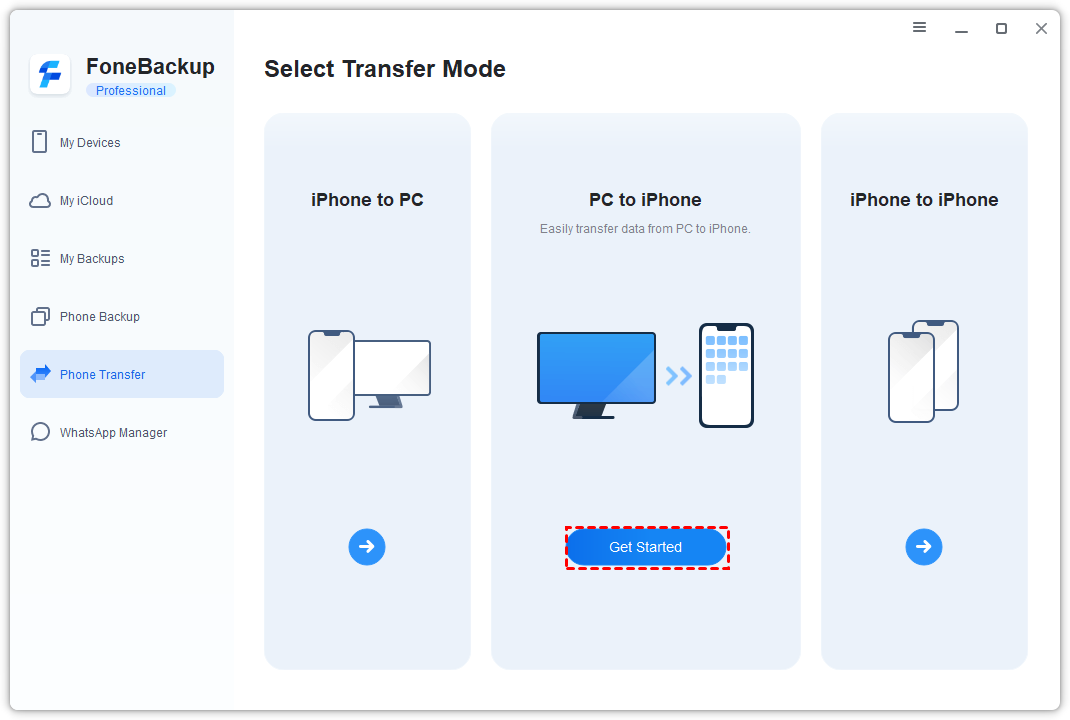
Step 2. Select Phone Transfer > PC to iPhone, then click Get Started.
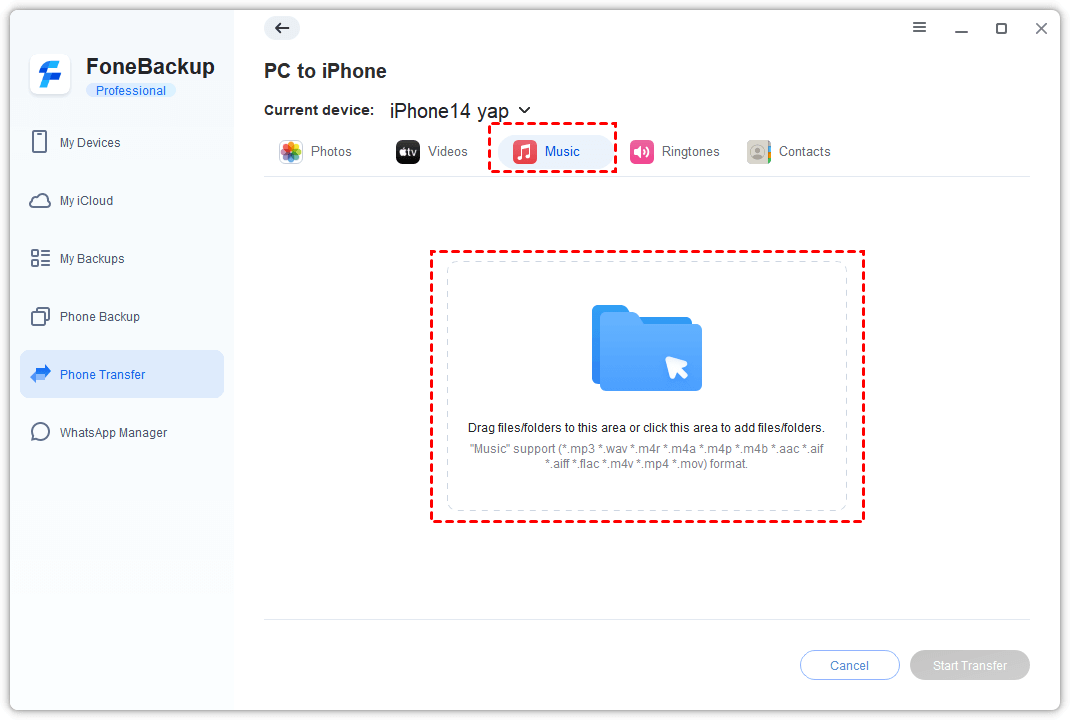
Step 3. Click the plus (+) button, and select the MP3 files you want to add. You can also drag and drop them into the window.
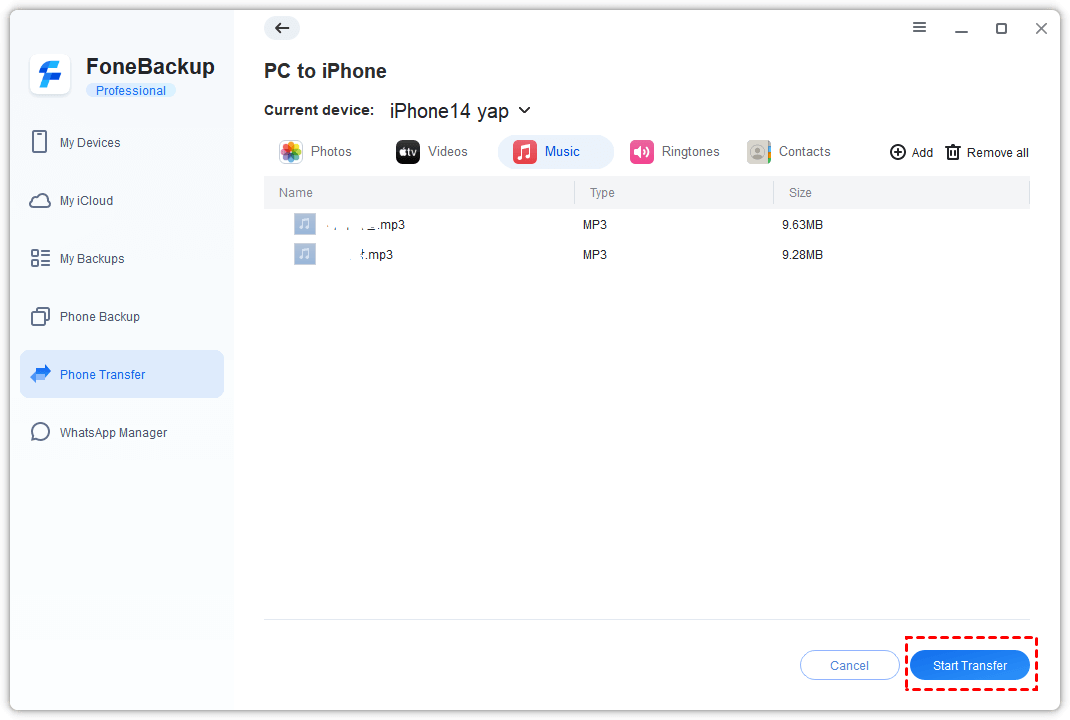
Step 4. Confirm you select all MP3 files you want and click Start Transfer to add MP3 to Apple Music on iPhone. Keep the phone connected until the task completes.
Your MP3, Your Way: A Quick Look at All 3 Options
|
Factor |
Sync Library |
Apple Devices |
AOMEI FoneBackup |
|
🔥 Best for |
Subscribers using several devices |
Apple cable syncing |
Selective Windows transfer |
|
Main requirement |
Apple Music or iTunes Match subscription |
Sync Library off; computer music library |
Windows PC and USB cable |
|
Scope |
Cloud-enabled music library |
All music or selected library groups |
Chosen MP3 files |
|
Main advantage |
Automatic access across signed-in devices |
Built-in Apple workflow |
No Apple Music library management |
|
Main limitation |
Subscription and upload time |
Sync choices can change device content |
Windows only; free limit is 30 files/day |
Top recommendations:
- Use Sync Library if you already pay for Apple Music and want the MP3 across your signed-in devices.
- Use Apple Devices for an Apple-managed Windows cable sync without cloud music.
- Choose AOMEI FoneBackup when you only need to add selected local MP3 files from a Windows PC.
Quick Check: Is Your MP3 Really There?
Open Music on your iPhone and search for the song by name, artist, or album. Play the first few seconds, then jump somewhere in the middle—just to make sure the file isn’t cut off or corrupted.
If you used Sync Library, sit tight for a moment while the cloud status finishes up, and keep both your iPhone and computer online during that time.
If a cable transfer didn’t work, don’t start hopping between methods yet. Reconnect your iPhone, unlock it, tap Trust, and try the same method again. Wait until that sync or transfer is fully done before you switch to something else.
Frequently Asked Questions
1. Can I add MP3 to the iPhone Music app without a computer?
Not directly from Files. You can play the file in Files or another audio app, but adding it to the Music library requires a computer-based library or transfer workflow.
2. Why is the Music sync option missing?
Sync Library may be enabled. Apple disables manual music syncing while cloud library syncing controls the music collection.
3. Will an imported MP3 appear on every Apple device?
It can when you use an active Apple Music or iTunes Match subscription, sign in with the same Apple Account, and enable Sync Library on each device.
4. Does an MP3 in Files automatically move into Music?
No. Files and Music maintain different libraries, so saving or playing an MP3 in Files does not import it into Music.
Conclusion
To add MP3 to Apple Music on iPhone, first get the file onto a Windows PC. Then, choose the route that matches your setup:
- Sync Library for subscription-based access across devices
- Apple Devices for local Apple syncing
- AOMEI FoneBackup for a selective transfer
Check the track in Music before deleting the original MP3. If you regularly move local songs from a PC, try AOMEI FoneBackup and keep the source folder as your backup copy.

 as a preferred
source on Google
as a preferred
source on Google