



Can You Recover Deleted Photos from Olympus Cameras?
How to recover deleted photos from Olympus digital camera? This guide covers 3 ways - using professional recovery software, Windows File Recovery, and SD card repair. Start with the easiest method. Keep reading.

By Ivy Updated on July 13, 2026


You've just returned from a trip, plugged your Olympus camera's SD card into your computer, and… nothing. The photos you thought you'd captured are gone. Maybe you accidentally deleted them. Maybe you formatted the card. Maybe the card itself is acting up.
Before you panic, here's the good news: in most cases, those photos are still recoverable. When you delete a photo from an Olympus camera, the file isn't immediately erased - the camera marks that space as available for new data. As long as you stop using the card, those photos can often be brought back.
This guide walks you through 3 practical ways to recover deleted photos from your Olympus digital camera, whether you're using Windows or Mac, whether the card was formatted or just had a few files deleted.
Which Recovery Method Should You Use?
| ❓ Your Situation | 🎯 Best Method |
|---|---|
| Accidentally deleted Photos or the card was formatted | Method 1: AOMEI FastRecovery - Fast, reliable, and handles most scenarios |
| Prefer a free, official tool | Method 2: Windows File Recovery - Command-line based, requires some technical |
| The SD card is physically damaged or corrupted | Method 3: Try CHKDSK first, then recovery software |
If you're unsure where to start, skip straight to Method 1, it works for the vast majority of Olympus photo recovery scenarios.
Why Photos Disappear from Olympus Cameras
Olympus cameras, now operating under the OM System brand, have a long history of producing quality imaging equipment. They typically store photos on SD, SDHC, SDXC, or xD memory cards.
Photos can be lost for several reasons:
-
Accidental deletion
-
Formatting the memory card
-
Power outages during writing
-
Virus infections
-
Card corruption or failure
No matter the cause, the recovery process follows the same principle: stop using the card immediately and start recovery as soon as possible.
Don't Make It Worse: What to Do First
Before attempting any recovery method, follow these critical steps:
-
Stop using the camera immediately. Do not take any more photos, as new data could overwrite the deleted photos.
-
Do not format the card. Formatting can permanently erase the data you're trying to recover.
-
Safely remove the memory card from the camera and keep it secure.
-
Avoid writing any new data to the card when connecting it to your computer.
Following these precautions gives you the best chance of a successful recovery.
Method 1: Recover Deleted Olympus Photos with AOMEI FastRecovery (Easiest & Most Reliable)
🔥Best for: Most Olympus photo recovery scenarios - accidental deletion, formatting, card corruption, and more.
AOMEI FastRecovery is a professional photo recovery tool that's specifically designed to retrieve deleted or lost photos from digital cameras, memory cards, and other storage devices.
 AOMEI FastRecovery
- 🔎 Dual-Scan Mode: Quick Scan for recently deleted files, Deep Scan for complex data loss. Together, they give you the best chance of recovery.
- 📁 1000+ File Types: Recovers 42+ image formats (JPG, PNG, GIF, TIF, PSD, CR2, etc.), plus videos, documents, audio, and more.
- 💾 Card Compatibility: Compatible with SD, xD, microSD, miniSD, SDHC, CF, and other card types.
- 🛡️ Wide Range of Scenarios: Recover files from accidental deletion, disk formatting, system crashes, unbootable drives, and more.
- 🚀 Find Your Files Fast: Browse by type or path, preview files, and recover only what you need. No more digging through endless lists.
- ✅ Safe & Easy to Use: Read-only, no data overwriting. simple, intuitve interface.
- 🎁 Try It with No Risk: Free edition recovers up to 500MB - no commitment, no quality compromise.
 100% Secure
How to recover deleted photos from an Olympus camera with AOMEI FastRecovery:
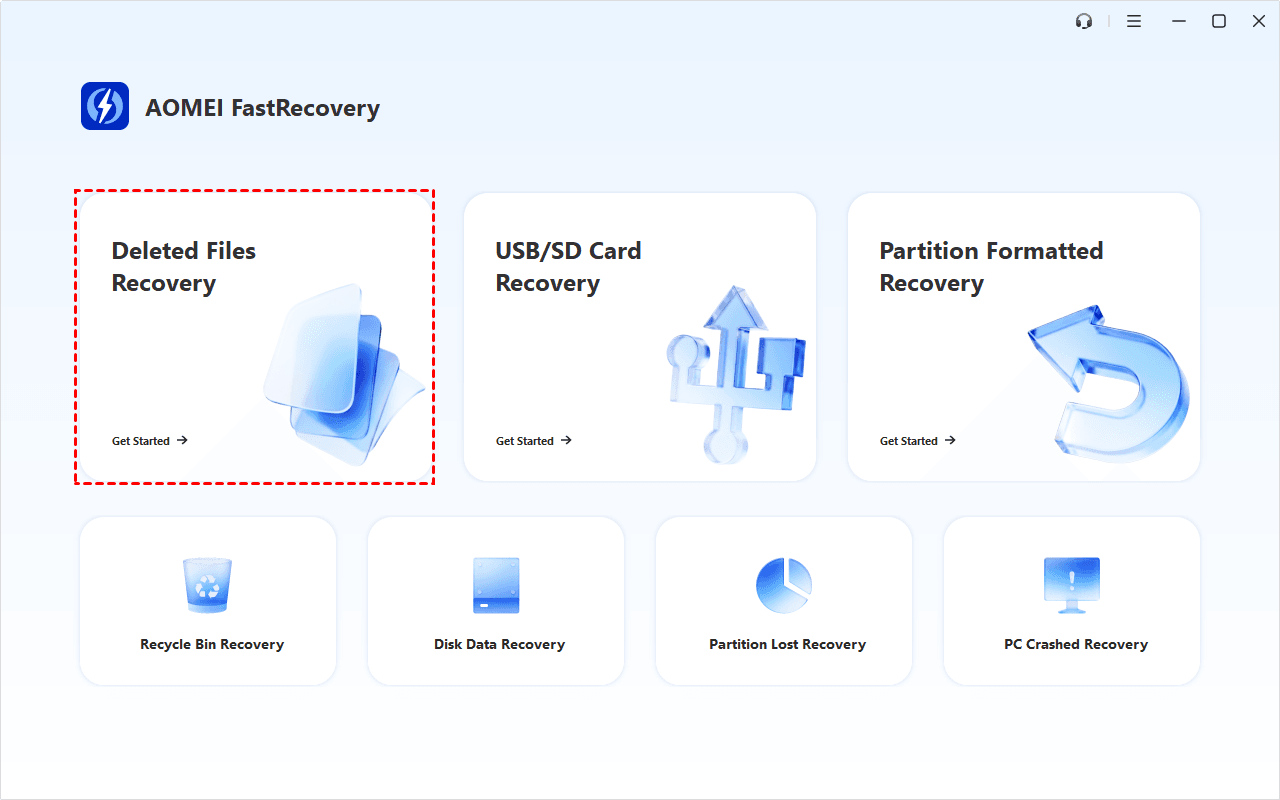
Step 1. Download and install AOMEI FastRecovery on your Windows PC. Connect your Olympus camera's memory card to your computer using a card reader. Choose Deleted Files Recovery for a quick scan, or USB/SD Card Recovery for a more thorough scan.
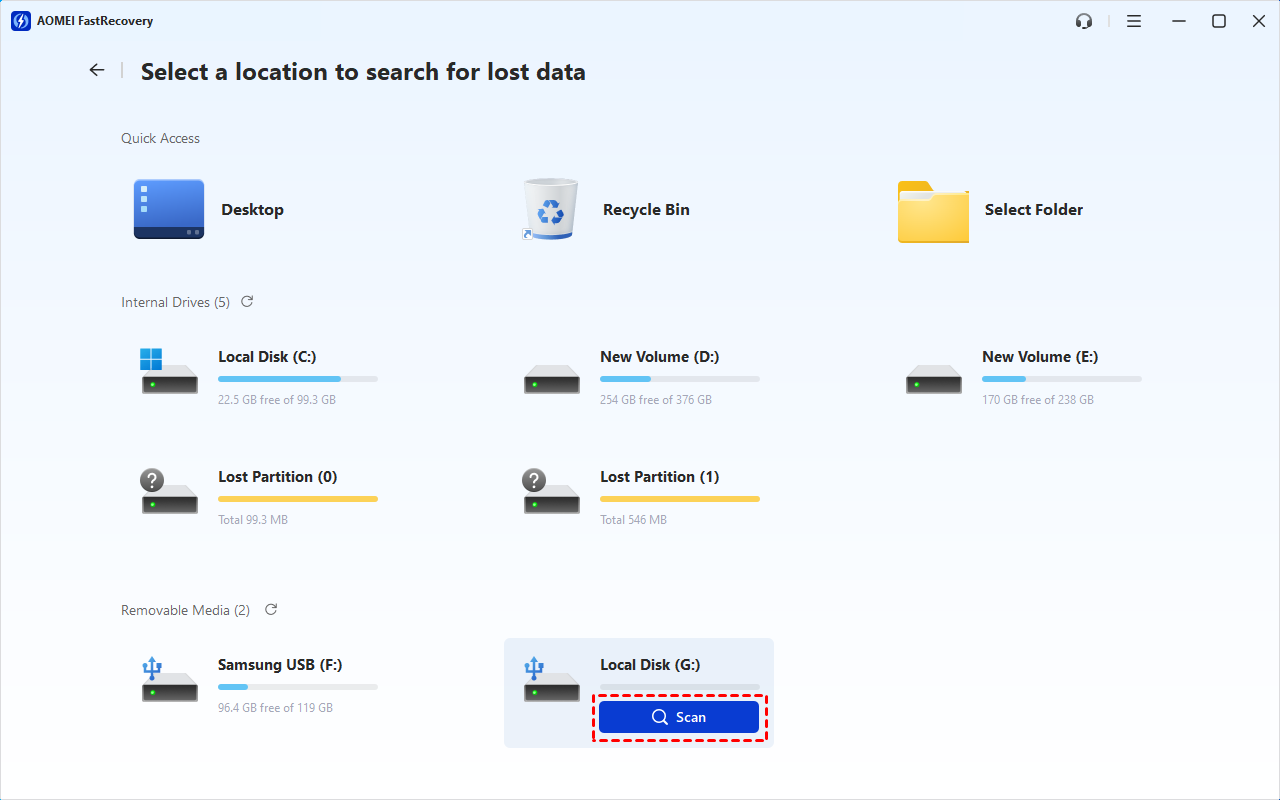
Step 2. Hover your mouse over the connected card and click Scan.
Step 2. The Quick Scan runs automatically to find recently deleted photos. Browse by Type, select Images, and look for CR2 files. Or expand Deleted Files to locate individual files.
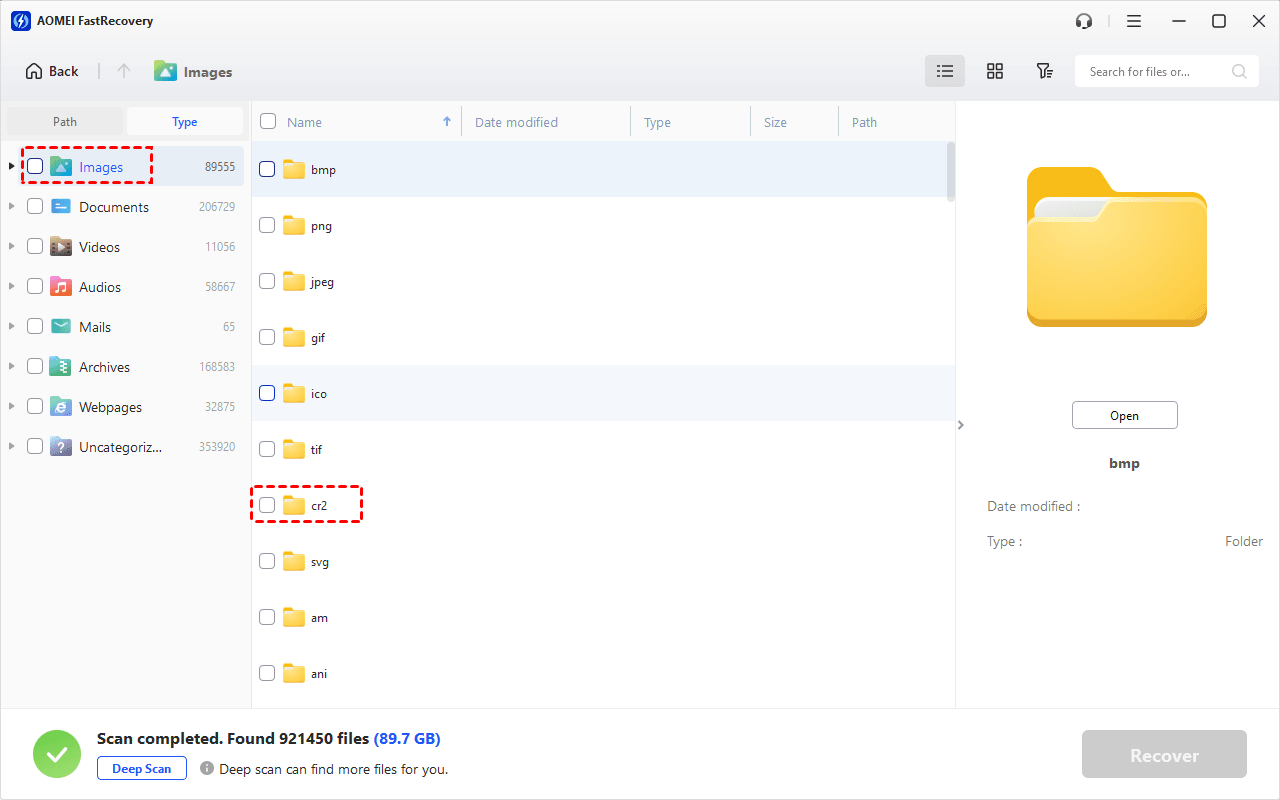
💡 Too many files to scroll through? Type a file name or extension (e.g., .cr2) in the search box and sort the list by column headers. You can also filter by type or size.
-
Browse by path if you remember where the lost files were saved.
-
Click the Deep Scan to find more data if Quick Scan fails. It will scan every sector of the disk and take longer.
Step 3. Select the CR2 photos you want to recover and click the Recover button. Always choose a NEW location to save the recovered files.
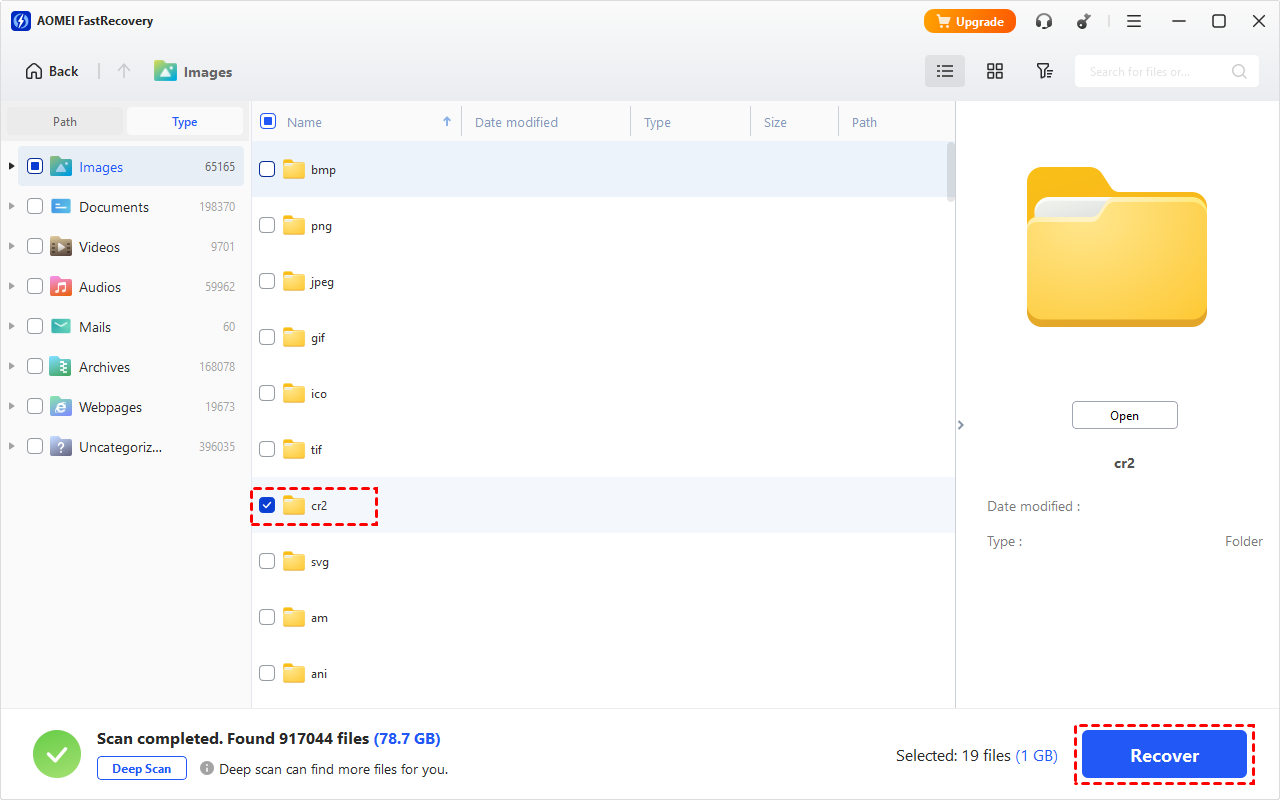
Never save them back to the same card, as this may cause data overwriting.
Method 2: Recover Olympus Photos with Windows File Recovery (Free Alternative)
✅ Best for: Users who prefer a free, built-in Windows tool and are comfortable with the command line.
If you don't want to install third-party software, Windows offers a free command-line recovery tool called Windows File Recovery. It can scan your Olympus memory card and recover deleted photos, but it requires typing commands and understanding recovery modes.
How to use it:
Step 1. Download and install Windows File Recovery from the Microsoft Store.
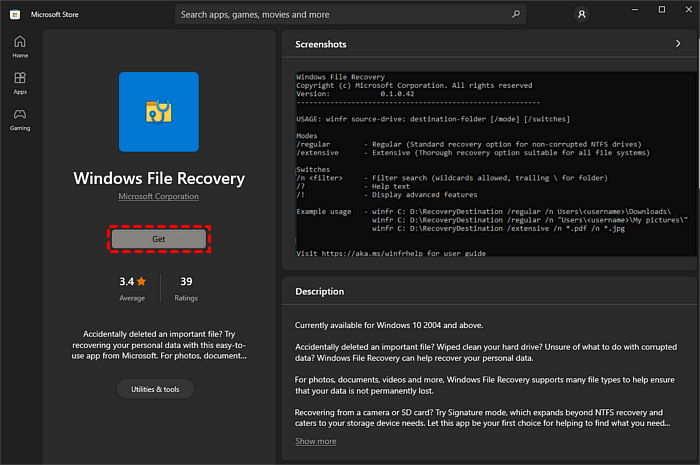
Step 2. Open Command Prompt as Administrator and type the following command:
winfr source-drive: destination-drive: /mode /switches
Replace source-drive with the drive letter of your Olympus memory card, and destination-drive with a different drive on your computer.
For photo recovery, use the Signature mode with the /y switch to specify image file types:
winfr X: D: /signature /y:CR2
Method 3: Repair the SD Card with CHKDSK Before Recovery
✅ Best for: When the memory card is corrupted or shows errors in File Explorer.
If your Olympus camera's SD card is corrupted or not recognized by your computer, you may need to repair it before recovery. The Windows CHKDSK (Check Disk) command can fix file system errors that prevent the card from being read.
How to run CHKDSK:
Step 1. Connect your Olympus memory card to your computer.
Step 2. Open Command Prompt as Administrator. Type the following command:
chkdsk X: /f /r /x
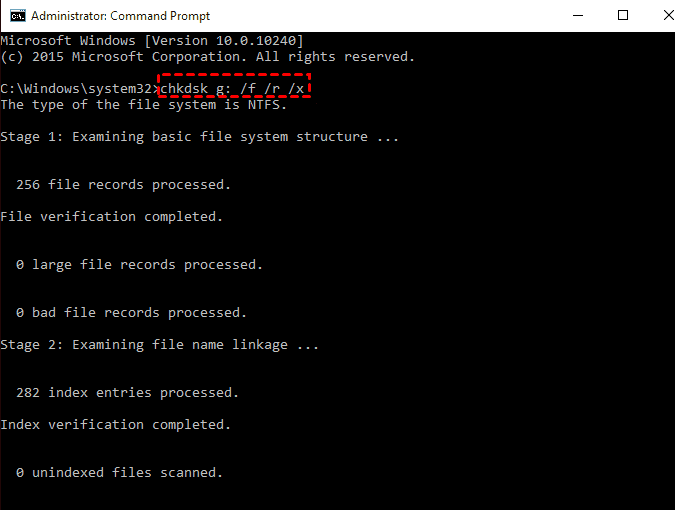
Replace X: with the drive letter of your memory card and wait for the scan to complete. Once the card is repaired, use Method 1 (AOMEI FastRecovery) to scan for and recover your photos.
How to Prevent Photo Loss from Your Olympus Camera
While recovery tools are effective, prevention is always better. Here are some simple habits to protect your Olympus camera photos:
-
Create regular backups: Back up your photos to your computer, external drive, or cloud storage at regular intervals.
-
Eject the SD card properly: Always turn off your camera before removing the card. On your computer, safely eject the drive before physically removing it.
-
Avoid low battery operation: Using your camera with a low battery can cause unexpected shutdowns during writing, leading to data corruption.
-
Keep spare cards: If you're on a trip, carry extra memory cards so you don't have to delete photos to free up space.
Final Words
Losing photos from your Olympus digital camera is frustrating, but it's rarely permanent. With the right approach, most deleted or lost photos can be recovered.
Here's the simple rule:
-
Start with Method 1 (AOMEI FastRecovery) - it's the easiest and most reliable option for most users.
-
Try Method 2 (Windows File Recovery) only if you're comfortable with the command line and want a free alternative.
-
Use Method 3 (CHKDSK) if your memory card is corrupted or not being recognized by your computer.
Most importantly: stop using the card immediately. Every photo you take or file you save after deletion increases the risk of overwriting the photos you're trying to recover.
Your memories are worth saving. Take action now, and you'll likely get them back.

 as a preferred
source on Google
as a preferred
source on Google