
Samsung Data Migration Access Violation, Fix Now
This article describes what causes the Samsung Data Migration Access Violation or and how to fix it in 5 quick methods. Or try the best SDM alternative.
By Ivy Updated on October 16, 2025
Samsung Data Migration Access Violation Error
A Permission or Conflict Problem
An "Access Violation" error in Samsung Data Migration acts like a digital "Keep Out" sign from the operating system. It blocks SDM from reading a critical file, memory address, or protected system area required for cloning.

Windows security features, such as User Account Control (UAC), protected memory, or kernel-enforced file locks, trigger this to prevent unauthorized access, crashes, or data corruption, halting SDM's disk cloning process.
Common Triggers for the Error
- Software Conflicts: Antivirus (e.g., Windows Defender, Norton), firewalls, or background processes lock files or memory that SDM needs, mistaking its access for a threat.
- File System Errors: Corruption on the source drive, e.g., from bad sectors, improper shutdowns, or hardware failure, blocks SDM from reading inconsistent NTFS or FAT32 structures.
- Insufficient Permissions: Even as an admin, SDM may lack elevated rights. Windows requires "Run as Administrator" for low-level access to system directories, registry, or drivers.
- Outdated or Corrupted Software: Bugs in SDM or system files (e.g., DLL conflicts) cause invalid memory access attempts, prompting the OS to enforce the violation.
Quick Fixes to Samsung Data Migration Access Violation
Fix 1: Try Some Simple Solutions
- Run as Administrator (The Obvious First Step): Don't just be logged in as an admin. Right-click the Samsung Data Migration shortcut and select "Run as administrator."
- Close All Non-Essential Applications: Every open browser tab, document, or chat app could be locking a file. Use Task Manager (Ctrl+Shift+Esc) to close them before running SDM.
Fix 2: Disable Your Antivirus Software Temporarily
Real-time protection in antivirus software can interfere with SDM by scanning and locking files or memory during cloning, triggering access violations as it flags deep disk operations as suspicious.
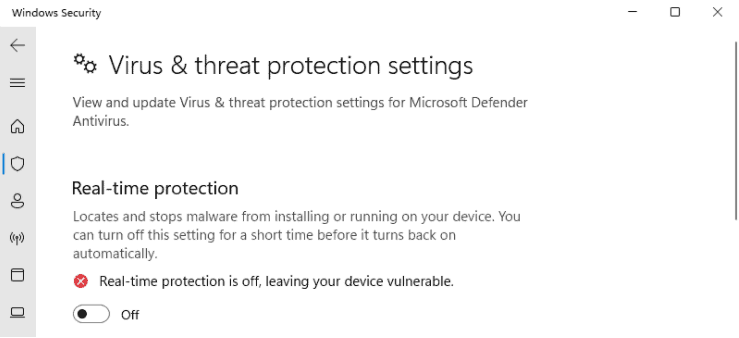
Step 1. Open and search Windows Security in the Start menu. Then, go to Virus & threat protection.
Step 2. Under Virus & threat protection settings, click Manage settings.
Step 3. Set Real-Time Protection to Off. It may re-enable automatically after a restart or a short time.
💡 Disable Third-Party Antivirus:
- Norton/Symantec: Right-click system tray icon > Disable Auto-Protect (select duration, e.g., 15 minutes).
- McAfee: Open McAfee > Virus and Spyware Protection > Real-Time Scanning > Turn off (set temporary duration).
- Avast/Bitdefender: Check system tray or app settings for "Pause protection" or "Disable shields" options, choosing a short timeframe.
Fix 3: Repair File System Errors with CHKDSK
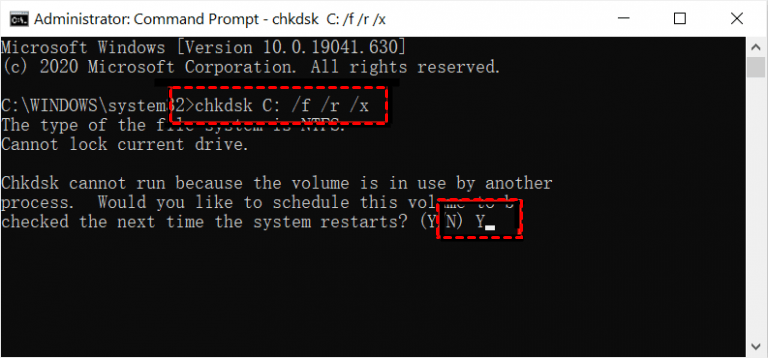
File system corruption on the source drive can block SDM's access, causing violations. Run chkdsk C: /f /r to scan for and fix errors, bad sectors, and inconsistencies.
Step 1. Search "cmd" in the Start menu. Select Command Prompt > Run as administrator.
Step 2. Type: chkdsk C: /f /r /x, and press Enter. Replace C: with the drive letter of your source drive.
⚠️Notes:
◾ /f fixes file system errors.
◾ /r locates bad sectors and recovers readable data.
◾ /x forces the volume to dismount before repair.
Step 3. If the drive is in use, Windows prompts: "Cannot lock current drive. Schedule for next restart? (Y/N)" Type Y and press Enter. Then, restart your PC immediately and start the disk check during boot. This may take 30 minutes to hours, depending on drive size/health.
Fix 4: Reinstall Samsung Data Migration
Corrupted SDM installations can cause internal glitches, leading to access violations. A clean reinstall removes faulty files and ensures a stable version.
Step 1. Open Control Panel > Programs and Features, then find Samsung Data Migration, right-click > Uninstall. Follow prompts and restart your PC to save changes.
Step 2. Open File Explorer to access the following path and delete leftover files and folders:
- C:\Program Files\Samsung (delete SDM folder if present).
- C:\Program Files (x86)\Samsung (check for remnants).
- C:\Users\[YourUsername]\AppData\Local\Samsung (delete SDM-related folders).
- C:\Users\[YourUsername]\AppData\Roaming\Samsung (remove any SDM entries).
Step 3. Type %appdata% and %localappdata% in the address bar for quick access. Then, delete SDM-related folders. At last, empty the Recycle Bin.
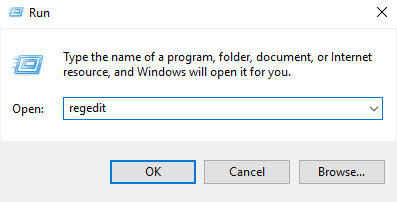
Step 4. Open regedit as Administrator and search for Samsung Data Migration. Then, delete related keys in the following registry path.
- HKEY_LOCAL_MACHINE\SOFTWARE
- HKEY_CURRENT_USER\SOFTWARE
Step 5. Now, go to Samsung's official site and download the latest SDM. Be sure to run the installer as Administrator.
Fix 5: Clone in Safe Boot (The Ultimate Bypass)
Running SDM within Windows can cause conflicts, as background services, drivers, and third-party software actively use system resources, lock files, or compete for disk access during cloning, leading to access violations. Cloning in Safe boot mode resolves this error.
Step 1. Press Win + R, type msconfig, and hit Enter.
Step 2. In the System Configuration window, switch to the Boot tab, check Safe boot and Minimal under Boot options. Then, click Apply > OK.
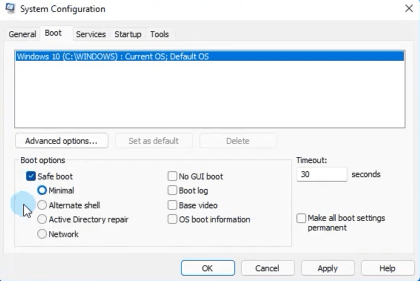
Step 3. Restart your computer and run Samsung Data Migration (as administrator) to proceed with cloning.
Once cloning is complete, you can then cancel Safe boot in the System Configuration window and restart to normal mode.
Best Alternative to Samsung Data Migration
If you've exhausted all fixes and access violations persist, it's time for a more robust tool like AOMEI Cloner. Unlike SDM, it supports different SSD drives and brands (e.g., MBR/GPT or SATA/M.2; Samsung, WD, Crucial, SanDisk, etc) and can optimize SSD to top-tier performance. Also, here are some highlights of it:

- 3 Cloning Solutions: System Clone, Disk Clone, Partition Clone.
- Full Migration: Include all data, OS-related partitions,making the cloned drive bootable.
- Intelligent Clone (best for smaller SSDs): Clone only used sectors, skipping bad sectors for faster cloning.
- Auto-Resize: Automatically resize new, larger drive to full capacity. Also, convert disk types between MBR and GPT.
- OS Compatibility: Support Windows 7, 8, 10, 11, and Windows Server.
Step 1. Physically install the new drive or connect it using a proper adapter. Open AOMEI Cloner after installing, and click Clone > Disk Clone.
Step 2. Select the current system drive and new SSD, respectively. Don’t mix them, as the target drive will be deleted during cloning.
Step 3 (IMPORTANT). It will auto-resize the new, larger SSD to full capacity. You can click Edit Partitions to confirm this and, optionally, convert MBR to GPT, or GPT to MBR. Also, it’s suggested to enable SSD Alignment for best performance.
⚠️Note: Sector by Sector Clone is a cloning mode that can clone all sectors of a drive and takes longer. Just leave it unchecked unless it’s for data recovery!
Step 4. Confirm and click Start Clone to clone hard drive to SSD. Be sure to perform a boot test before saving the drive, as this determines whether you can boot from this disk afterward.
Conclusion
Note that the Samsung Data Miration Access Violation error is a permissions or software conflict issue, not a death sentence for your SSD. So be sure to run SDM as an administrator and try the other methods.
If Samsung Data Migration is not working, the best option is to use the best alternative to clone hard drive to Samsung SSD. AOMEI Cloner is a good choice as it’s more compatible and takes care of SSD drives’ performance.
