
Raspberry Pi 5 Clone SD Card to NVMe [Full Guide]
In this article, you’ll get how to clone Raspberry Pi 5 SD card to NVMe, from what you need to potential cloning issues. Scroll down to explore more!
By Ivy Updated on December 15, 2025
Cloning your Raspberry Pi system from an SD card to an NVMe SSD is one of the most impactful upgrades you can make. NVMe storage delivers dramatically higher performance, better durability, and far greater stability, especially for long-running or data-intensive Raspberry Pi projects.
What Do You Need to Clone RPI 5?
Before cloning your Raspberry Pi system to an NVMe SSD, make sure you have the right hardware and tools. The Pi 5 fully supports native NVMe booting through the official PCIe/NVMe Baseboard or other compatible HATs, faster and more stable, without SD card required (with updated firmware).
- Your Raspberry Pi 5microSD card and card reader.
- A high-quality NVMe SSD (2280 is most common)and M.2 adapter or enclosure.
- A PCIe to NVMe baseboard / HAT, such as, official Raspberry Pi NVMe Base or Pineboards HatDrive!
- A compatible ribbon cable (if required by the board).
- USB keyboard and monitor (if not using SSH).
- Heat sinks or cooling if using Pi-heavy workloads.
⚠️Note: You can also use a similar method to clone Raspberry Pi 4, but it cannot use NVMe directly, requiring a USB 3.0 to NVMe adapter or enclosure, bootloader updates (EEPROM), etc., and the bottleneck is the bottleneck.
Method 1: RPI Clone NVMe with Best Cloning Tool (Recommended)
A simple yet powerful NVMe cloner is essential for the RPI NVMe clone. AOMEI Cloner features a GUI interface, offers 3 cloning solutions, and is compatible with different NVMe SSDs, enabling effortless RPI NVMe cloning, without boot issues.
In addition, it still supports a comprehensive suite of cloning features, making the process faster and less error-prone.

- 3 Cloning Solutions: System Clone, Disk Clone, and Partition Clone. Select as needed - clone OS or entire disk.
- Intelligent or Sector Cloning: Clone only the used sectors for faster, smoother cloning, or clone all sectors for full migration.
- SSD Alignment: Optimize SSD to achieve top-tier performance and extend lifespan.
- Edit Partitions: Clone and resize partitions of a new, larger SSD and convert MBR to GPT (with a different partition style).
- SSD Compatibility: Support different NVMe SSDs, such as Samsung 990 Pro, WD Black SN850X, WD BlACK SN7100, Crucial T500, Crucial P3, etc.
Step 1. Power off your Raspberry Pi 5 and remove the microSD card. Then, connect it to your Windows PC using a compatible SD card reader. Also, connect an NVMe SSD to the motherboard or use an adapter, depending on if there is one more slot.
Step 2. Open AOMEI Cloner after installing, click Clone > Disk Clone.

Step 2. Select the Raspberry Pi 5 microSD card and NVMe SSD, respectively. Click Next after each selection.
Step 3. Be sure to enable SSD Alignment to accelerate the reading and writing speed of NVMe SSD, and check Sector by Sector Clone to clone all sectors of the SD card. At last, click Start Clone to clone Raspberry Pi 5 SD card to NVMe.
⚠️Note: The Add unused space to all partitions is automatically enabled in Edit Partitions to resize the larger NVMe drive, preventing cloned SSD show wrong size. Optionally, convert MBR to GPT to boot a UEFI system.
Method 2: Clone Raspberry Pi 5 to NVMe Directly (for Advanced Users)
This method uses the DD command for a raw, bit-for-bit clone on a live system or for people who have no access to another computer, requiring a high-tech skills. Warnings and prerequisites:
- High risk of file inconsistency when copying a running root filesystem. Back up first.
- If possible, stop services that frequently write to disk (databases, logging) or boot into single-user mode.
- Have a USB keyboard + monitor attached or SSH ready to recover data if something goes wrong.
Steps to Clone Raspberry Pi 5 SD Card to NVMe
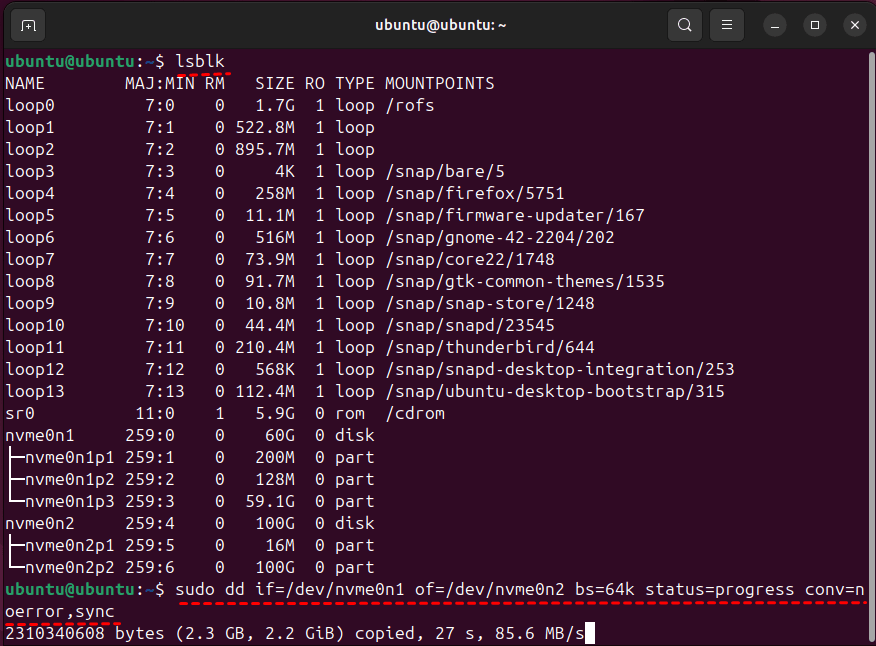
Step 1. In the Command Prompt window, type lsblk to identify devices.
⚠️Optional: Type sudo mount -o remount,ro /and press Enter to remount read-only the root temporarily. This helps consistency, but will break running services and make the system unstable. Use with caution.
Step 2. Run the dd command and sync:
sudo dd if=/dev/mmcblk0 of=/dev/nvme0n1 bs=4M status=progress conv=noerror, sync
⚠️Notes:
● if=is your source (input) drive (e.g., /dev/nvme0n1)
● of=is your destination (output) drive (e.g., /dev/nvme0n2)
●bs=4m sets block size for faster performance
● status=progress gives a real-time progress display
● conv=noerror
● syncensures dd keeps going if it hits a bad sector and pads blocks as needed
Step 3. Mount the NVMe on a PC and list UUIDs, run:
- blkid
- ls -l /dev/disk/by-uuid/
You’ll see UUID values for partitions (e.g., UUID="3b2f-1a2b").
Step 4. Open the NVMe boot partition, usually a small FAT partition. Edit cmdline.txt and be sure the root= parameter points to the correct root partition on NVMe.
- Using device path: root=/dev/nvme0n1p2
- Better: use UUID: root=UUID=xxxxxxxx-xxxx-xxxx-xxxx-xxxxxxxxxxxx
- Example:
console=serial0,115200 console=tty1 root=UUID=11111111-2222-3333-4444-555555555555 rootfstype=ext4 fsck.repair=yes rootwait
If cmdline.txt still points to /dev/mmcblk0p2 (the SD), change it to the NVMe UUID.
Step 5. Mount the NVMe root file system using tools like ext4 drivers and open /etc/fstab. Replace any /dev/mmcblk0pX lines with the correct UUIDs for NVMe partitions. Example fstab entries:
UUID=22222222-3333-4444-5555-666666666666 / ext4 defaults,noatime 0 1UUID=3B2F-1A2B /boot/firmware vfat defaults 0 2
⚠️Note: Use the UUID values you got from blkid.
If files change during dd, the NVMe image may be inconsistent. dd is fine for simple static systems, less so for active systems.
Verify RPI NVMe Clone before Reboot
After cloning, it’s necessary to be sure the cloned NVMe contains the boot partition and necessary files.
Step 1. In the Command Prompt window, type the following command and confirm NVMe has p1 (boot) and p2 (root).
lsblk -o NAME,FSTYPE,SIZE,MOUNTPOINT,LABEL
Step 2. Mount and inspect files:
- sudo mount /dev/nvme0n1p2 /mnt
- ls /mnt
- ls /mnt/boot
- sudo umount /mnt
Step 3. Run fsck (unmounted):
sudo fsck -fy /dev/nvme0n1p2
Step 4. Confirm boot files exist:
- bootcode.bin, start.elf (older firmwares), kernel*.img, cmdline.txt, config.txt (on p1 FAT partition)
- On Raspberry Pi OS with the boot/firmware scheme, check the appropriate folders.
How to Boot Raspberry Pi from Cloned NVMe
Once your SD card is successfully cloned to the NVMe drive, the final step is ensuring your Raspberry Pi 5 can recognize and boot from it.
- To boot from NVMeonRaspberry Pi 5, the Pi must have an updated bootloader and the correct boot order.
- The Pi 5 supports PCIe NVMe boot out of the box, but only when using a compatible NVMe baseboard or HAT.
Step 1. Open a terminal on your Raspberry Pi. Update bootloader to the latest release, run:
- sudo apt update
- sudo apt full-upgrade
- sudo rpi-eeprom-update -a
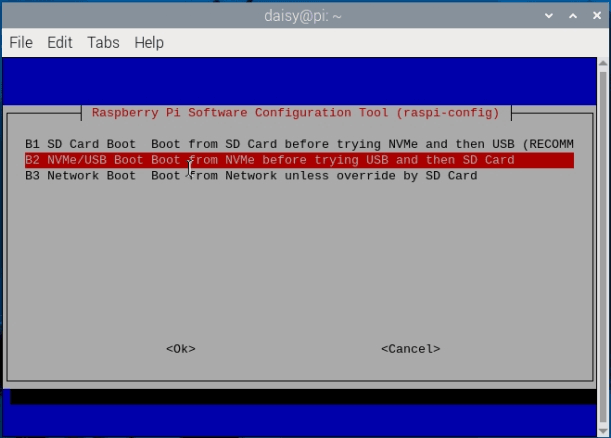
Step 2. Open Raspberry Pi Configuration (GUI) or raspi-config (CLI). Then, go to Advanced Options > Boot Order and set NVMe /USB as the first boot option.
Step 3. Press Finish to exit raspi-config. Power off, attach the NVMe board, and reboot.
Troubleshooting RPI Clone NVMe Problems
If the Raspberry Pi fails to boot or detect the NVMe drive, the following troubleshooting steps will help you identify the root cause quickly.
Raspberry Pi NVMe Not Detected
This occurs before boot even beginsand the possible causes are a faulty NVMe drive, an unsupported model or enclosure, insufficient power, loose PCIe cable (Pi 5), etc. Try the following fixes:
1. Run device listing: lsblk and press Enter.
2. Check for power issues (Pi 5 especially).
3. Try a known-good USB 3.0 NVMe enclosure.
4. Update bootloader and firmware to the latest version.
Boot Loops After Cloning
If the Pi repeatedly restarts or gets stuck on the rainbow screen, the likely causes are a wrong partition set as boot, an incorrect cmdline.txt root device, missing firmware files in /boot, etc. Here are some common fixes:
1. Check the boot partition, run:
- sudo mount /dev/nvme0n1p1 /mnt
- ls /mnt
2. Ensure cmdline.txt uses the correct drive:
root=PARTUUID=xxxxxxxx
3. Run fsck on both partitions to repair corruption.
Filesystem Expansion After NVMe Clone
When cloning from a smaller SD card, the NVMe root partition typically doesn’t auto-expand.Here are two methods to to expand the partition, enabling the cloned NVMe SSD to fully utilize its capacity(128GB, 256GB, 1TB, etc.)
#1: Useraspi-config
- Type sudo raspi-config and press Enter in the Command Prompt window.
- Choose Advanced Options >Expand Filesystem.
- Reboot.
#2: Manually useparted + resize2fs
1. Extend the partition, run:
sudo parted /dev/nvme0n1
2. Resize the filesystem, run:
sudo resize2fs /dev/nvme0n1p2
Final Thoughts
RPI clone NVMe is one of the easiest methods to get a big boost in speed, reliability, and overall performance. What’s more, you avoid the common failures that happen with SD cards over time.
For cloning, beginner-friendly tools like AOMEI Backupper work well, while advanced users can rely on dd - customizable but more complex. Once the clone is done and the bootloader is set correctly, you can boot Raspberry Pi 5from NVMe quickly.
Secure Download
