Disk Imaging vs Disk Cloning [Key Differences & Best Usage]
This article describes the difference between disk imaging vs cloning, when to image a drive and when to clone it, and how to image or clone a drive in a few steps. Scroll down to explore more.
What is the difference between those two operations? My friends say that cloning is more reliable than imaging. Cloning involves that you erase the destination disk and re-write every time you do it but aside from that, what are the good and the bad between them?
- A user from askwoody.com
The disk imaging and cloning can help users create backup copies of a drive to protect OS, family photos, business files, upgrading or replacing old drives, etc., which is necessary but confusing.
Thus, many users want to know what the difference is between disk imaging and disk clone? That's what we're going to cover. Also, we’ll show you when to image a drive and when to clone it.
What Is Disk Imaging?
Disk imaging is a powerful backup method that involves creating a compressed archive of an entire hard drive or a specific partition. Think of it as taking a “snapshot” of your system at a given moment, capturing everything from the operating system to user settings, installed applications, and personal files.
The archive is typically saved as an image file, such as .iso, .img, or proprietary formats used by disk imaging tools. These image files are not directly usable like regular folders and require you to restore image to new hard drive or SSD using specialized software.
In addition, it allows you to create multiple backups and set them as automatic backup, usually with full/differential/incremental backup methods. They are used to back up only changed files after creating a full backup.
What Is Disk Cloning?
Disk cloning is the process of creating an exact, uncompressed 1: 1 copy of an entire drive or partition, including the operating system, applications, settings, and files. The cloned drive is often bootable and ready for immediate use without additional setup or configuration.
Disk cloning is perfect for quick migrations (e.g., clone 2TB HDD to 1TB SSD) or disaster recovery, especially when you need to get a system back up and running without delay. However, it does require a destination drive of equal or greater capacity and doesn’t offer the same flexibility or storage efficiency as disk imaging.
Disk Imaging vs Cloning: What’s the Difference? When to Use It?
|
Feature |
Disk Imaging |
Disk Cloning |
|
Compression |
Yes, compress to a single file (.iso, .img), greatly saving time and space |
No,create an exact, uncompressed copy |
|
Storage Efficiency |
Store multiple copies on a drive and requireless space |
Single copy on a drive, withequal or larger target drive |
|
Speed |
Slower (due to compression) |
Faster, as it's a direct one-to-one copy |
|
ImmediateUse |
No, it requires you to restore image file first |
Yes, bootable and immediateuse |
|
Hardware Compatibility |
More flexible,evenrestoring to dissimilar hardware |
Work best with identical/similar systems |
|
🥇 Best Usage |
|
|
How to Image or Clone a Drive Step by Step
I'm sure you're familiar with disk imaging vs. disk cloning and can now make a decision. So, the next question is how to imaging or cloning a drive.
#1: Image a Drive with Built-in Backup and Restore (Windows 7)
Backup and Restore (Windows 7) is a free backup software for Windows that can create a system image in Windows 7, 8, 10, 11, etc., and save it to external hard drive or network drive. Note that it does not support dissimilar hardware restore.
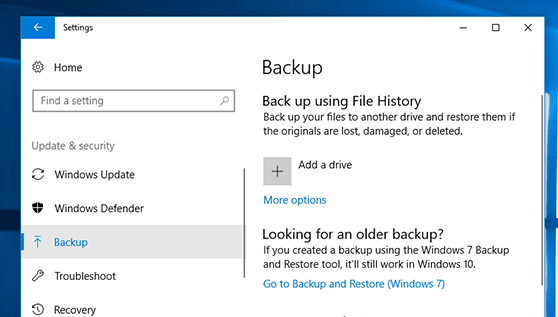
Step 1. Type Control Panel in the search box and select Backup and Restore (Windows 7) on the right side. Or go to Settings > Update & Security > Backup, and scroll down to Looking for an older backup and select Go to Backup and Restore (Windows 7).
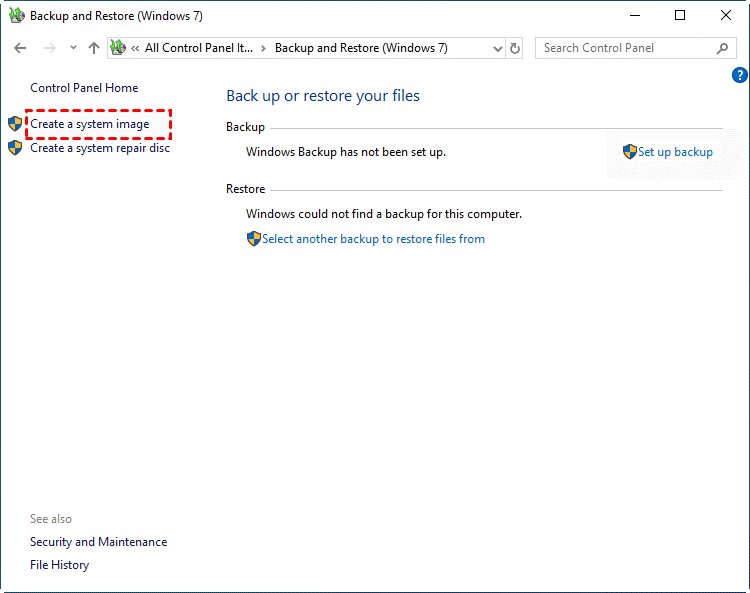
Step 2. Click Create a system image in the left panel. Then, it will look for all available storage devices and allow you to select from hard disks, DVDs, and network locations. Click Next to continue.
Step 3. Confirm your backup settings and click Start Backup to create a system image.
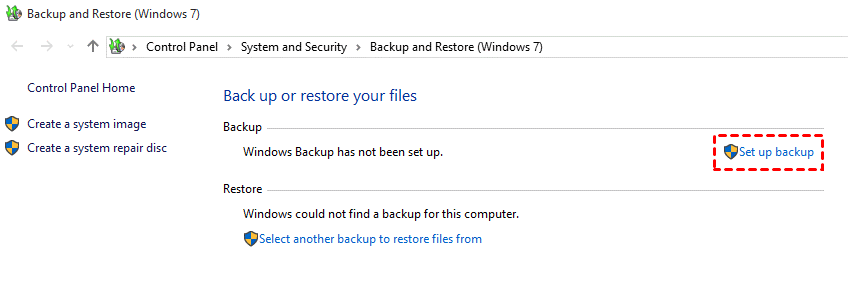
In this way, it will create a single system backup, not automatically. To make it, go to Back up or restore your files and click Set up under Backup and Restore (Windows 7).
It will offer users the “Let Windows Choose (recommended)” option to include a system image by default and backup it every Sunday at 7:00 PM.
In addition, if you want to restore system image to different computer or backup the entire disk, you can turn to a reliable 3rd-party backup software.
#2: Clone a Hard Drive with AOMEI Cloner
Since Windows does not provide any cloning tool, you can only use a 3rd-party option for a quick upgrade or system migration. Here, we strongly recommend you use professional disk clone software - AOMEI Cloner. Here are some highlights of it:
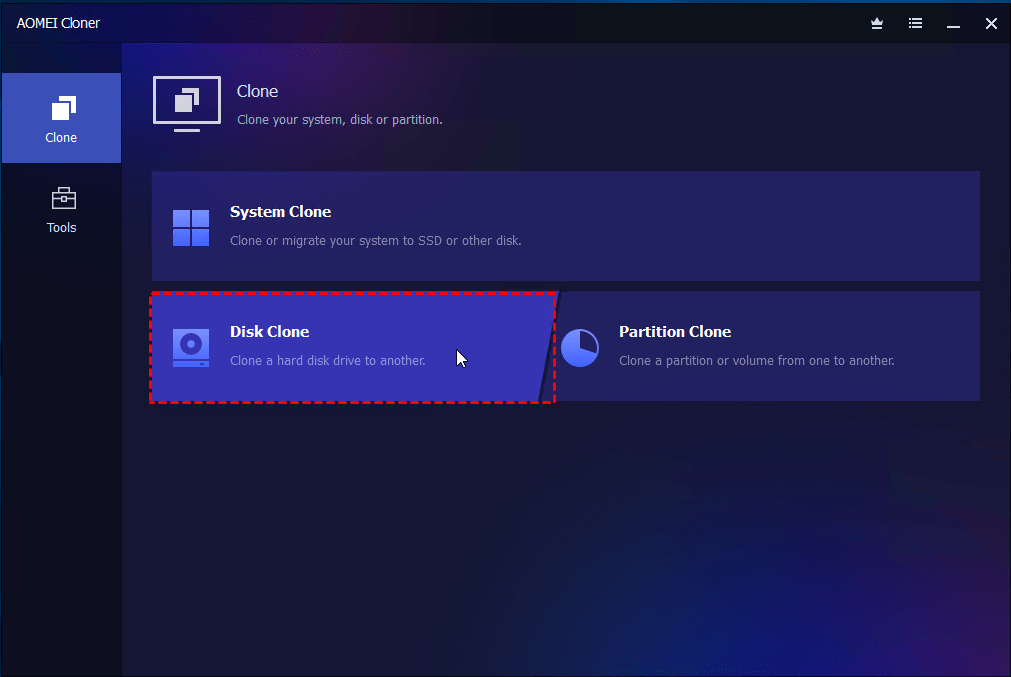
- 3 cloning solutions - Disk Clone, System Clone, and Partition Clone. If the cloned drive is a system disk, it will remain bootable after cloning.
- 2 cloning modes - Intelligent clone (default) is for most scenarios, especially for cloning large HDD to smaller SSD, while sector by sector clone is for encrypted disks or those with bad sectors.
- Advanced cloning feature - Check Edit Partitions to clone and resize partitions or convert disk partition styles, e.g., from MBR to GPT, or vice versa, for smooth cloning. Enable SSD Alignment to improve its performance.
- Highly compatible - Work perfectly with different disk brands, such as Samsung, WD, SanDisk, Crucial, Corsair, etc.
1. Connect the target drive to your computer using a SATA cable or an adapter. Then, open AOMEI Cloner, click Clone > Disk Clone subsequently.
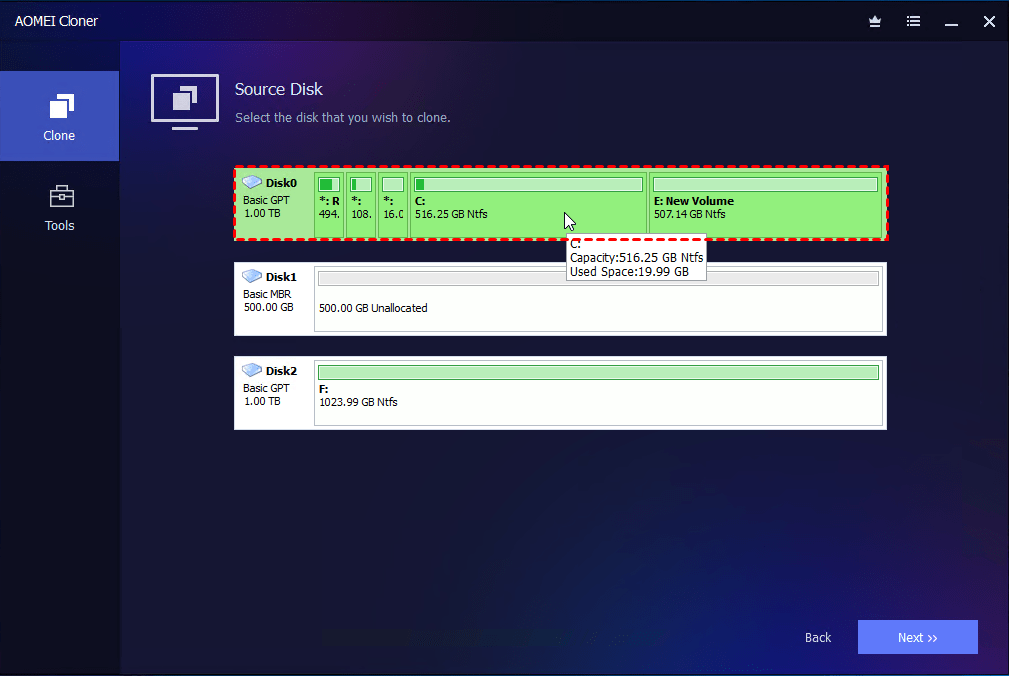
2. You will then be asked to select source and destination disk (with equal or larger capacity). Select them and click Next after each selection.
Warning: The existing partitions on the target disk will be overwritten or deleted. Please backup files to external hard drive first (if there are) to be sure your data is safe. If not, click OK to continue.
3. Be sure to check the SSD Alignment feature to improve SSD disk performance (if it is). Also, click the Edit Partitions feature in the following two situations.
- The target drive is larger. Select “Add unused space to all partitions”or “Manually adjust partition size”to avoid unallocated space left after cloning.
- Both drives have different partition styles (one MBR, one GPT). Check the option “Convert the destination disk from MBR to GPT”or vice versa to make them identical.
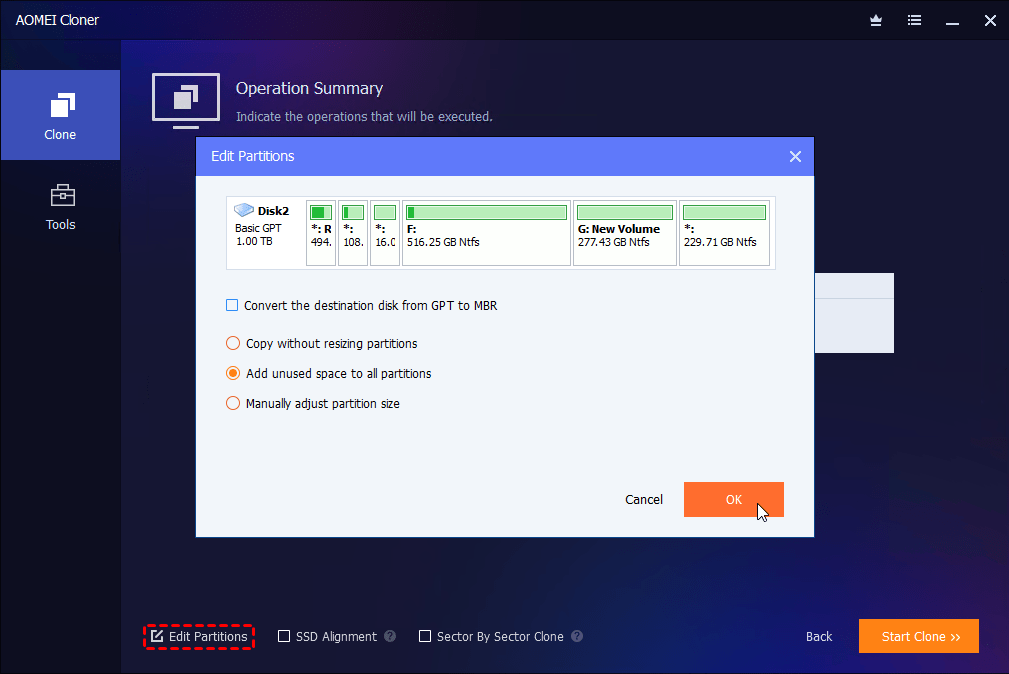
At last, click Start Clone to clone hard drive to another one. By default, this software will enable the intelligent clone feature to clone only used sectors of a drive, which helps to minimize the cloned SSD won’t boot issue (if it’s smaller).
Conclusion
What’s the difference between disk imaging and disk cloning? When to image a drive and when to clone it? It’s suggested to image your drive regularly for ongoing backups and clone it occasionally to prepare for sudden hardware failures or migrations. In this way, your data is protected on all fronts.
If you want to go with one or the other, here are some suggestions as well:
- Disk cloning is best for upgrading or replacing a hard drive, making your system up and running fast with no setup.
- Disk imaging is more suitable for long-term, space-efficient backupsjust in case.

