[3 Ways] How to Resize Partition without Losing Data
Learn how to resize partition without losing data in Windows 11/10/8/7, including extend and shrink partition size with Windows built-in tools as well as a powerful disk manager.
By Hedy Updated on May 29, 2026
Imagine this: You’ve just installed a bunch of games on your PC, and suddenly your C drive is running out of space. You look over at your D drive — which has tons of free room — and wonder if you could just borrow some of that space. That’s exactly what resizing a partition lets you do. In basic terms, partitions are like dividing your hard drive into separate rooms. If one room is too small and another has plenty of space, resizing lets you take a bit from one and give it to the other — like knocking down a wall between two rooms to make one bigger and one smaller.
But unlike knocking down physical walls, partition resize interacts directly with how the computer organizes and stores your files. That’s why it’s both powerful and potentially risky. When done properly, it can refresh a cluttered hard disk and improve efficiency. When done carelessly? You could lose data or corrupt your system. So let’s get it right.
Why is it necessary to resize partition?
Resizing partitions in Windows is not just a technical option—it’s often a necessary step to keep your system running efficiently, safely, and flexibly. As storage demands change over time, your original disk layout may no longer meet your needs. Here’s why resizing partitions becomes essential:
1. Optimize disk space usage: Over time, some partitions may run out of space (like the C drive full), while others remain underused. Resizing allows you to reallocate unused space from one partition to another, ensuring balanced and efficient disk utilization without wasting storage.
2. Prevent system performance issues: When the system partition runs low on space, Windows may slow down, fail to install updates, or even crash. Expanding the system partition ensures there is enough room for temporary files, updates, and system operations, maintaining smooth performance.
3. Support system updates and upgrades: Major Windows updates require sufficient free space, especially in critical partitions like the System Reserved Partition. If space is insufficient, you may encounter errors (e.g., update failures). Resizing partitions helps avoid these interruptions.
4. Enable better data organization: Users often need separate partitions for system files, personal data, and applications. Resizing allows you to reorganize your disk structure, making it easier to manage files, improve data security, and simplify backups.
5. Adapt to changing storage needs: Your storage needs may evolve—installing large software, games, or handling more data. Resizing partitions gives you the flexibility to adjust your disk layout without reinstalling Windows or losing data.
How to resize partition in Windows 11/10/8/7
It is better to resize partition Windows 11to manage disk space, improve system performance, and allocate storage efficiently. Whether your system drive is running out of space or you want to reorganize disk layout, Windows provides multiple ways to resize partitions safely.
Part 1. How to resize Windows partition via partition resizer
AOMEI Partition Software is a professional disk partition management tool designed for Windows users. It supports Windows 11, 10, 8, 7, and even older systems, offering advanced features that go far beyond what native utilities can provide.
Whether you’re a beginner or an IT professional, this partition resizer simplifies complex partition operations into a few clicks.
Resizing partitions can be risky if not done properly. AOMEI Partition Software provides a safe and efficient solution with several advantages:
✔️ Resize without data loss: You can shrink or extend partitions without deleting files or reinstalling Windows. The software ensures your data remains intact throughout the process.
✔️ Flexible partition adjustment: Unlike Disk Management, which requires adjacent unallocated space, this partition extender allows you to extend partitions even when unallocated space is not next to them, merge partitions directly, and allocate free space from one partition to another.
✔️ User-friendly interface: The intuitive interface makes it easy for anyone to resize partitions with step-by-step guidance, even without technical experience.
A safe and reliable disk partition management tool that helps you migrate OS to SSD or HDD, reorganize disk space, and improve overall PC performance.
Step 1. Download and install AOMEI Partition Software, then launch it. Upon opening, a well-organized, color-coded layout displays all disks and partitions for easy navigation.
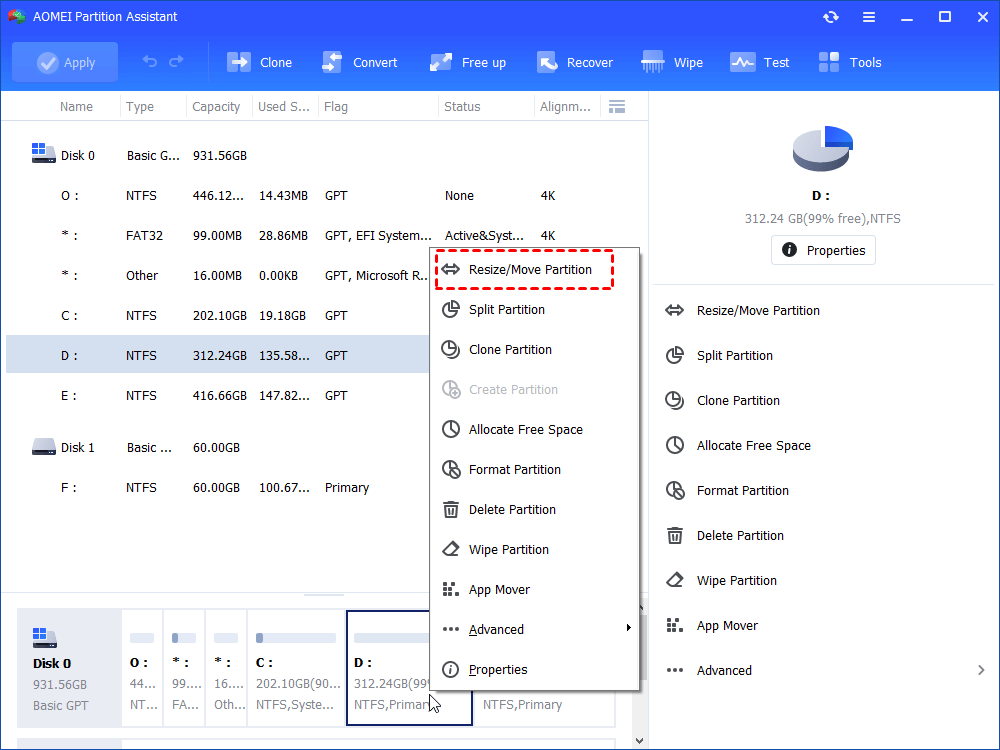
Step 2. Locate the partition you want to adjust (such as the C: drive), right-click it, and choose “Resize/Move Partition”.
Step 3. A new window appears with a visual bar representing the selected partition.
◉ To shrink the partition: Drag the edge inward to create unallocated space.
◉ To extend the partition: Drag the edge outward into any available unallocated space.
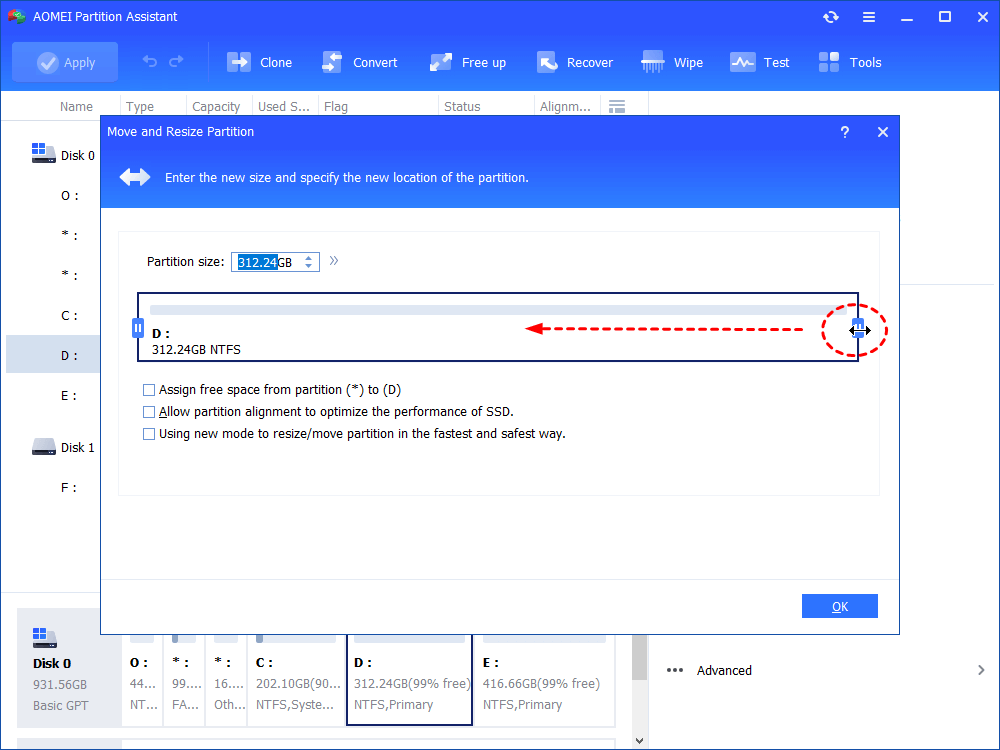
Step 4. Click “OK” to confirm the adjustment and return to the main interface.
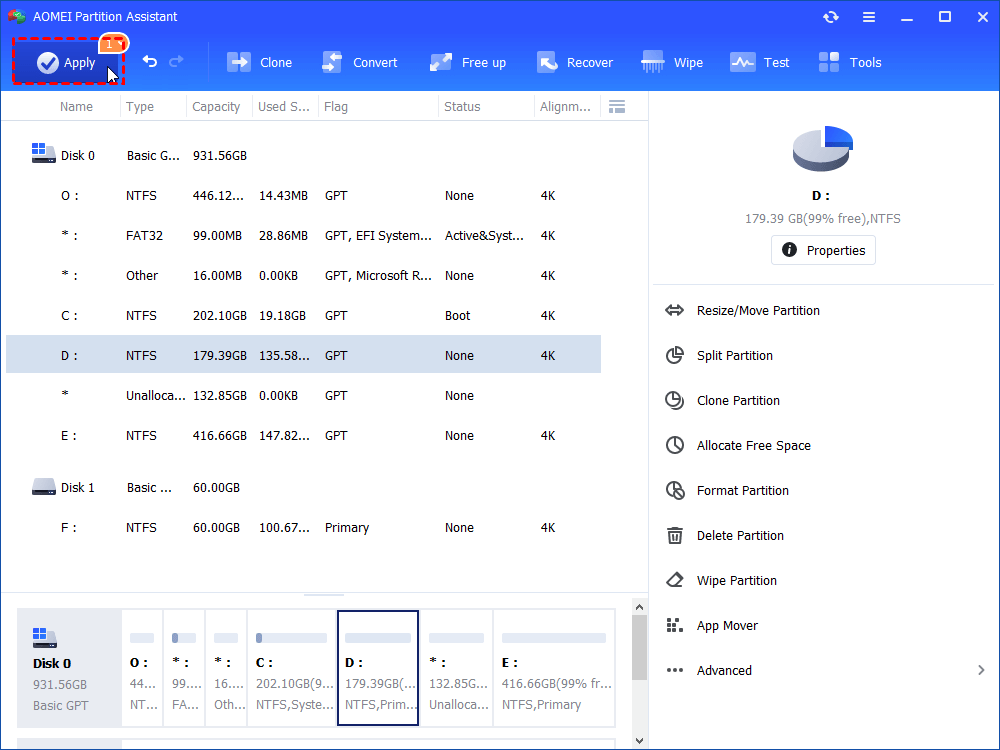
Step 5. The modification will be listed as a pending task. To finalize it, click “Apply” in the toolbar, then select “Proceed” to execute the changes.
Part 2. How to resize Windows partition in Disk Management
The Disk Management utility in Windows 11 functions almost identically to its counterpart in Windows 10 when it comes to handling partitions. Reducing a volume will generate unallocated space, whereas extending a partition typically requires removing an adjacent partition.
However, attempting to enlarge a partition by shrinking another volume often fails. This limitation exists because Windows’ built-in tools cannot reposition partitions or shift unallocated space. As a result, the newly created space may not sit next to the target drive, making it unusable for expansion.
Note: A volume can only be extended if it uses the NTFS file system and has contiguous unallocated space directly beside it—without any recovery or other partitions in between. Otherwise, third-party software is required to complete the task.
🔎 How to shrink a partition
Step 1. Press Windows + X simultaneously and select Disk Management from the menu to open the utility.
Step 2. Locate the NTFS partition you intend to reduce. Right-click on it and choose “Shrink Volume”.
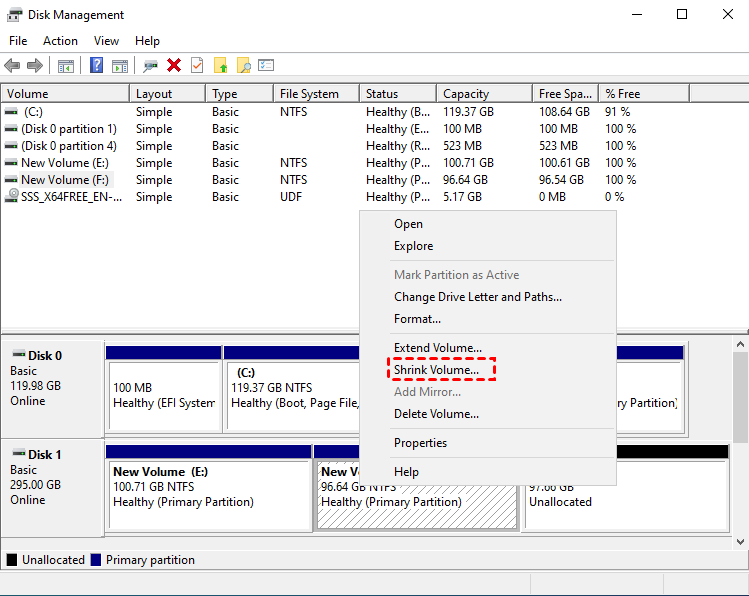
Step 3. Specify the amount of space you want to shrink, then click “Shrink” to proceed.
Note: The unallocated space generated after shrinking a partition in Disk Management is typically used to create a new volume. It cannot be directly merged into another drive unless the adjacent partition is deleted instead of shrunk, due to the limitations of the built-in tool.
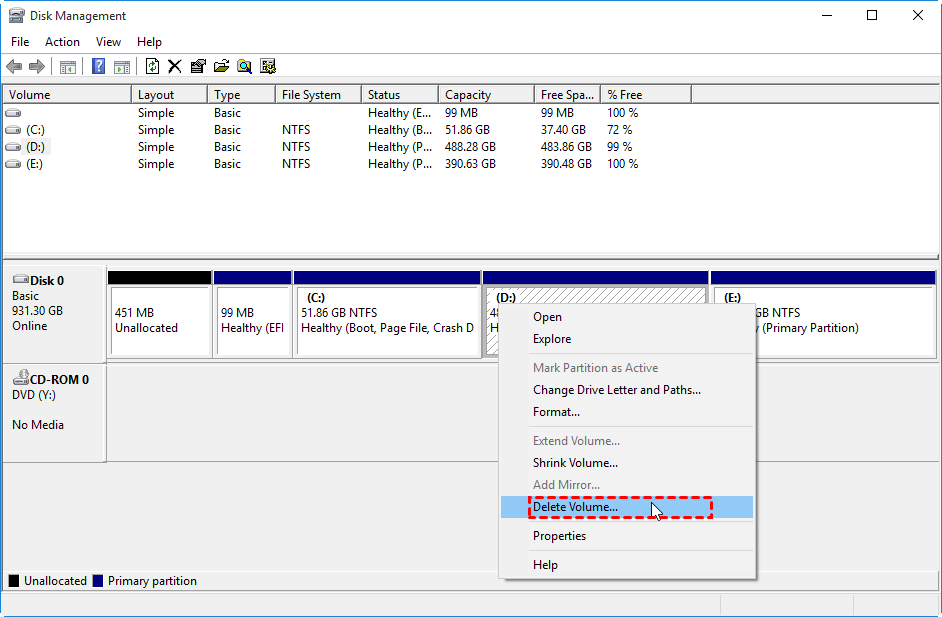
🔎 How to extend a partition
Step 1. Transfer any important data from the adjacent partition on the right to a safe location to prevent data loss.
Step 2. Right-click the partition located directly to the right of your target drive and choose “Delete Volume”.This action will turn the partition into unallocated space.
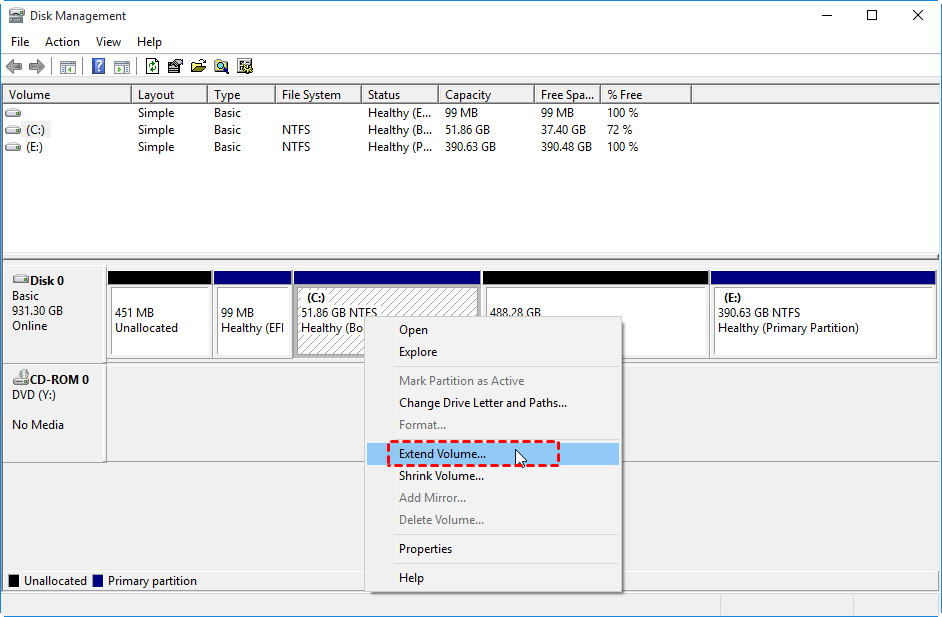
Step 3. Next, right-click the partition you want to enlarge (the one on the left) and select “Extend Volume”. Follow the prompts in the wizard to finish extending the partition.
Part 3. How to resize Windows partition using DiskPart
DiskPart is a command-line free partition resizer designed for advanced disk and partition management. It provides functionality similar to Disk Management but operates through text-based commands, which may not be ideal for less experienced users. For a simpler and more intuitive experience, Disk Management is often the preferred choice due to its graphical interface.
Note: A volume can only be extended if it is formatted with the NTFS file system and has unallocated space directly adjacent to it.
🔎 How to shrink a partition
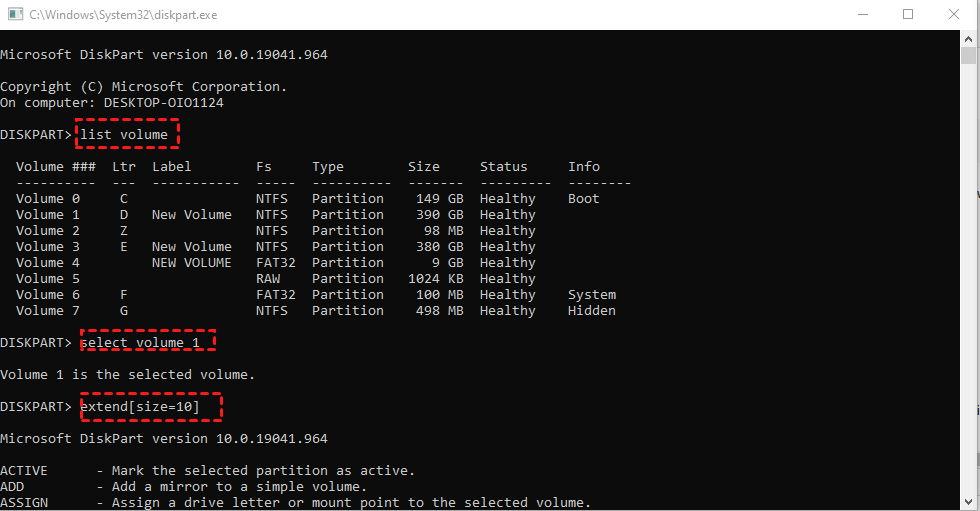
Step 1. Open the search bar, type “diskpart”, then select “Run as administrator” to launch the tool with elevated privileges.
Step 2. Enter list volume and press Enter to display all available partitions on the system.
Step 3. Identify the target partition and type select volume x (replace x with the correct volume number), then press Enter.
Step 4. Type shrink desired=xxxx (replace xxxx with the amount of space to reduce in MB), and press Enter to execute the command.
Note: DiskPart cannot relocate partitions or shift unallocated space. Therefore, shrinking a volume will not allow you to reassign that space elsewhere. To enable the “Extend Volume” option for an NTFS partition, the adjacent partition on the right must be deleted.
🔎 How to extend a partition
Step 1. Launch DiskPart with administrative privileges, following the same method outlined earlier.
Step 2. Type list volume and press Enter to view all partitions available on your system.
Step 3. Choose the target partition by entering select volume x (replace x with the corresponding volume number), then press Enter.
Step 4. Enter extend size=xxxx (replace xxxx with the amount of space to add in MB) and press Enter to expand the partition.
FAQs
Q1. What's the reason behind the dysfunction of Extend volume in C drive?
When the Extend Volume feature appears greyed out, it usually means there is no unallocated space available on the disk. Without adjacent unallocated space next to the C drive, the option cannot be used.
Q2. Can I shrink a partition without data loss?
Yes, shrinking a partition is generally safe and does not delete existing data. However, if there are unmovable files (such as page files or shadow copies), the system will only shrink the volume up to the point where those files are located.
Q3. What's the process of merging partitions in Windows 11?
The steps are as follows:
Step 1: Identify the partitions you want to combine and delete one of them.
Step 2: Right-click the target (usually system) partition and select “Extend Volume”.
Step 3: Follow the on-screen wizard and accept the default settings to complete the merge.
Q4. Why I'm unable to delete a partition?
If the delete option is unavailable in Disk Management, the partition may be protected. This often applies to Recovery Partitions or EFI System Partitions, which cannot be removed through standard methods.
Q5. Why is my C drive full?
A full C drive can result from various factors, including malware infections, hidden large files, or the buildup of temporary data, cache, and system junk. Over time, these files can occupy significant disk space without being immediately noticeable.
Conclusion
In conclusion, resizing partitions is a practical way to keep your system organized, efficient, and adaptable. Whether using built-in tools or dedicated software, the key is to manage space wisely and proceed carefully. Done right, partition resizing helps you avoid storage issues, improve performance, and maintain a smoother Windows experience without risking your valuable data.