[6 Ways] How to Transfer Photos from Old iPad to New iPad
Want to transfer pictures from one iPad to another iPad but do not know how? Read this guide to see how to transfer photos from old iPad to new iPad 2022.
By Lena / Updated on April 3, 2024
Attracted by the improvements of new iPad 10th generation or iPad M2 2022, you bought one to replace the previous iPad, right? Especially the new iPad Pro. It uses the M2 chip giving it mind-blowing performance and makes it the fastest device of its kind.

Switching iPads can be amazing but moving data from one to another is a tedious task. But in fact, as long as a reasonable method is used, transferring photos from iPad to iPad can be easily completed. Read to see how to transfer photos from one iPad to another iPad.
Method 1. The Easiest Way to Transfer Photos from iPad to iPad
The professional iOS data transfer software - FoneTool offers you 2 ways to finish the process.
Option 1. Share Multiple Images from iPad to iPad with A Cable
If you have a computer at hand, you can use FoneTool's Windows version. With its powerful feature, various files can be sent quickly.
- Highlights:
- Preview and select all or part of iPad pictures as you like to transfer.
- Fast transfer speed allows you to move 1000+ full-resolution photos within minutes.
- Various image files can be recognized including jpg, jpeg, png, bmp, gif, tif, tiff, heic, raw, etc.
- FoneTool can also help you transfer videos, music, contacts, messages, etc. from iPad to iPad/iPhone.
- Wide compatibility lets all iPad/iPhone models can be supported including the lastest ones.
Now you can download the tool on computer and follow the steps below to transfer pictures from one iPad to another.
1. Launch FoneTool > Connect the source iPad to computer.
2. Go to Phone Transfer > iPhone to PC > Click Get Started to continue.
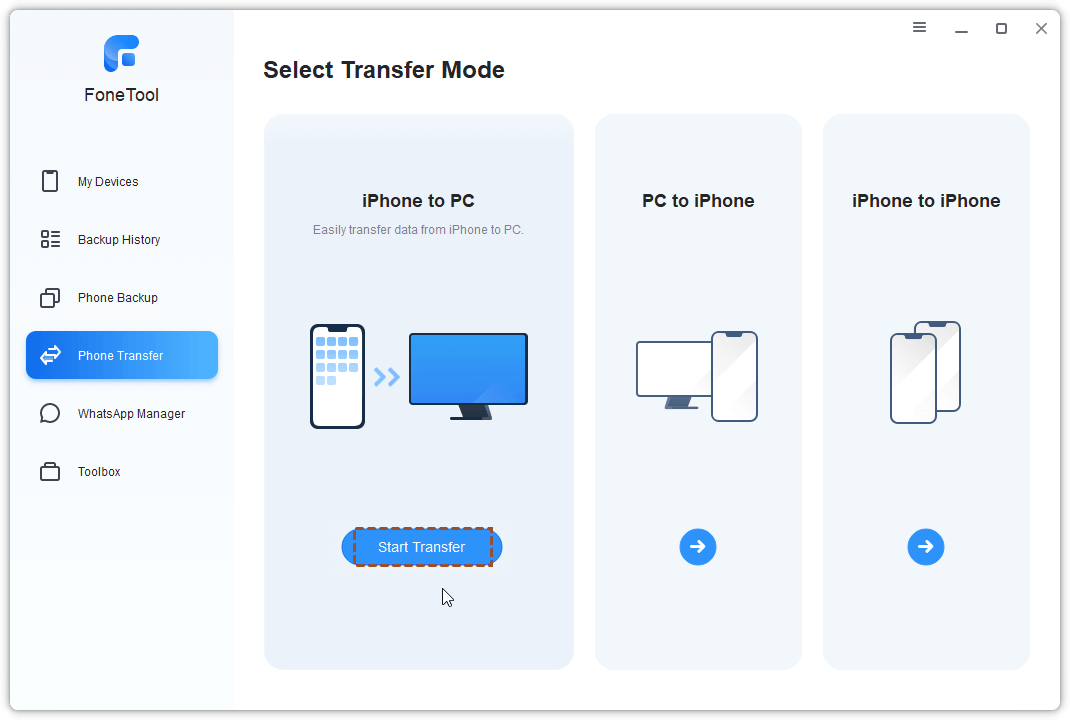
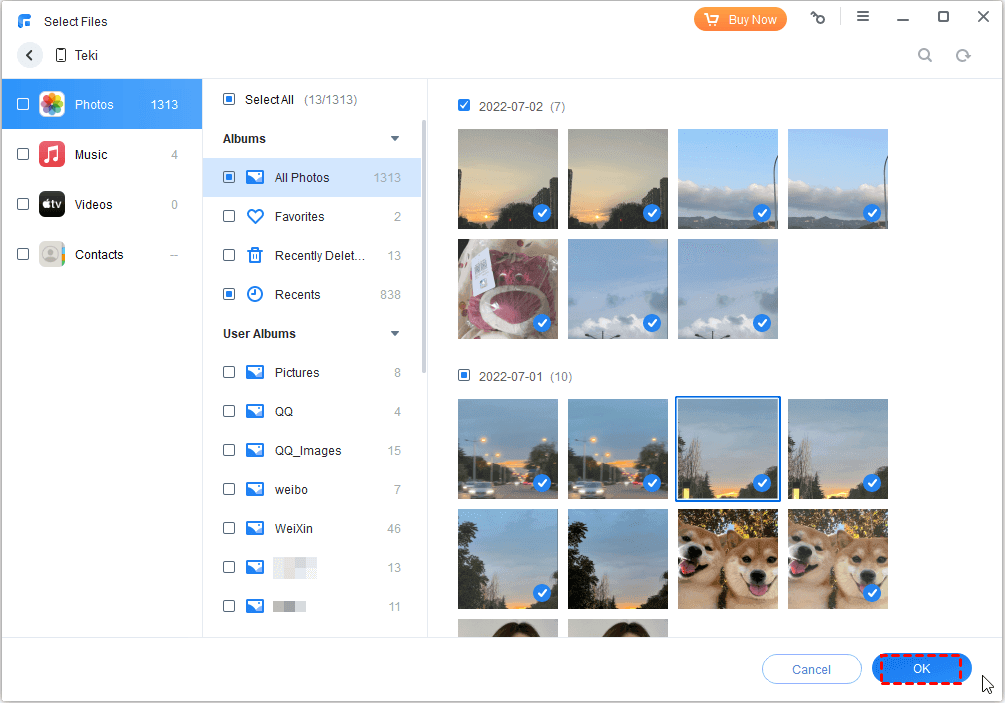
3. Click the “+” icon > Choose the pictures you want to transfer > Click OK to continue.
4. Click the Start Transfer to save pictures to the computer.
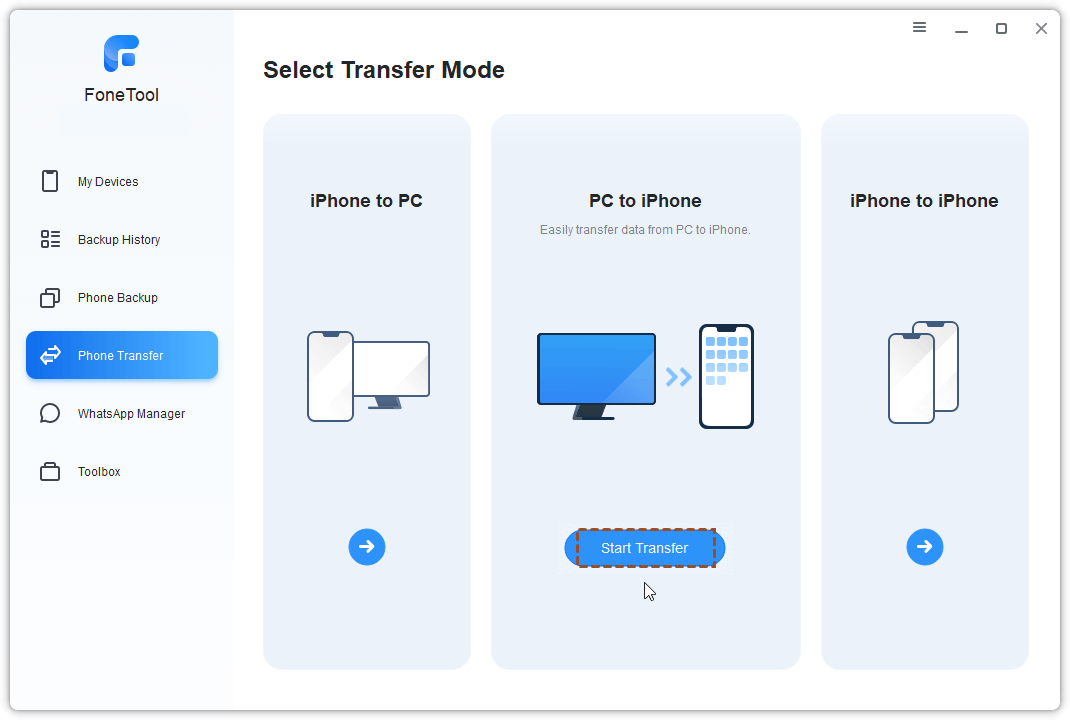
5. Unplug the source iPad and plug in the target iPad > Choose PC to iPhone and tap on Get Started.
6. Click the “+” icon > Choose the pictures you want to transfer > Click Open to continue.
7. Finally, click Start Transfer to transfer pictures from iPad to iPad.

Option 2. Transfer Photos from iPad to iPad Wirelessly
If you do not have a computer at hand, you can install FoneTool's mobile app to wirelessly transfer photos from one iPad to another.
1. Go to this page to download FoneTool on your iPads. Or you can scan the QR code to get the app.
2. When you open FoneTool the first time, you will be asked to allow FoneTool to connect to devices on your local network, access your photos, music, contacts, etc. on your device.
3. Place two devices near each other > Go to Connect Device and tap the device name on either iPhone to establish a connection. (FoneTool connects other devices through WLAN services, so please turn on the Wi-Fi option on both iPhones.)
4. Now go to File Transfer > Choose the photos you want to transfer > Tap Send.
You can go to Transfer Records to view the progress of receiving and sending. The transferred photos will be saved in Photos app.
Method 2. Share Photos with Another iPad Using AirDrop
AirDrop is a built-in file sharing tool that lets users transfer data from one Apple device to another one wirelessly via Bluetooth and Wi-Fi connection. Keep two iPads within 30 feet of each other and turn on AirDrop to transfer pictures from iPad to another one using Airdrop/Bluetooth.
1. Turn on AirDrop on both iPads: Go to Control Center > Turn on AirDrop > Choose Contacts Only or Everyone. Please make sure you have turned on Wi-Fi and Bluetooth.
2. On source iPad: Go to Photos app > Select the pictures you want to transfer > Tap the Share icon > Choose the target iPad name.
3. On target iPad: Tap Accept to receive photos. The photos will be saved in Photos app.
Method 3. Transfer Photos from Old iPad to New iPad Using iCloud
iCloud only offers 5 GB of free storage space to store iOS data. If you have enough storage plan of iCloud, you can choose to transfer photos from old iPad to new iPad using iCloud.
1. On the source iPad: Connect it to Wi-Fi network > Go to Settings > Tap your name > Tap iCloud > Choose Photos > Turn on iCloud Photo Library to upload photos.
2. On the target iPad: Make sure you have signed in with the same iCloud account > Go to Settings to turn on iCloud Photo Library. When Wi-Fi is enabled, it will try to download the photos that have been uploaded to iCloud from the source iPad.
Method 4. Transfer Photos Between iPads with Photo Stream
Photos Stream is another Apple service that sync photos among your Apple devices. When you take a photo from your iPad or iPhone, the photo will be automatically sent to your other Photo Stream devices.
But the way has two limitations:
• Only recently added photos will be shared.
• It requires a stable and strong Internet environment and may use lots of cellular data.
If you are OK with the limitations, follow the steps below to turn on the Photo Stream.
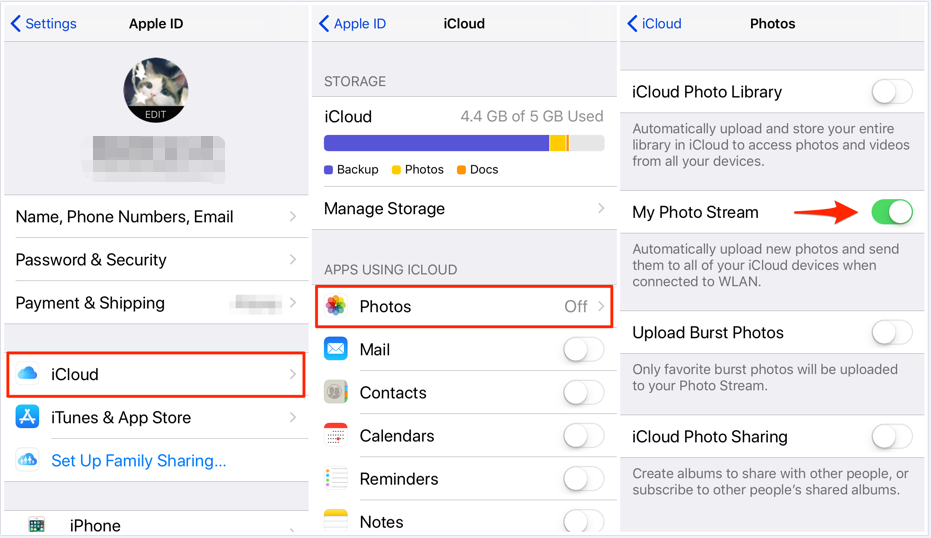
Step 1. Go to Settings app on one iPad > Tap Apple ID banner > Choose iCloud.
Step 2. Choose Photos > Toggle on the Photo Stream or My Photo Stream.
Step 3. Do the same steps on the other iPad to open Photo Stream.
Method 5. Send pictures from iPad to iPad using iTunes
iTunes is the traditional way to share iPad/iPhone files on a computer. With this tool, you can move photos between iPads on comuter. Here are the steps.
Step 1. Connect the source iPad to a Windows computer.
Step 2. Run iTunes, and click the device icon from the top of the interface.
Step 3. Choose the Photos section on the left pane. Tick the Sync Photos option. Choose folder of pictures to sync. Click Apply.
Step 4. Wait for the process to get finished. And disconnect the source iPad, and connect the target iPad. Do the same steps to sync pictures from iTunes to the target iPad.
Method 6. Copy Photos from iPad to iPad via Email
This method is recommended if you want to transfer one or two pictures. It’s a time-consuming job if you want to transfer a large number of pictures.
1. On the source iPad: Go to Photos app > Select the pictures you need > Tap Share button > Choose Mail option > Send the email to yourself.
2. On the target iPad: Go to Mail app > Check the email and save the pictures on device.
Conclusion
That’s all for how to transfer photos from iPad to iPad. You can choose one according to your need. If you have a USB cable and computer, FoneTool is the best choice to transfer pictures between iPad without any limitations. Or if you want to transfer photos without a computer, you can let iCloud sync help you or choose to AirDrop/email the pictures.
