Backup and Restore iPhone Running iOS 13 on PC/Mac
This passage tells how to create iOS 13 backup. You could backup and restore iPhone running iOS 13 to computer or Mac.
By Dylan / Updated on June 1, 2023
How to backup iPhone running iOS 13
----I have upgraded iPhone to iOS 13, but I'm not so familiar with the new iOS. Anyone could give me some advice?
- Question from Apple User
According to Apple, if you use has iPhone 6s or another iPhone later than it, you could upgrade iPhone to iOS 13. The latest iPhone SE 2020 is also released and it would be preinstalled with iOS 13. Let's have a look at the huge change to your iPhone.
●Dark Mode: New dark color scheme has been added to iOS 13.
●Camera & Photos: The new Photos app has been optimized to let you easily manage and edit pictures in iOS 13.
●Maps: The new Maps app would give you more understandable and precise navigation in iOS 13.
●Siri: You would have a more intelligent assistant with a more natural voice in iOS 13.
●Memoji and Messages: In iOS 13, you could create a customized avatar of yourself to show in messages.
●Augmented Reality: In iOS 13, you could have a better experience when interacting with virtual objects.
●Other Improvement: Apple has improved some features in iOS 13 including Battery life, Reminders, Mail, Notes, Safari, Fronts, Files, Screen Time, System Experience, etc.
Every time you upgrade iOS, you should backup your iPhone before act it. With huge change happening to your system, some files could be incompatible with iOS 13. Some users lost photos after upgrading to iOS 13. Saving your iPhone is always wise. Let’s get to know how to backup iOS 13 files to computer/Mac/iCloud.
Method 1. The easiest way to backup and restore iPhone on iOS 13
Backing up iPhone should be necessary for you now after you upgrade to iOS 13. You need to professional tool to manage iPhone data so FoneTool should be recommended to you. It’s totally free and without any ads or plug-ins.
-
Safely and quickly backup photos, videos, music files, messages, and contacts from iPhone to computer.
-
Preview every item on iPhone and select the needed ones to save.
-
View and manage your backup copy on iPhone by one click.
-
Incremental backup to help you create different versions of backup copies.
-
Support iPhone 4s/5/5s/6/6s/6 plus/6s plus/SE/7/7 plus/8/8 plus/X/XS/XS Max/XR/11/ 11 Pro /11 Pro Max
-
Perfectly support iOS 13/14/15/16 and iPad OS
Step 1. Connect iPhone to FoneTool
Download FoneTool for free. Connect iPhone to computer with USB cable and tap "Trust" on iPhone.
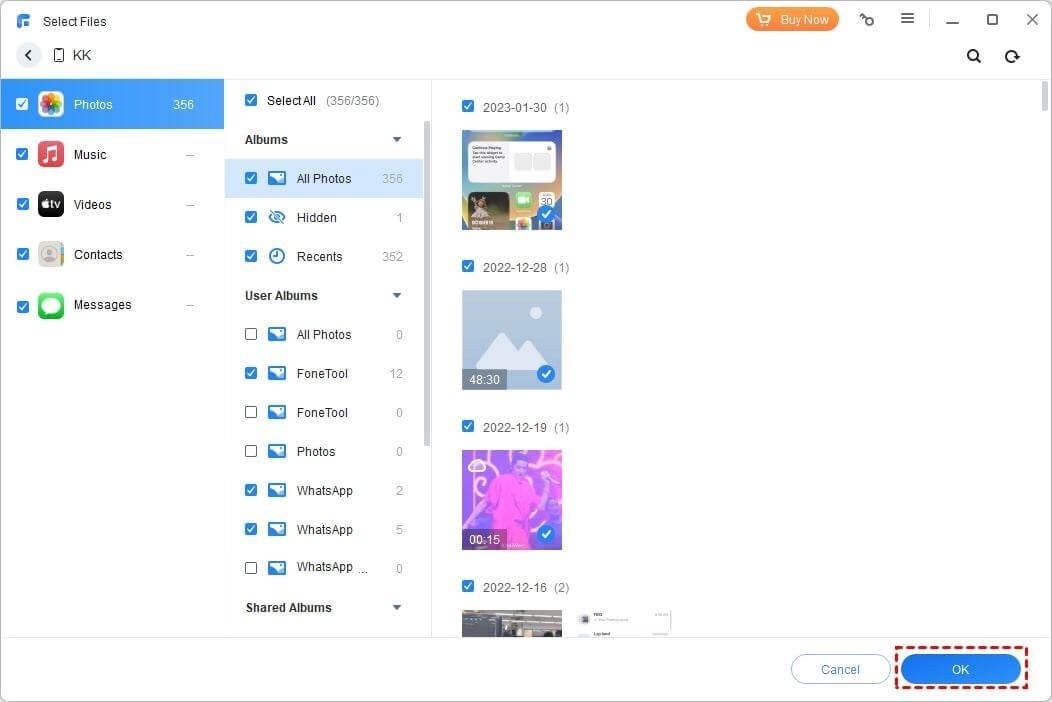
Step 2. Select files on your iOS 13 iPhone
Click Phone Backup and go to Selective Backup. Click an icon to preview and select photos, videos, songs, contacts, and messages. After selecting files, you could click OK to return.
Step 3. Backup iOS 13 iPhone
Click Start Backup to save data on iOS 13 iPhone in seconds.

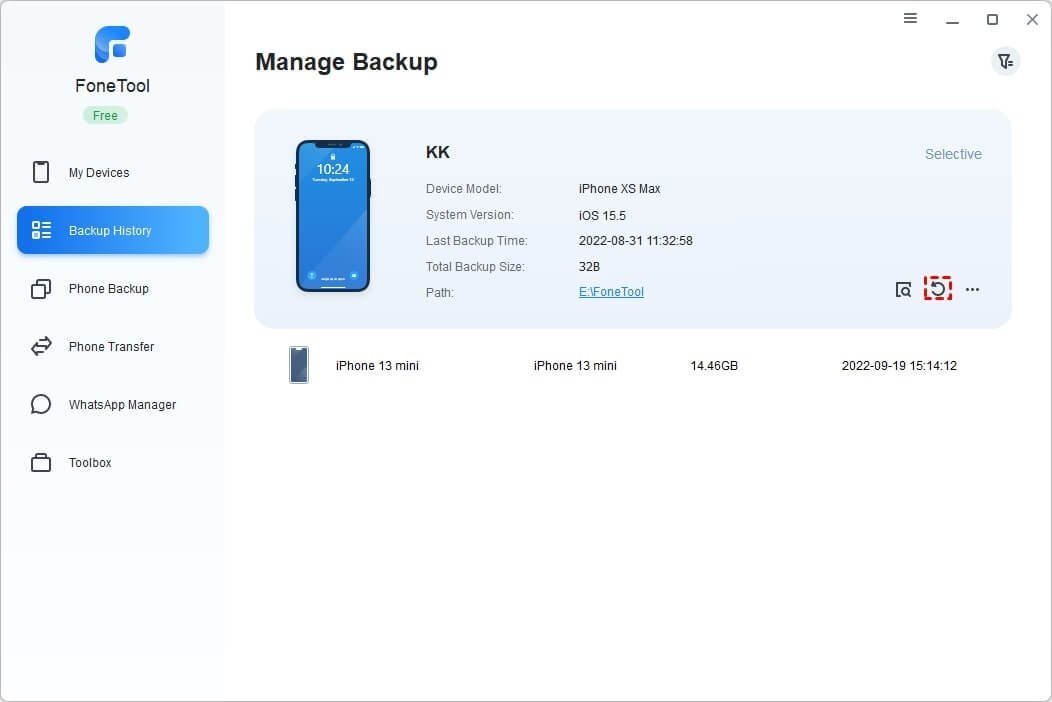
Tips: To view and manage your backup copy, you just need to select the task in Backup Management and click the eye ion or the pin icon. If you want to restore this iPhone or transfer files to another Apple device, you could connect the target device to FoneTool and perform the following steps.
Step 4. Connect target iPhone to FoneTool
Connect the iPhone you want to restore or transfer files to. Then select the task you need in Backup History and select Restore.
Step 5. Restore iPhone from the iOS 13 backup
Preview files from your iOS 13 iPhone like you backup it. Click Start Restore to safely transfer files from iOS 13 iPhone to the target device.
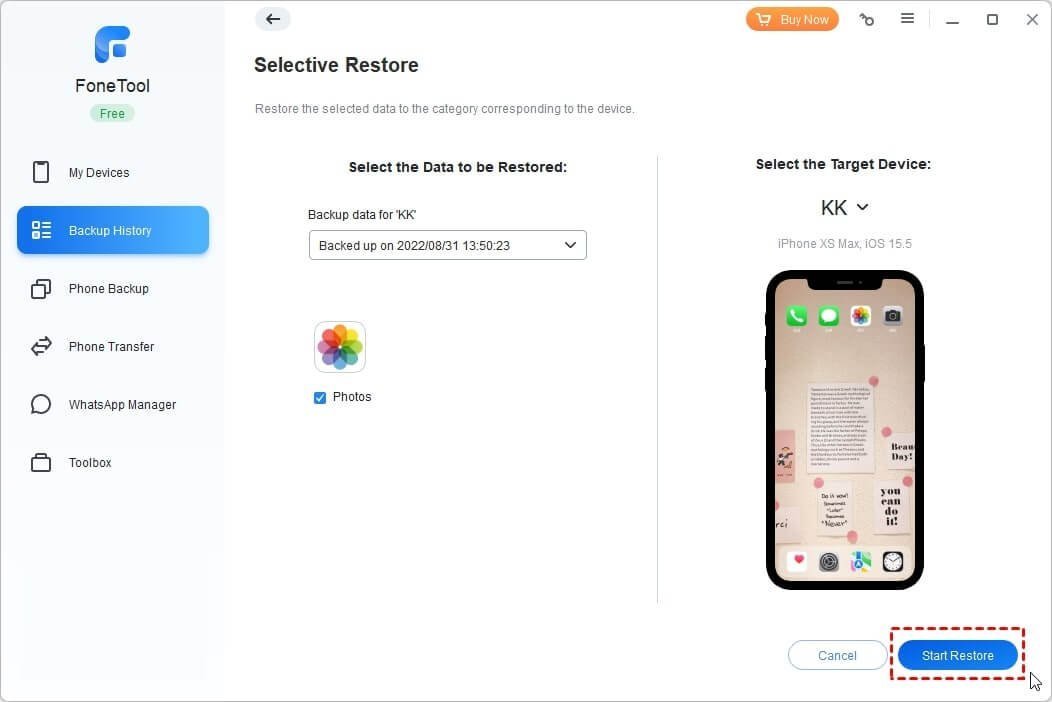
Tips: FoneTool would not modify or remove any data on your iPhone when you restore iPhone with it. Please be at ease to use it.
Method 2. Backup iPhone (iOS 13) to Mac with iTunes/Finder
If you have to save what you want from iOS 13 iPhone to a Mac. You could use iTunes or Finder to create an iOS 13 backup. You could just use Finder on Mac OS Catalina to save iOS backup, because Apple has removed iTunes and add the feature of backup to Finder.
Step 1. Open iTunes/Finder on Mac. Connect iPhone to Mac with USB cable.
Step 2. Select your iPhone in the sidebar in Finder.
Or click the device icon in the upper-left corner if you use iTunes.
![]()
Step 3. Click Back Up Now to save iPhone to computer.
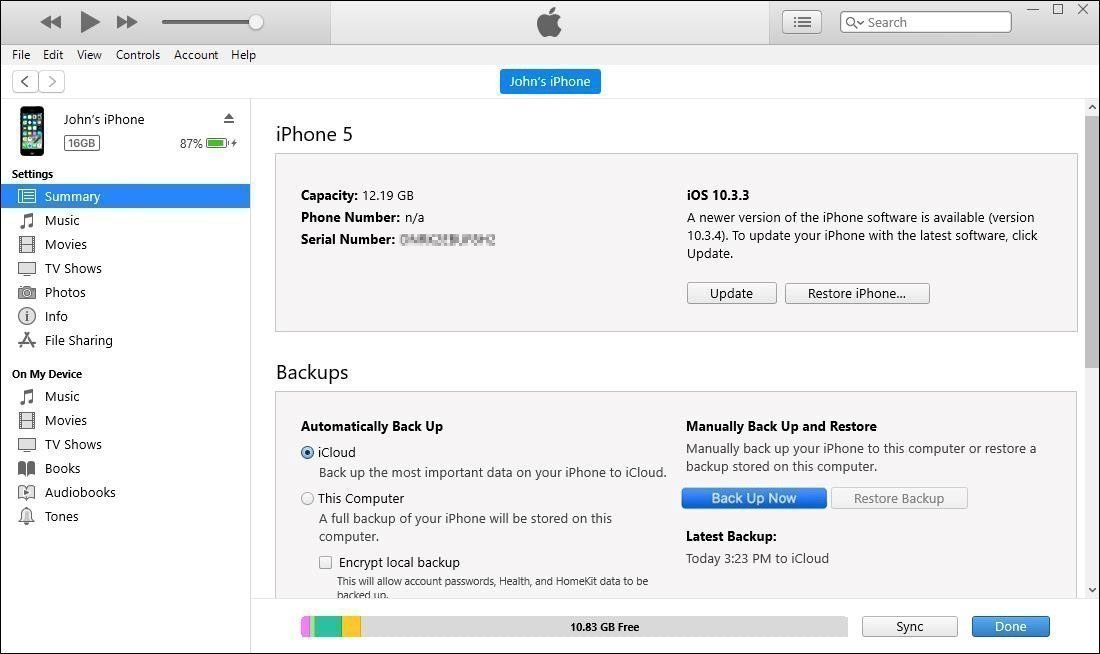
Note: You might be confused about what iTunes backup includes. Indeed, it save most necessary iPhone data and you could get nearly the same iPhone if you restore iPhone from that backup, but it also means what’s on iPhone now would be erased. You should consider whether you want to fully restore iPhone with iTunes or need iPhone backup browser.
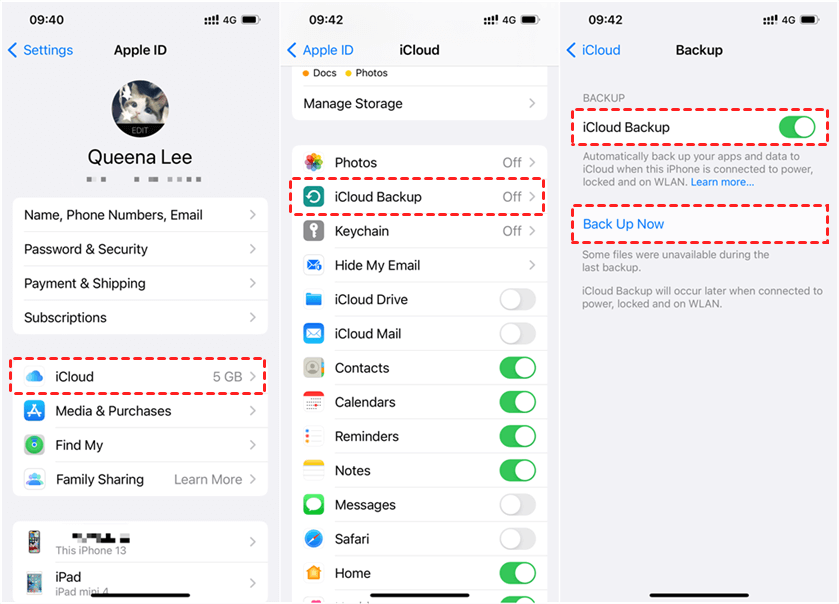
Method 3. Backup iOS 13 on iPhone with iCloud
You could directly save iOS 13 iPhone in Settings. Find iCloud on iPhone and then it would save iPhone to the cloud. You could restore that backup to another Apple device with Wi-Fi connected, but you need to erase iPhone content and then you could use that backup.
Go to iPhone Settings > [your name] > iCloud > Backup to Enable iCloud Backup and iPhone would backup the iOS 13 iPhone to iCloud at night. If you want the task start immediately, tap Back Up Now.
Conclusion
iOS 13 would bring you a brand-new experience on iPhone, but you should also know the importance of data backup. Create an iOS 13 backup with the 3 methods in this passage so that you would never be disappointed about losing photos or contacts.
FoneTool would give you the best experience. It is the best iPhone to PC transfer software and let you protect you iPhone in the easiest and safest way. If you like this passage, you could share it to help more people.
