[Fixed] Photos Didn’t Transfer to New iPhone 15/14
Why didn’t my photos transfer to my new iPhone? This guide will tell you the reason and 6 solutions to fix this photos didn’t transfer to new iPhone issue.
By Lena / Updated on March 29, 2024
Problem: Photos Didn't Transfer to New iPhone
Not All Photos Transferred to New iPhone 15.
Not all my photos transferred to my new iPhone but everything else did. How do I retrieve those photos?
- Question from Apple Community
After getting the new iPhone, the first thing is to transfer data from old iPhone to it. However, it seems that things do not work smoothly as you expected: you find your photos didn’t transfer to new iPhone or not all photos transferred to new iPhone. Actually, it’s a quite common problem that many users have reported. Don’t be too worried, there are some solutions you can try to fix this annoying problem.
![]()
Why Didn’t My Photos Transfer to My New iPhone?
Before we start to see the solution of "all my photos didn't transfer to new iPhone", let’s learn some main reasons that can lead to the photos didn’t transfer to new iPhone problem.
- ✎...
- 1. You've logged in with an incorrect account. The iCloud accounts on two devices should be the same. Otherwise, the photos will not be transferred to another one.
- 2. The iCloud backup does not contain your photos. If you have turned on the “iCloud Photo Library” option, then your iCloud backup will not contain your photos.
- 3. Poor Network Connection. The data syncing requires a stable network connection and the transfer may be interrupted because of the disconnection.
How to Fix Photos Didn’t Transfer to New iPhone - 6 Solutions
From the above, you know “why didn’t my photos transfer to my new iPhone”, and here in this part, I’ll list all the potential solutions that can help you troubleshoot the problem. These methods apply to all iPhone models, including 15/14/13/12/11/XR/XS/X/8.
Solution 1. Check the iCloud Account
First make sure that you have logged in with the same iCloud account that you used on your new iPhone. Go to have a check: Open Settings app > Tap your name >Then you will see your Apple ID, make sure the account is correct. If not, just log out and sign in with the account that you have linked to your old iPhone.
Solution 2. Turn on iCloud Photos
The iCloud Phots feature helps you automatically upload photos to iCloud. If you have turned it on your old iPhone, then your photos have been already uploaded in iCloud and they will not be included in the iCloud backup.
You may not have turned it on on your new device, so you meet the photos didn’t transfer to new iPhone issue. In this case, just go to Settings > tap [your name] > tap iCloud > tap Photos > turn on iCloud Photos option to let it download your photos from iCloud to your device.

Solution 3. Check Internet Connection
The photos didn’t transfer to new iPhone problem will occur due to the network connection error. Please make sure your iPhone is connected to a stable Wi-Fi network.
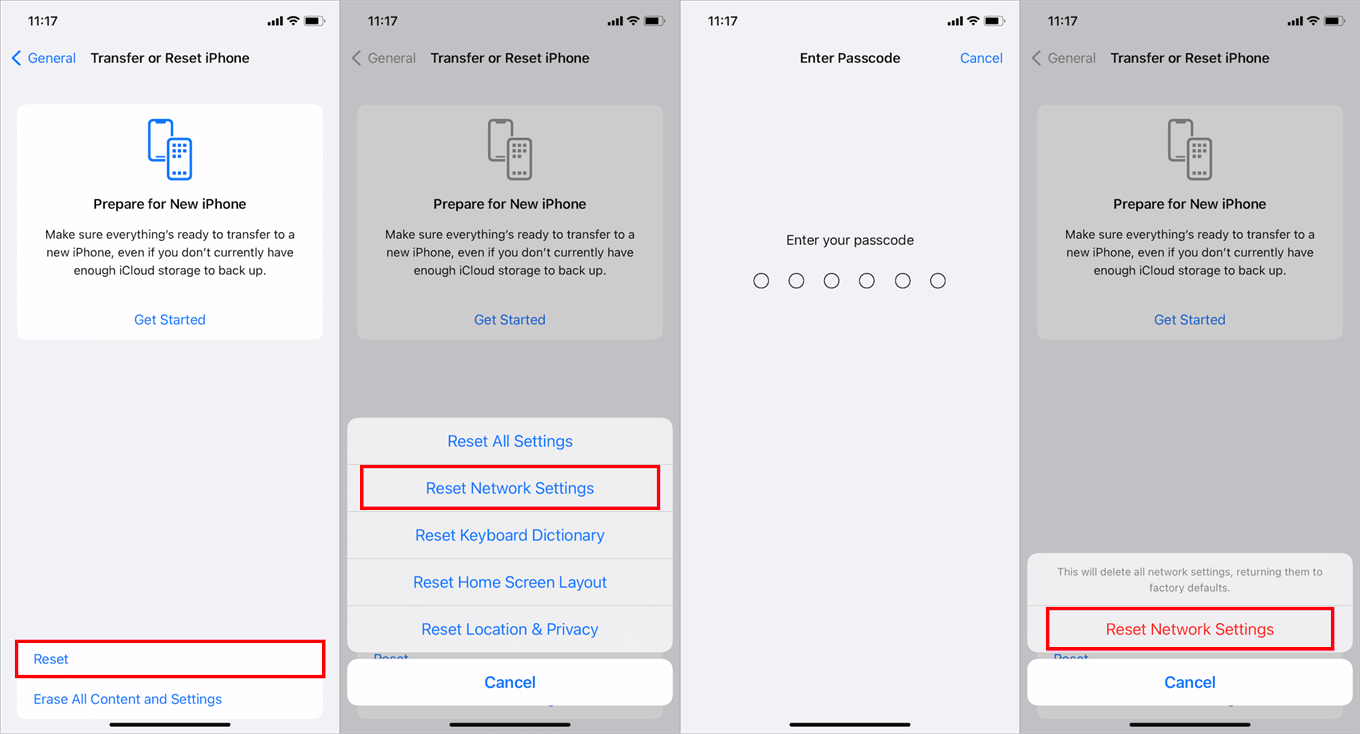
You can try to reset network connection to make it: go to Settings > General > Transfer or Reset iPhone > Reset > Reset Network Settings. You need to re-connect Wi-Fi but it will not affect your data security.
Solution 4. Just Wait
Sometimes the restore seems to look complete but it is still downloading information in the background. The time it takes to finish the transfer depends on the size of your data and the speed of your Wi-Fi. It may take many hours to download all the data. Just leave your new iPhone plugged into power and connected to Wi-Fi and wait for it to finish downloading.
Solution 5. Transfer Photos to New iPhone via iTunes
You may also choose to transfer photos to new iPhone by restoring from an iTunes backup. Just like restoring from iCloud backup, the existing data on your new iPhone will be erased and replaced by the iTunes backup content.
1. Download and install the latest version of iTunes on your computer.
2. Connect your old iPhone to computer and run iTunes.
3. Click the Device tab > Select This Computer > Click Back Up Now. Wait for the backup to be finished.

4. Disconnect the old iPhone and plug in your new iPhone.
5. Click Restore Backup… at the Summary page on iTunes >Then choose the backup that contains the photos you want to transfer > Click Restore to make it.
Solution 6. Easily Import Photos to New iPhone with FoneTool
Besides iCloud and iTunes way, there’s another way that can help you transfer photos to new iPhone without effort. That’s FoneTool. It’s a professional iPhone transfer tool that offers a safe way to help you transfer data between two iDevices.
Two steps to complete the transfer:
① Export photos from old iPhone to computer
② Transfer photos from computer to new iPhone
You can preview and select the photos you want to transfer. Most of all, there is no need to reset your new iPhone and it will not erase any existing data.
FoneTool supports all models of iPhone including the latest iPhone 15 and would be perfectly compatible with the latest iOS 17. Download the tool on your PC and follow the steps below to transfer photos from iPhone to new iPhone.
Export Photos on Old iPhone
1. Launch FoneTool > Connect your old iPhone to computer > Enter the passcode on iPhone to give the computer access to your device.
2. Click Phone Transfer > Go iPhone to PC and click Get Started.

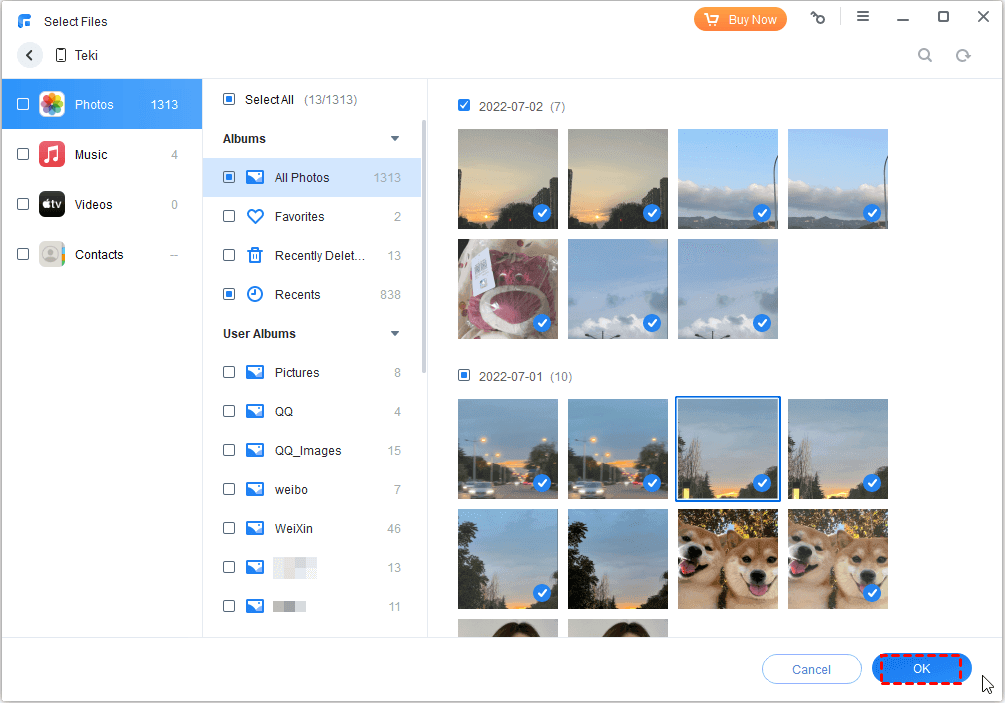
3. Click the “+” icon > Choose the pictures you want to transfer > Click OK to continue.
4. Click the Start Transfer to save pictures to the computer > Select a path to save the pictures and click Transfer.
Transfer Photos to New iPhone
5. Unplug the old iPhone and plug in your new iPhone > Go to Phone Transfer > PC to iPhone.
6. Choose Photos icon > Click the “arrow” icon > Choose the pictures you want to transfer > Click Open to continue.

7. Finally, click Start Transfer to transfer photos to your new iPhone.

- ★Tips:
- iPhone photos are stored in HEIC format by default. However, Windows system and many apps do not support this format. If you want to view your photos on computer, you can let HEIC Converter help you convert HEIC to JPG/JPEG/PNG.
- If your iPhone is filled with duplicate photos, you can let the Photo Deduplication Tool help you find duplicate photos on iPhone.
Transfer Photos from Old iPhone to New iPhone Wirelessly
The mobile app of FoneTool can help you transfer photos between two iPhones without connecting to WiFi and consuming data.
1. Go to App Store to download and install FoneTool on both iPhones. Or you can scan the QR code to get the tool.
2. Turn on FoneTool and make sure Wi-Fi is enabled. (It only needs to use WLAN related services to connect two iPhones.)
![]() Note:
Note:
When you first open FoneTool, you will be asked to allow FoneTool to connect to devices on your local network.
For iOS versions below 14, go to Settings > FoneTool > Wireless Data and tick WLAN or WLAN & Cellular Data.
3. Place two iPhones near each other and go to Connect Device > Tap the device name on either iPhone to establish a connection.
4. Go to File Transfer > Choose the photos you want to transfer > Tap Send button and that's it.

The transferred photos will be saved to Photos app on the target iPhone.
Conclusion
That’s all about how to fix photos didn’t transfer to new iPhone 15/14 problem. Does any of the methods have solved your problem? If so, you could share it to help more people. We strongly recommend you pick FoneTool and have a try! It is easy and fast. If you have any other ideas, just shart them with us in the comment section.
