


vSphere Session Timeout | How to Edit Timeout Settings
Have you encountered the situation that vSphere session timeouts automatically, asking you to login again and again? Where to edit the timeout value and avoid the hassle?
By Delia / Updated on February 23, 2023
Overview for vSphere Session Timeout Issue
You may run into different situations where vSphere/vCenter session timeouts. One of the most common scenarios is vSphere Client UI session timeout – by default, the vSphere Client session automatically ends after 120 minutes, requiring user to log in again to resume using it.
Connection Timeout
❗Your vSphere Client session is no longer authenticated. Please login again.

This kind of inactivity timeouts may be necessary in production environments to avoid others accessing vSphere environment. Stopping idle sessions also helps to reduce the resources consumed. However, if you are in a more secure environment (such as a lab environment), you may want to increase the vSphere session timeout value to avoid frequent re-logins. Here I will show you how.
How to Edit vSphere Session Timeout Value (3 Cases)
Whether it’s vSphere Client session timeout or VMware ESXi Host Client session timeout, the principle is all the same, and you just need to know where to modify the corresponding timeout settings. Let’s continue to find out.
#1. Change vSphere Client UI Timeout Value
To fix vSphere HTML5 and vCenter session timeout, you can change vSphere Client timeout settings.
Pleasingly, from vSphere 7.0, the session timeout value can be configured directly within the vSphere H5 Client. Or you can configure the vSphere session timeout by changing the value of the session.timeout property in the webclient.properties file.
🔹How to edit vSphere Client timeout settings:
vSphere Client UI now enables you to edit the session timeout value directly. Here are the steps.
1. Log into vCenter using vSphere H5 Client.

2. Navigate to Administration -> Deployment -> Client Configuration.

3. You will find client session timeout settings here, and the default value is 120 minutes. Click Edit button on the top-right corner and enter the value you prefer. Then click Save to confirm the settings.

🔹How to modify vSphere Client session timeout in properties file:
You can also configure the vSphere Client timeout by changing the value of session.timeout property in the webclient.properties file. Especially when you want to edit vSphere 6.7 Web Client session timeout or even older versions, this may be the only way to do it.
The location of file depends on the OS where the vSphere Web Client is installed.
|
Operating System |
File path |
|
Windows 2008 |
C:\ProgramData\VMware\vCenterServer\cfg\vsphere-client |
|
vCenter Server Appliance |
/etc/vmware/vsphere-client/ |
Simply edit the file to include the session.timeout = value line (fill in the timeout value you want in minutes). Enter 0 if you want to disable the session timeout function.
Then restart the vSphere Web Client service - VMware vSphere Web Client service for Windows operating systems or vSphere-client service for vCenter Server Appliance (VCSA).
✍Note: In vSphere 7, the HTML5 Client has replaced the Web Client, and the Windows-based vCenter has been deprecated. The location of the properties file now becomes: /etc/vmware/vsphere-ui/webclient.properties
I will give an example based on vCenter 7.
🔹How to configure the session timeout when logging into VCSA 7:
1. Open a console window to the vCenter appliance or use the Shell prompt to SSH to vCenter. type Shell at the prompt, as this will take you to the BASH shell on the appliance.
2. Use this command to view webclient.properties and check the session.timeout value:
✍Tips: It’s suggested to copy the webclient.properties file first in case you want to roll back.

3. Find session.timeout = 120 (default value), and edit the file with this command:
4. Navigate to session.timeout line and press i to enter insert mode. Change the value as you need in minutes. For example, if you want to change the value to 3 hours, then use:
*Use 0 if you want to disable the vSphere session timeout (set the client to never timeout).
5. Press Esc to exit editing, then use “:wq” command to save the changes and quit VI.
Log off the current session and login again to the vSphere Client. Then navigate to Administration -> Deployment -> Client Configuration, you will find the session timeout value has been modified successfully.
#2. Configure vCenter Server Connection Timeout Settings
You can also edit the session timeout value of vCenter Server to configure the intervals for vCenter Server operations. These intervals specify the amount of time after which the vSphere Client times out. Here take vCenter 7 as an example.
🔹How to change vCenter 7 session timeout settings:
1. Launch the vSphere Client, navigate to the vCenter Server instance.
2. Select Configure -> General (under Settings).

3. Click Edit on the top-right corner and switch to Timeout settings. Then you can edit the following:
- Normal: The default value is 30. Type the timeout interval in seconds for normal operations.
- Long: The default value is 120. Type the timeout interval in minutes for long operations.
*The value should be a number between 5 and 2147483647.

4. Click Save, and restart the vCenter Server system for the changes to take effect.
#3. Edit VMware ESXi Host Client UI Session Timeout
In VMware ESXi Host Client, the UI session automatically times out every 15 minutes (900 seconds) by default, which is quite annoying sometimes. You can increase the default inactivity timeout by changing an advanced configuration parameter.
🔹How to change ESXi host client session timeout value:
1. Log into the ESXi Host Client, click Manage in the inventory and click Advanced Settings.
2. Scroll down to find UserVars.HostClientSessionTimeout (you can also search it in the text box). Right-click it and select Edit option.

3. In the pop-up dialog box, enter the new timeout setting in seconds.
✍Note that a value of zero (0) disables the timeout.

4. Click Save to confirm the settings.
There’s an even easier way to do it:
Click on the username on the top-right corner of the client, click Settings -> Application timeout and choose from:
15 minutes/30 minutes/1 hour/2 hours/Off

To disable the inactivity timeout, simply select Off.
Bonus Tips: Protect vSphere VMs Managed by ESXi or vCenter
With the prevalence of virtualization, the protection of virtual environments has become a major issue – vSphere session timeouts are also a means of guarding against unwanted persons accessing our virtual environment.
Another thing to consider is the security of the virtual machines in vSphere that carry the most important data. As we know, there are some protection features, such as VMware snapshot, export & import, etc., but there’s no real backup option. For independent and long-term VM backup, you still need to use a dedicated VM backup solution.
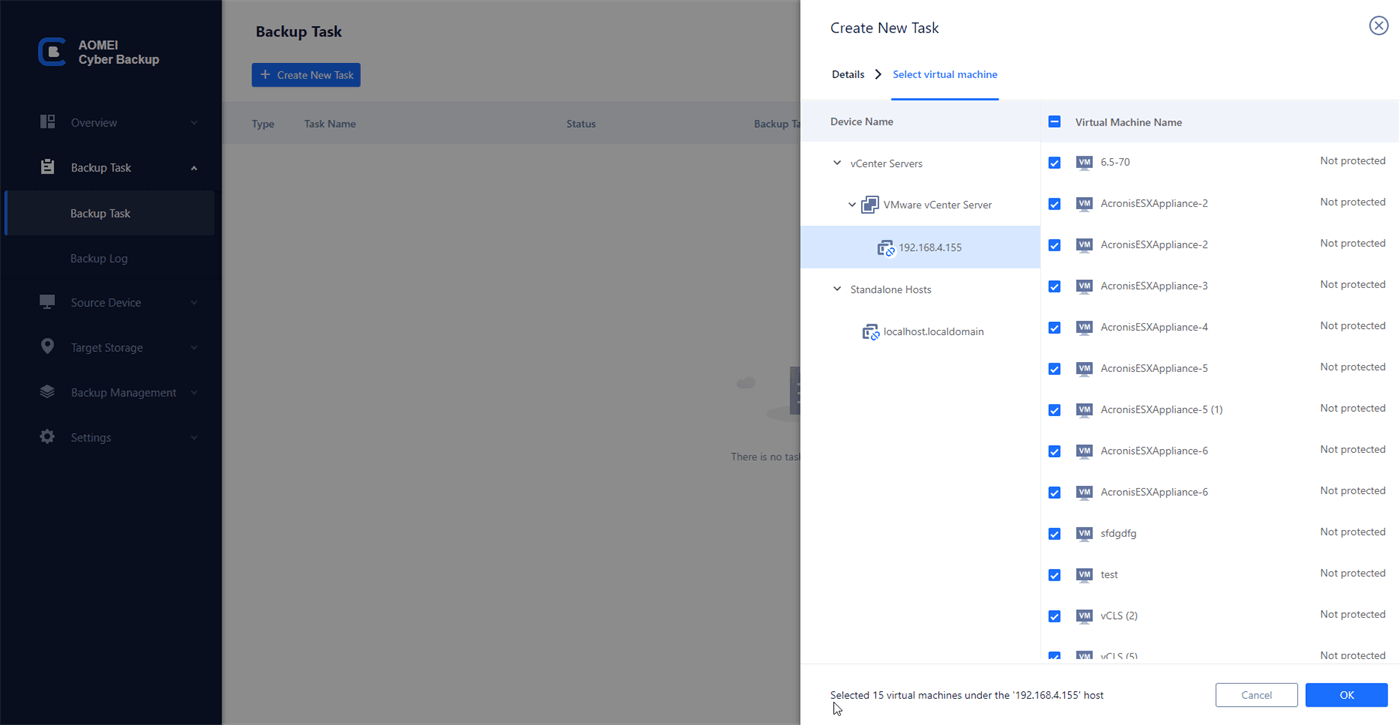
AOMEI Cyber Backup is an efficient VMware backup software designed to backup virtual machines securely and restore them from any point you need.
With it, you can add VMs managed by vCenter Servers or standalone ESXi hosts (including free ESXi) to a central web console easily. Even novices can configure ESXi or vCenter backups with several clicks. Here are some more benefits:
Backup VMs at once: Create a task of multiple VMs managed by vCenter Server or standalone ESXi host.
Hot backup: Backup VMware VMs while running. No need to suspend running operations and ongoing access.
Automation: Create backup schedule to auto protect VMs, and set retention policy to auto delete old backups.
Backup strategy: Perform full backup, or incremental/differential backup that keeps tracking changed data.
Restore to new location: Besides in-place recovery, you can restore a VM to new location in the same or another datastore/host/vCenter.
Email notification: Send email notification when the task is completed or abnormal.
Click the following button to download the software.
It can be installed on Windows or Linux systems, and works with VMware ESXi 6.0 onwards (as well as Hyper-V).
Conclusion
By default, the vSphere Client sessions close automatically after 120 minutes of idle time, requiring the user to log in again. You can change the timeout value avoid the situation, but if you are in a production environment, for security reasons, it is still not recommended to completely turn off vSphere session timeout.
There are many factors that can threaten the security of virtual environment. Besides inactivity timeouts, attention should also be paid to the security of virtual machines. A reliable enterprise backup software is necessary to secure the data within the VMs.

