


How to Create Windows 10 VM in Hyper-V
If you want to enable Hyper-V feature on Windows 10 or create a virtual machine installed Windows 10, this article provides you with the efficient and fast methods, some of which only take a few seconds.
By Crystal / Updated on October 17, 2023
What is Hyper-V
Hyper-V is a Type 1 hypervisor virtualization technology provided by Microsoft, first introduced in Windows Server 2008, that is able to deploy different systems. Hyper-V consolidates virtual servers onto a single physical computer, enabling you to significantly reduce the related costs, improve hardware utilization, optimize your infrastructure, and increase server availability.
- How to enable Hyper-V in Windows 10
- How to create Windows 10 VM in Hyper-V using Hyper-V Manager
- Use Hyper-V Quick to create Windows 10 VM rapidly
Prerequisites of creating Windows 10 Hyper-V VM
Before creating a Windows 10 virtual machine in Hyper-V, you need to check your OS and hardware first, then go to enable Hyper-V.
Hyper-V is only available for Windows 8/8.1/10/11, and only for Education, Professional and Enterprise versions. Take Windows 10 as an example, where Hyper-V can be enabled normally for Windows 10 Education, Professional and Enterprise editions, but Windows 10 Home does not include Hyper-V role, so you cannot use Hyper-V to create virtual machines.
In addition, you need to check if your computer meets the hardware requirements and BIOS settings for creating a virtual machine in Hyper-V.
- 64-bit CPU with Second Level Address Translation (SLAT)
- VM monitoring mode expansion
- At least 4 GB of memory
- Hardware-assisted virtualization (Intel VT or AMD-V)
- Hardware enforced data execution protection (Intel XD-bit or AMD NX-bit)
How to enable Hyper-V in Windows 10
The following steps are based on Windows 10 Enterprise to enable the Hyper-V feature.
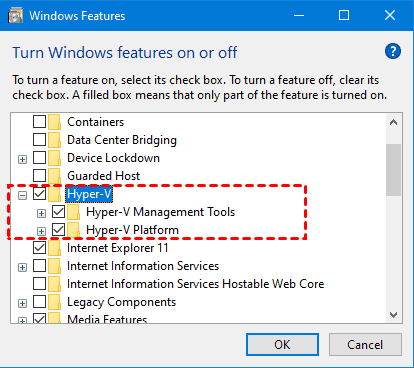
1. Use Windows+R to open the Execute window, type optionalfeatures.exe and press Enter.
2. In the Windows Feature, select Hyper-V >> OK. Restart the computer to enable Hyper-V on Windows 10.
3. In addition to Windows features, you can also install Hyper-V in Windows PowerShell (System Administrator) by typing Enable-WindowsOptionalFeature -Online -FeatureName Microsoft-Hyper-V -All and pressing Enter.
After the Hyper-V installation is complete, you need to press Y to restart your computer.

After enabling Hyper-V role, please connect Hyper-V VM to Internet correctly.
How to create Windows 10 VM in Hyper-V using Hyper-V Manager
Hyper-V Manager is a virtual machine management tool that allows you to create, delete, and manage virtual machines. This part will introduce how to use Hyper-V Manager to create a Windows 10 virtual machine.
1. Open Hyper-V Manager, click Action at the top, select New >> Virtual Machine.
2. Click Next to the Specify Name and Location window, you can change the name of the new virtual machine and store the virtual machine in a different location, and then click Next.
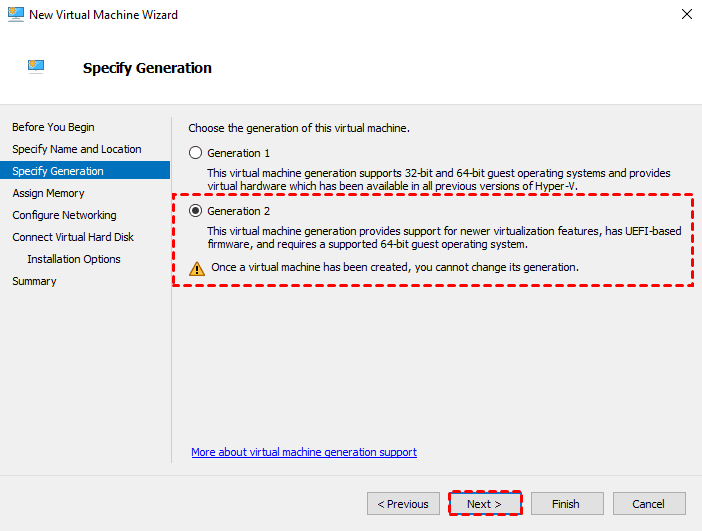
3. In the Specify Generations window, you can select Generation 1 or Generation 2 virtual machines according to the actual situation, and click Next.
Generation 1: support 32-bit and 64-bit guest operating systems, providing virtual hardware compatible with previous Hyper-V versions. If you want to use a Hyper-V virtual floppy drive, choose Gen 1 virtual machine.
Generation 2: only support 64-bit guest operating systems. It has more features such as UEFI based firmware, larger RAM, more virtual CPU cores etc... In addition, you need to disable secure boot if you want to install a Linux distribution on a Gen 2 virtual machine.
4. Specify the amount of memory and use Dynamic Memory, then configure the proper network and select Default Switch.
5. In Connect Virtual Hard Disk window, select a location and specify the size of virtual hard disk. Then go to Installation Options wizard, select Install an operating system from a bootable image file and then select the Windows 10 .iso file by hitting Browse. Click Next to create a Hyper-V virtual machine installed Windows 10.
Tip: Download Windows 10 Enterprise Evaluation from Microsoft’s website.

6. Review the information and click Finish.
Use Hyper-V Quick to create Windows 10 VM rapidly
It’s fast to create a Windows 10 virtual machine by using Hyper-V Quick Create.
1. Enter Windows+S and type Hyper-V Quick Create.
2. Select Local Installation Source and locate the Windows 10 .iso file. Then click Create Virtual Machine. The whole process only takes several seconds to create a virtual machine with Windows 10 OS in Hyper-V.

You can edit the settings after creation. While using Windows 10 VM, do backup Hyper-V VM data. For enterprise, it is crucial to protect data security to avoid the unexpected situations such as outage, natural disaster, virus-attack or system crash……
Free Backup & Restore Hyper-V virtual machine
AOMEI Cyber Backup is a free Hyper-V backup tool that offers a powerful backup task for enterprise virtual machines. It supports Hyper-V in Windows 8/8.1/10/11, Windows Server/Microsoft Hyper-V Server 2012 R2 and later version. With this professional software, you can enjoy these benefits forever.
Perpetual Free: no time limit for AOMEI Cyber Backup Free Edition.
Centralized Backup: backup virtual machines at host-level, eliminating agent installation on each VM, significantly simplifying management through central console.
Flexible backup strategy: create full/incremental backup of VM, and specify the resilient tracking time.
Fast disaster recovery: one-click to restore Hyper-V VM from a backup file without complicated configuration and reinstallation.
Reduce financial and reputational losses: backup multiple Hyper-V virtual machines automatically and available to perform hot backup.
Please hit the button below to download and use AOMEI Cyber Backup for free:
*You can choose to install this VM backup software on either Windows or Linux system.
3 steps to backup and restore VMs centrally:
1. Download AOMEI Cyber Backup and add Hyper-V host.

2. Click Create Backup Task to create VMware VM backups for free.
● Name the backup task and select Hyper-V Backup as an example.
● Specify a location to store virtual machine backup files.
● In Schedule window, it offers different backup methods (full/incremental backup) and time (daily/weekly/monthly by date/monthly by week).

3. Restore: recover the VM from any selected backup version, then click Restore to original location. The whole process is based on clicks without any complicated reinstallation and configuration.

✎ Secure Virtual Machine Protection Solution
If you want a file-based backup instead of image-based backup for your Windows 10 VMs, AOMEI Backupper is always a powerful backup software that also offers the features of System Backup, Disk Backup, Partition Backup, which can help you backup all kinds of data on your virtual machine. More »
Summary
This article introduces how to create Windows 10 VM in Hyper-V environment using Hyper-V Manager or Quick Create. If you want to enable Hyper-V feature in Windows 10, remember to check your OS and hardware settings.
Besides, in Hyper-V, you can share files between physical machine and Windows 10 VM. For example, you can use Hyper-V PowerShell cmdlet, enhanced session mode, ect.

